Commandes essentielles pour switches Cisco Small Business, SG et Catalyst 1300
- Mise à jour le 10 avril 2026
Je regroupe ici, les commandes que j'utilise lorsque je configure des switchs Cisco de la gamme Small Business.
Configuration
- Switch modèle : Cisco SG550X
- Switch modèle : Cisco SG350X
- Switch modèle : Cisco CBS250
- Switch model : Cisco Catalyst 1300
Commandes
Show
- Afficher le numéro de série :
Cisco# show system id- Afficher le modèle, l'uptime, le hostname et la MAC Address :
Cisco# show system unit 1- Afficher la mac address :
Cisco# show mac address-table- Afficher les informations sur le gbic (sfp module) :
Cisco# show inventory- Afficher la version du firmware :
Cisco# show version- Afficher les derniers évènements :
Cisco# show logging- Afficher les addresses ip enregistrées :
Cisco# show arpGestion des Comptes Utilisateurs
- Paramétrer le mot de passe :
Cisco(config)# username cisco password myNEWpassword- Ajouter un utilisateur admin :
Cisco(config)# username cisco privilege 15 password myNEWpassword- Désactiver la durée de vie du mot de passe :
Cisco(config)# password aging 0Divers
- Paramétrer le hostname :
Cisco(config)# hostname Switch- Sauvegarder la configuration :
Switch# copy running-config startup-configSwitch# write- Paramétrer l'adresse ip du switch
Switch(config)# interface vlan1
Switch(config-if)# ip address 192.168.1.100 255.255.255.0
Switch(config-if)# no ip address dhcp- Paramétrer le DNS :
Switch(config)# ip name-server 192.168.1.110- Désactiver la recherche automatique DNS, pour les commandes inconnues :
Switch(config)# no ip domain lookup- Paramétrer la passerelle par défaut :
Switch(config)# interface vlan1
Switch(config-if)# ip default-gateway 192.168.1.254- Redémarrer le commutateur :
Switch# reload- Paramétrer plusieurs interfaces (utiliser gi1, gi2 etc… sur la série CBS) :
Switch(config)# interface range ge1/0/4,ge1/0/30Switch(config)# interface range ge1/0/4-18- Activer le serveur ssh :
Switch(config)# ip ssh server- Désactiver le serveur http :
Switch(config)# no ip http server- Désactiver le protocole Bonjour :
Switch(config)# no bonjour enable- Désactiver le protocole PNP :
Switch(config)# no pnp enable- Afficher la charge cpu :
Switch# show cpu utilization- Désactiver globalement cette 💩 de configuraiton automatique des ports (auto smartport) :
Switch(config)# no macro auto- Supprimer la configuration, faire un reset usine :
Switch# delete startup-config
Delete startup-config? (Y/N)[N] Y
Switch# reload
You haven't saved your changes. Are you sure you want to continue ? (Y/N)[N] Y
This command will reset the whole system and disconnect your current session. Doyou want to continue ? (Y/N)[N] Y- Désactiver l'affichage des messages système et des événements sur l'interface de la console :
Switch(config)# no logging consoleImport/Export de la configuration
- Exporter la configuration vers un serveur tftp :
Switch# copy running-config tftp://tftp_server/YYYY-MM-DD- Exporter la configuration actuelle vers un serveur SSH (IP :
192.168.1.200, utilisateur :sshuser, mot de passe :sshpassword) dans un fichier nomméSwitch_config. Le fichier sera enregistré dans le répertoire personnel de l’utilisateur :
Switch# copy running-config scp://sshuser:sshpassword@192.168.1.200/Switch_config- Importer la configuration depuis un serveur tftp :
Switch# copy tftp://tftp_server/YYYY-MM-DD running-configMise à jour du Firmware
Méthode facile
- Exporter le nouveau firmware :
Switch# boot system tftp://tftp_server/firmware.bin- Redémarrer pour charger le nouveau firmware :
Switch# reloadMéthode normale
- Exporter le nouveau firmware :
Switch# copy tftp://tftp_server/firmware.bin flash://system/images/- Afficher les firmwares disponibles :
Switch# show bootvar- Activer le nouveau firmware :
Switch# boot system image-2- Redémarrer :
Switch# reloadLACP
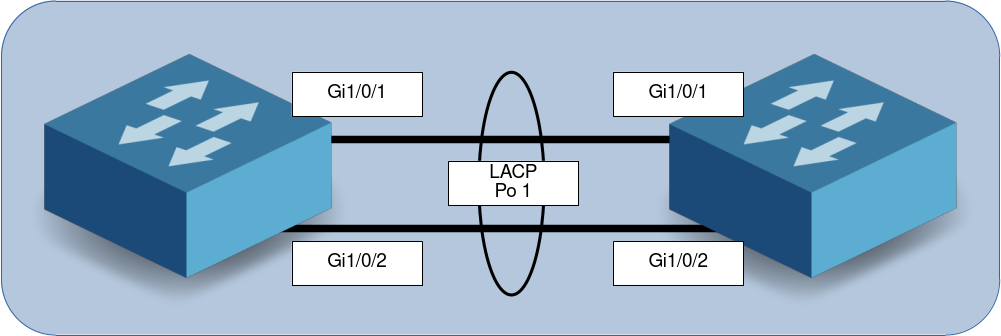
Switch01
- Configurer LACP sur les interfaces gi1/0/1 et gi1/0/2 :
Switch01(config)# interface range gi1/0/1-2
Switch01(config-if-range)# channel-group 1 mode auto- Configurer l'Aggregation de liens, l'interface virtuelle Po 1, comme n'importe quelle autre interface :
Switch01(config)# interface Port-Channel 1
Switch01(config-if)# switchport mode trunk
Switch01(config-if)# switchport trunk allowed vlan all
Switch02
- Configurer LACP sur les interfaces gi1/0/1 et gi1/0/2 :
Switch02(config)# interface range gi1/0/1-2
Switch02(config-if-range)# channel-group 1 mode auto- Configurer l'Aggregation de liens, l'interface virtuelle Po 1, comme n'importe quelle autre interface :
Switch02(config)# interface Port-Channel 1
Switch02(config-if)# switchport mode trunk
Switch02(config-if)# switchport trunk allowed vlan all
Show
Switch01# show lacp port-channel 1Switch01# show lacp gi1/0/1PoE
- Désactiver le PoE
Switch(config)# interface gi1/0/1
Switch(config-if)# no power inline
- Activer le PoE
Switch(config)# interface gi1/0/1
Switch(config-if)# power inline auto
- Afficher les information PoE
Switch# show power inline
Switch# show power inline gi1/0/1
VLAN
- Ajouter un VLAN :
Switch(config)# vlan database
Switch(config-vlan)# vlan 4
Switch(config)# interface vlan 4
Switch(config-if)# name VoIP- Paramétrer une interface en mode access :
Switch(config)# interface GigabitEthernet 1/24
Switch(config-if)# switchport mode access
Switch(config-if)# switchport access vlan4- Paramétrer une interface en mode trunk :
Switch(config)# interface te 1/0/1
Switch(config-if)# switchport mode trunk
Switch(config-if)# switchport trunk allowed vlan none
Switch(config-if)# switchport trunk allowed vlan add 4,100,101,150
Locked Port / Désactiver le port security
Message : Your port has port security enable and has noticed that the MAC address on that port is different from what the port had originally learned.
Switch# set interface active gi2/0/4
Switch# show ports security gi2/0/4
Switch(config) # interface gi2/0/4
Switch(config-if)# no port security
sFlow
- Activer sFlow :
Switch(config)# sflow receiver <index of the receiver> <sflow receiver ip> port 2055
Switch(config)# interface range GigabitEthernet1/0/1-48
Switch(config-if-range)# sflow flow-sampling 1024 1
Switch(config-if-range)# sflow counters-sampling 600 1- Désactiver sFlow :
Switch(config)# interface TengigabitEthernet1/0/1
Switch(config-if)# no sflow counters-sampling
Switch(config-if)# no sflow flow-sampling
Port Mirroring / SPAN
- Activer le miroir de port sur l'interface GigabitEthernet1/0/1
Switch(config)# monitor session 1 destination interface GigabitEthernet1/0/1- Avec le trafic des ports GigabitEthernet1/0/2 et GigabitEthernet1/0/3
Switch(config)# monitor session 1 source interface GigabitEthernet1/0/2 both
Switch(config)# monitor session 1 source interface GigabitEthernet1/0/3 both
NTP
- Afficher le temps :
Switch# show clock- Afficher le status ntp :
Switch# show sntp status- Paramétrer ntp (le paramétrage réseau doit être fonctionnel) :
Switch(config)# clock source sntp
Switch(config)# sntp unicast client enable
Switch(config)# sntp server 0.pool.ntp.org
Spanning Tree
- Afficher la configuration spanning tree :
Switch# show spanning-tree- Configurer le switch comme root bridge :
Switch(config)# spanning-tree priority 4096- Utiliser le protocole RTSP (Rapid Spanning Tree Protocol) :
Switch(config)# spanning-tree mode rstpConfiguration du Stack
Stacker deux commutateurs SG
Remarque : Avant de stacker deux commutateurs SG, il faudra s'assurer que les modèles et le micrologiciel (firmware) soient identiques.
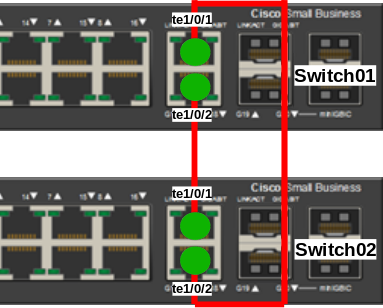
Switch01
- Accéder au contexte de l'unité de stack 1 :
Switch01(config)# stack unit 1- Définir l'ID d'unité à 1 (Maître) :
Switch01(unit)# stack configuration links te1-2 unit-id 1- Enregistrer la configuration :
Switch01(unit)# do write- Redémarrer :
Switch01(unit)# do reloadSwitch02
- Accéder au contexte de l'unité de stack 1 :
Switch02(config)# stack unit 1- Définir l'ID d'unité à 2 :
Switch02(unit)# stack configuration links te1-2 unit-id 2- Enregistrer la configuration :
Switch02(unit)# do write- Redémarrer :
Switch02(unit)# do reloadQuelques commandes Show
- Afficher la configuration du stack:
Stack# show stack configuration

Unit Id  After Reboot Configuration
         Unit Id   Stack Links
-------- ------- ---------------
1        1       te1-2
2 2 te1-2 - Afficher les paramètres du stack :
Stack# show stack

Topology is Chain
Units stack mode: Native

Unit Id     MAC Address        Role    Network Uplink
                                       Port    Port
                                       Type    Type
------- ------------------- ---------- ------- ------
   1     40:a6:e8:e6:9c:11    active     gi      te
2 40:a6:e8:e6:9c:12 standby gi te- Afficher les informations du stack pour l'ensemble du stack :
Stack# show stack links details

Topology is Chain

UNIT ID   Link     Status   Speed Neighbor Neighbor     Neighbor
                                  Unit ID  Link         MAC Address
------- -------- ---------- ----- -------- -------- -------------------
   1      te1      Active    10G     2       te2     40:a6:e8:e6:9c:12
   1      te2      Active    10G     2       te1     40:a6:e8:e6:9c:12
   2      te1      Active    10G     1       te2     40:a6:e8:e6:9c:11
   2      te2      Active    10G     1       te1     40:a6:e8:e6:9c:11
Supprimer la configuration du stack
- Supprimer les paramètres de configuration du stack :
Switch01(config)# stack unit 1Switch01(unit)# no stack configuration