How to Extend an mdadm RAID1 to RAID5 on a UEFI Boot System
- Last updated: Feb 15, 2025

I've already shown how to create a RAID1 on a UEFI boot with mdadm on a Debian distribution, you can find that wonderful tutorial here. I will now explain how to extend a RAID1 mdadm on a UEFI boot to a RAID5 as it's quite common, over time, to need more disk space.
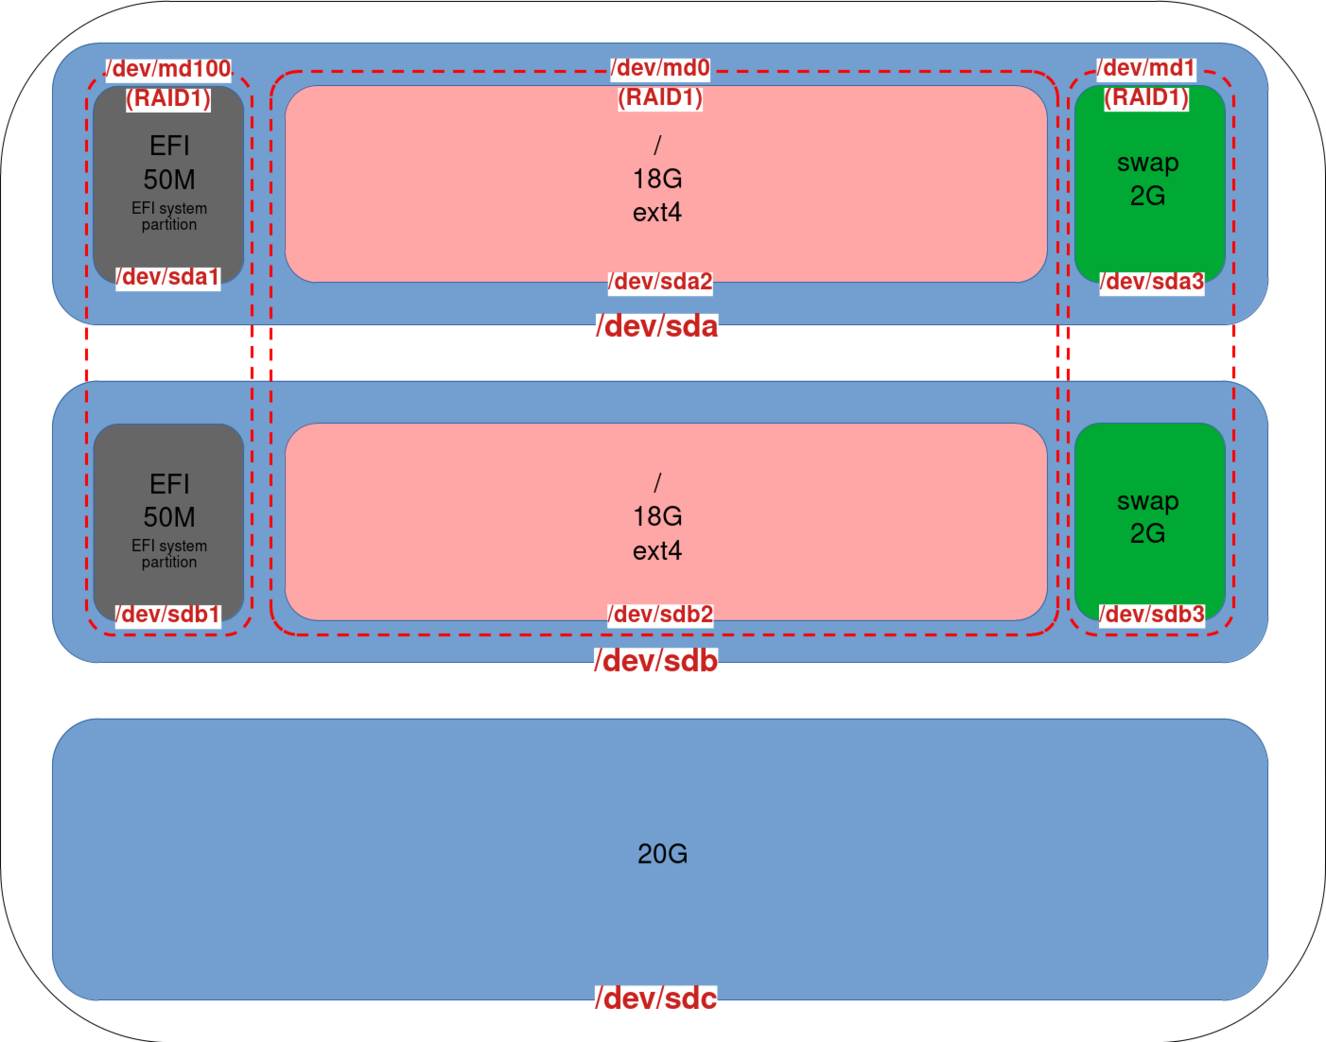
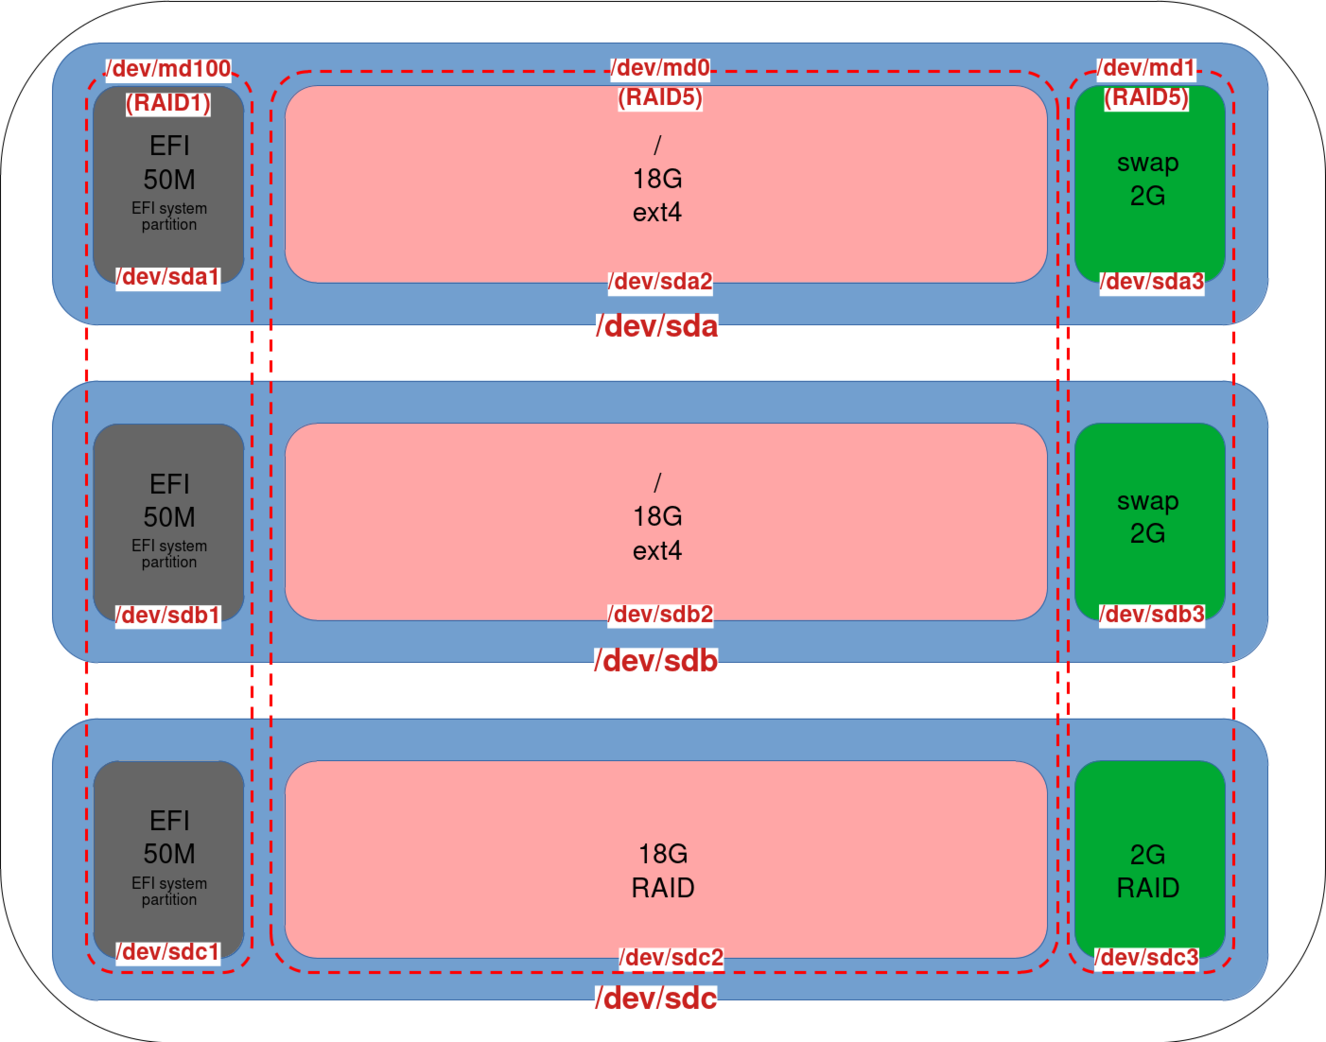
I'll assume in the following article that an UEFI RAID1, configured with two 20G disks, is already perfectly functional. A third 20G disk will be added to form a RAID5.
And since I'm in a happy mood, I'll show how to do it with or without lvm (yes, yes, don't thank me! Actually, you can do it… 😊).
Does it work?
I carried out a number of tests while writing this article. Indeed, after migrating the root partition (which here includes the /boot/ partition) to RAID5, the system would no longer boot normally and switches to grub rescue mode. What's strange is that the system boots normally when you first enter the UEFI boot menu and manually select one of the EFI boot partitions. I've seen this behavior on VMware ESXi and Proxmox VE. Fortunately, it seems to work outside the virtual machine, in my case I tested it on a Dell PowerEdge T630. If you have an explanation, I'd be glad to hear it!

To sum up, always make backups. Ideally test before going into production.
Now that you've been properly warned, let's get on with the tutorial!
Adding the new disk
As explained in the introduction, we start with a working UEFI RAID1.
- Our disk configuration looks like this: two disks (
sdaandsdc) configured in RAID1 and one newly added disk (sdc):
Convert RAID1 to RAID5
- Identify the new disk to avoid deleting an existing one. Here we have our
sdcdisk with no partition configured, indicating that this is our new disk:
root@host:~# fdisk -l
Disk /dev/sda: 20 GiB, 21474836480 bytes, 41943040 sectors
Disk model: Virtual disk
Units: sectors of 1 * 512 = 512 bytes
Sector size (logical/physical): 512 bytes / 512 bytes
I/O size (minimum/optimal): 512 bytes / 512 bytes
Disklabel type: gpt
Disk identifier: F89D780E-776F-4CFF-A096-2F13B8435BE4

Device        Start      End  Sectors  Size Type
/dev/sda1      2048    98303    96256   47M EFI System
/dev/sda2     98304 39159807 39061504 18.6G Linux RAID
/dev/sda3  39159808 41940991  2781184  1.3G Linux RAID


Disk /dev/sdb: 20 GiB, 21474836480 bytes, 41943040 sectors
Disk model: Virtual disk
Units: sectors of 1 * 512 = 512 bytes
Sector size (logical/physical): 512 bytes / 512 bytes
I/O size (minimum/optimal): 512 bytes / 512 bytes
Disklabel type: gpt
Disk identifier: 580CC43C-5BED-45D4-B2B5-FD460A3EC1A1

Device        Start      End  Sectors  Size Type
/dev/sdb1      2048    98303    96256   47M EFI System
/dev/sdb2     98304 39159807 39061504 18.6G Linux RAID
/dev/sdb3  39159808 41940991  2781184  1.3G Linux RAID


Disk /dev/sdc: 20 GiB, 21474836480 bytes, 41943040 sectors
Disk model: Virtual disk
Units: sectors of 1 * 512 = 512 bytes
Sector size (logical/physical): 512 bytes / 512 bytes
I/O size (minimum/optimal): 512 bytes / 512 bytes- An alternative way of identifying the new disk is to use the
cat /proc/mdstatcommand. Here we see our RAID arrays forsdaandsdb:
root@host:~# cat /proc/mdstat
Personalities : [raid1] [linear] [multipath] [raid0] [raid6] [raid5] [raid4] [raid10]
md100 : active raid1 sda1[0] sdb1[2]
      48064 blocks super 1.0 [2/2] [UU]

md1 : active (auto-read-only) raid1 sda3[0] sdb3[1]
      1388544 blocks super 1.2 [2/2] [UU]

md0 : active raid1 sda2[1] sdb2[0]
19513344 blocks super 1.2 [2/2] [UU]- Install the
gdisktool:
root@host:~# apt update && apt install gdisk- Copy the partitions scheme from
sdbtosdcusinggdisk:
root@host:~# sgdisk /dev/sdb -R /dev/sdc- Regenerate a GUID of the
sdcdisk to avoid having the same as that ofsdbcopied beforehand:
root@host:~# sgdisk -G /dev/sdc- After these commands, the partitions of our
sdcdisk should be defined:
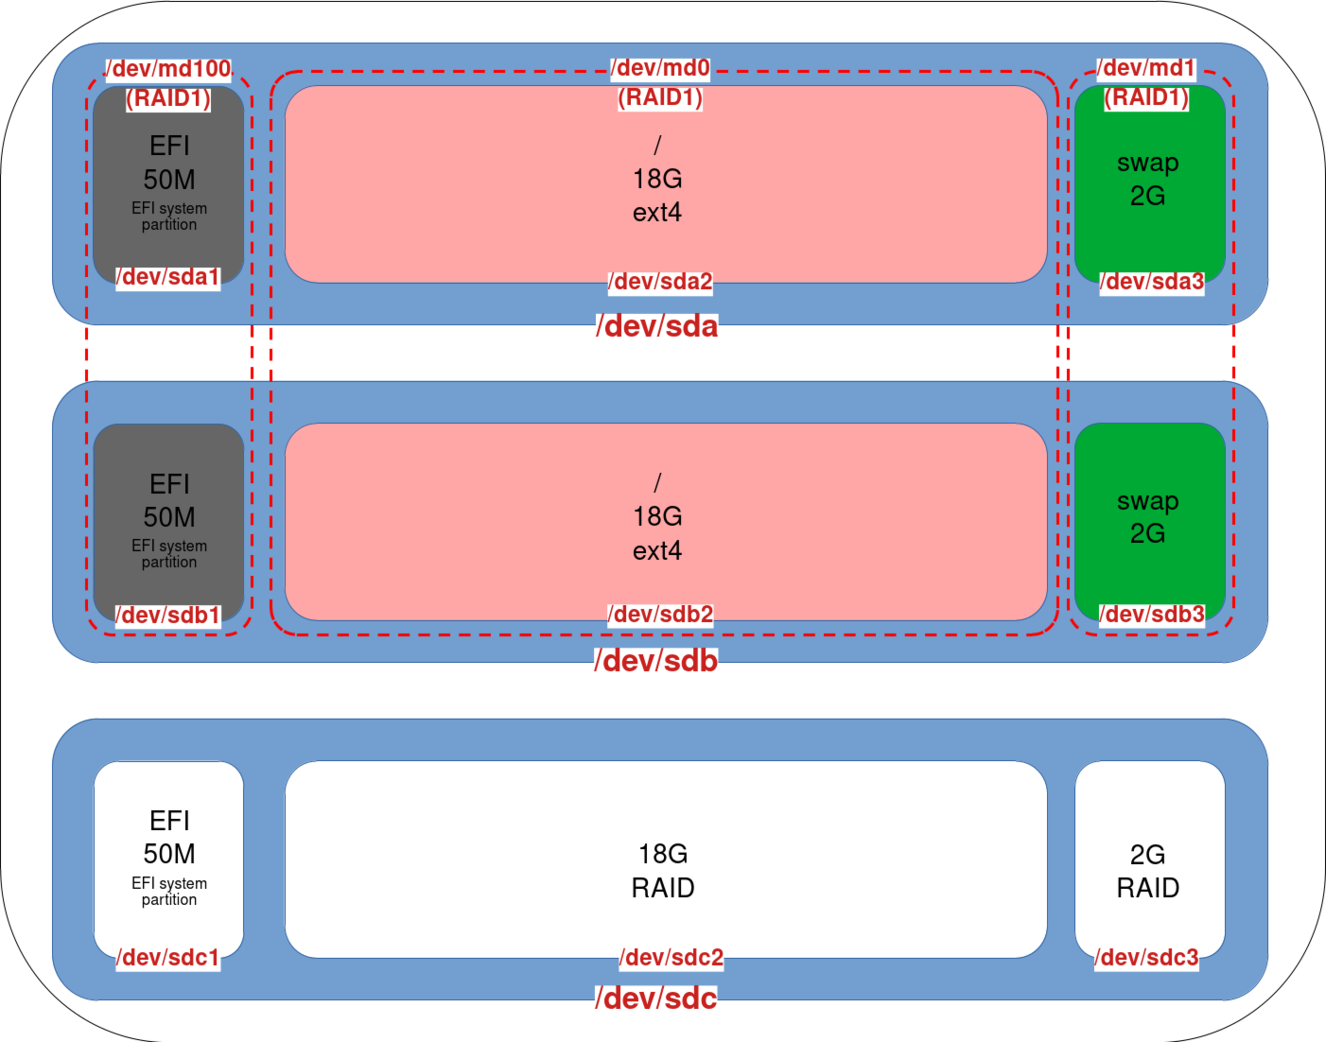
- Add an EFI entry named
debian3for the EFI partition of oursdcdisk:
root@host:~# efibootmgr --create --disk /dev/sdc --part 1 --label "debian3" --loader "\EFI\debian\shimx64.efi"- Add disk
sdc1to RAID1 md100 array. Note that we're not converting our UEFI partition to RAID5, because if we do, the boot system won't be able to read a RAID5 partition:
root@host:~# mdadm --grow /dev/md100 --raid-devices=3 --add /dev/sdc1- Our md100 array is now a RAID1 composed of three partitions:
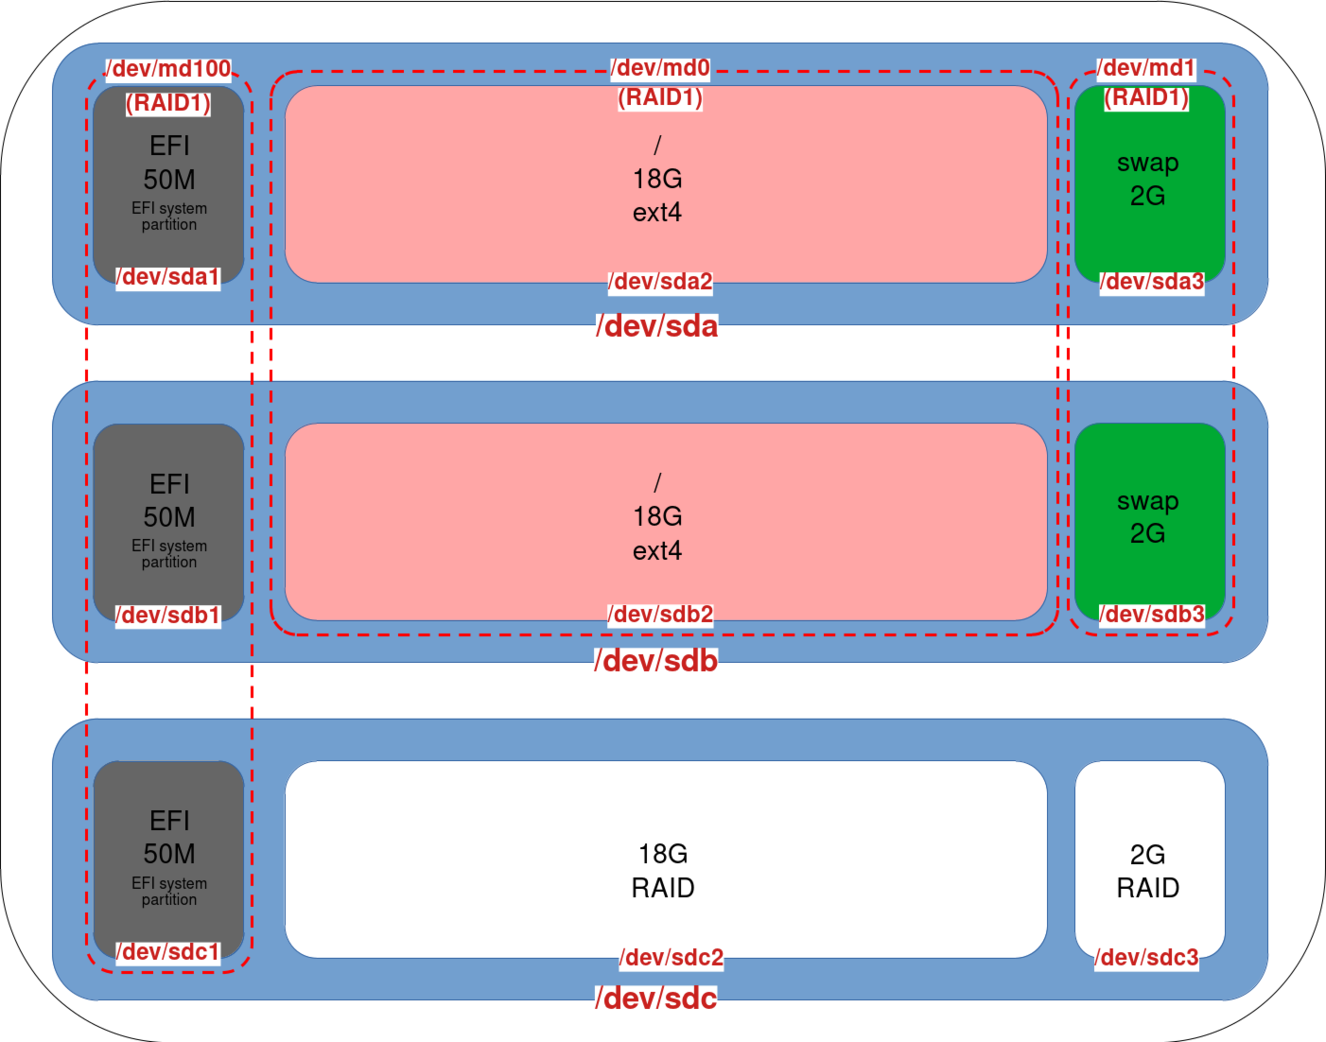
- This command converts the array to RAID5 and adds the
sdc2partition to themd0array (SYSTEM). (Optional, but consider using the--backup-fileoption in case of a system crash during the operation):
root@host:~# mdadm --grow /dev/md0 --raid-device=3 --level=5 -a /dev/sdc2- Check reshaping progress (⚠️ Do not reboot the system while reshaping is in progress⚠️):
root@host:~# cat /proc/mdstat
cat /proc/mdstat
Personalities : [raid1] [linear] [multipath] [raid0] [raid6] [raid5] [raid4] [raid10]
md100 : active raid1 sdc1[3] sdb1[0] sda1[2]
      48064 blocks super 1.0 [3/3] [UUU]

md1 : active (auto-read-only) raid1 sda3[0] sdb3[1]
      1388544 blocks super 1.2 [2/2] [UU]

md0 : active raid5 sdc2[2] sda2[0] sdb2[1]
      19513344 blocks super 1.2 level 5, 64k chunk, algorithm 2 [3/3] [UUU]
[>....................] reshape = 0.3% (77596/19513344) finish=37.5min speed=8621K/sec- Our
md0array is now a RAID5 consisting of three partitions:
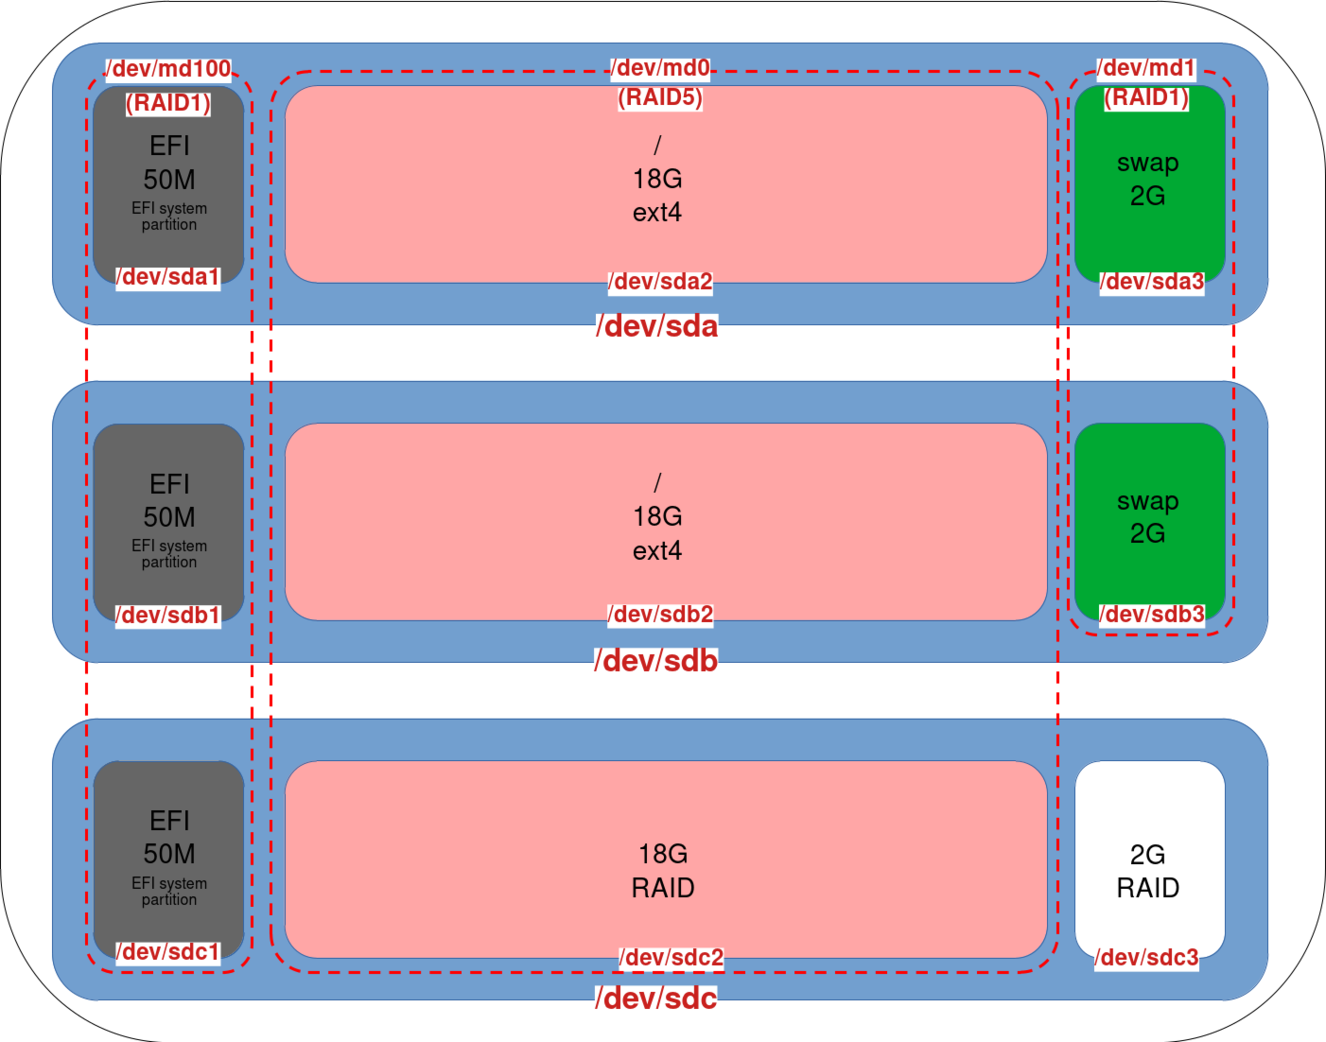
- Do the same with the
sdc3partition on themd1array (SWAP):
root@host:~# mdadm --grow /dev/md1 --raid-device=3 --level=5 -a /dev/sdc3- Our
md1array is now also a RAID5 with three disks:
Resize partitions
Resize the File System
- Once shaping is complete, resize the file sytem to the new size (example here with ext4 file system):
root@host:~# resize2fs /dev/md0- Check that the new size has been taken into account:
root@host:~# df -h
Filesystem      Size  Used Avail Use% Mounted on
udev            1.9G     0  1.9G   0% /dev
tmpfs           392M  700K  391M   1% /run
/dev/md0         37G  2.3G   33G   7% /
tmpfs           2.0G     0  2.0G   0% /dev/shm
tmpfs           5.0M     0  5.0M   0% /run/lock
/dev/md100       47M  5.9M   41M  13% /boot/efi
tmpfs           392M     0  392M   0% /run/user/0
tmpfs           392M     0  392M   0% /run/user/1000
Resize the Swap
For the swap partition, we need to disable and then recreate the swap partition. This change involves modifying the entries in /etc/fstab and /etc/mdadm/mdam.conf.
- Disable the swap:
root@host:~# swapoff /dev/md1- Create a new swap that takes the new size into account, and copy the new UUID:
root@host:~# mkswap /dev/md1
mkswap: /dev/md1: warning: wiping old swap signature.
Setting up swapspace version 1, size = 2.6 GiB (2843734016 bytes)
no label, UUID=dfefc270-893d-4c77-930e-94d2985c9ab3- Note that we can retrieve the UUID with the
blkidcommand:
root@host:~# blkid /dev/md1
/dev/md1: UUID="dfefc270-893d-4c77-930e-94d2985c9ab3" TYPE="swap"- Edit
/etc/fstaband modify the swap entry to include the new UUID:
# /etc/fstab: static file system information.
#
# Use 'blkid' to print the universally unique identifier for a
# device; this may be used with UUID= as a more robust way to name devices
# that works even if disks are added and removed. See fstab(5).
#
# systemd generates mount units based on this file, see systemd.mount(5).
# Please run 'systemctl daemon-reload' after making changes here.
#
# <file system> <mount point>   <type>  <options>       <dump>  <pass>
# / was on /dev/md0 during installation
UUID=869d77af-e5b0-4f17-bfd8-79245b6915d6 /               ext4    errors=remount-ro 0       1
# /boot/efi was on /dev/sda1 during installation
#UUID=4FE8-AC32  /boot/efi       vfat    umask=0077      0       1
#/dev/md100 /boot/efi vfat umask=0077	0	1
/dev/md100 /boot/efi vfat umask=0077,noauto,defaults	0	1
# swap was on /dev/md1 during installation
#OLD SWAP ENTRY: UUID=42f44cc3-025d-4a22-8510-647ff25338de none            swap    sw              0       0
UUID=dfefc270-893d-4c77-930e-94d2985c9ab3 none            swap    sw              0       0
#/dev/sr0 /media/cdrom0 udf,iso9660 user,noauto 0 0- Next, edit the
/etc/initramfs-tools/conf.d/resumefile and replace the UUID as for the/etc/fstabfile:
RESUME=UUID=dfefc270-893d-4c77-930e-94d2985c9ab3- Generate a new initramfs image for the changes to take effect:
root@host:~# update-initramfs -u- Activate swap:
root@host:~# swapon /dev/md1- Check swap size:
root@host:~# swapon --show
NAME     TYPE      SIZE USED PRIO
/dev/md1 partition 2.6G   0B   -2
With LVM
It's pretty much the same thing, the difference being that we need to use the pvresize command to make our LVM take the new space into account. As we can see, LVM brings flexibility.
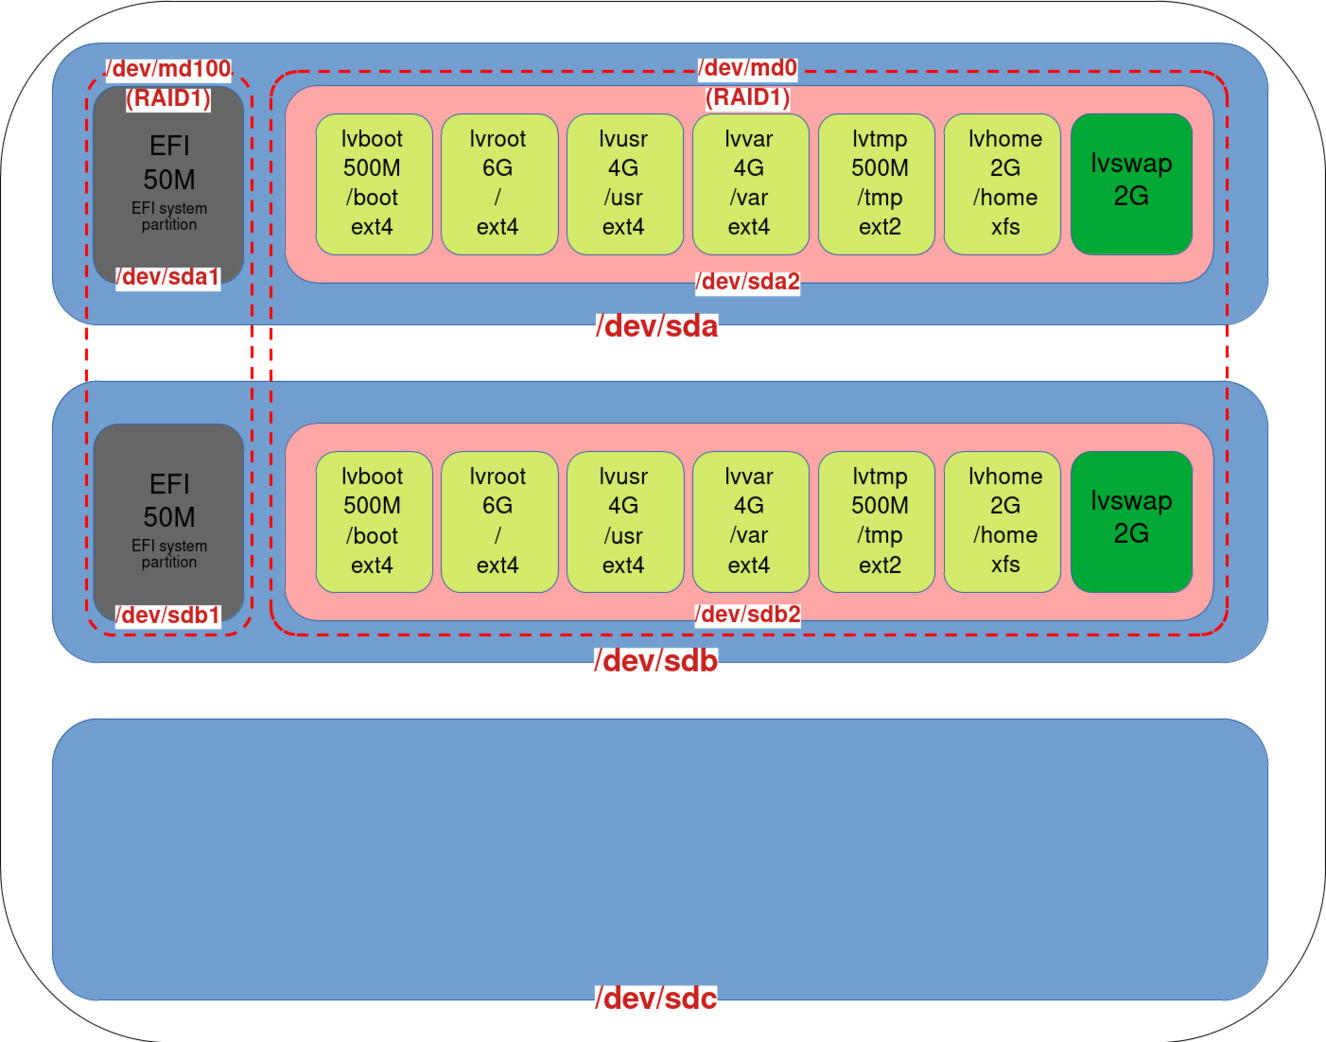
- Let's suppose we're in this LVM configuration:
- Copy the partitions scheme from
sdbtosdcusinggdisk:
root@host:~# sgdisk /dev/sdb -R /dev/sdc- Regenerate a GUID of the
sdcdisk to avoid having the same as that of sdb copied beforehand:
root@host:~# sgdisk -G /dev/sdc- Add an EFI entry named
debian3for the EFI partition of oursdcdisk:
root@host:~# efibootmgr --create --disk /dev/sdc --part 1 --label "debian3" --loader "\EFI\debian\shimx64.efi"- Add partition
sdc1to RAID1 md100 array:
root@host:~# mdadm --grow /dev/md100 --raid-devices=3 --add /dev/sdc1- Add partition
sdc2and convert the array to RAID5:
root@host:~# mdadm --grow /dev/md0 --raid-device=3 --level=5 -a /dev/sdc2- Check reshaping progress (⚠️ Do not reboot the system while reshaping is in progress⚠️):
root@host:~# cat /proc/mdstat- Once fully reshaped, expand the LVM:
root@host:~# pvresize /dev/md0- Resize the file sytem of each logical volume you wish to resize:
root@host:~# lvextend -r -L+2G /dev/mapper/vgos-lvhome