Using Rsync on GNU/Linux: A Comprehensive Guide with Practical Examples
- Last updated: Nov 30, 2025

rsync (remote synchronization) is a powerful command-line tool for copying and synchronizing files and directories across local or remote systems.
It is ideal for copying data and backing up file servers. However, it is not suitable for files that are actively in use, such as databases or running virtual machines, as this will typically result in corrupted or unusable copies.
- Notes:
- For remote transfers, rsync must be installed on both the source and the destination hosts.
- Best suited for flat files (text, images, videos, archives, etc.).
- Not suitable for live or locked data such as databases or active virtual machines.
Install rsync
rsync is not always installed by default, so the first step is to install it on your Linux distribution.
- Debian/Ubuntu:
user@host:~$ sudo apt install rsync- Arch Linux:
[root@host ~]# pacman -S rsyncExamples of rsync usage
Here are several practical examples of how rsync can be used.
Copying a file to another folder
Let's start with a basic example: using rsync to copy a file from the /home/std/ directory to /tmp/.
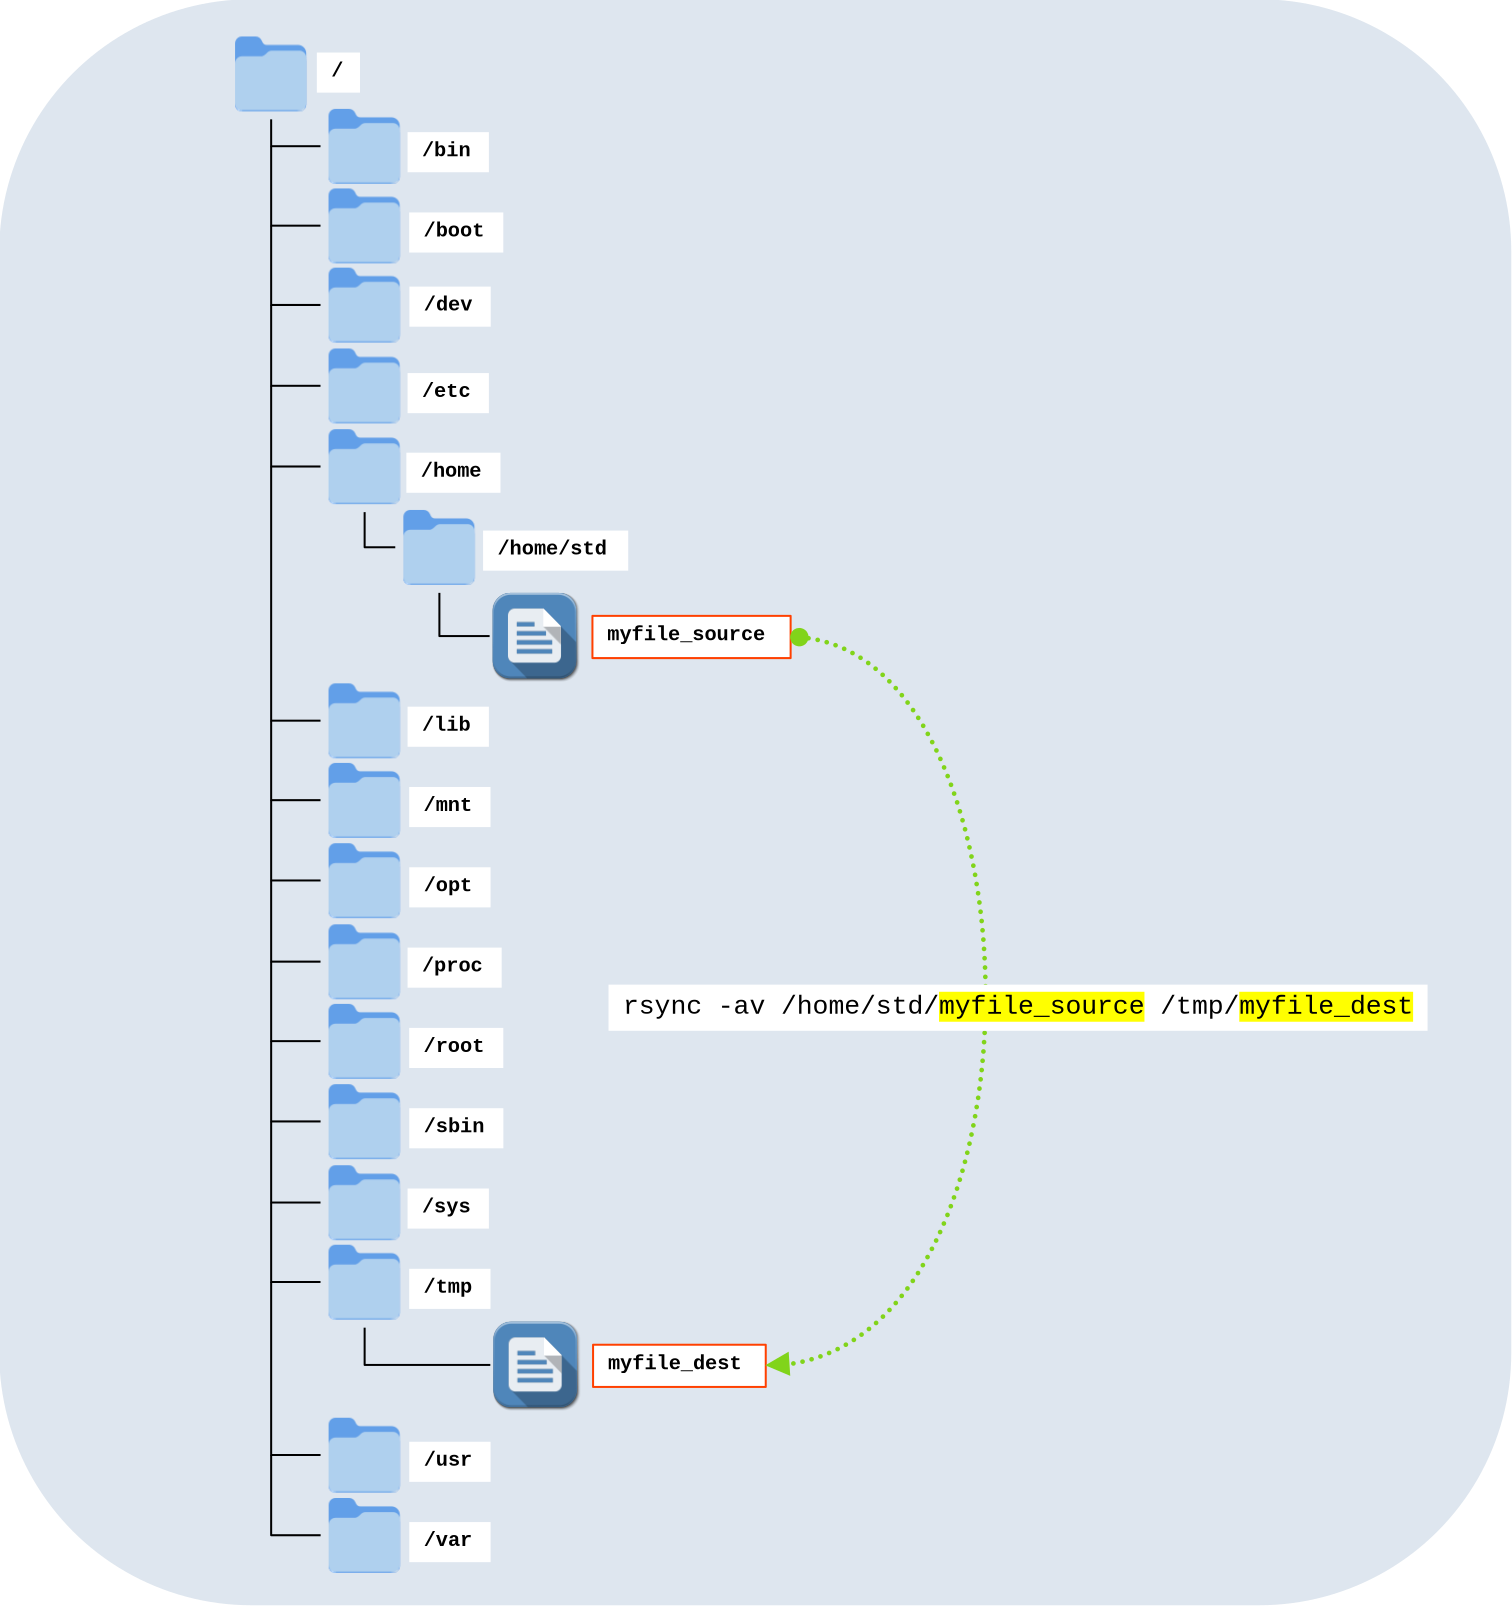
rsync -av command.- Command line:
user@host:~$ rsync -av /home/std/myfile_source /tmp/myfile_dest- Options:
-aor--archive: a convenience option that includes:-r: recurse into directories-l: copy symlinks as symlinks-p: preserve permissions-t: preserve modification times-g: preserve group-o: preserve owner (super-user only)-D: preserve devices and special files
-v: increases the verbosity of the transfer.
Copying an entire directory
rsync can also be used to copy a directory recursively. In this example, we will copy the entire /home/std/ directory to /tmp/.
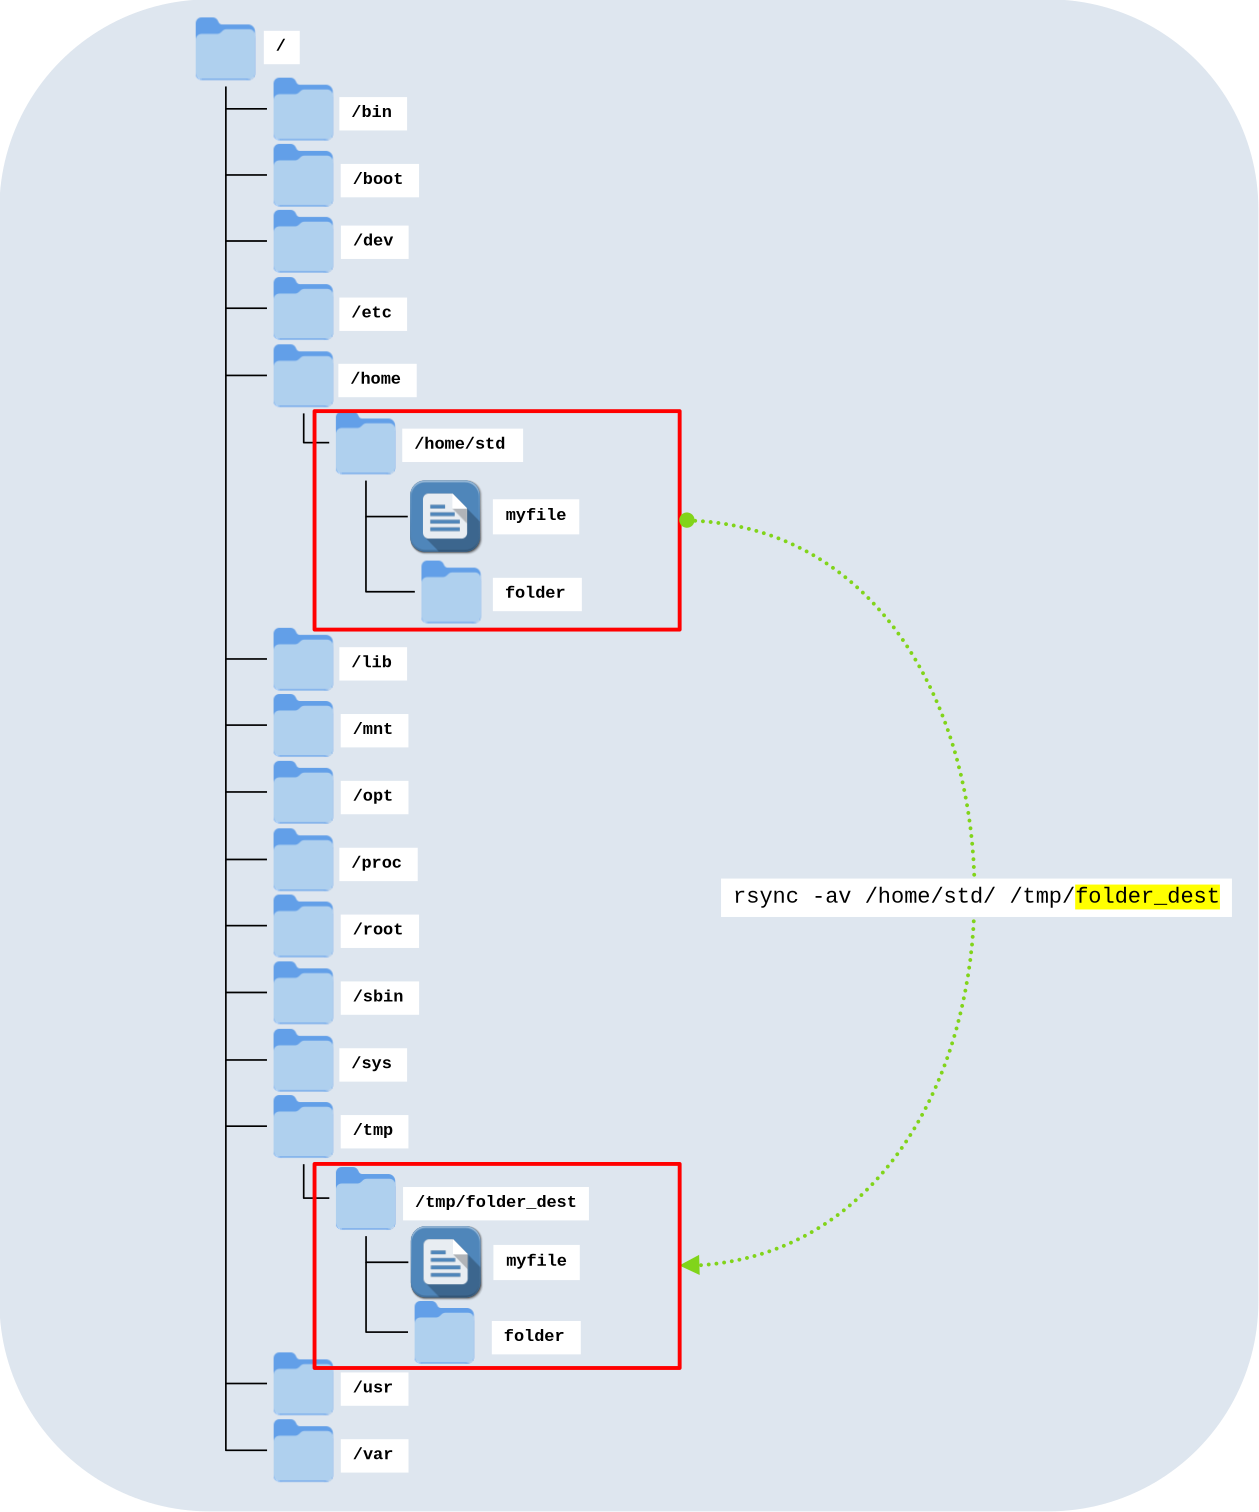
rsync -av command.- Command line:
user@host:~$ rsync -av /home/std/ /tmp/folder_dest- Options:
-aor--archive: a convenience option that includes:-r: recurse into directories-l: copy symlinks as symlinks-p: preserve permissions-t: preserve modification times-g: preserve group-o: preserve owner (super-user only)-D: preserve devices and special files
-v: increases the verbosity of the transfer.
Copying over the network
rsync can also be used to transfer files and directories over the network. To do this, both rsync and SSH must be installed on the source and destination systems.
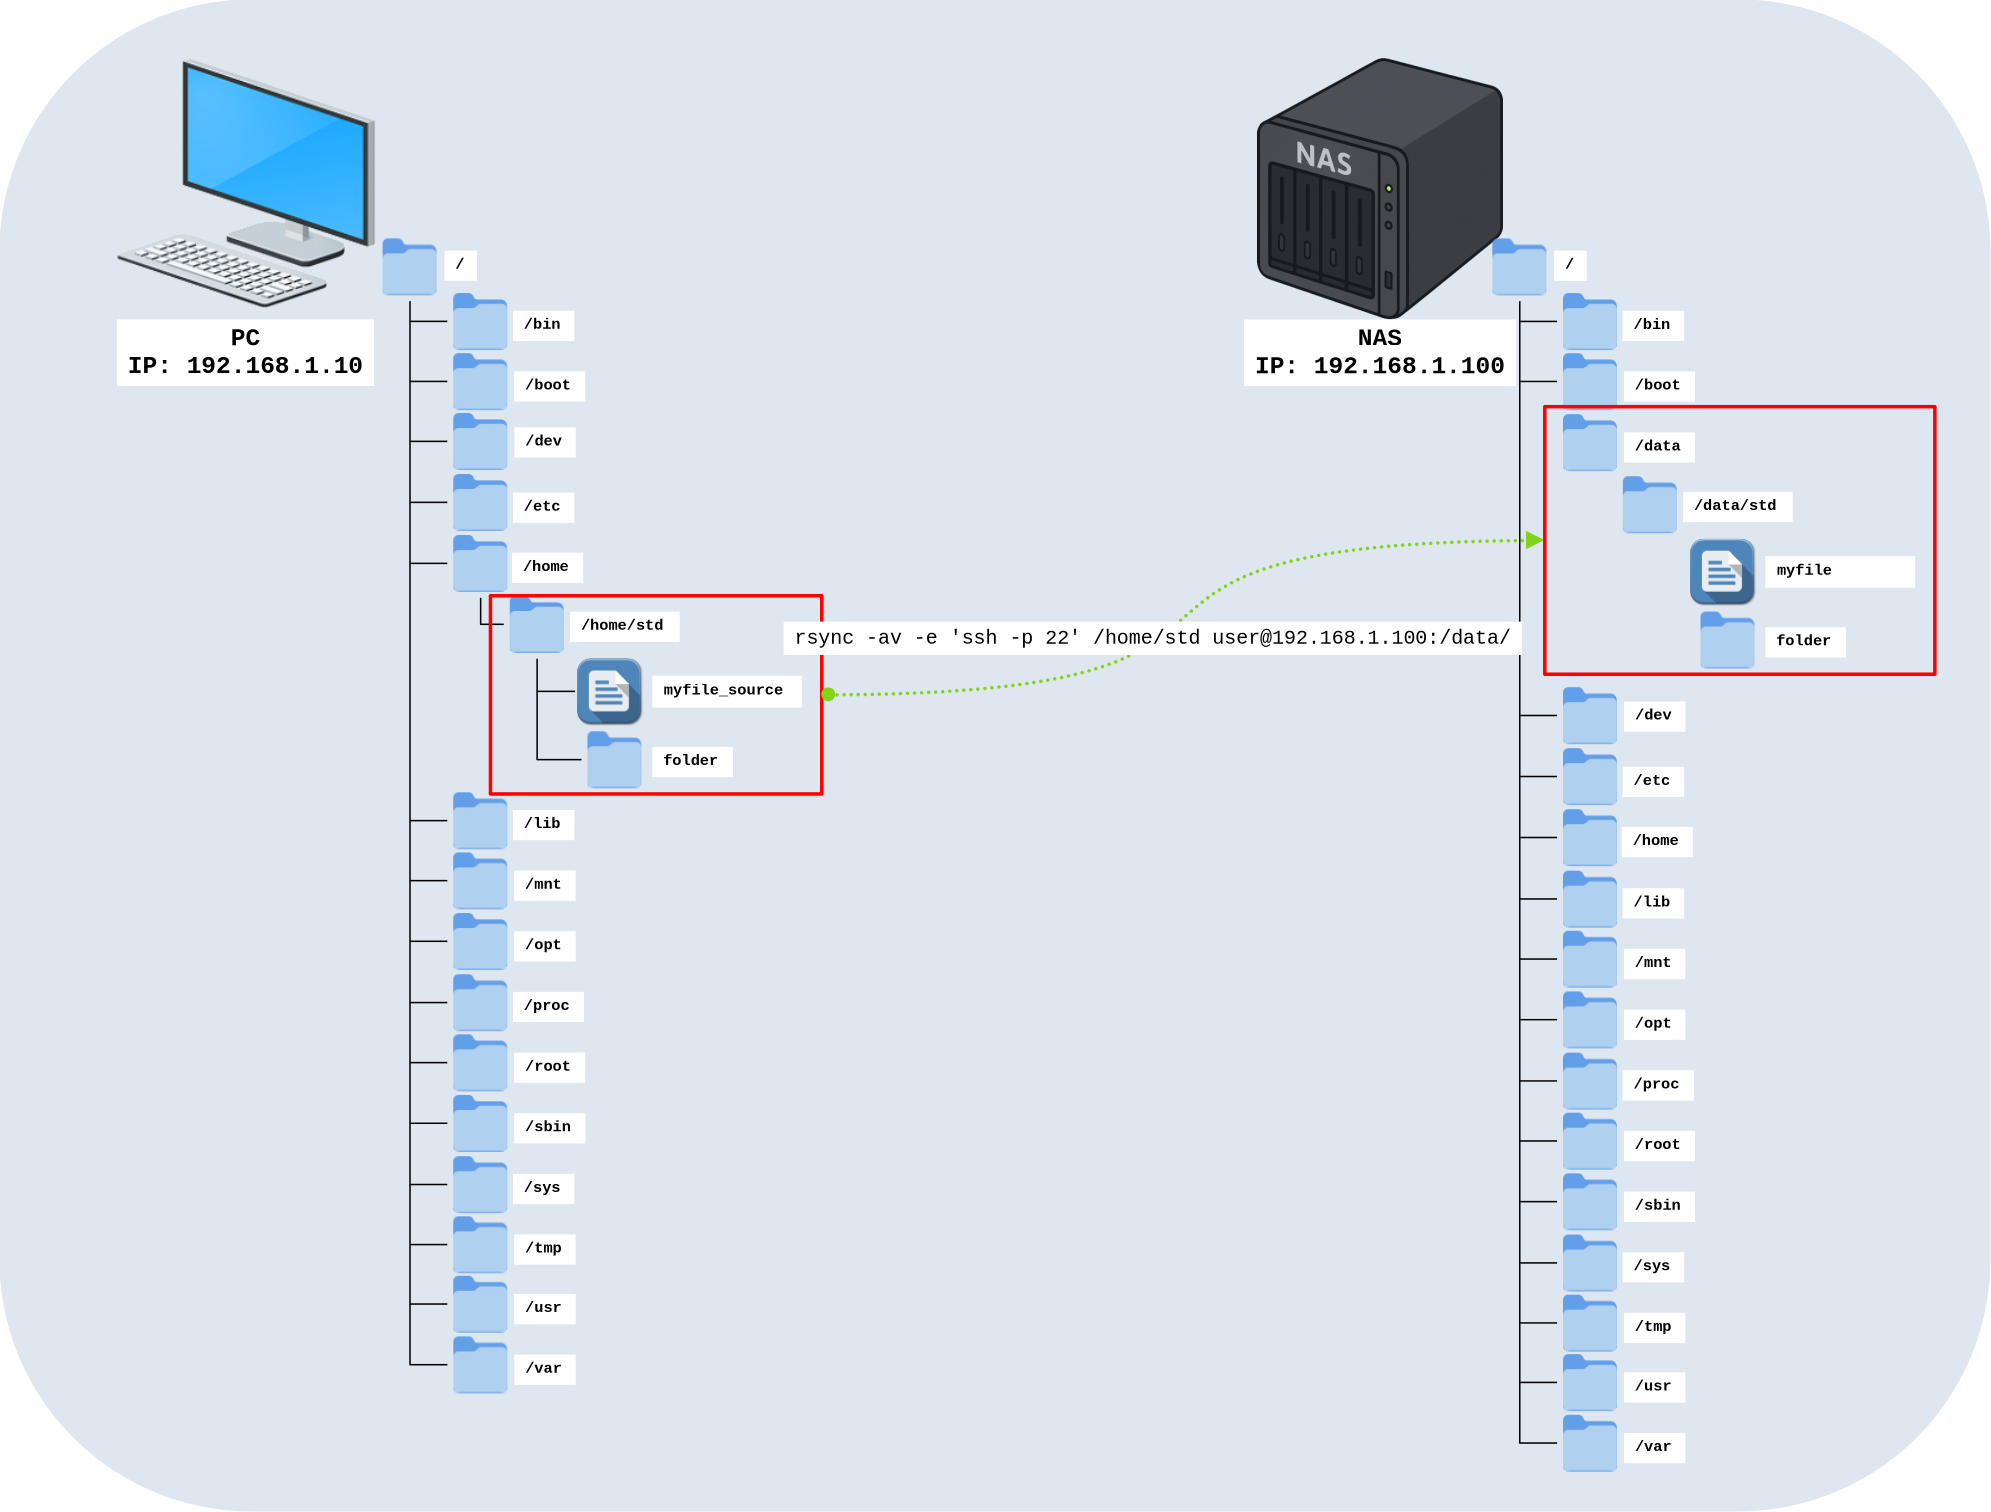
rsync -av -e 'ssh -p 22' command.- Command line:
user@host:~$ rsync -av -e 'ssh -p 22' /home/std user@192.168.1.100:/data/- Options:
-aor--archive: a convenience option that includes:-r: recurse into directories-l: copy symlinks as symlinks-p: preserve permissions-t: preserve modification times-g: preserve group-o: preserve owner (super-user only)-D: preserve devices and special files
-v: increases the verbosity of the transfer.-e: specifies the remote shell to use. Here, it is used to define the SSH port (useful if the remote SSH service is running on a non-default port).
Misc
- Copy files from a remote host to the local machine:
user@host:~$ rsync -av -e 'ssh -p 22' user@192.168.1.100:/data/std /home/Backups
As explained above, rsync is particularly well suited for backing up file servers. In this section, we will look at how to back up data to a USB drive, to a remote host, and how to perform incremental backups to save disk space.
Backup to external hard drives
In this example, we will perform a full backup of our GNU/Linux system. We will exclude all special or unnecessary directories (/dev, /mnt, /proc, /sys, and /tmp). The destination directory on the external hard drive will be automatically created using the current date in the format back-YYYY-MM-dd.
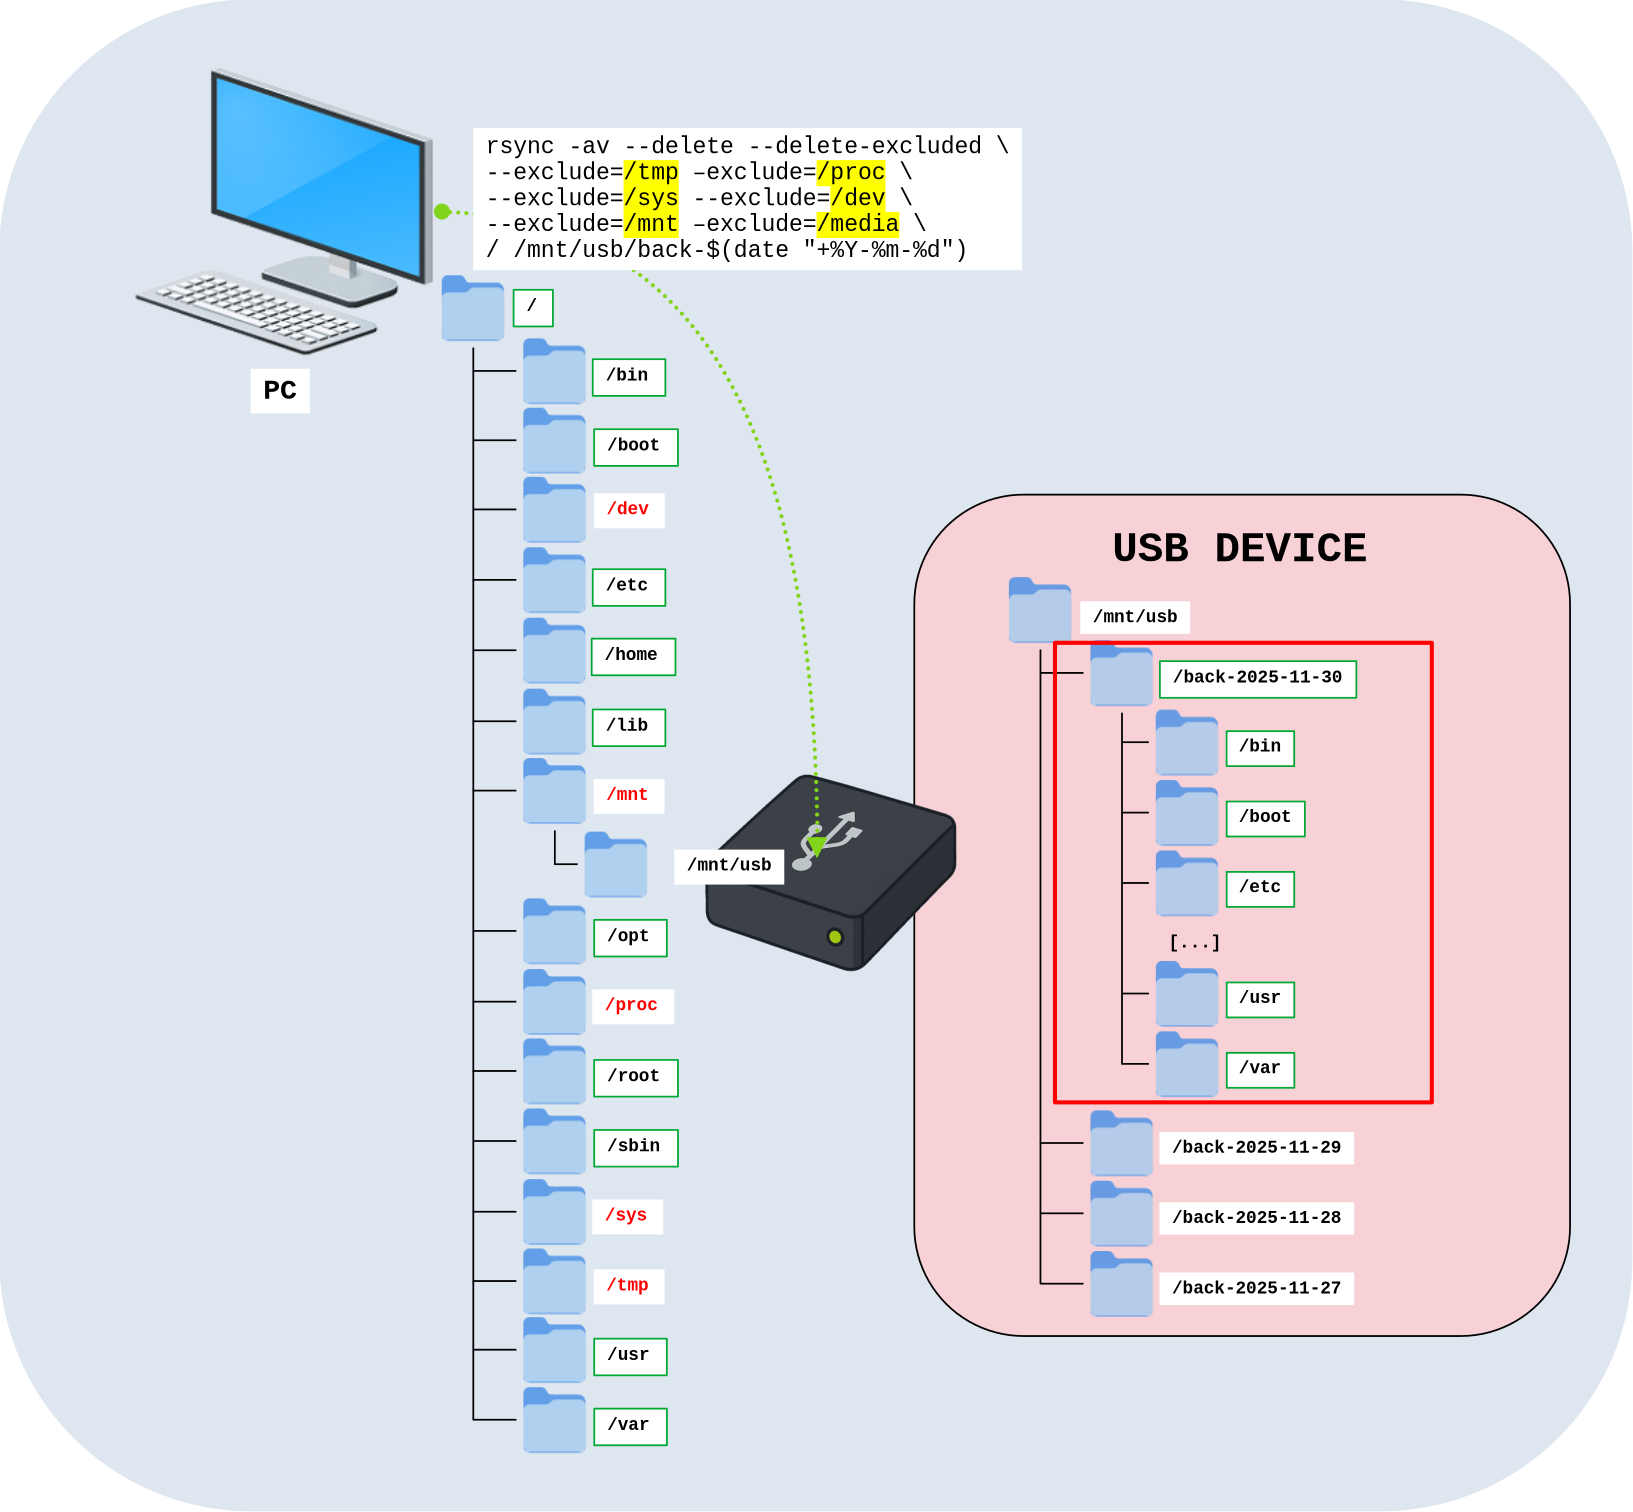
rsync -av command with excluded directories.- Command line (the source is
/to back up the entire system, and the destination is/mnt/usb/):
root@host:~# rsync -av --delete --delete-excluded --exclude=/tmp --exclude=/proc --exclude=/sys --exclude=/dev --exclude=/mnt --exclude=/media / /mnt/usb/back-$(date "+%Y-%m-%d")- Options:
-aor--archive: a convenience option that includes:-r: recurse into directories-l: copy symlinks as symlinks-p: preserve permissions-t: preserve modification times-g: preserve group-o: preserve owner (super-user only)-D: preserve devices and special files
-v: increases the verbosity of the transfer.--exclude=PATTERN: exclude files matchingPATTERN.--delete(optional): remove extraneous files from destination directories.--delete-excluded(optional): also remove files from the destination that match the excluded patterns.
Incremental backups
One of rsync's strengths is its ability to perform incremental backups. To achieve this, it relies on hard links. For each file to be backed up, rsync compares it with the corresponding file from the previous backup (the current directory on the external hard drive, which is a symbolic link to the most recent backup). If the file is identical, rsync creates a hard link instead of a new copy, which consumes no additional disk space. If the file is new or modified, a new file is created.
The current symbolic link must be created manually and updated after each backup so that it always points to the latest backup.
As shown in the diagram, the first backup consumes the most space (10 GB in this example), while subsequent backups only store the differences (1 GB here).
One important thing to keep in mind: if you need to reclaim space on the external hard drive, you must delete the older backups first. Removing newer backups first would break the hard links that depend on them.
- The three phases of an incremental rsync backup:
- PRE-BACKUP: the external hard drive is mounted at
/mnt/usb/. - BACKUP: the rsync backup runs, using the
currentsymbolic link to reference the previous backup (in this exampleback-2025-11-28). - POST-BACKUP: once the backup completes, the
currentsymbolic link is updated to point to the new backup (hereback-2025-11-29).
- PRE-BACKUP: the external hard drive is mounted at

rsync and --link-dest.Backup to USB drive with incrementals
This is a detailed application of the incremental backup process described above.
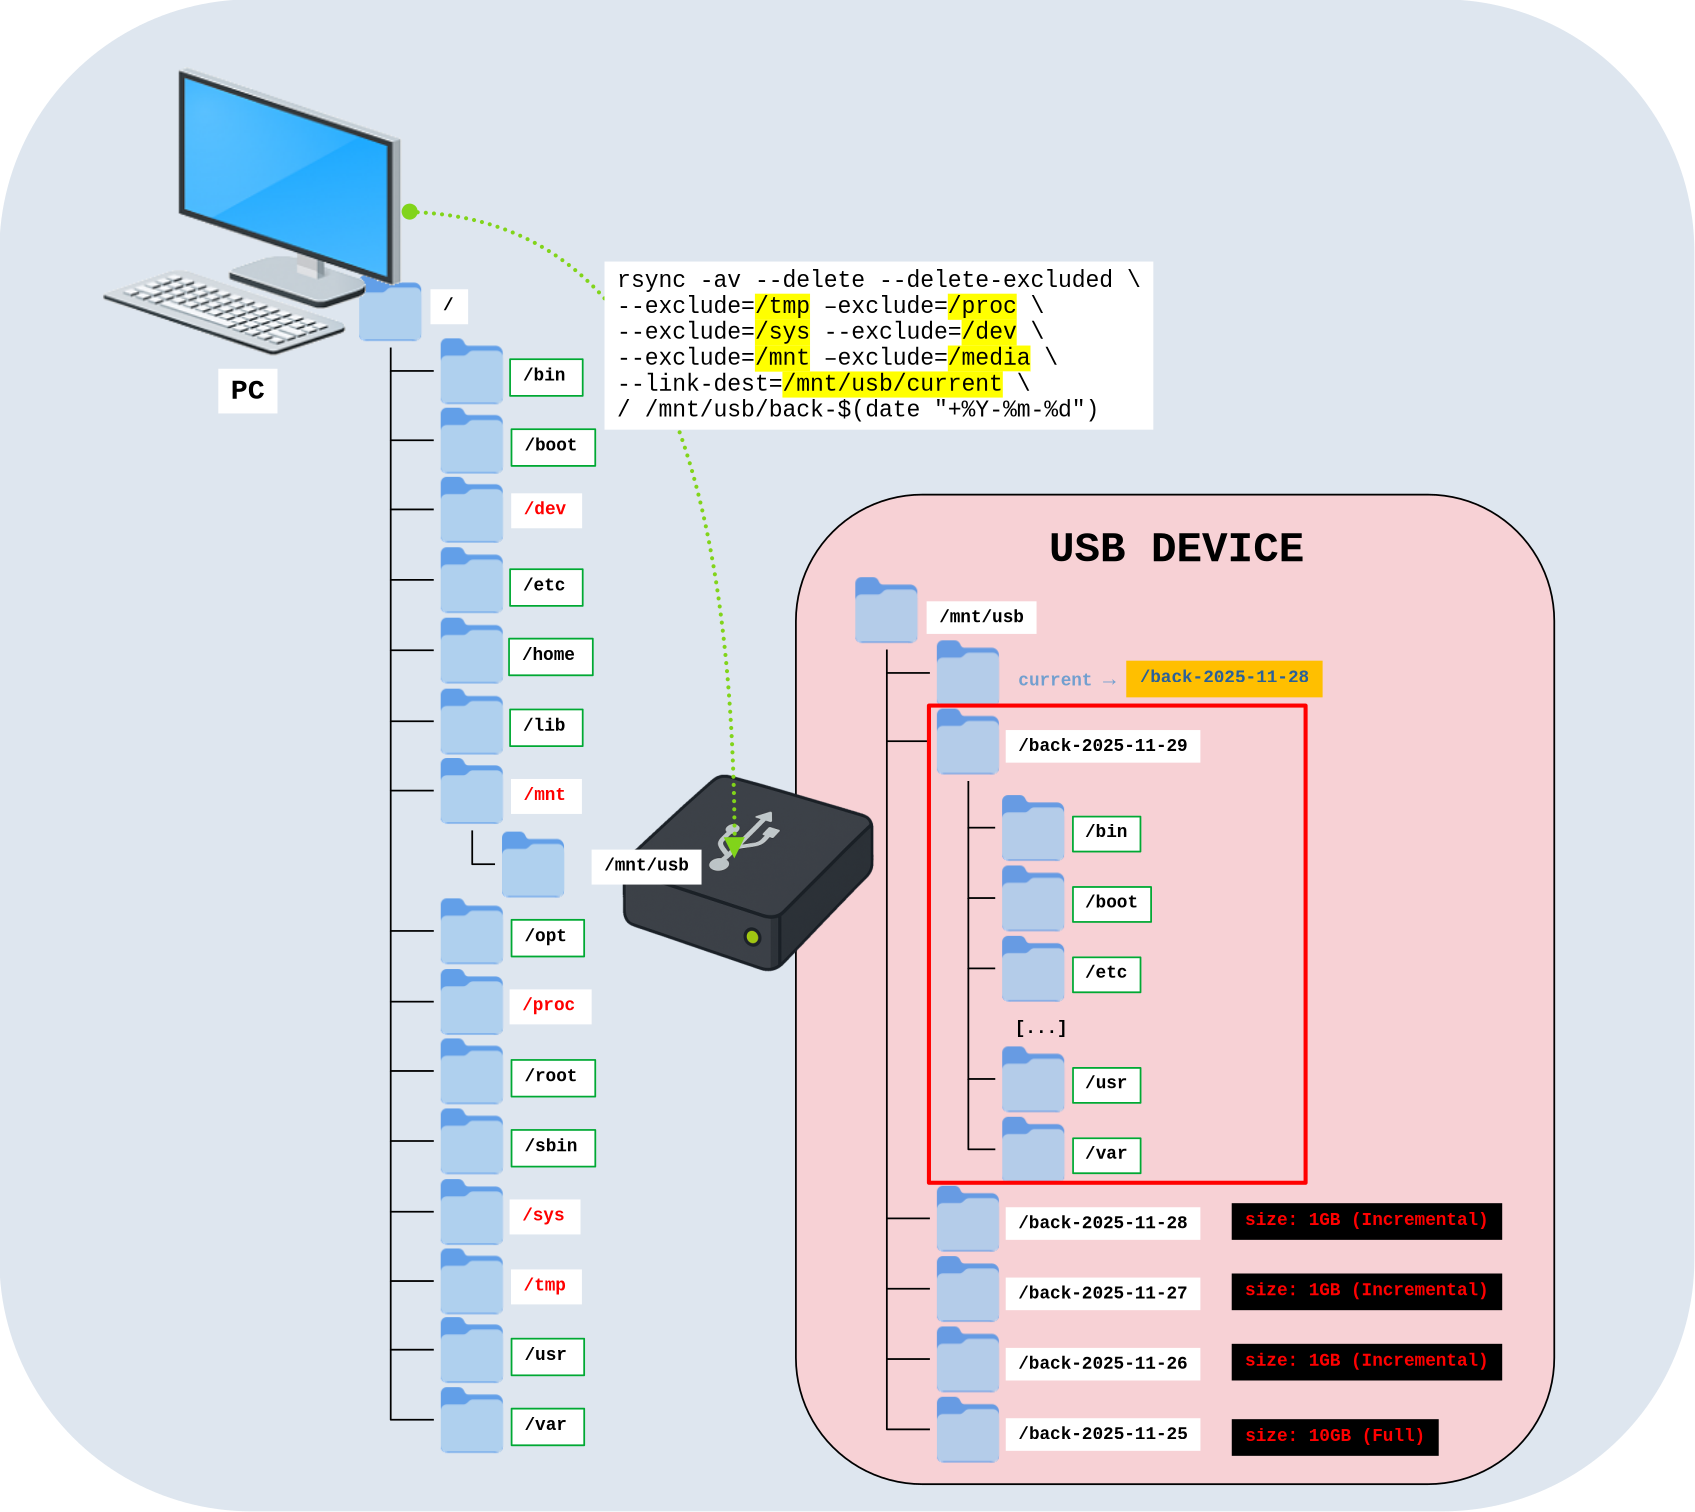
rsync and --link-dest.- Options:
-aor--archive: a convenience option that includes:-r: recurse into directories-l: copy symlinks as symlinks-p: preserve permissions-t: preserve modification times-g: preserve group-o: preserve owner (super-user only)-D: preserve devices and special files
-v: increases the verbosity of the transfer.--exclude=PATTERN: exclude files matchingPATTERN.--link-dest=/mnt/usb/current: create hard links to files incurrentwhen they are unchanged.--delete: remove extraneous files from destination directories.--delete-excluded: also remove files from the destination that match the excluded patterns.
- Command line to backup (the source is
/to back up the entire system, and the destination is/mnt/usb/):
user@host:~$ rsync -av --delete --delete-excluded --exclude=/tmp --exclude=/proc --exclude=/sys --exclude=/dev --exclude=/mnt --exclude=/media --link-dest=/mnt/usb/current / /mnt/usb/back-$(date "+%Y-%m-%d")- Update the
currentsymbolic link:- Remove the existing symbolic link named
current:
- Remove the existing symbolic link named
user@host:~$ rm -f /mnt/usb/current- Recreate the
currentsymbolic link:
user@host:~$ ln -s /mnt/usb/back-$(date "+%Y-%m-%d") /mnt/usb/current- Check the disk space used by incremental backups:
user@host:~$ du -sh /mnt/usb/back-*
10G	back-2025-11-25
1G	back-2025-11-26
1G	back-2025-11-27
1G	back-2025-11-28
Backup to a Network Server with incrementals
This works the same way as above, except that the destination is now a GNU/Linux server and the backup is performed over the network.
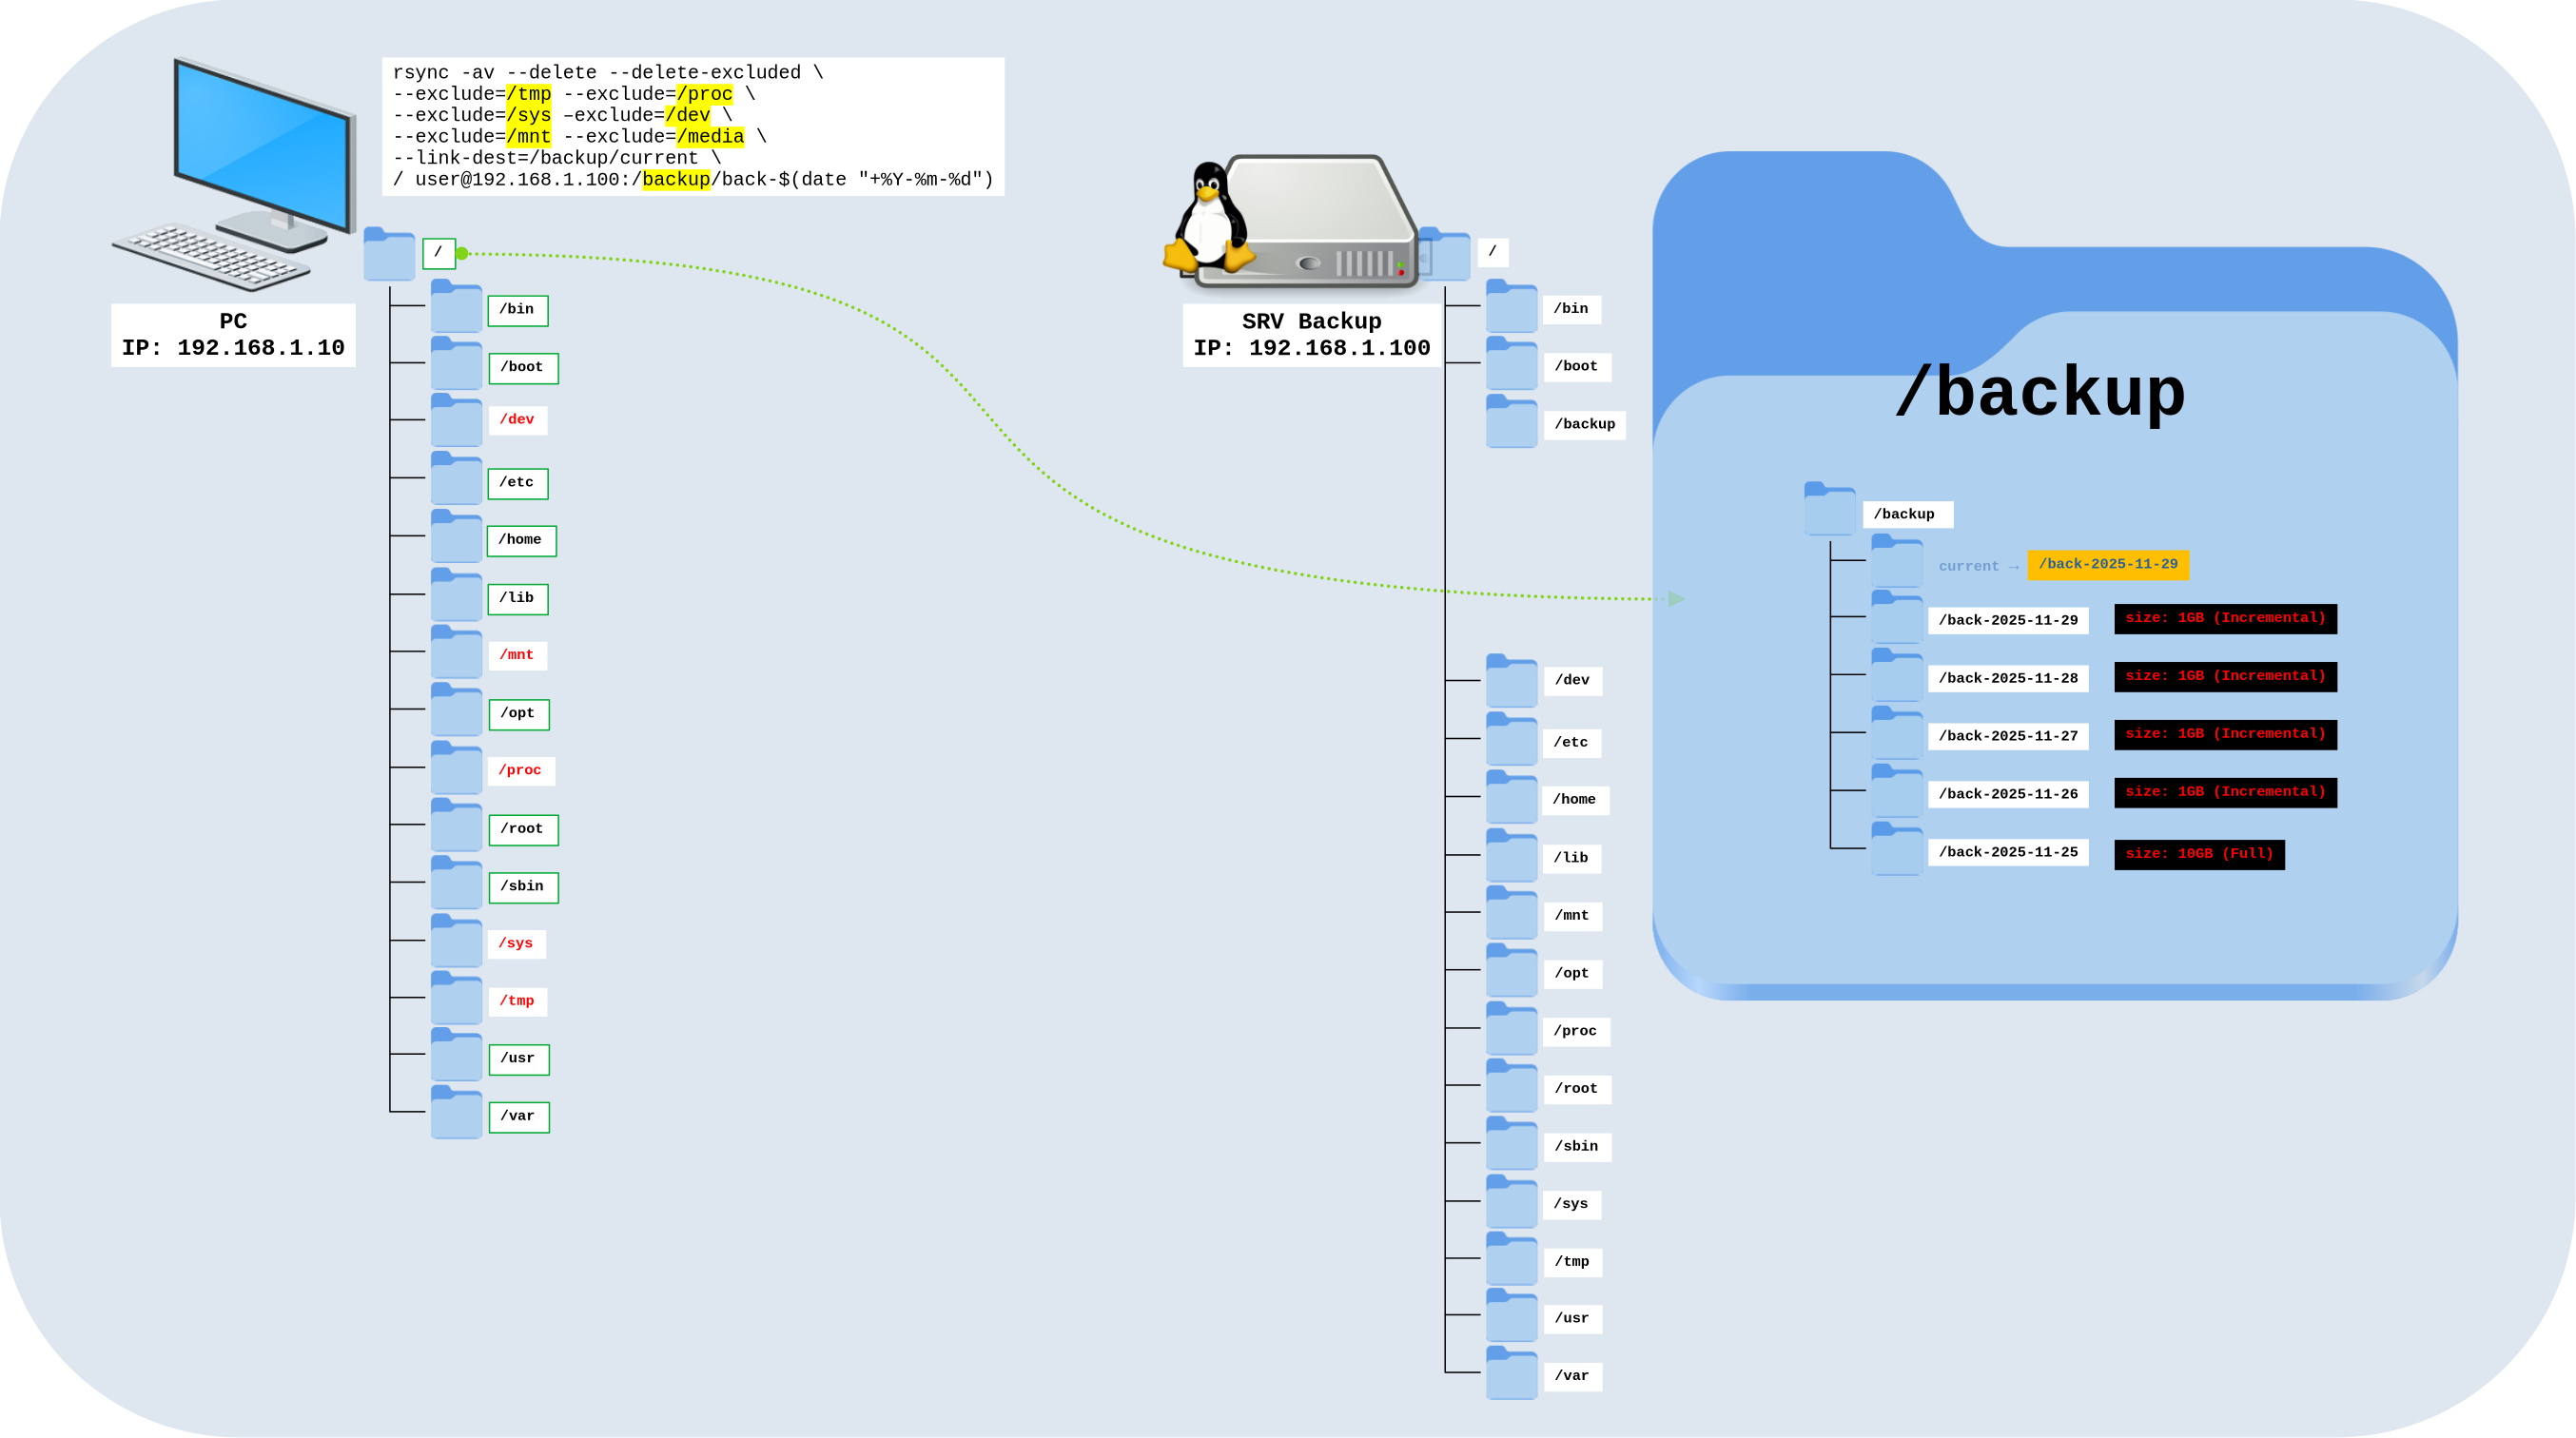
rsync and --link-dest.- Options:
-aor--archive: a convenience option that includes:-r: recurse into directories-l: copy symlinks as symlinks-p: preserve permissions-t: preserve modification times-g: preserve group-o: preserve owner (super-user only)-D: preserve devices and special files
-v: increases the verbosity of the transfer.--exclude=PATTERN: exclude files matchingPATTERN.--link-dest=/mnt/usb/current: create hard links to files incurrentwhen they are unchanged.--delete: remove extraneous files from destination directories.--delete-excluded: also remove files from the destination that match excluded patterns.
- Command line for backup (the source is
/to back up the entire system, and the destination is/backup/on the server192.168.1.100):
user@host:~$ rsync -av --delete --delete-excluded --exclude=/tmp --exclude=/proc --exclude=/sys --exclude=/dev --exclude=/mnt --exclude=/media --link-dest=/backup/current / user@192.168.1.100:/backup/back-$(date "+%Y-%m-%d")- Update the
currentsymbolic link:- Remove the existing symbolic link named
current:
- Remove the existing symbolic link named
user@host:~$ ssh -p 22 user@192.168.1.100 "rm /backup/current"- Recreate the
currentsymbolic link:
user@host:~$ ssh -p 22 user@192.168.1.100 "ln -s /backup/back-$(date "+%Y-%m-%d") /backup/current"Misc
Here is a collection of additional options and examples that may be useful.
- Show progress during the transfer:
user@host:~$ rsync --progress -av /home/std/folder_source/ remoteuser@192.168.1.100:/tmp/folder_dest- Display statistics at the end of the transfer:
user@host:~$ rsync --stats -av /home/std/folder_source/ remoteuser@192.168.1.100:/tmp/folder_dest- Limit the bandwidth used during the transfer:
user@host:~$ rsync --progress -av --bwlimit=100k /home/std/folder_source/ remoteuser@192.168.1.100:/tmp/folder_dest- Transfer only files whose modification date is within the last 3 days to the
/tmp/directory:
user@host:~$ rsync --progress -av remoteuser@192.168.1.100:/ --no-relative --files-from=<(ssh remoteuser@192.168.1.100 find /data/* -mtime -3 -type f) /tmp/- Mirror copy (
--delete: remove extraneous files from destination directories):
user@host:~$ rsync -av --progress --delete /home/std/ /tmp/folder_destHow to use rsync with root privileges
- On the remote host, add the following
sudorule (replaceuserwith the username used for the SSH connection):
root@host:~# visudouser ALL=NOPASSWD:/usr/bin/rsync- Use
rsyncwithsudowhen root privileges are required on the destination machine:
user@host:~$ rsync -av -e 'ssh -p 22' --rsync-path='sudo rsync' /home/std user@192.168.1.100:/data/