Setting Up a Shared Calendar on Debian Linux with Baïkal
- Last updated: Jan 11, 2026

I have been a long-time user of the Zimbra collaborative software, appreciating its web interface with email access and shared calendar features. Initially, there was a free and open-source version that served its purpose well, even if it became somewhat challenging to use and to update, it remained overall a good solution. However, with recent developments (since version 8.5) and various changes in ownership, the free edition has been completely abandoned. I therefore found myself looking for alternative solutions for the various modules (calendar, webmail, etc.).
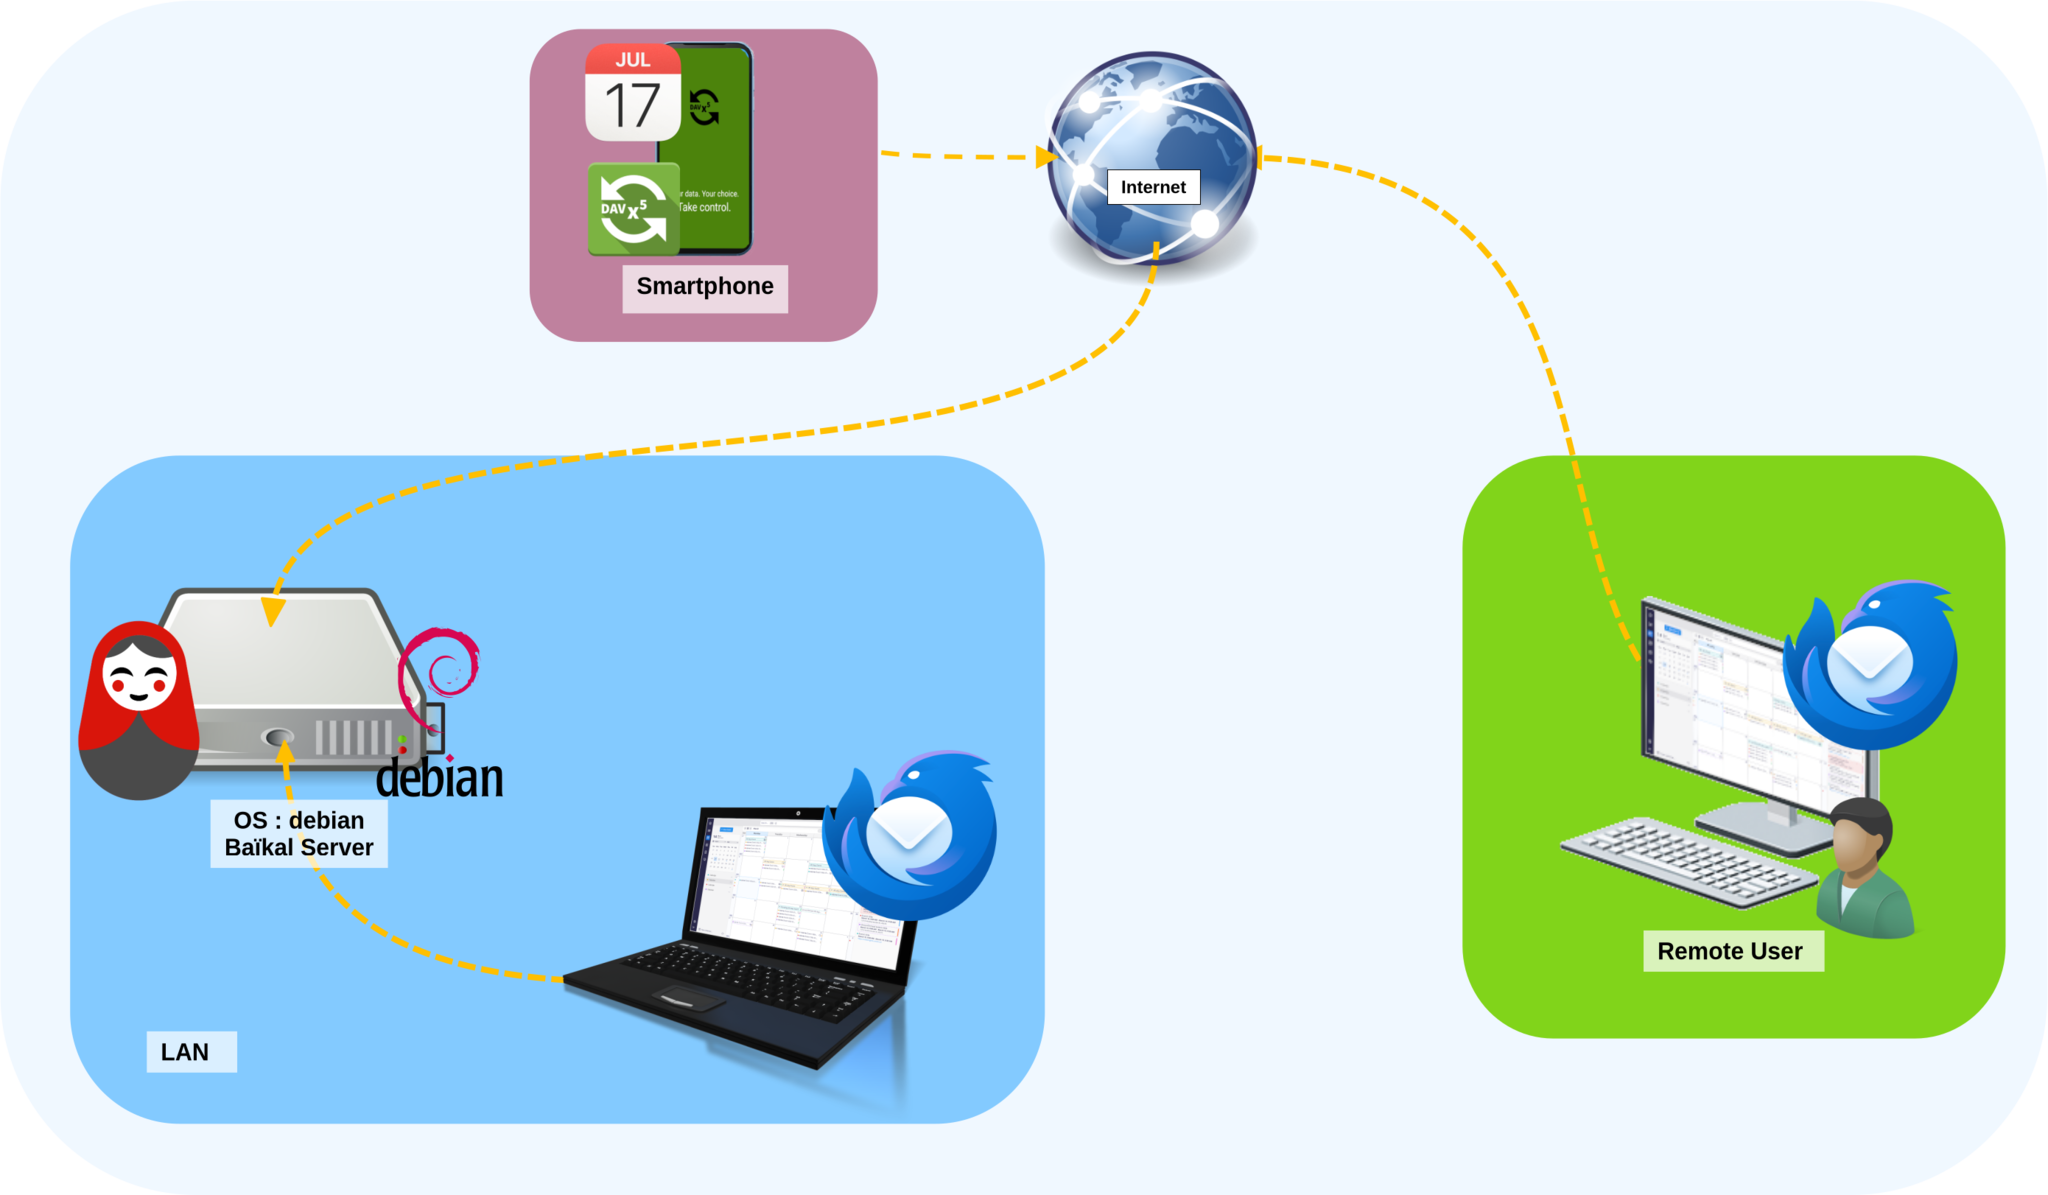
This article will focus on setting up a shared calendar server. I'll show how to set up a shared calendar on GNU/Linux using the Baïkal server, which supports both CalDAV and CardDAV. Its web interface makes it easy to manage users, address books, and calendars.
The sqlite3 database is the perfect choice for a small number of users.
- Configuration:
- Debian: 13 (trixie)
- Baïkal: 0.11.1
- sqlite3: 3.46
- PHP: 8.4
And a big thank you to ByteHamster for making this product free and Open Source.
Baïkal Installation
Prerequisites
- Install prerequisites:
root@host:~# apt update && apt install apache2 php-sqlite3 git sqlite3 unzip php php-xml libapache2-mod-php- Download the latest Baïkal release (check the official GitHub repository for the latest version https://github.com/sabre-io/Baikal/releases):
root@host:~# wget https://github.com/sabre-io/Baikal/releases/download/0.11.1/baikal-0.11.1.zip- Unzip and move the folder to
/var/www/baikal/:
root@host:~# unzip baikal-0.11.1.zip
root@host:~# mv baikal /var/www/baikal- Set
www-dataas the owner of the folder:
root@host:~# chown -R www-data:www-data /var/www/baikal/Certificates
To enable HTTPS on your Baïkal server, you need TLS certificates. You can choose between generating self-signed certificates or using Let’s Encrypt certificates.
Self-signed certificates are easy to generate, but they are not trusted by default by external devices and applications. As a result, clients will display security warnings when connecting to your server.
Let’s Encrypt provides free, publicly trusted TLS certificates. Certificates issued by Let’s Encrypt are recognized automatically by operating systems, browsers, and CalDAV/CardDAV clients, which prevents security warnings.
In this guide, both methods are presented so you can choose the solution that best fits your environment.
Self signed certificates
- First, create the
/etc/apache2/ssl/directory, which will be used to store the TLS certificates and private keys:
root@host:~# mkdir /etc/apache2/ssl/- Generate the self-signed TLS certificate using
openssl:
root@host:~# openssl req -x509 -nodes -days 3650 -newkey rsa:4096 -keyout /etc/apache2/ssl/selfsigned.key -out /etc/apache2/ssl/selfsigned.crt
-----
You are about to be asked to enter information that will be incorporated
into your certificate request.
What you are about to enter is what is called a Distinguished Name or a DN.
There are quite a few fields but you can leave some blank
For some fields there will be a default value,
If you enter '.', the field will be left blank.
-----
Country Name (2 letter code) [AU]:FR
State or Province Name (full name) [Some-State]:The Elements Of A State
Locality Name (eg, city) []:City
Organization Name (eg, company) [Internet Widgits Pty Ltd]:STD Corp
Organizational Unit Name (eg, section) []:STD Department
Common Name (e.g. server FQDN or YOUR name) []:baikal.std.rocks
Email Address []:baikal@std.rocks- Create the
cert.pemfile by concatenating the private key and the certificate:
root@host:~# cat /etc/apache2/ssl/selfsigned.key /etc/apache2/ssl/selfsigned.crt > /etc/apache2/ssl/cert.pem- Edit the Apache VirtualHost configuration file
/etc/apache2/sites-available/000-default.conf:
<VirtualHost *:443>

    DocumentRoot /var/www/baikal/html
    ServerName baikal.std.rocks

    RewriteEngine On
    # Generally already set by global Apache configuration
    #RewriteRule .* - [E=HTTP_AUTHORIZATION:%{HTTP:Authorization}]
    RewriteRule /.well-known/carddav /dav.php [R=308,L]
    RewriteRule /.well-known/caldav  /dav.php [R=308,L]

    <Directory "/var/www/baikal/html">
        Options None
        # If you install cloning git repository, you may need the following
        Options +FollowSymlinks
        AllowOverride None
        # Configuration for apache-2.4:
        Require all granted
        # Configuration for apache-2.2:
        # Order allow,deny
        # Allow from all
    </Directory>

    <IfModule mod_expires.c>
        ExpiresActive Off
    </IfModule>

    SSLEngine On

    #SECURE SSL
    SSLProtocol all -SSLv3 -TLSv1 -TLSv1.1
    SSLCipherSuite HIGH:!aNULL:!MD5
    SSLHonorCipherOrder On

    #AUTOGENERATE CERTIFICATES
    SSLCertificateFile    /etc/apache2/ssl/cert.pem
    SSLCertificateKeyFile /etc/apache2/ssl/selfsigned.key

    #LETS ENCRYPT CERTIFICATES
    #SSLCertificateFile /etc/letsencrypt/live/baikal.std.rocks/fullchain.pem
    #SSLCertificateKeyFile /etc/letsencrypt/live/baikal.std.rocks/privkey.pem
</VirtualHost>
Let's encrypt certificates
- First, stop the Apache service to allow Certbot to listen on the HTTP port during the certificate validation process:
root@host:~# systemctl stop apache2.service- Install the
certbotpackage:
root@debian:~# apt update && sudo apt install certbot- Use
certbotto request a Let’s Encrypt SSL/TLS certificate. Replacebaikal.std.rockswith your own domain name andletsencrypt@std.rockswith your administrative email address:
root@debian:~# certbot certonly --standalone -d baikal.std.rocks --email letsencrypt@std.rocks --agree-tos --noninteractive
Saving debug log to /var/log/letsencrypt/letsencrypt.log
Requesting a certificate for mail.std.rocks

Successfully received certificate.
Certificate is saved at: /etc/letsencrypt/live/baikal.std.rocks/fullchain.pem
Key is saved at:         /etc/letsencrypt/live/baikal.std.rocks/privkey.pem
This certificate expires on 2026-04-23.
These files will be updated when the certificate renews.
Certbot has set up a scheduled task to automatically renew this certificate in the background.

- - - - - - - - - - - - - - - - - - - - - - - - - - - - - - - - - - - - - - - -
If you like Certbot, please consider supporting our work by:
 * Donating to ISRG / Let's Encrypt:   https://letsencrypt.org/donate
 * Donating to EFF:                    https://eff.org/donate-le
- - - - - - - - - - - - - - - - - - - - - - - - - - - - - - - - - - - - - - - -- Edit the Apache VirtualHost configuration file
/etc/apache2/sites-available/000-default.conf:
<VirtualHost *:443>

    DocumentRoot /var/www/baikal/html
    ServerName baikal.std.rocks

    RewriteEngine On
    # Generally already set by global Apache configuration
    #RewriteRule .* - [E=HTTP_AUTHORIZATION:%{HTTP:Authorization}]
    RewriteRule /.well-known/carddav /dav.php [R=308,L]
    RewriteRule /.well-known/caldav  /dav.php [R=308,L]

    <Directory "/var/www/baikal/html">
        Options None
        # If you install cloning git repository, you may need the following
        Options +FollowSymlinks
        AllowOverride None
        # Configuration for apache-2.4:
        Require all granted
        # Configuration for apache-2.2:
        # Order allow,deny
        # Allow from all
    </Directory>

    <IfModule mod_expires.c>
        ExpiresActive Off
    </IfModule>

    SSLEngine On

    #SECURE SSL
    SSLProtocol all -SSLv3 -TLSv1 -TLSv1.1
    SSLCipherSuite HIGH:!aNULL:!MD5
    SSLHonorCipherOrder On

    #AUTOGENERATE CERTIFICATES
    #SSLCertificateFile    /etc/apache2/ssl/cert.pem
    #SSLCertificateKeyFile /etc/apache2/ssl/selfsigned.key

    #LETS ENCRYPT CERTIFICATES
    SSLCertificateFile /etc/letsencrypt/live/baikal.std.rocks/fullchain.pem
    SSLCertificateKeyFile /etc/letsencrypt/live/baikal.std.rocks/privkey.pem
</VirtualHost>
Finalize configuration
Once your self-signed or Let’s Encrypt certificate has been generated, you can continue with the installation of Baïkal.
- Enable the required Apache modules for URL rewriting and SSL support:
root@host:~# a2enmod rewrite
root@host:~# a2enmod ssl- Restart the Apache service to apply the configuration changes:
root@host:~# systemctl restart apache2You can now proceed with the Baïkal configuration.
Baïkal Configuration
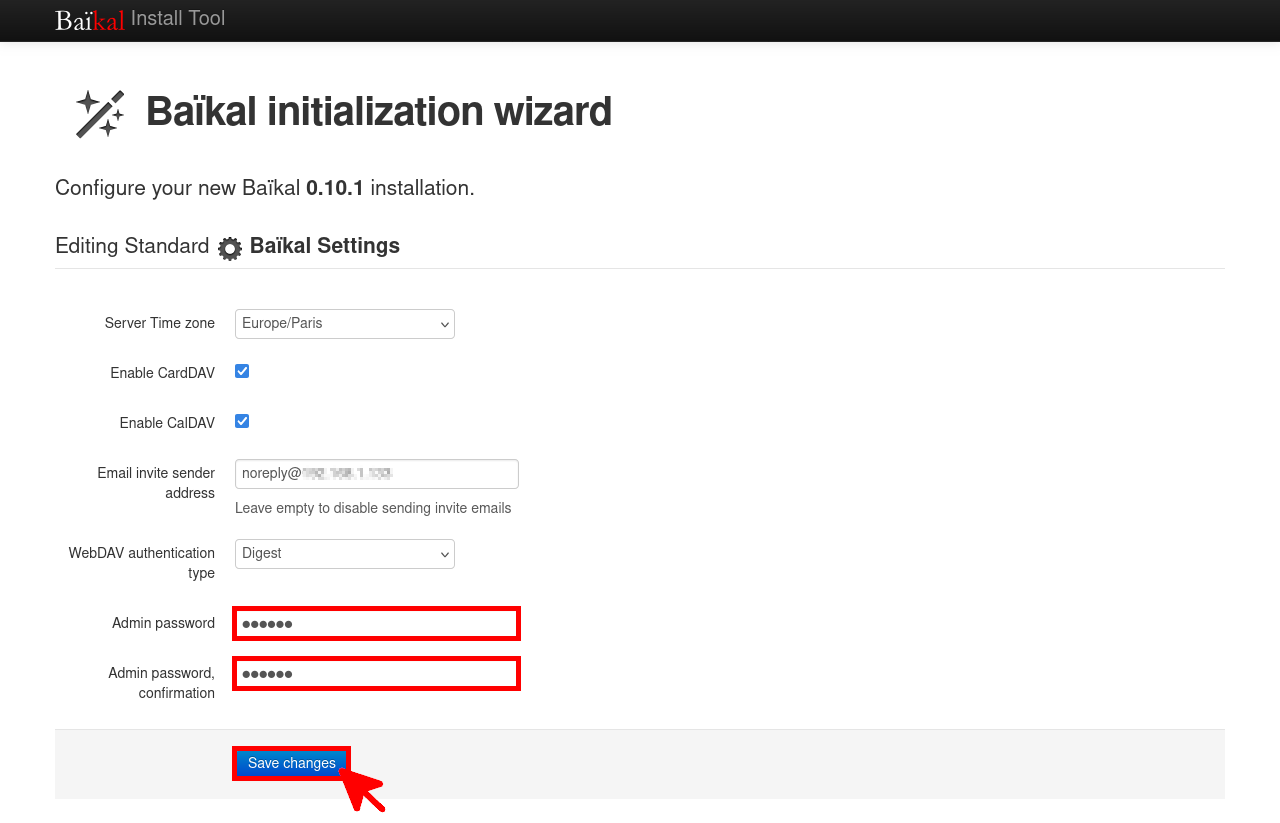
- Open a web browser and connect to the Baïkal web interface (
https://IP_SERVER) to set the admin password:
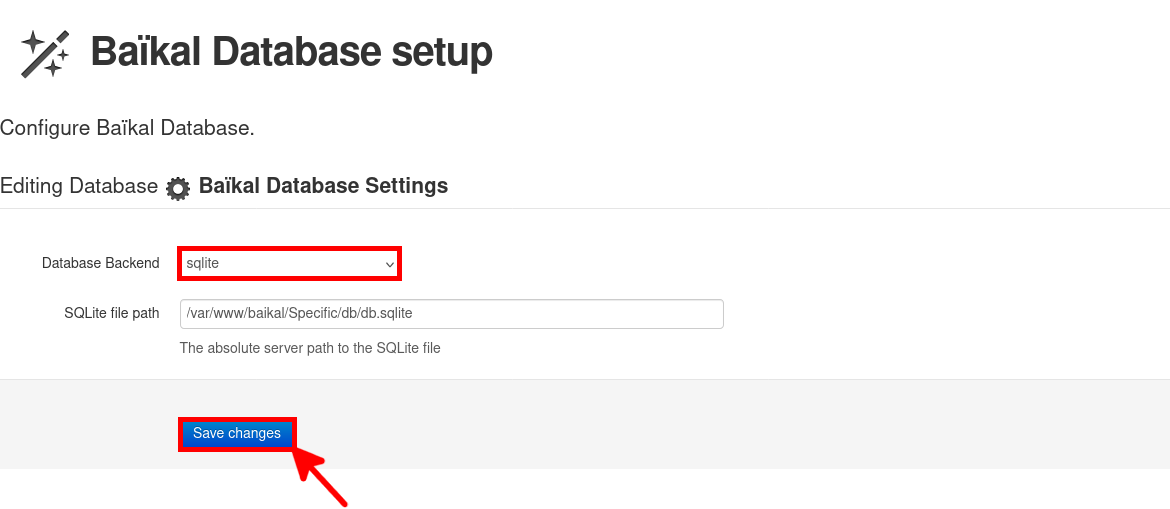
- Keep the default database configuration (SQLite) and click Save changes to continue:
- Finally, click on Start using Baïkal:

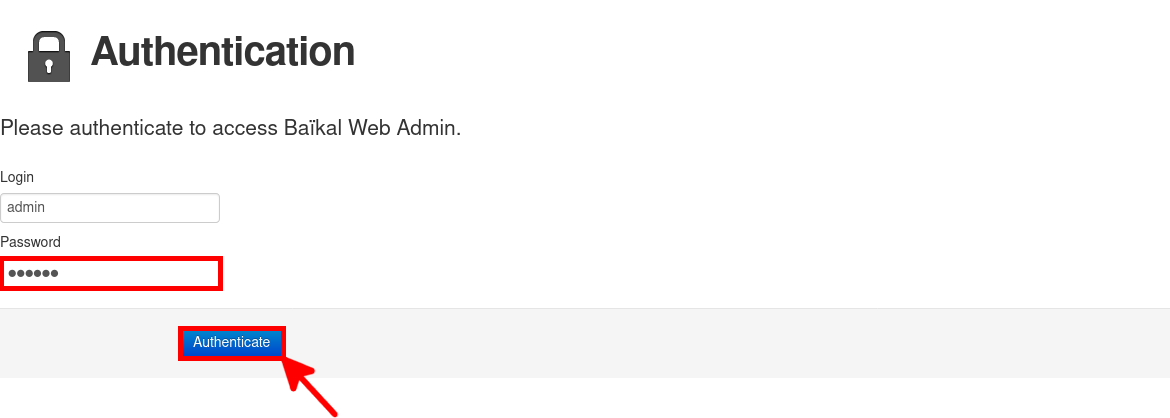
- Use the previously configured password and click Authenticate:
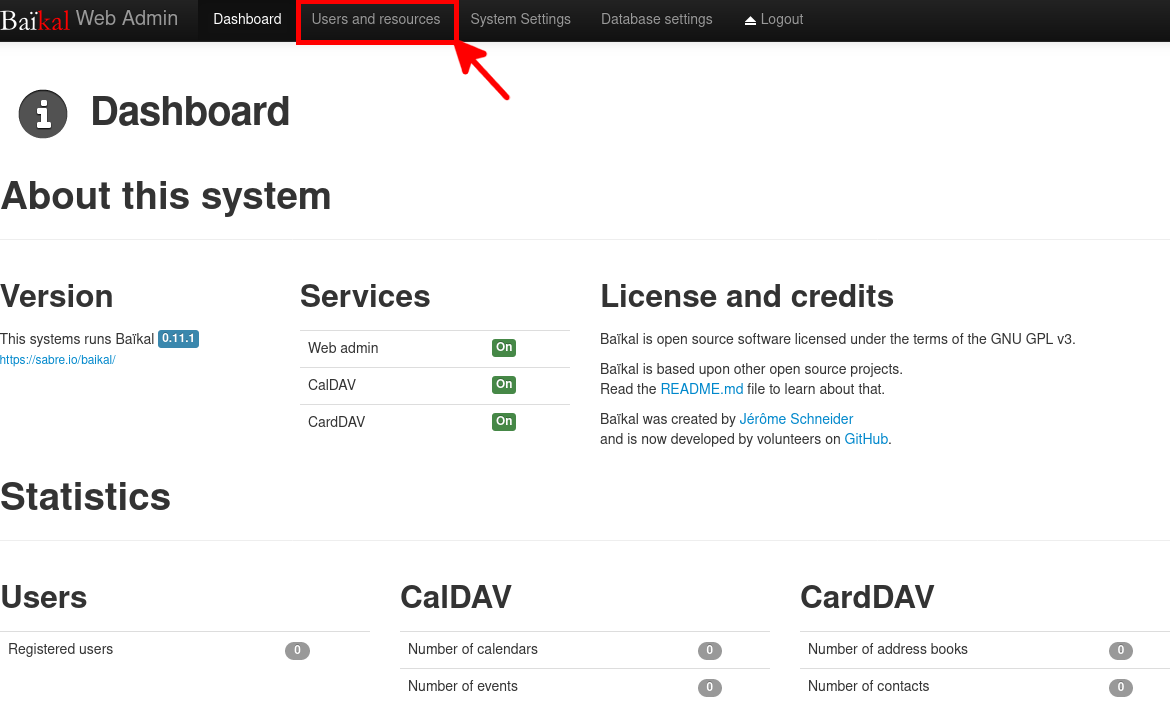
- To add users, click Users and Resources from the dashboard:
- Then, click the Add User button:

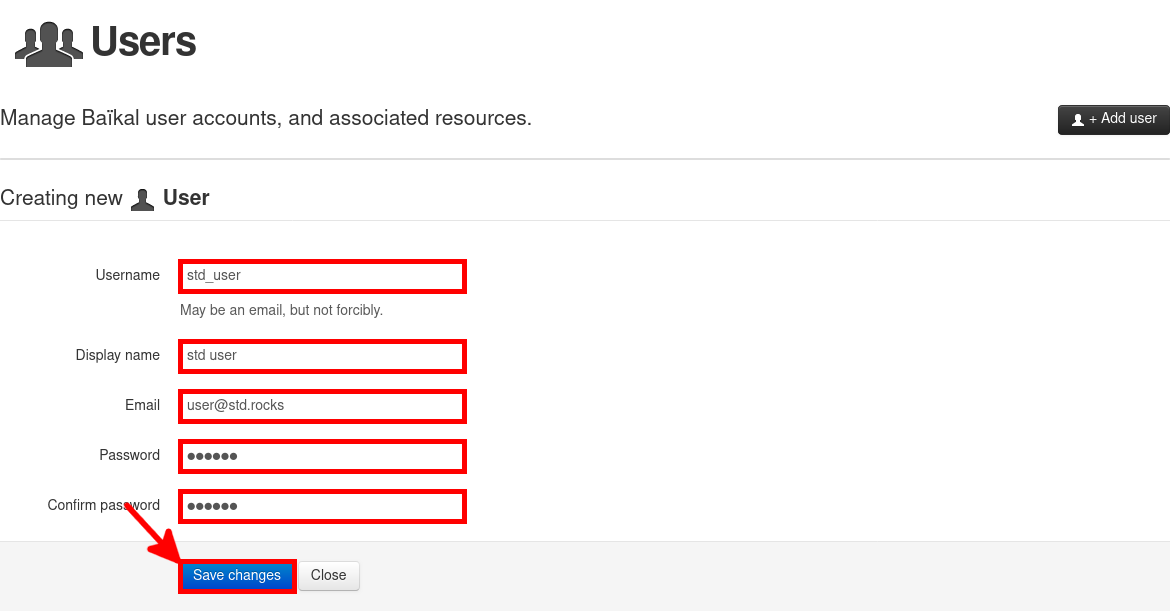
- Enter information for the new account and click Save changes:
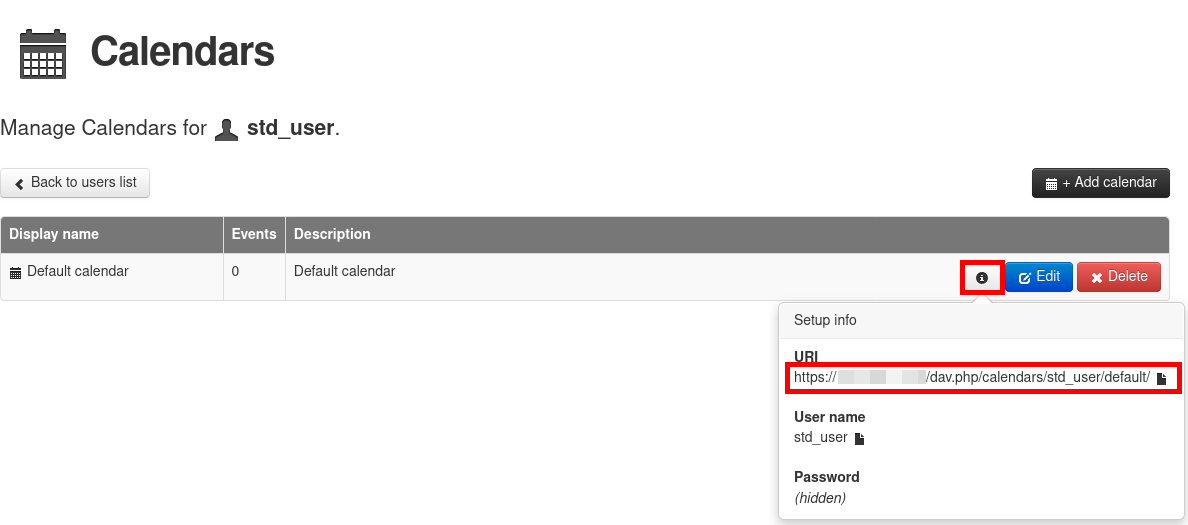
- The user is now created. Click on the Calendars button:

- From here, you can add a calendar and obtain the URI information (which can be useful depending on the calendar client):
Calendar Clients Configuration
At this point, we have a working shared calendar server. Now, let's connect our clients. I'll demonstrate how to do it with Thunderbird, which has an integrated calendar, and the DAVx5 Android application, allowing synchronization with calendars on Android devices.
Thunderbird
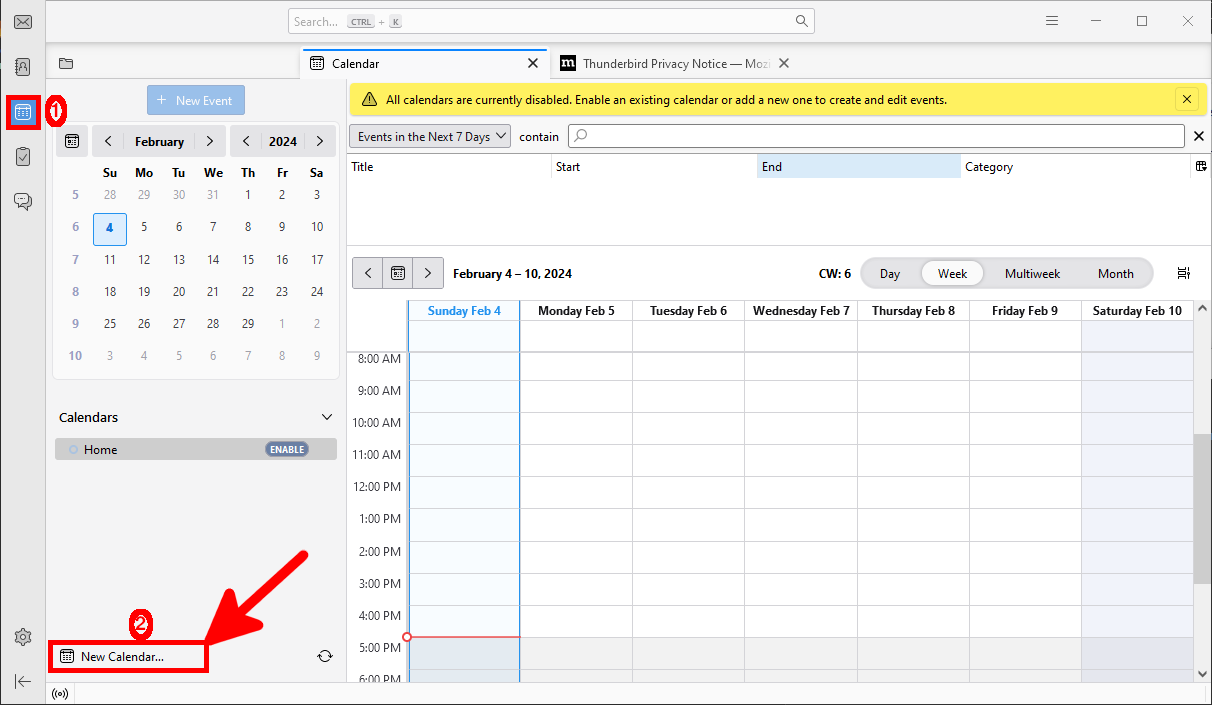
- Open Thunderbird and click the calendar button, then select New Calendar…:
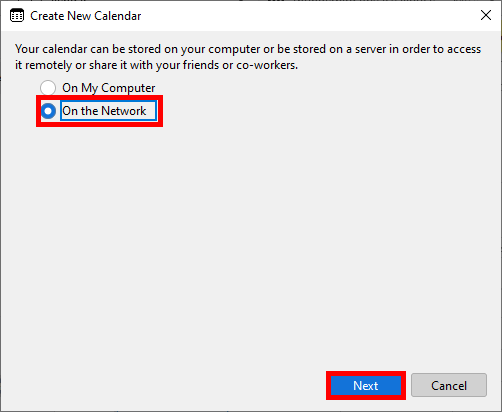
- Select On the Network and click the Next button:
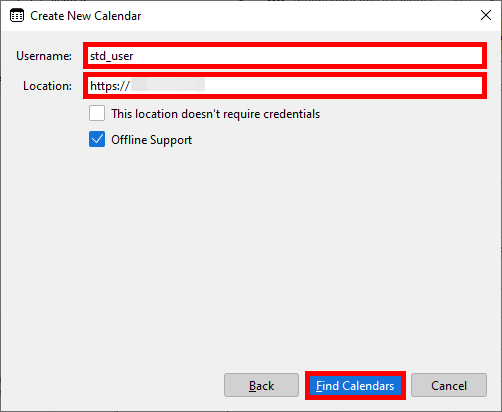
- Add the Username login and the URL
https://IP_SERVER, then click Find Calendars:
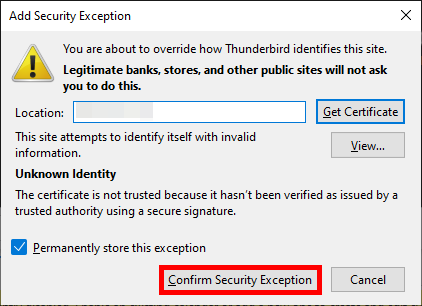
- If you used a self-signed certificate, confirm the security exception:
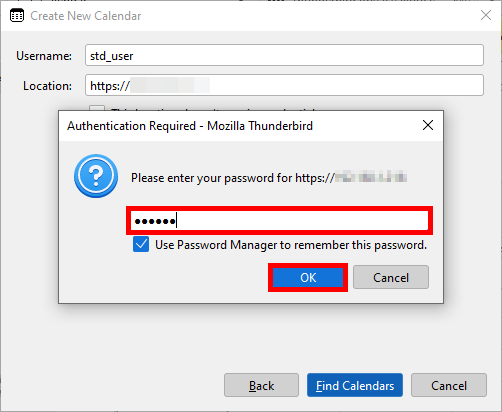
- Enter the password of the user previously created:
- Finally, click on Subscribe to add the calendar:

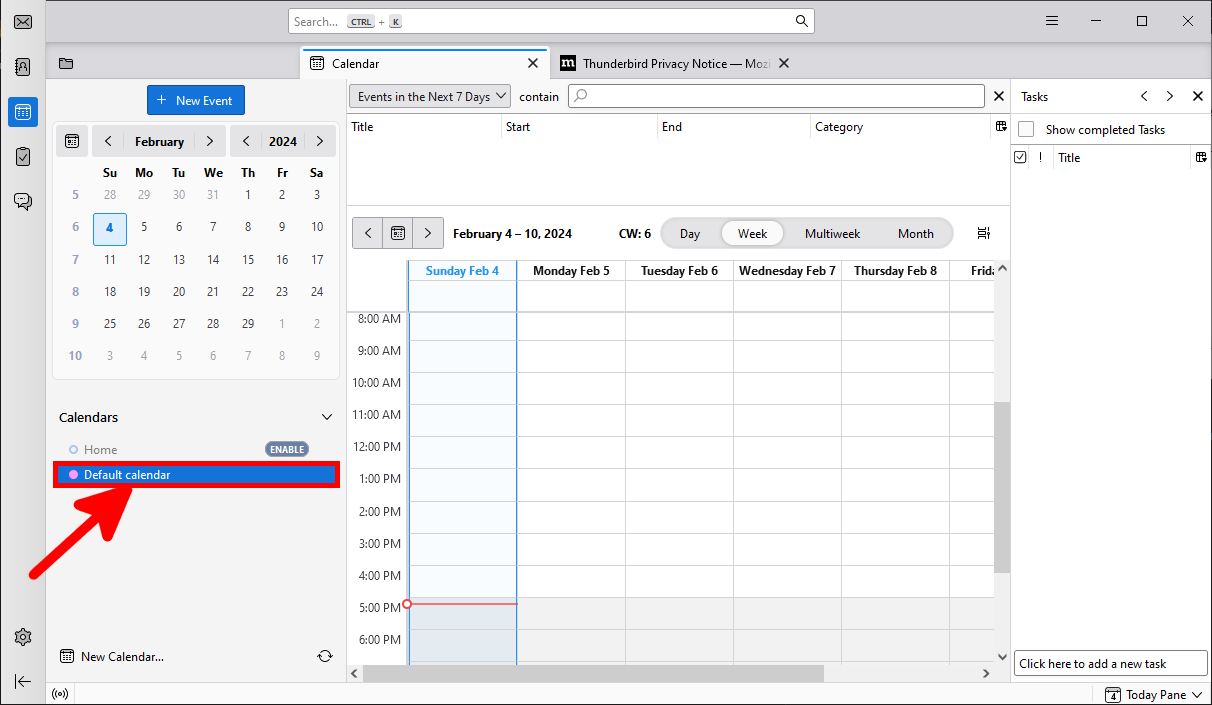
- The shared calendar will appear:
DAVx5
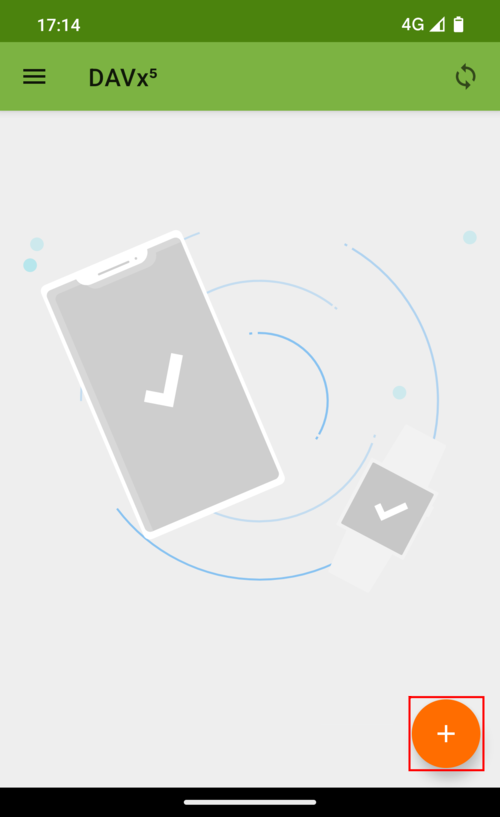
- Open the DAVx5 app and click on the plus symbol to add an account:
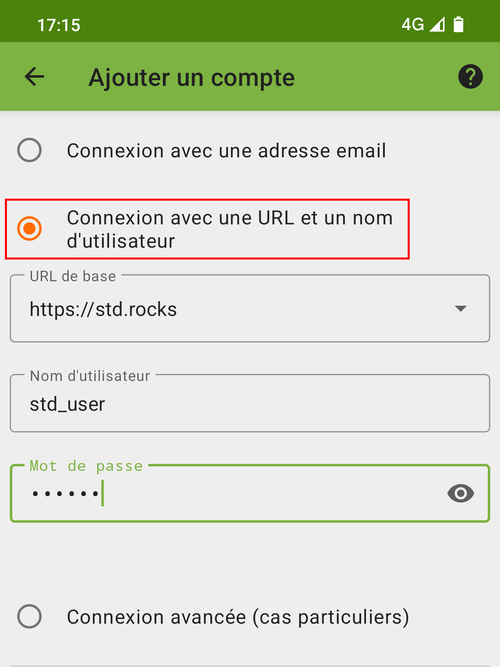
- Select Connect with URL and enter the requested information:
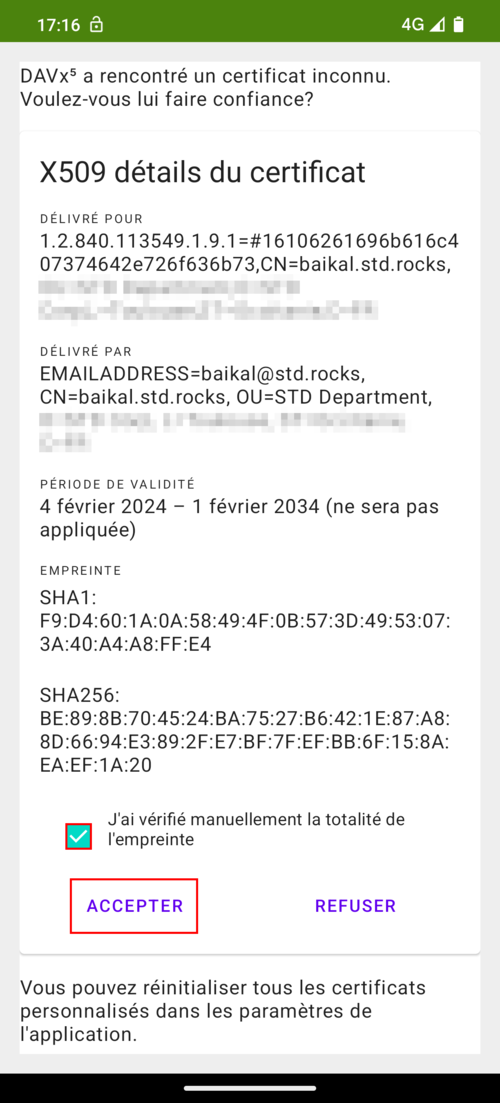
- As with Thunderbird, we will receive a warning about the certificate if it is self-signed. Just click Accept:
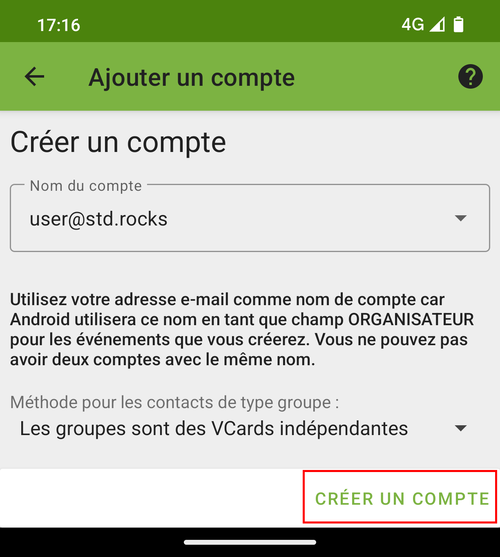
- Finally, click on Create:
Upgrading Baïkal
Baïkal is a maintained software, so new versions become available as time goes by. Here, I'll explain how to update Baïkal while preserving user data. The first step, as usual for this kind of operation, will be to make a full backup of your system.
- Stop the
apache2service:
root@host:~# systemctl stop apache2- Backup the
sqlite3database:
root@host:~# sqlite3 /var/www/baikal/Specific/db/db.sqlite ".backup 'backup.db.sqlite'"- Backup the baikal folder:
root@host:~# cp -a /var/www/baikal /var/www/$(date +%Y%m%d).baikal- Get the latest release (you can check here: https://github.com/sabre-io/Baikal/releases) of Baïkal and unzip it to
/tmp/:
root@host:~# cd /tmp/root@host:~# wget https://github.com/sabre-io/Baikal/releases/download/0.11.1/baikal-0.11.1.ziproot@host:~# unzip baikal-0.11.1.zip- Copy the current config and Specific folders to
/tmp/baikal:
root@host:~# cp -ra /var/www/baikal/config /tmp/baikal/root@host:~# cp -ra /var/www/baikal/Specific /tmp/baikal/- Disable old baikal folder:
root@host:~# cd /var/www/root@host:~# mv baikal baikal.OLD- Move the new version of baikal to
/var/www/:
root@host:~# mv /tmp/baikal /var/www/- Restore
www-datarights:
root@host:~# chown -R www-data:www-data /var/www/baikal/- Start
apacheservice:
root@host:~# systemctl start apache2- Open the baikal web administration page (e.g. https://baikal.std.rocks/admin/install/) and click on Start the upgrade:
