How to Set Up an OpenVPN Server on Debian 13 Trixie

- Last updated: Aug 21, 2025
With the release of Debian 13 “Trixie”, it’s the perfect time to update my tutorial on setting up an OpenVPN server and discover what’s new in this version.
This is a hands-on tutorial for installing and configuring an OpenVPN server on Debian 13 Trixie.
Our goal is to transform the Debian server into a fully functional VPN gateway, giving remote Windows clients secure access to the entire network.
This setup is my preferred approach, as it provides seamless access to all internal company resources (see the Gateway Mode section for details).
OpenVPN Network Diagram

- OpenVPN Server:
- OS: Debian GNU/Linux 13 (Trixie)
- Role: OpenVPN Server + Gateway
- IP (wan): OPENVPN_IP
- IP (lan): 192.168.0.254 and 10.50.8.1
OpenVPN Server Setup (Debian 13 Trixie)

Installation
- Install the OpenVPN package:
root@host:~# apt update && apt install openvpn- Enable automatic start of the OpenVPN service:
root@host:~# sed -i 's/#AUTOSTART="all"/AUTOSTART="all"/' /etc/default/openvpnroot@host:~# systemctl daemon-reload; systemctl restart openvpnPKI
- Navigate to the
/etc/openvpn/directory:
root@host:~# cd /etc/openvpn/- Initialize the PKI (Public Key Infrastructure):
root@host:~# /usr/share/easy-rsa/easyrsa init-pki- Type
yeswhen prompted to initialize the PKI and confirm removal of the existing configuration:
WARNING!!!

You are about to remove the EASYRSA_PKI at:
* /etc/openvpn/pki

and initialize a fresh PKI here.

Type the word 'yes' to continue, or any other input to abort.
  Confirm removal: yes

         ******************************************
         * SECOND WARNING - STOP - SECOND WARNING *
         ******************************************

  To keep your current 'pki/vars' settings use 'init-pki soft'.
  To keep your current Request files use 'init-pki soft'
  The Requests can then be signed by a new CA (Partial CA renewal)
  To keep your current Easy-RSA TLS Key use 'init-pki soft'
  This private key file is in use by your current VPN.

       ** USE OF   'init-pki soft'   IS RECOMMENDED **


Type the word 'yes' to continue, or any other input to abort.

  WARNING: COMPLETELY DESTROY current PKI (NOT recommended) ?

    [yes/NO]: yes


Notice
------
'init-pki' complete; you may now create a CA or requests.

Your newly created PKI dir is:
* /etc/openvpn/pki

Using Easy-RSA configuration:
* undefined- If, like me, you don’t want to regenerate certificates frequently, create and edit the file
/etc/openvpn/pki/vars:
root@host:~# cp -a /usr/share/easy-rsa/vars.example /etc/openvpn/pki/vars# In how many days should the root CA key expire?
set_var EASYRSA_CA_EXPIRE 3650
# In how many days should certificates expire?
set_var EASYRSA_CERT_EXPIRE 1825
# How many days until the Certificate Revokation List will expire.
#
# IMPORTANT: When the CRL expires, an OpenVPN Server which uses a
# CRL will reject ALL new connections, until the CRL is replaced.
#
set_var EASYRSA_CRL_DAYS 1095
# Choose a size in bits for your keypairs. The recommended value is 2048.
# Using 2048-bit keys is considered more than sufficient for many years into
# the future. Larger keysizes will slow down TLS negotiation and make key/DH
# param generation take much longer. Values up to 4096 should be accepted by
# most software. Only used when the crypto alg is rsa, see below.
set_var EASYRSA_KEY_SIZE 4096- Once everything is set, create the Certificate Authority (CA) in
/etc/openvpn/pki/ca.crt:
root@host:~# /usr/share/easy-rsa/easyrsa build-ca nopass- When prompted, enter a Common Name (CN) for your CA:
You are about to be asked to enter information that will be incorporated
into your certificate request.
What you are about to enter is what is called a Distinguished Name or a DN.
There are quite a few fields but you can leave some blank
For some fields there will be a default value,
If you enter '.', the field will be left blank.
-----
Common Name (eg: your user, host, or server name) [Easy-RSA CA]:openvpn-server

Notice
------
CA creation complete. Your new CA certificate is at:
* /etc/openvpn/pki/ca.crt

Create an OpenVPN TLS-AUTH|TLS-CRYPT-V1 key now: See 'help gen-tls'

Build-ca completed successfully.
Generate the OpenVPN Server Certificate, Private Key, and Diffie-Hellman Parameters
- Create the OpenVPN server certificate and its private key:
root@host:~# /usr/share/easy-rsa/easyrsa build-server-full server nopass
Using Easy-RSA 'vars' configuration:
* /etc/openvpn/pki/vars
[…]
-----

Notice
------
Private-Key and Public-Certificate-Request files created.
Your files are:
* req: /etc/openvpn/pki/reqs/server.req
* key: /etc/openvpn/pki/private/server.key

You are about to sign the following certificate:

  Requested CN:     'server'
  Requested type:   'server'
  Valid for:        '1825' days


subject=
    commonName                = server

Type the word 'yes' to continue, or any other input to abort.
  Confirm requested details: yes

Using configuration from /etc/openvpn/pki/9934d973/temp.6.1
Check that the request matches the signature
Signature ok
The Subject's Distinguished Name is as follows
commonName            :ASN.1 12:'server'
Certificate is to be certified until Aug 14 13:00:21 2030 GMT (1825 days)

Write out database with 1 new entries
Database updated

Notice
------
Inline file created:
* /etc/openvpn/pki/inline/private/server.inline


Notice
------
Certificate created at:
* /etc/openvpn/pki/issued/server.crt- Generate the Diffie–Hellman (DH) parameters and save them to
/etc/openvpn/pki/dh.pem:
root@host:~# /usr/share/easy-rsa/easyrsa gen-dh
Using Easy-RSA 'vars' configuration:
* /etc/openvpn/pki/vars
Generating DH parameters, 4096 bit long safe prime
[…]
DH parameters appear to be ok.

Notice
------

DH parameters of size 4096 created at:
* /etc/openvpn/pki/dh.pem
Generate OpenVPN Client Certificates and Keys
- Generate the client01 certificate and private key:
root@host:~# /usr/share/easy-rsa/easyrsa build-client-full client01 nopass
Using Easy-RSA 'vars' configuration:
* /etc/openvpn/pki/vars
[…]
-----

Notice
------
Private-Key and Public-Certificate-Request files created.
Your files are:
* req: /etc/openvpn/pki/reqs/client01.req
* key: /etc/openvpn/pki/private/client01.key

You are about to sign the following certificate:

  Requested CN:     'client01'
  Requested type:   'client'
  Valid for:        '1825' days


subject=
    commonName                = client01

Type the word 'yes' to continue, or any other input to abort.
  Confirm requested details: yes

Using configuration from /etc/openvpn/pki/7e41ac10/temp.6.1
Check that the request matches the signature
Signature ok
The Subject's Distinguished Name is as follows
commonName            :ASN.1 12:'client01'
Certificate is to be certified until Aug 14 13:09:38 2030 GMT (1825 days)

Write out database with 1 new entries
Database updated

Notice
------
Inline file created:
* /etc/openvpn/pki/inline/private/client01.inline


Notice
------
Certificate created at:
* /etc/openvpn/pki/issued/client01.crt
After running the above command, the client01 certificate and private key will be generated in the following locations:
| Client | Certificate Path | Private Key Path |
|---|---|---|
| client01 | /etc/openvpn/pki/issued/client01.crt |
/etc/openvpn/pki/private/client01.key |
- To generate 10 client certificates and private keys (client01 to client10) in a single command:
root@host:~# for i in $(seq -w 1 10);do /usr/share/easy-rsa/easyrsa build-client-full client"$i" nopass; doneOpenVPN Server Configuration – server.conf
- Create and edit the OpenVPN server configuration file at
/etc/openvpn/server.conf:
port 1194
proto udp
dev tun

ca /etc/openvpn/pki/ca.crt
cert /etc/openvpn/pki/issued/server.crt
key /etc/openvpn/pki/private/server.key # the server.key private key must be kept secret
dh /etc/openvpn/pki/dh.pem

# internal tun0 connection IP
server 10.50.8.0 255.255.255.0

ifconfig-pool-persist ipp.txt

keepalive 10 120

# Compression - must now be turned off for security reasonfor security reasons.
# Use compress stub-v2 if needed in place
#comp-lzo

persist-key
persist-tun

# parameters to be adjusted according to your network configuration
push "dhcp-option DNS 192.168.0.200"
push "dhcp-option DOMAIN std.local"
push "route 192.168.0.0 255.255.255.0"

status /var/log/openvpn-status.log

# verbose mode
verb 3
Manage the OpenVPN Server Service with Systemd
- Enable the OpenVPN server service so that it starts automatically at boot:
root@host:~# systemctl enable openvpn@server.service- Restart the OpenVPN server service to apply the changes:
root@host:~# systemctl restart openvpn@server.serviceGateway Mode
Gateway mode allows VPN clients to access the 192.168.0.0/24 internal network from the client side.
Configuring nftables
A few netfilter rules will allow VPN clients to access the entire network through the VPN tunnel.
Identify Network Interfaces
- List all network interfaces on the server and identify the one connected to the local network (LAN):
root@host:~# ip addr sh
1: lo: <LOOPBACK,UP,LOWER_UP> mtu 65536 qdisc noqueue state UNKNOWN group default qlen 1000
    link/loopback 00:00:00:00:00:00 brd 00:00:00:00:00:00
    inet 127.0.0.1/8 scope host lo
       valid_lft forever preferred_lft forever
    inet6 ::1/128 scope host
       valid_lft forever preferred_lft forever
2: ens192: <BROADCAST,MULTICAST,UP,LOWER_UP> mtu 1500 qdisc mq state UP group default qlen 1000
    link/ether 01:02:a0:21:fd:54 brd ff:ff:ff:ff:ff:ff
    inet OPENVPN_IP brd X.X.X.X scope global wan
       valid_lft forever preferred_lft forever
    inet6 fe80::ff:fe5d:f333/64 scope link
       valid_lft forever preferred_lft forever
3: enp2s0: <BROADCAST,MULTICAST,UP,LOWER_UP> mtu 1500 qdisc mq state UP group default qlen 1000
    link/ether 11:a2:a9:21:fd:54 brd ff:ff:ff:ff:ff:ff
    inet 192.168.0.254 brd X.X.X.X scope global wan
       valid_lft forever preferred_lft forever
    inet6 fe80::6a05:caff:fe39:c153/64 scope link
       valid_lft forever preferred_lft forever
4: tun0: <POINTOPOINT,MULTICAST,NOARP,UP,LOWER_UP> mtu 1500 qdisc pfifo_fast state UNKNOWN group default qlen 500
    link/none
    inet 10.50.8.1 peer 10.50.8.2/32 scope global tun0
       valid_lft forever preferred_lft forever
    inet6 fe80::7ea2:577f:e834:7a20/64 scope link stable-privacy
       valid_lft forever preferred_lft forever
Temporary Rules
- Add
masqueraderules to make the internal network accessible to Windows VPN clients:
root@host:~# nft add table ip NATroot@host:~# nft add chain ip NAT my_masquerade '{ type nat hook postrouting priority 100; }'root@host:~# nft add rule NAT my_masquerade ip saddr { 10.50.8.0/24 } oifname enp2s0 masqueradePersistent Rules
- To make the
natconfiguration persistent, edit the/etc/nftables.conffile:
#!/usr/sbin/nft -f

flush ruleset

table inet filter {
        chain input {
                type filter hook input priority 0;
        }
        chain forward {
                type filter hook forward priority 0;
        }
        chain output {
                type filter hook output priority 0;
        }
}
table ip NAT {
        chain my_masquerade {
                type nat hook postrouting priority 100; policy accept;
                ip saddr { 10.50.8.0/24 } oifname "enp2s0" masquerade comment "outgoing NAT"
        }
}- Enable the
nftablesservice so that it starts automatically at boot:
root@host:~# systemctl enable nftables.serviceEnable IP Forwarding for Gateway Mode
- Create a
/etc/sysctl.d/99-ipforward.conffile and add the following line:
net.ipv4.ip_forward=1- Apply the change immediately with the following command:
root@host:~# sysctl -p /etc/sysctl.d/99-ipforward.confOpenVPN with a Single Network Interface (Not Default Gateway)
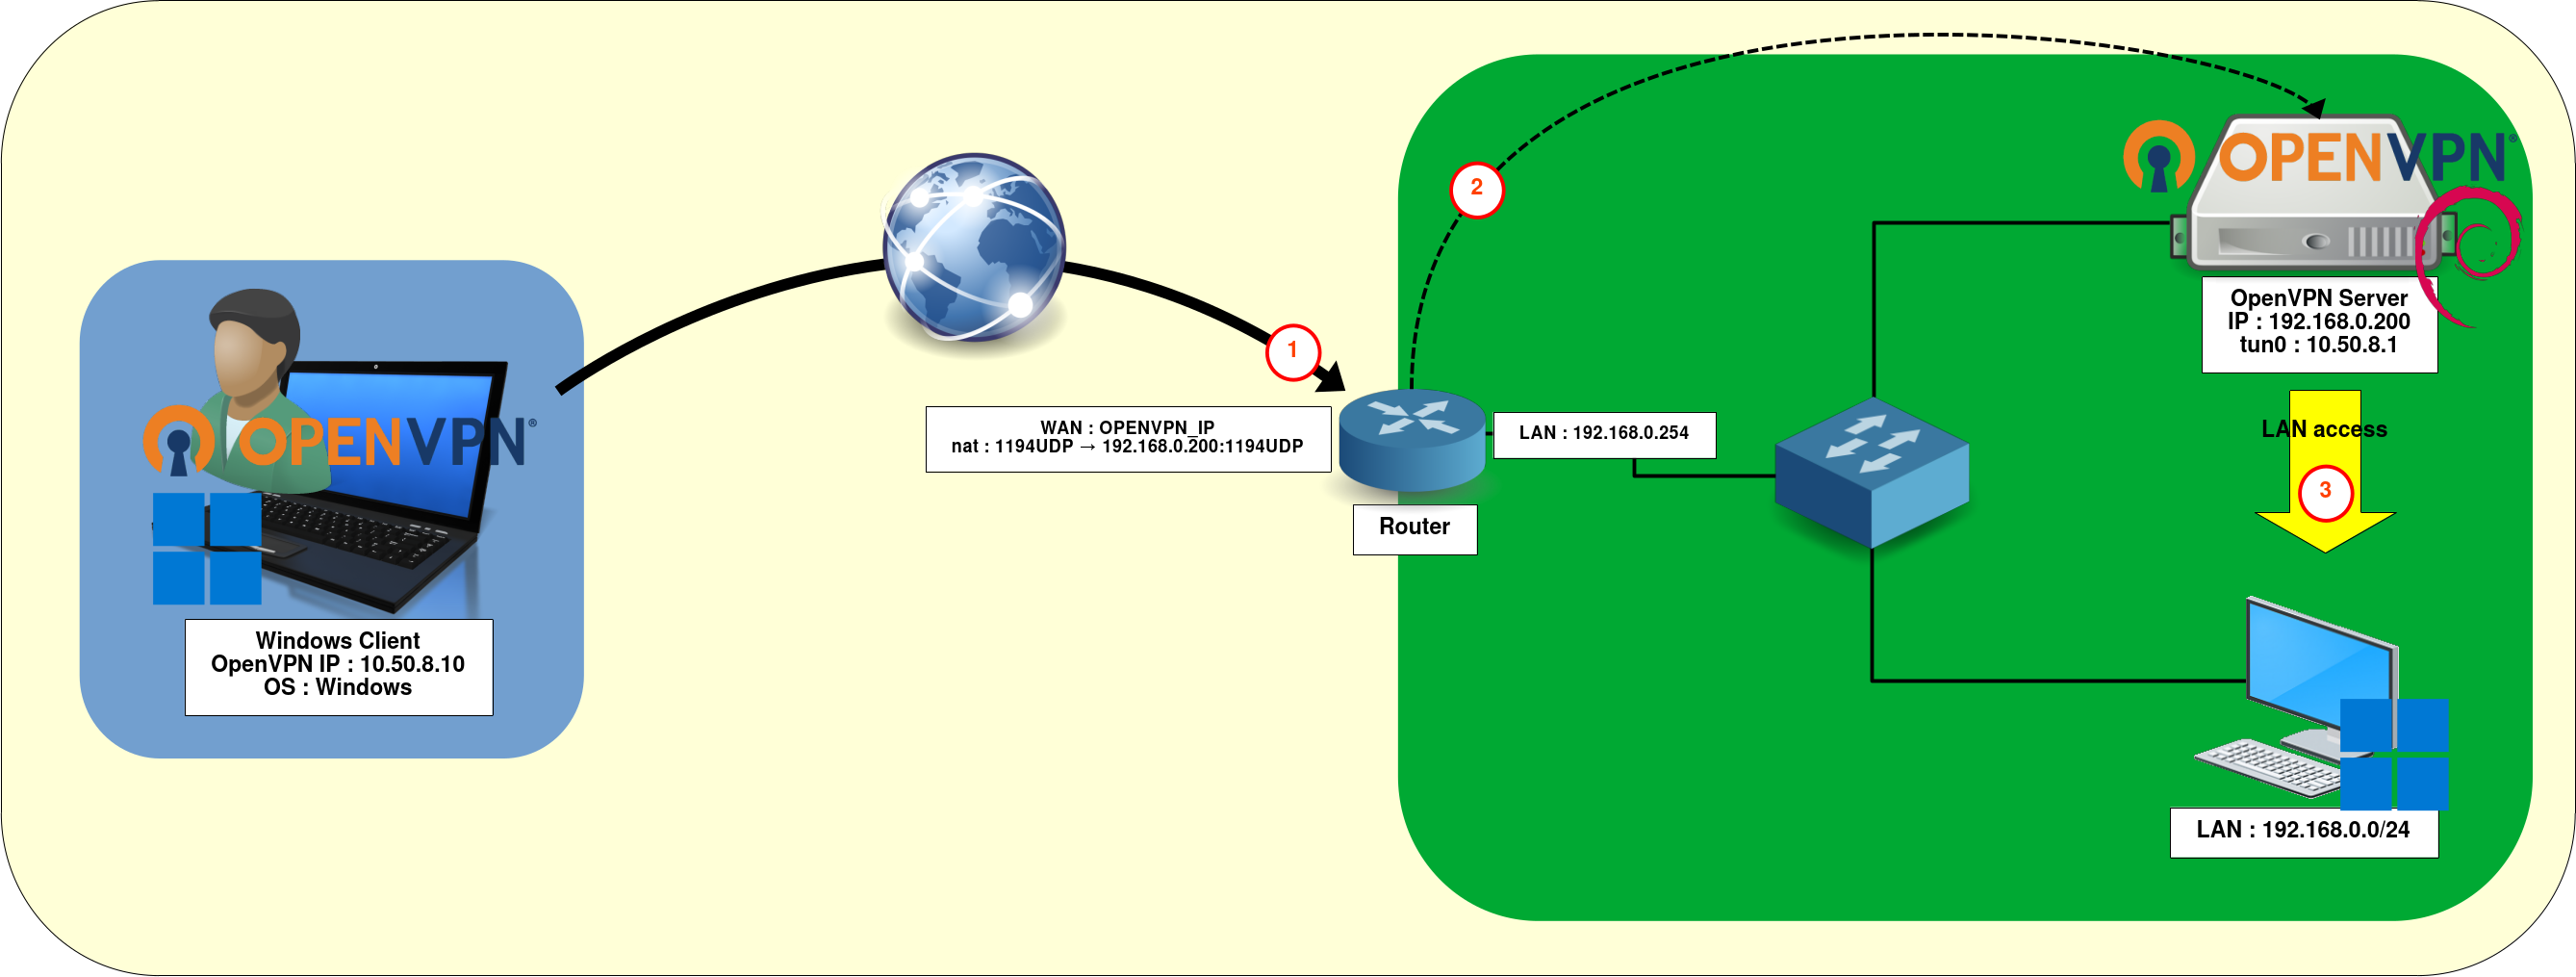
Sometimes it’s not possible to install OpenVPN directly on the router. In such cases, you can set up the OpenVPN server as a virtual machine or deploy it on a dedicated server within the internal LAN.
Create a port forwarding rule on the WAN router to redirect OpenVPN traffic (step 1 in the diagram) to the OpenVPN server (step 2).
The rest of the configuration remains the same: enable gateway mode and create a NAT rule so that the client can reach the entire LAN 192.168.0.0/24 (step 3).
In short, apply the same rules as described earlier.
Windows Client Configuration

First, download and install the OpenVPN Community Edition for Windows from the official website: OpenVPN Community Edition for Windows.
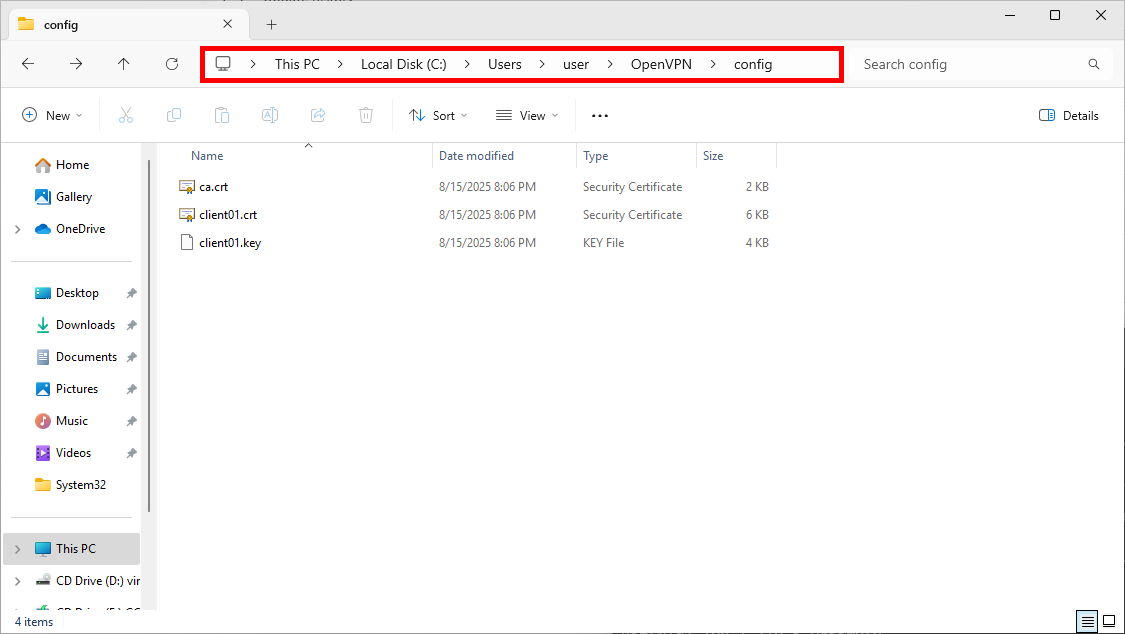
- Copy the following files from the Debian server to the Windows client:
ca.crt—/etc/openvpn/pki/ca.crtclient01.crt—/etc/openvpn/pki/issued/client01.crtclient01.key—/etc/openvpn/pki/private/client01.key
C:\Program Files\OpenVPN\configC:\Users\user\OpenVPN\config\(recommended)
- After copying, you should see the following client files on your Windows machine:
- Create the file
client.ovpnin the same directory as the above files:
client

dev tun

proto udp

remote OPENVPN_IP 1194

resolv-retry infinite
nobind
persist-key
persist-tun

ca ca.crt
cert client01.crt
key client01.key

# disabled for security, use compress stub-v2 if needed in place
#comp-lzo

verb 3- Open OpenVPN and click on connect:
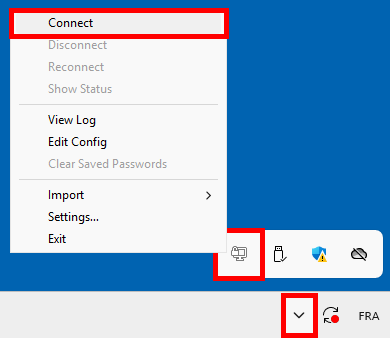
- If OpenVPN is launched for the first time by a user without administrator rights, this pop-up window will appear. Click Yes and enter the administrator credentials to add the current user to the OpenVPN Administrators group:

- This confirmation pop-up should appear, and the OpenVPN icon will turn green, indicating that you are successfully connected to the server.