Setup SSH Two-Factor Authentication (2FA/MFA) on Debian 13
- Last updated: Aug 17, 2025

In this article, I will explain how to implement MFA/2FA for SSH connections on Debian 13. MFA/2FA provides an additional layer of security beyond the traditional password. When connecting to a remote host secured with MFA/2FA, you will first be asked to enter a 6-digit code, followed by your usual password.
This verification code is generated using a shared secret (between the device and the server), the current time (which is why both server and device must have synchronized clocks), and a hash algorithm. This mechanism follows the TOTP standard (Time-based One-Time Password).
It is important to understand that this method does not rely on any third-party provider: the server does not need an internet connection to contact Google or any other external service.
SSH Server
The goal is to secure SSH logins (instead of relying solely on a password) by requiring users to provide a One-Time Password (OTP).
Configuring libpam-google-authenticator
- Install the
libpam-google-authenticatorpackage, which implements one-time passcodes for mobile platforms, as well as a Pluggable Authentication Module (PAM):
root@debian:~# apt update && apt install libpam-google-authenticator- Once
libpam-google-authenticatoris installed, switch to the user account(s) for which you want to enable MFA/2FA. For example, here we switch to the john user:
root@debian:~# su - john- Run the
google-authenticatorcommand to generate your secret key and set up the OTP configuration:
john@debian:~$ google-authenticator

Do you want authentication tokens to be time-based (y/n) y- Scan the generated QR code with a OTP application on your telephone, for example FreeOTP or Proton Pass:

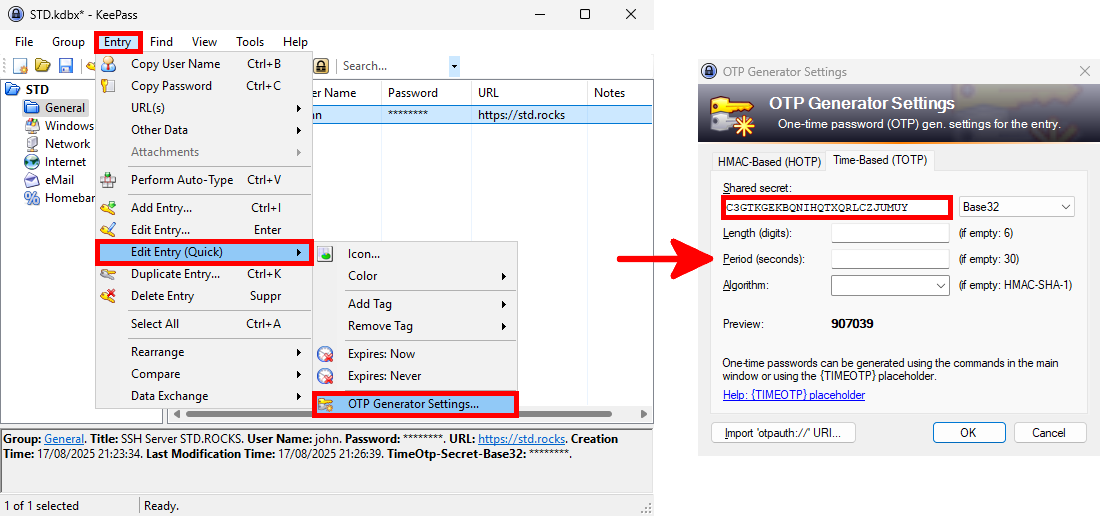
- Copy the secret key (useful for KeePass, see below) and enter the code generated by your authentication app — here 907039 — then press Enter:
Your new secret key is: C3GTKGEKBQNIHQTXQRLCZJUMUY
Enter code from app (-1 to skip): 907039- I also recommend configuring a password manager like KeePass, which is natively OTP-compatible, as a backup in case you lose your mobile phone:
- Once the OTP code is confirmed, copy the emergency scratch codes to a safe place (for example in your KeePass — yes, I insist! 😜). Then answer the security questions according to your needs (press
yif unsure):
Code confirmed
Your emergency scratch codes are:
  37376676
  48157307
  91160405
  59889865
  38533612

Do you want me to update your "/home/john/.google_authenticator" file? (y/n) y

Do you want to disallow multiple uses of the same authentication
token? This restricts you to one login about every 30s, but it increases
your chances to notice or even prevent man-in-the-middle attacks (y/n) y

By default, a new token is generated every 30 seconds by the mobile app.
In order to compensate for possible time-skew between the client and the server,
we allow an extra token before and after the current time. This allows for a
time skew of up to 30 seconds between authentication server and client. If you
experience problems with poor time synchronization, you can increase the window
from its default size of 3 permitted codes (one previous code, the current
code, the next code) to 17 permitted codes (the 8 previous codes, the current
code, and the 8 next codes). This will permit for a time skew of up to 4 minutes
between client and server.
Do you want to do so? (y/n) y

If the computer that you are logging into isn't hardened against brute-force
login attempts, you can enable rate-limiting for the authentication module.
By default, this limits attackers to no more than 3 login attempts every 30s.
Do you want to enable rate-limiting? (y/n) y
Editing /etc/pam.d/sshd
- Edit
/etc/pam.d/sshdand add the lineauth required pam_google_authenticator.so nullokat the top of the file.auth: indicates that this line applies to the authentication phaserequired: means the check is mandatory; authentication will fail if it does not succeedpam_google_authenticator.so: the PAM module that enables TOTPnullok: if the file~/.google_authenticatordoes not exist, TOTP is skipped. Remove this option if you want to enforce TOTP for all connections.
# PAM configuration for the Secure Shell service
auth       required     pam_google_authenticator.so nullok
# Standard Unix authentication.
@include common-auth
Editing /etc/ssh/sshd_config
- Edit
/etc/ssh/sshd_configand make the following changes:- Add
ChallengeResponseAuthentication yes - Ensure
KbdInteractiveAuthenticationis set toyes
- Add
# Add this line:
ChallengeResponseAuthentication yes
# Modify this line:
KbdInteractiveAuthentication yes- Finally, restart the
sshdservice to apply the changes:
root@debian:~# systemctl restart sshdSSH Client
- Now, using one of your configured OTP applications, try connecting to your server from a remote host. First, enter the current OTP generated by your app, then provide your account password:
[user@arch ~]$ ssh -l john 192.168.1.10
(john@192.168.1.10) Verification code:
(john@192.168.1.10) Password: