How to Virtualize Windows 11 with QEMU and USB Device Support
- Last updated: May 7, 2025
I've previously discussed how to set up a Windows virtual machine on an Arch Linux host to enable the use of a USB peripheral (specifically, the Canon CanoScan 4400F scanner). That article focused on Windows 10, which is now reaching its end of support. As a result, it's an opportune time to update that guide for Windows 11. Given that this newer version of Windows introduces significant changes—such as requirements for TPM, Secure Boot, specific CPU, and UEFI boot-several key aspects of the setup need to be reconsidered and adjusted accordingly.
QEMU Architecture
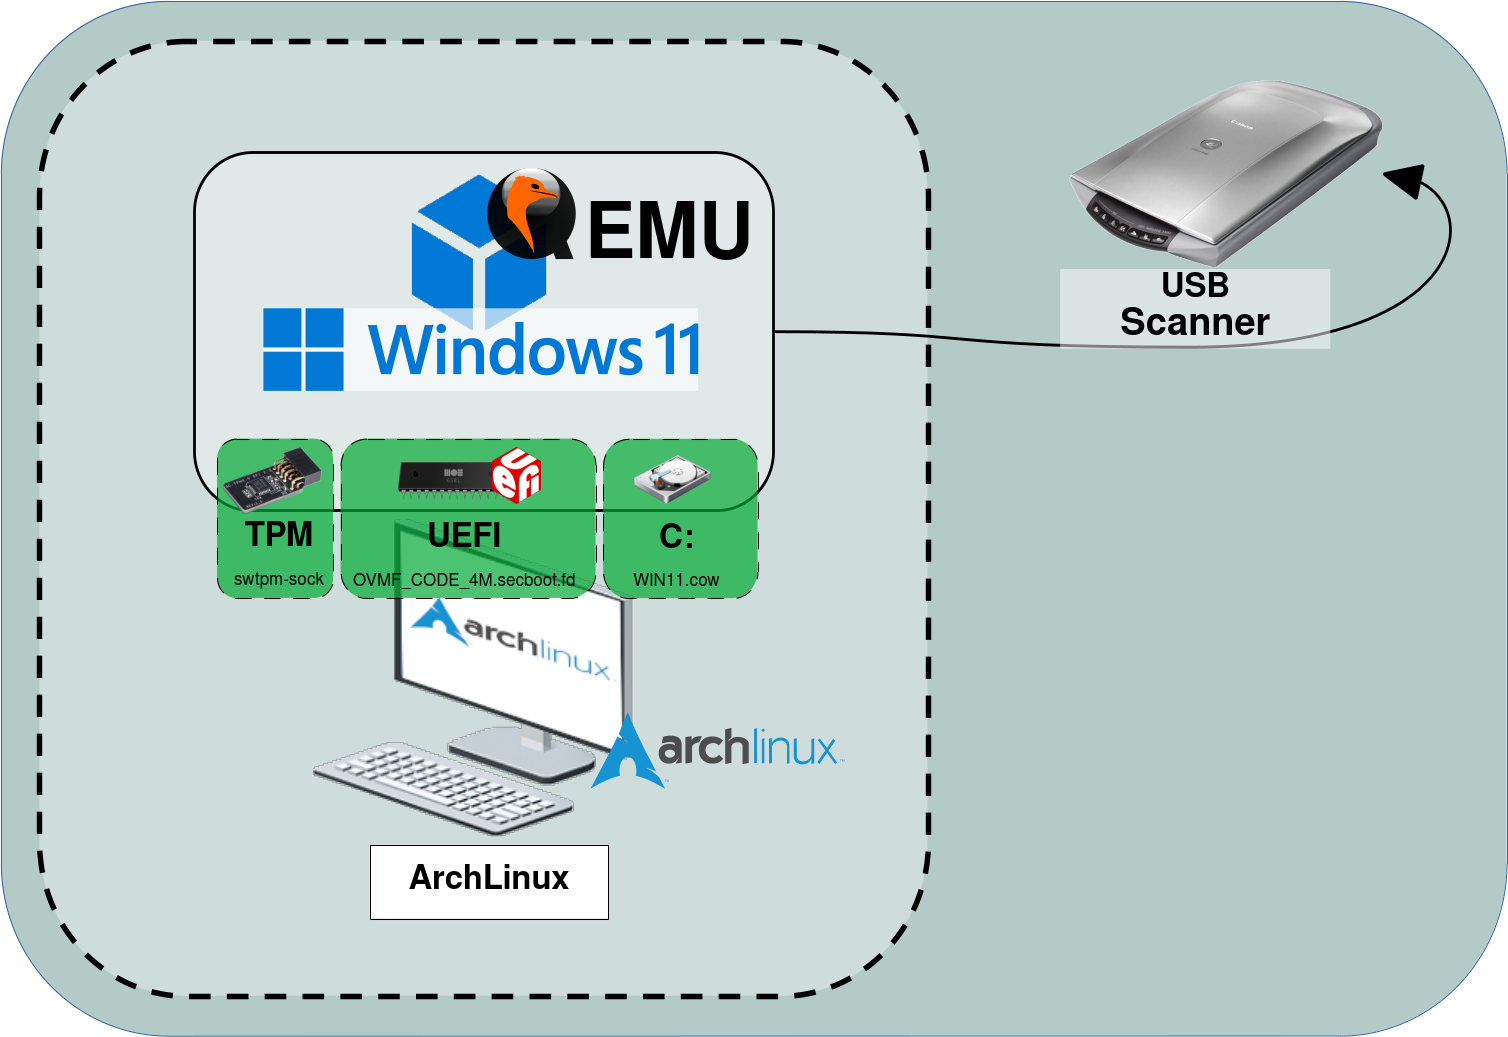
As mentioned in the introduction, this guide demonstrates how to virtualize a Windows 11 operating system. To achieve this, both TPM and UEFI need to be emulated. The system will be installed on a WIN11.cow virtual disk, and a USB scanner is connected to the Arch Linux host.
USB Device
To use the USB device, we first need to identify it and then assign the correct permissions. Specifically, we must ensure the current user is authorized to interact with it.
- Install the
cymetool, which is an alternative tolsusb:
[root@host ~]# pacman -S cyme- List the USB devices and take note of the Bus and Device IDs:
[user@host ~]$ cyme -l | grep -i Canon
Bus 003 Device 002: ID 04a9:2228 Canon, Inc. CanoScan 4400F- As we can see, it is owned by
root:
[user@host ~]$ ls -l /dev/bus/usb/003/002
crw-rw-r--+ 1 root root 189, 257  4 mai   18:49 /dev/bus/usb/003/002
Temporary Solution
A temporary solution is to change the device owner manually from a root prompt. This change must be repeated after every reboot.
- Change the owner to your current user:
[root@host ~]# chown user:user /dev/bus/usb/003/002Permanent Solution
To make the change persistent, we will create a udev rule that automatically assigns the user as the device owner.
- First, retrieve the main device attributes:
root@host:~# udevadm info --attribute-walk --path=$(udevadm info --query=path --name=/dev/bus/usb/003/002)
Udevadm info starts with the device specified by the devpath and then
walks up the chain of parent devices. It prints for every device
found, all possible attributes in the udev rules key format.
A rule to match, can be composed by the attributes of the device
and the attributes from one single parent device.

  looking at device '/devices/pci0000:00/0000:00:14.0/usb3/3-1':
    KERNEL=="3-10"
    SUBSYSTEM=="usb"
[…]
    ATTR{idProduct}=="2228"
    ATTR{idVendor}=="04a9"
[…]
Once the device attributes have been identified, we can create the corresponding udev rule.
- Create and edit the file
/etc/udev/rules.d/80-scanner.rules:
SUBSYSTEM=="usb", ATTR{idVendor}=="04a9", ATTR{idProduct}=="2228", OWNER="user", GROUP="user"- Reload the udev rules to apply the changes:
[root@host ~]# udevadm control --reload- Verify that the udev rules are correctly applied:
[root@host ~]# udevadm test $(udevadm info --query=path --name=/dev/bus/usb/003/002) | less
[…]
Reading rules file: /etc/udev/rules.d/80-scanner.rules
[…]- Finally, verify that the permissions have been correctly applied:
[user@host ~]$ ls -l /dev/bus/usb/003/002
crw-rw-r-- 1 user user 189, 129 31 oct.  09:20 /dev/bus/usb/003/002
QEMU
Initial Setup
Packages
- Install the QEMU packages, along with the UEFI and TPM tools:
[root@host ~]# pacman -S qemu-full qemu-hw-usb-host edk2-ovmf swtpm wgetVirtual Disk
- Create the virtual disk (add the
-o nocow=onoption if using a Btrfs file system):
[user@host ~]$ qemu-img create -f qcow2 WIN11.cow 80G
Formatting 'WIN11.cow', fmt=qcow2 cluster_size=65536 extended_l2=off compression_type=zlib size=85899345920 lazy_refcounts=off refcount_bits=16- If needed, you can resize the virtual disk image:
[user@host ~]$ qemu-img resize WIN11.cow +10GVirtIO
VirtIO is a virtualization standard for network and disk device drivers where just the guest's device driver "knows" it is running in a virtual environment, and cooperates with the hypervisor. This enables guests to get high performance network and disk operations, and gives most of the performance benefits of paravirtualization. (source: https://wiki.libvirt.org/Virtio.html).
[user@host ~]$ wget "https://fedorapeople.org/groups/virt/virtio-win/direct-downloads/stable-virtio/virtio-win.iso"Secure Boot
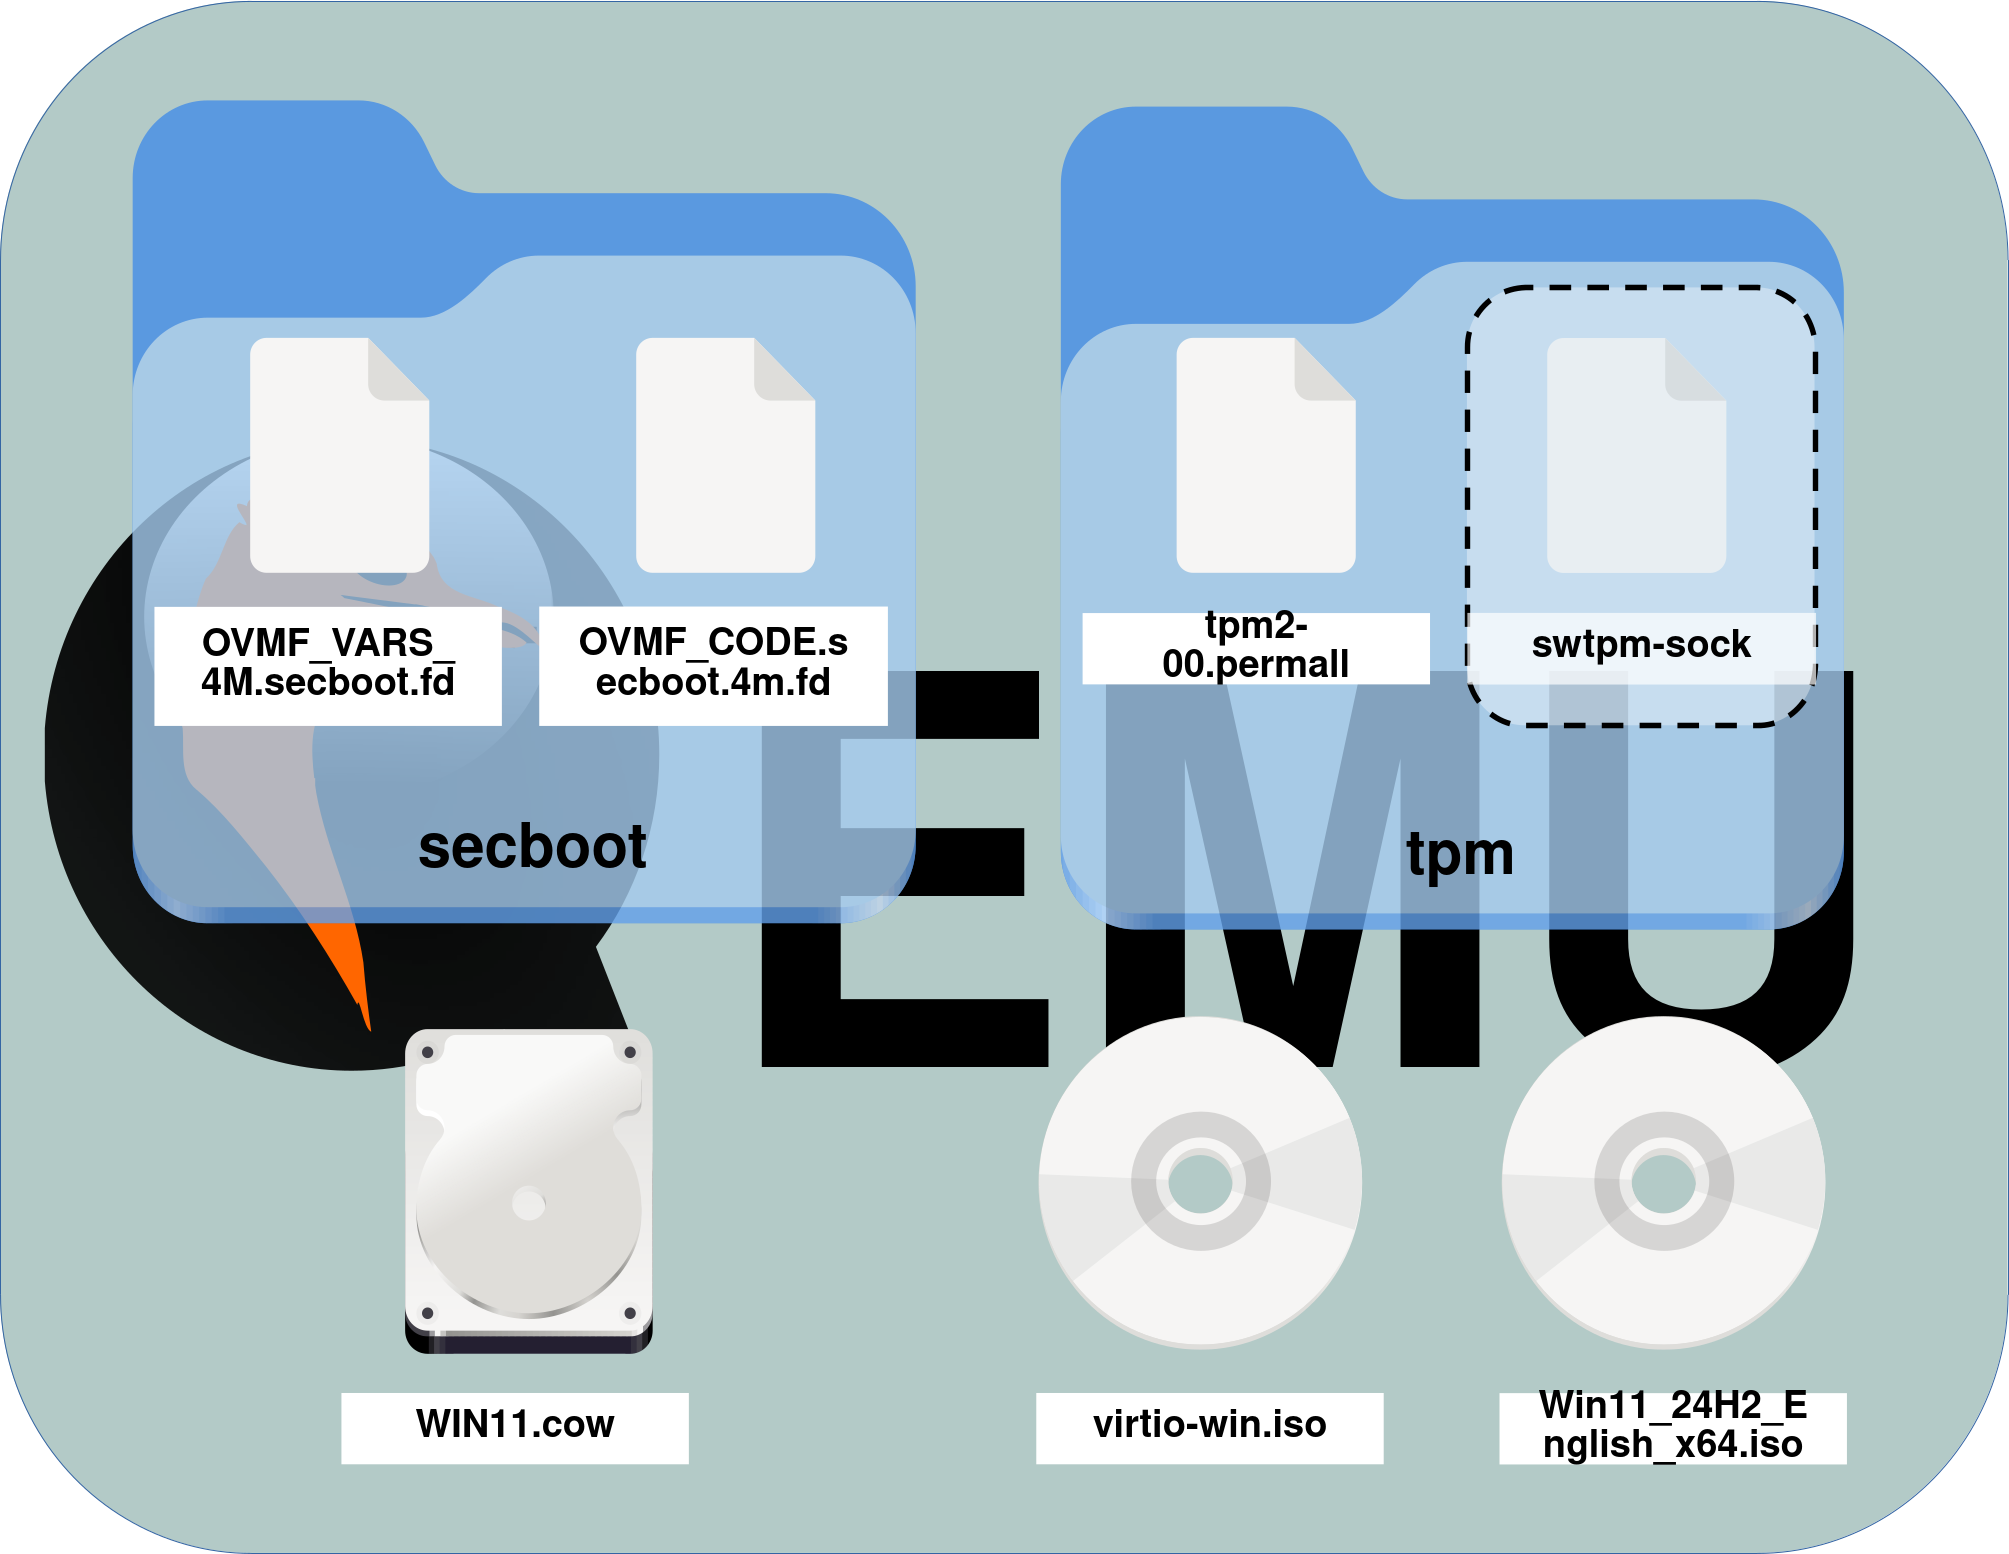
Since Arch does not currently provide its own OVMF_VARS.secboot.4m.fd file with pre-enrolled keys, we need to obtain it from a distribution that does—such as Fedora. To do this, download the appropriate RPM package and extract the OVMF_VARS.secboot.4m.fd file from it.
- Create a directory to store the Secure Boot files:
[user@host ~]$ mkdir secboot- Install the necessary RPM extraction tools:
[root@host ~]# pacman -S rpmextract- Download a recent edk2-ovmf RPM package (see: https://koji.fedoraproject.org/):
[user@host ~]$ wget "https://kojipkgs.fedoraproject.org/packages/edk2/20241117/5.fc42/noarch/edk2-ovmf-20241117-5.fc42.noarch.rpm"- Extract the contents of the RPM package:
[user@host ~]$ rpmextract.sh edk2-ovmf-20241117-5.fc42.noarch.rpm- Convert the extracted
OVMF_VARS_4M.secboot.qcow2file toOVMF_VARS_4M.secboot.fdformat:
[user@host ~]$ qemu-img convert -O raw -f qcow2 usr/share/edk2/ovmf/OVMF_VARS_4M.secboot.qcow2 OVMF_VARS_4M.secboot.fd- Finally, copy the
OVMF_CODE.secboot.4m.fdandOVMF_VARS_4M.secboot.fdfiles from the edk2-ovmf package into the secboot directory:
[user@host ~]$ cp /usr/share/edk2/x64/OVMF_CODE.secboot.4m.fd ./secboot[user@host ~]$ cp OVMF_VARS_4M.secboot.fd ./secbootTPM
We will later use the swtpm command to create a UNIX socket that QEMU will connect to.
- Create a directory to store the TPM data:
[user@host ~]$ mkdir tpmDirectory Organization
Organize all downloaded or created files in a clear structure.
- I personally chose the following organization:
secbootdirectory: contains theOVMF_VARS_4M.secboot.fdandOVMF_CODE.secboot.4m.fdfilestpmdirectory: containsswtpm-sock(created when running theswtpm socketcommand)WIN11.cow: the virtual disk imagevirtio-win.iso: the VirtIO driver ISO
Windows 11 Installation
We are now ready to launch the virtual machine and begin the installation of Windows 11.
- Run the following command to create the UNIX socket:
[user@host ~]$ swtpm socket --tpm2 --tpmstate dir=./tpm --ctrl type=unixio,path=./tpm/swtpm-sock- From another terminal, verify that the following files are present in the tpm directory:
[user@host ~]$ ls tpm/
swtpm-sock tpm2-00.permall- Run the following command from your main QEMU directory using these parameters:
-machine q35: required for Secure Boot-m 8192: allocates 8 GB of RAM to the VM-smp cores=4: assigns 4 virtual CPU cores-boot order=d: boots from the CD-ROM drive
[user@host ~]$ qemu-system-x86_64 -machine q35 -m 8192 \
-cpu host -enable-kvm -smp cores=4 \
-net nic,model=virtio-net-pci,macaddr=52:54:00:12:34:56 -net user,id=mynet0,net=192.168.76.0/24,dhcpstart=192.168.76.9 \
-cdrom ./Win11_24H2_English_x64.iso \
-drive file=./virtio-win.iso,media=cdrom,index=3 \
-boot order=d \
-drive file=./WIN11.cow,index=0,media=disk,if=virtio,format=qcow2 \
-chardev socket,id=chrtpm,path=./tpm/swtpm-sock -tpmdev emulator,id=tpm0,chardev=chrtpm -device tpm-tis,tpmdev=tpm0 \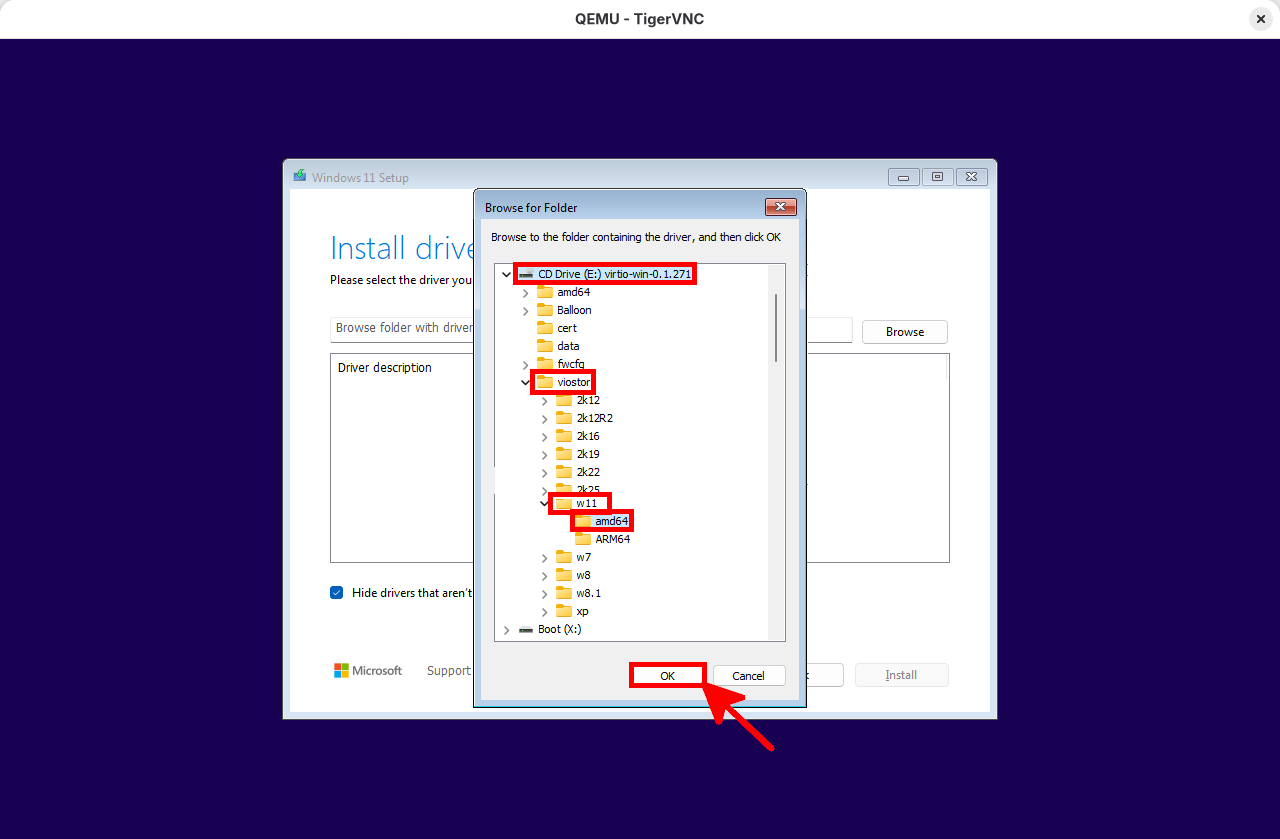
-drive if=pflash,format=raw,readonly=on,file=./secboot/OVMF_CODE.secboot.4m.fd -drive if=pflash,format=raw,file=./secboot/OVMF_VARS_4M.secboot.fd- At the disk selection stage, you must load the VirtIO storage drivers manually:
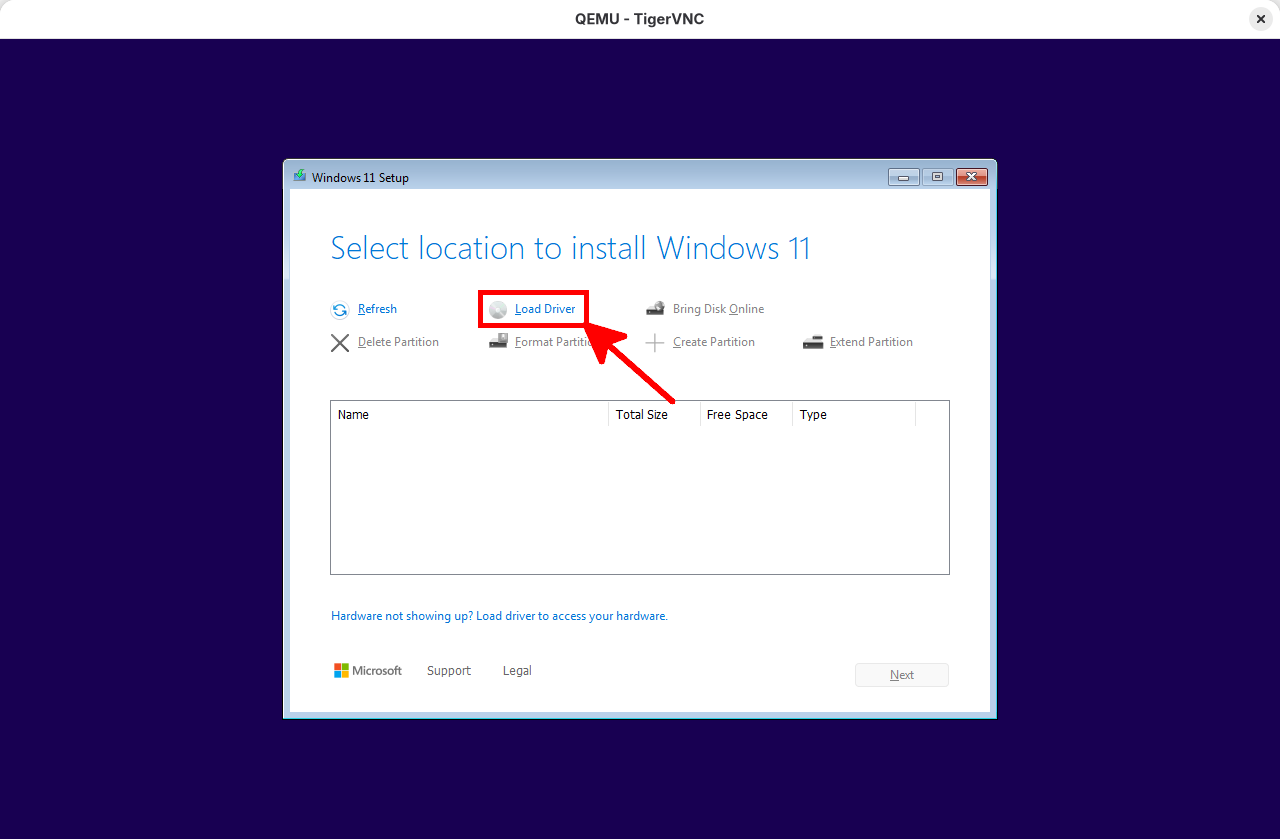
- Navigate to viostor > w11, select the amd64 directory, and click OK:
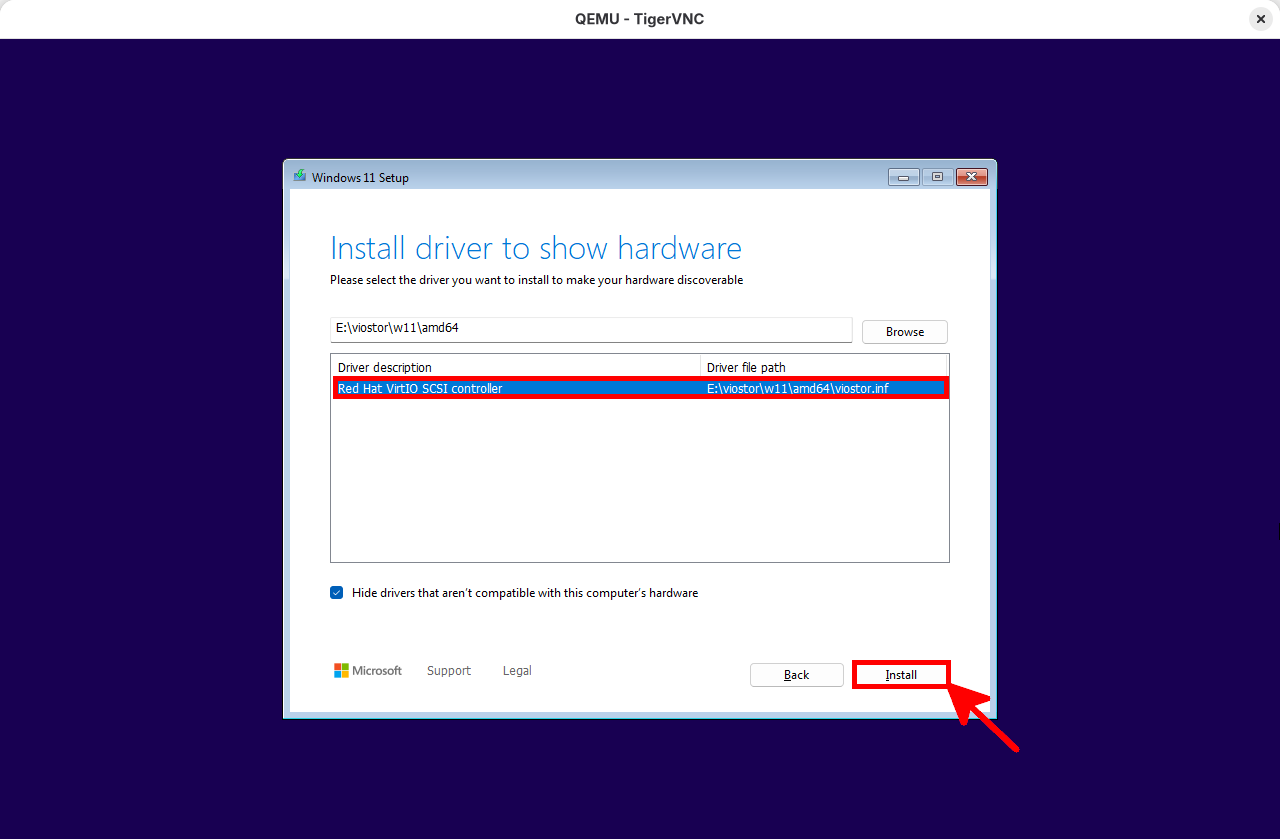
- Select the VirtIO driver and click Install:
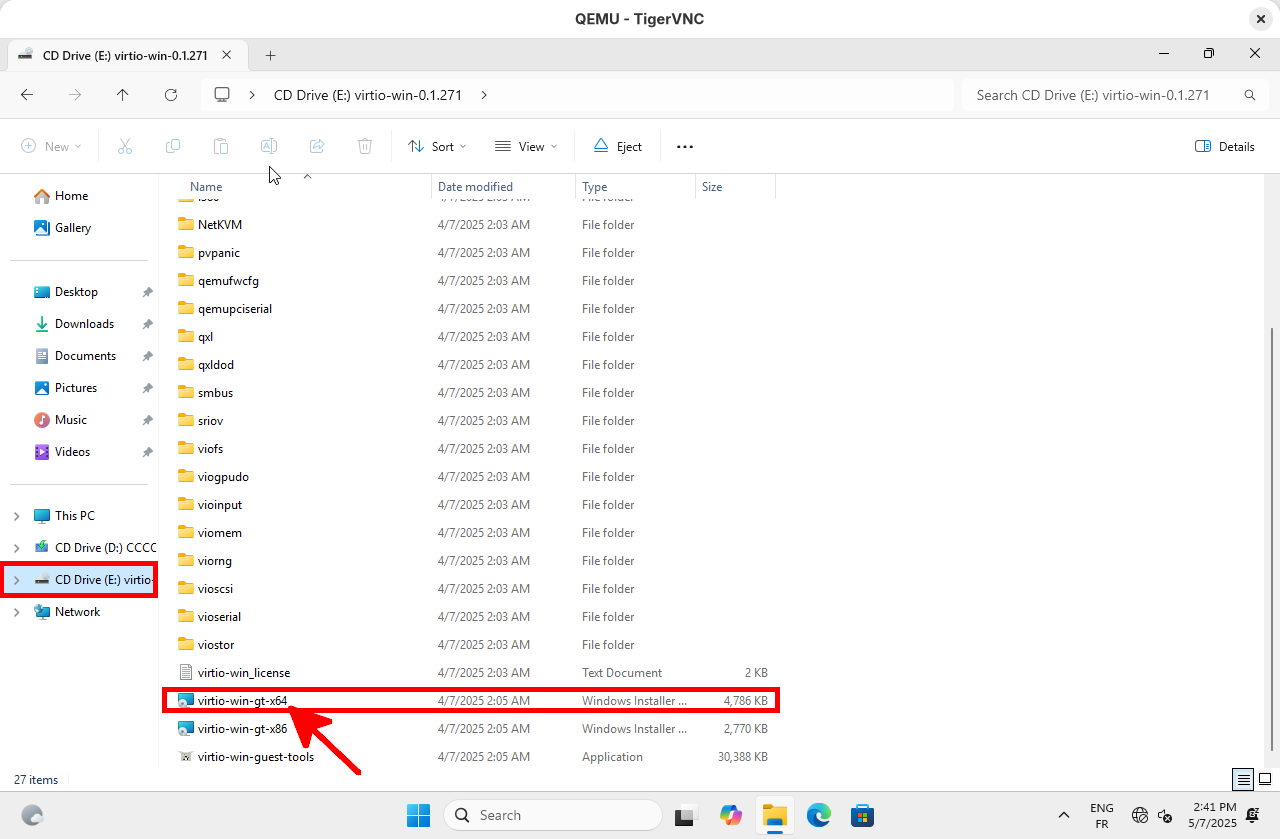
- Once Windows 11 is installed, proceed to install the VirtIO drivers:
Post-Installation
- Once Windows 11 is installed, you no longer need the installation media or the VirtIO ISO. You can also:
- Enable RDP redirection to allow remote connections via RDP using:
hostfwd=tcp::5555-:3389 - Add
-boot order=cto boot directly from the virtual hard drive - Enable USB pass-through for a host device using:
-device usb-host,hostdevice=/dev/bus/usb/003/002
- Enable RDP redirection to allow remote connections via RDP using:
[user@host ~]$ qemu-system-x86_64 -machine q35 -m 8192 \
-cpu host -enable-kvm -smp cores=4 \
-net nic,model=virtio-net-pci,macaddr=52:54:00:12:34:56 -net user,id=mynet0,net=192.168.76.0/24,dhcpstart=192.168.76.9,hostfwd=tcp::5555-:3389 \
-boot order=c \
-drive file=./WIN11.cow,index=0,media=disk,if=virtio,format=qcow2 \
-chardev socket,id=chrtpm,path=./tpm/swtpm-sock -tpmdev emulator,id=tpm0,chardev=chrtpm -device tpm-tis,tpmdev=tpm0 \
-drive if=pflash,format=raw,readonly=on,file=./secboot/OVMF_CODE.secboot.4m.fd -drive if=pflash,format=raw,file=./secboot/OVMF_VARS_4M.secboot.fd \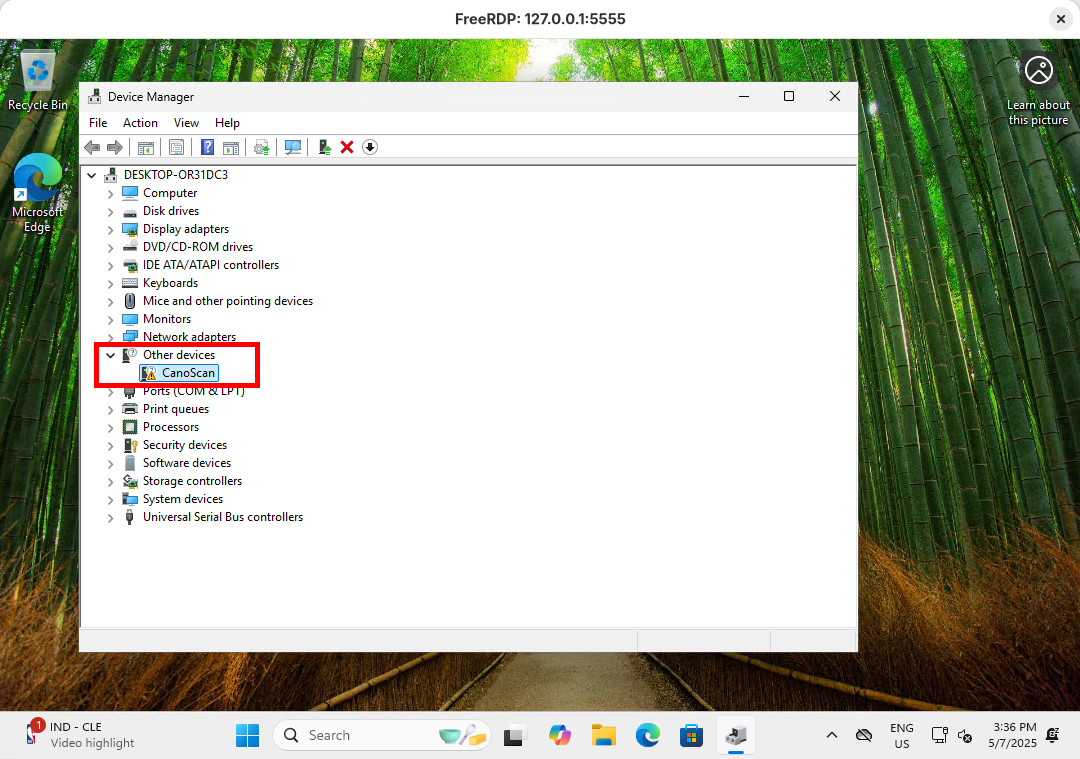
-device qemu-xhci,id=xhci -device usb-host,hostdevice=/dev/bus/usb/003/002- You can then connect to the virtual machine via RDP and verify the presence of the USB device:
[user@host ~]$ xfreerdp3 /v:127.0.0.1:5555 /w:1080 /h:720 /u:"USER" /p:"PASSWORD" /cert:ignore