How to Set Up WireGuard VPN on Debian 12/13 (Bookworm & Trixie)
- Last updated: Dec 30, 2025

Introduction
- WireGuard is a modern and highly efficient VPN solution, known for its:
- Excellent performance
- Robust security, thanks to a minimal attack surface and sound cryptographic design
- Ease of use and straightforward configuration
I previously worked with WireGuard VPN during the Debian 11 cycle. With the release of Debian 12 Bookworm and now Debian 13 Trixie, it’s the perfect time to revisit and improve that original tutorial.
This step-by-step guide will show you how to configure a Debian GNU/Linux server (12/13) to act as a WireGuard VPN gateway, allowing remote Windows clients to securely connect and access a private LAN network.
Network Diagram
- WireGuard Server:
- OS: Debian GNU/Linux 12 (Bookworm) or 13 (Trixie)
- Role: VPN server and LAN gateway
- Windows Client:
- OS: Windows 11

Debian Server (Part I)

Installing
- Install the WireGuard package:
root@host:~# apt update && apt install wireguardNetwork Configuration
- Create the
/etc/network/interfaces.d/wg0file with the following content:
# Bring up the wg0 interface on boot
auto wg0

# Define the interface with a static IPv4 address
iface wg0 inet static

	# Static IP address for the VPN interface
        address 10.0.2.1/24

	# Create the interface before bringing it up
	pre-up ip link add $IFACE type wireguard

	# Apply configuration from the main WireGuard config file
	pre-up wg setconf $IFACE /etc/wireguard/$IFACE.conf

	# Remove the interface when it is brought down
	post-down ip link del $IFACE
Key Generation
- Navigate to the
/etc/wireguard/directory and set a restrictiveumaskto ensure that newly created key files are only accessible by the owner:
root@host:~# cd /etc/wireguard/
root@host:/etc/wireguard# umask 077- Generate the private key:
root@host:/etc/wireguard# wg genkey > wg-private.key- Generate the corresponding public key (e.g., for a Windows client):
root@host:/etc/wireguard# wg pubkey < wg-private.key > w11-client01.keyConfiguration
- Display the contents of the
wg-private.keyfile and copy the value:
root@host:~# cat wg-private.key
2GIURzIDBgI1Y+1Ei+i2C5kEOR53mH172MaidaVpD3M=- Create the
/etc/wireguard/wg0.conffile and insert the PrivateKey you generated earlier:
# define the WireGuard service
[Interface]

# contents of file wg-private.key that was recently created
PrivateKey = 2GIURzIDBgI1Y+1Ei+i2C5kEOR53mH172MaidaVpD3M=

# UDP service port; 51820 is a common choice for WireGuard
ListenPort = 51820- Restart the system to ensure all interface changes are applied properly:
root@host:~# rebootWindows (Client)

- Download the latest version of WireGuard for Windows from the official website: https://wireguard.com/install/, then install it using the setup wizard:

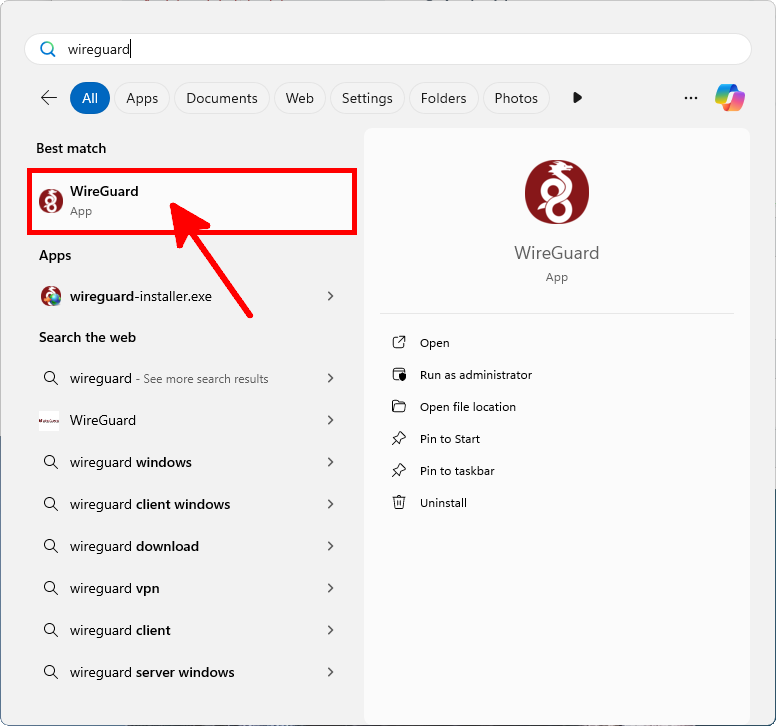
- Open the WireGuard VPN client by searching for "WireGuard" in the Windows Start menu:
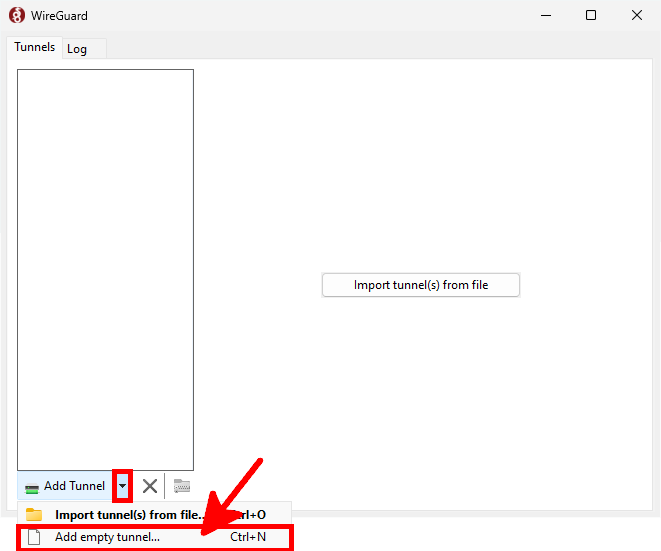
- Create a new tunnel profile manually in the WireGuard client:
- On the Debian server, retrieve the public key that was generated for the Windows client:
root@host:~# cat /etc/wireguard/w11-client01.key
hlKy6azGCB0uVbCdkW8Htx23k57iWzOFJRLAYHTx5wU=- Configure the WireGuard profile on the Windows client.
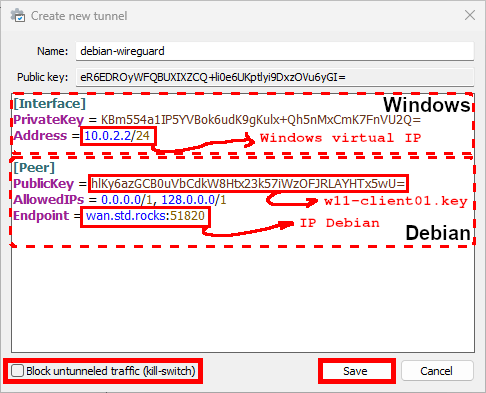
[Interface]
PrivateKey = CLIENT_PRIVATE_KEY
# CLIENT IP :
Address = 10.0.2.2/24
# IF YOU WANT TO PUSH DNS CONFIG :
# DNS = 192.168.11.1

[Peer]
PublicKey = hlKy6azGCB0uVbCdkW8Htx23k57iWzOFJRLAYHTx5wU=
# AllowedIPs = 0.0.0.0/0: routes all IPv4 traffic through the VPN
# It is possible to be more specific, for example:
# AllowedIPs = 10.0.2.0/24, 192.168.0.0/24
AllowedIPs = 0.0.0.0/0
Endpoint = SERVER_PUBLIC_IP:51820- Click on Activate in the WireGuard client to initiate the VPN connection:
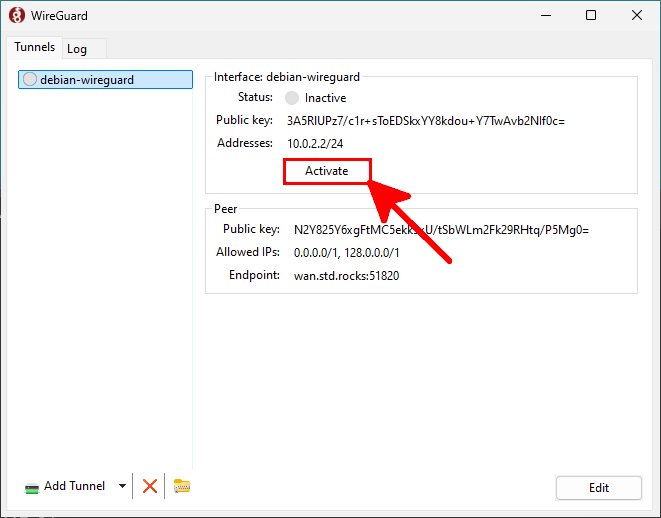
The VPN client is now ready. The server still needs additional configuration to accept and route the incoming connection.
Debian Server (Part II)
WireGuard
- Bring up the WireGuard interface:
root@host:~# ifup wg0- On the Windows 11 client, retrieve its public key from the WireGuard application interface:
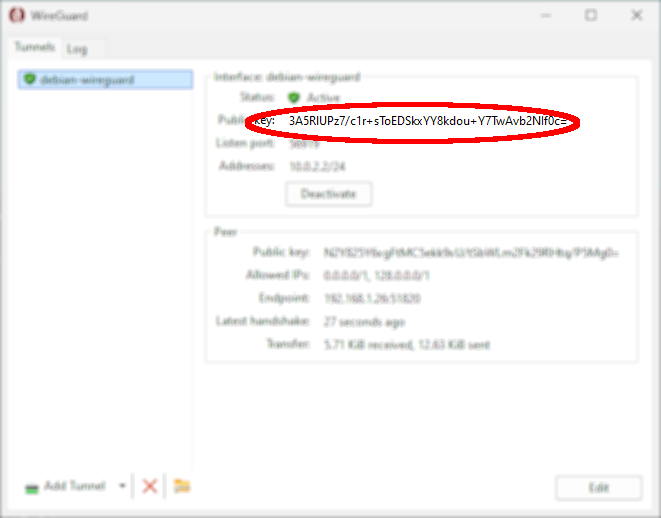
- On the Debian server, authorize the Windows client by adding its public key to the WireGuard interface:
root@host:~# wg set wg0 peer CLIENT_PUBLIC_KEY allowed-ips 0.0.0.0/0- From the Windows client, verify connectivity by pinging the
wg0interface IP of the Debian server (e.g.,10.0.2.1):
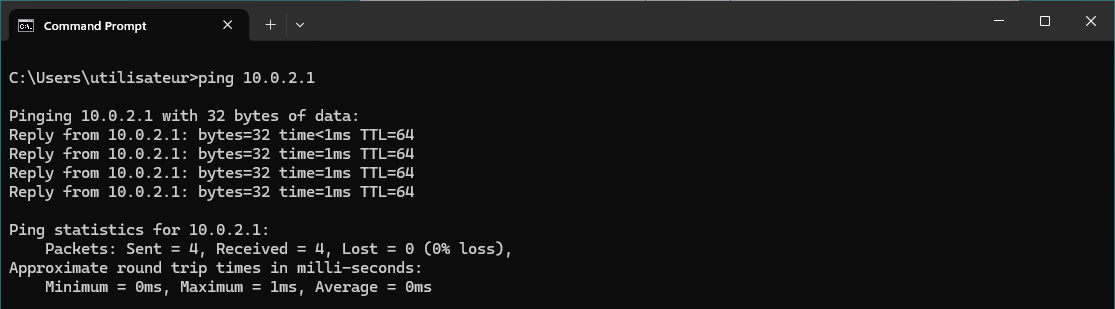
- On the Debian server, display the list of active peers and connection statistics:
root@host:~# wg show
interface: wg0
  public key: hlKy6azGCB0uVbCdkW8Htx23k57iWzOFJRLAYHTx5wU=
  private key: (hidden)
  listening port: 51820

peer: 3A5R|UPz7/c1r+sToEDSkxYY8kdou+Y7TwAvb2NIf0c=
  endpoint: WINDOWS_IP:52925
  allowed ips: 0.0.0.0/0
  latest handshake: 6 seconds ago
transfer: 453.44 KiB received, 411.87 KiB sent- To make the allowed peers persistent across reboots, edit the
/etc/network/interfaces.d/wg0file and append the following lines at the end:
 # indicate that wg0 should be created when the system boots, and on ifup -a
auto wg0

# describe wg0 as an IPv4 interface with static address
iface wg0 inet static

        # static IP address
        address 10.0.2.1/24

        # before ifup, create the device with this ip link command
        pre-up ip link add $IFACE type wireguard

        # before ifup, set the WireGuard config from earlier
        pre-up wg setconf $IFACE /etc/wireguard/$IFACE.conf

        # after ifdown, destroy the wg0 interface
        post-down ip link del $IFACE
        # allowed clients
	up wg set wg0 peer CLIENT01_PUBLIC_KEY allowed-ips 0.0.0.0/0
	up wg set wg0 peer CLIENT02_PUBLIC_KEY allowed-ips 0.0.0.0/0
Gateway Mode
At this stage, remote clients can successfully reach the Debian WireGuard server.
To allow them to access the full 192.168.0.0/24 internal network and communicate with other LAN devices,
you now need to enable gateway mode.
Enable IP Forwarding
- Create the
/etc/sysctl.d/99-ipforward.conffile to enable IPv4 forwarding at boot:
net.ipv4.ip_forward = 1- Apply the change immediately with the following command:
root@host:~# sysctl -p /etc/sysctl.d/99-ipforward.conf- Verify that IP forwarding is now active:
root@host:~# cat /proc/sys/net/ipv4/ip_forward
1
nftables NAT Rules
With IP forwarding enabled, the next step is to configure NAT so that traffic from the VPN subnet can be routed to the LAN.
- First, identify the name of your internal network interface (e.g.,
ens18in this example):
root@host:~# ip addr sh
1: lo: <LOOPBACK,UP,LOWER_UP> mtu 65536 qdisc noqueue state UNKNOWN group default qlen 1000
    link/loopback 00:00:00:00:00:00 brd 00:00:00:00:00:00
    inet 127.0.0.1/8 scope host lo
       valid_lft forever preferred_lft forever
    inet6 ::1/128 scope host noprefixroute
       valid_lft forever preferred_lft forever
2: ens18: <BROADCAST,MULTICAST,UP,LOWER_UP> mtu 1500 qdisc fq_codel state UP group default qlen 1000
    link/ether bc:24:12:48:bd:1a brd ff:ff:ff:ff:ff:ff
    altname enp0s18
    inet 192.168.0.200/24 brd 192.168.0.255 scope global ens18
       valid_lft forever preferred_lft forever
    inet6 fe80::be24:11ff:fe78:bd1a/64 scope link
       valid_lft forever preferred_lft forever
3: wg0: <POINTOPOINT,NOARP,UP,LOWER_UP> mtu 1420 qdisc noqueue state UNKNOWN group default qlen 1000
    link/none
    inet 10.0.2.1/24 brd 10.0.2.255 scope global wg0
       valid_lft forever preferred_lft forever
Temporary Rules
The following steps show how to enable NAT using temporary nftables rules (these will not persist after a reboot).
- Add a masquerade rule to allow traffic from the VPN subnet to access the internal network, making the Debian server act as a NAT gateway for connected Windows clients:
root@host:~# nft add table ip NATroot@host:~# nft add chain ip NAT my_masquerade '{ type nat hook postrouting priority 100; }'root@host:~# nft add rule NAT my_masquerade ip saddr { 10.0.2.0/24 } oifname ens18 masquerade- Optionally, you can define additional firewall filter rules to further control traffic:
root@host:~# nft add rule ip filter INPUT udp dport 51820 ct state new,established counter acceptroot@host:~# nft add rule ip filter OUTPUT udp sport 51820 ct state established counter acceptPersistent Rules
- To make the NAT configuration persistent across reboots, edit the
/etc/nftables.conffile and include the following content:
#!/usr/sbin/nft -f

flush ruleset

table inet filter {
        chain input {
                type filter hook input priority 0;
		udp dport 51820 ct state new,established counter accept
        }
        chain forward {
                type filter hook forward priority 0;
        }
        chain output {
                type filter hook output priority 0;
		udp sport 51820 ct state established counter accept
        }
}
table ip NAT {
        chain my_masquerade {
                type nat hook postrouting priority 100; policy accept;
                ip saddr { 10.0.2.0/24 } oifname "ens18" masquerade comment "outgoing NAT"
        }
}- Enable the nftables service so that it loads automatically at boot:
root@host:~# systemctl enable nftables.service- Apply the current nftables configuration immediately:
root@host:~# nft -f /etc/nftables.confTest from Windows
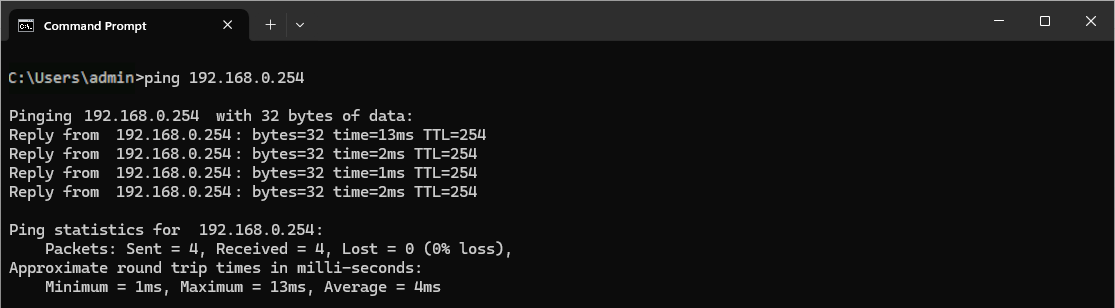
- From the Windows client, ping a host on the internal LAN (e.g.,
192.168.0.254) to verify VPN connectivity beyond the server:
Troubleshooting
Source: https://serverfault.com.
- Enable debug mode for WireGuard (useful for troubleshooting connection issues):
root@host:~# modprobe -r wireguard && modprobe wireguard dyndbgroot@host:~# ifdown wg0; ifup wg0- Monitor WireGuard logs in real time:
root@host:~# journalctl -f --grep wireguard- Disable debug mode once you're done troubleshooting:
root@host:~# modprobe -r wireguard && modprobe wireguardroot@host:~# ifdown wg0; ifup wg0