Synchroniser des fichiers de manière sécurisée entre ordinateurs avec Rclone et SFTP
- Mise à jour le 04 janv. 2026

J’utilise Rclone depuis plusieurs années pour synchroniser un fichier KeePass entre plusieurs ordinateurs Windows, et j’ai déjà rédigé un tutoriel détaillé sur ce sujet : Comment synchroniser des fichiers entre ordinateurs et un stockage cloud avec Rclone. Malheureusement, j’ai rencontré plusieurs problèmes de fiabilité en utilisant Proton Drive comme espace de stockage distant (voir par exemple le ticket ouvert correspondant sur le dépôt GitHub de Rclone). En raison de changements du côté de Proton Drive, la synchronisation peut parfois échouer ou devenir instable.
Pour résoudre ce problème, j’ai décidé de remplacer le stockage distant par un serveur SFTP entièrement auto-hébergé. Cette approche offre un meilleur contrôle, une stabilité accrue et un comportement plus prévisible. La mise en place est relativement simple : elle consiste principalement à installer le service OpenSSH sur un serveur que vous maîtrisez et à activer le protocole SFTP.
L’objectif reste inchangé : synchroniser des fichiers de manière sécurisée — ici, toujours une base de données KeePass — entre deux ordinateurs qui ne se trouvent pas sur le même réseau et ne disposant pas d’un espace de stockage partagé. Pour rappel, Rclone est un logiciel open source et gratuit (vous pouvez soutenir le projet ici : https://rclone.org/sponsor/) et il prend en charge un très large éventail de solutions de stockage (voir la liste complète ici : Présentation des systèmes de stockage pris en charge).
- Dans ce tutoriel, nous allons :
- Synchroniser un fichier KeePass entre deux postes de travail Windows, en tenant compte des modifications effectuées par deux utilisateurs : user01 et user02.
- Utiliser le protocole SFTP pour synchroniser le fichier KeePass avec un serveur SFTP distant.
- Activer le mode bisync de Rclone, permettant la modification du fichier KeePass depuis les deux ordinateurs.
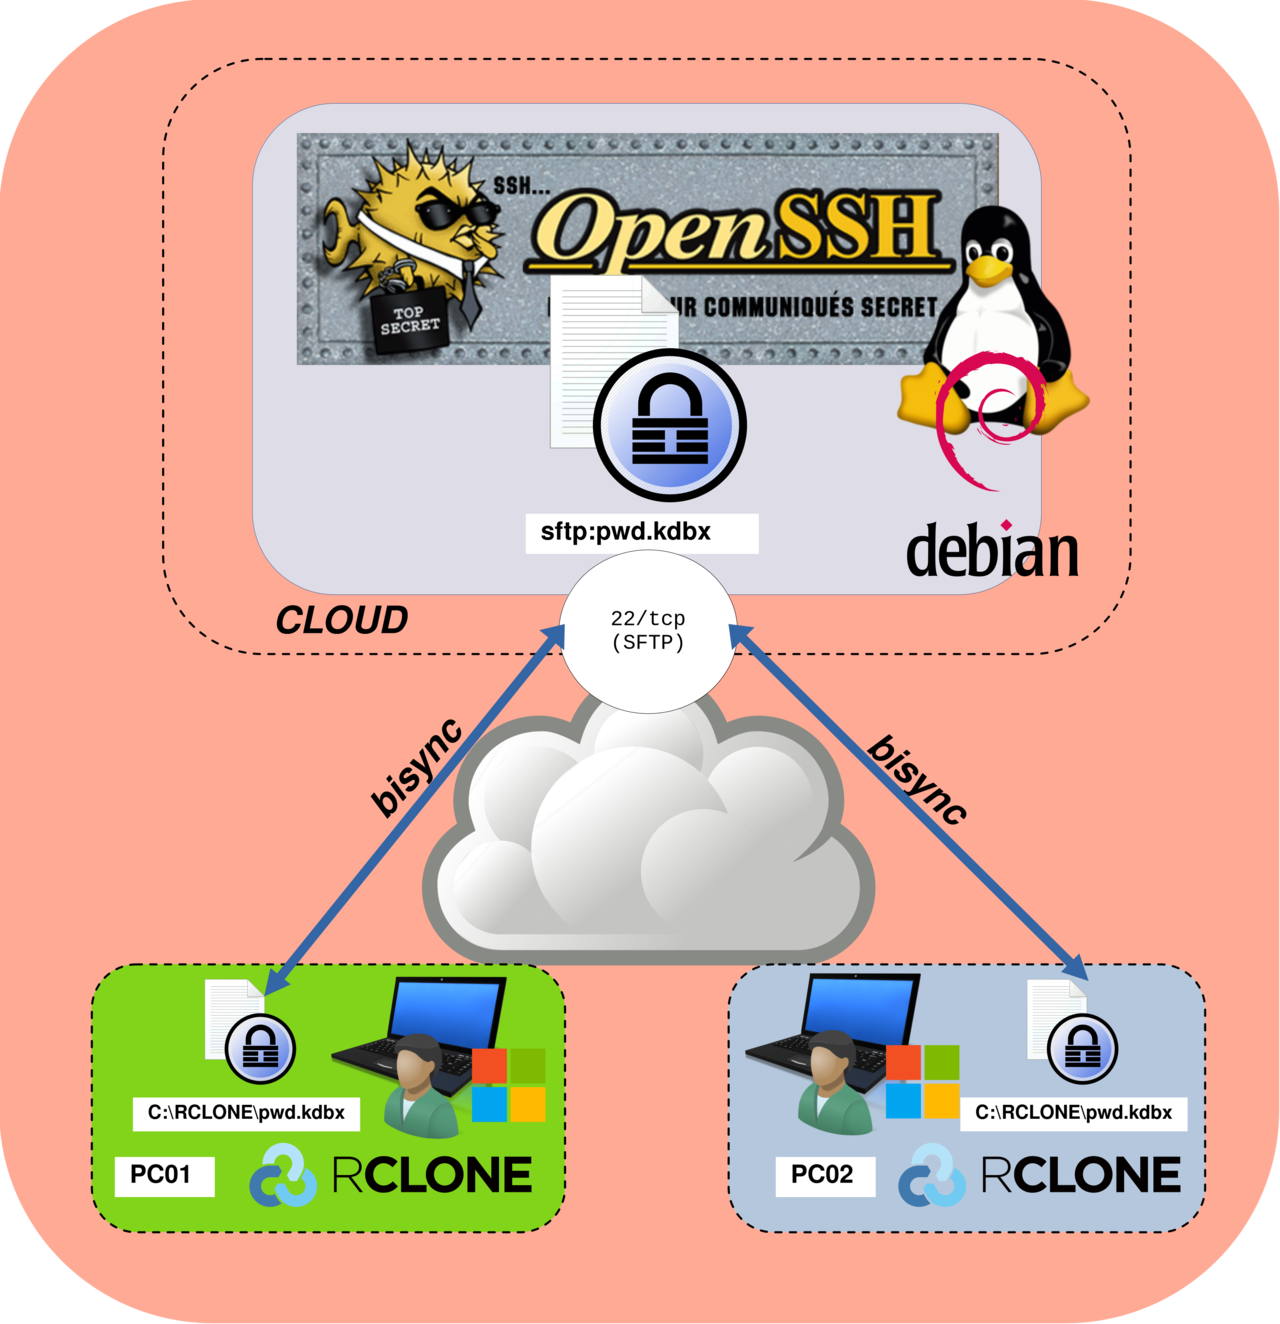
Au final, l’architecture sera la suivante : deux clients Windows distants (PC01 et PC02) utilisent Rclone en mode bisync pour synchroniser un unique fichier pwd.kdbx. Chaque poste de travail stocke le fichier localement dans le répertoire C:\RCLONE\, tandis qu’un serveur SFTP auto-hébergé joue le rôle de point central de synchronisation via SSH (port TCP 22).
Configurer un serveur SFTP avec OpenSSH
Sur le serveur GNU/Linux, nous allons créer un utilisateur dédié nommé rclone, qui sera utilisé exclusivement pour l’accès SFTP. Nous configurerons également le service SSH afin d’activer SFTP et de générer des paires de clés SSH permettant une authentification sans mot de passe. Si cela vous intéresse, j’ai rédigé un guide détaillé sur le sujet : Comment configurer une authentification SSH sans mot de passe sous Debian.
Créer l’utilisateur rclone
- Créer l’utilisateur
rcloneet définir/home/rclonecomme répertoire personnel :
root@SFTP:~# useradd -m -d /home/rclone rclone- Définir un mot de passe pour l’utilisateur
rclone(nécessaire lors de l’initialisation, même si l’authentification par clé SSH sera utilisée ultérieurement) :
root@SFTP:~# passwd rclone- Créer l’arborescence chroot pour SFTP et appliquer les permissions appropriées :
root@SFTP:~# mkdir -p /home/rclone/jail/RCLONE
root@SFTP:~# chown root:root /home/rclone/
root@SFTP:~# chmod 755 /home/rclone/
root@SFTP:~# chown root:root /home/rclone/jail
root@SFTP:~# chmod 755 /home/rclone/jail
root@SFTP:~# chown rclone:rclone /home/rclone/jail/RCLONE
Modifier le fichier sshd_config
Nous devons modifier le fichier /etc/ssh/sshd_config afin d’activer SFTP et d’appliquer les restrictions de sécurité nécessaires à un utilisateur SFTP dédié.
- Éditez le fichier
/etc/ssh/sshd_configet ajoutez la configuration suivante. Cette configuration limite l’utilisateurrcloneà un accès SFTP uniquement, l’isole dans une prison chroot (ici/home/rclone/jail) et désactive toutes les fonctionnalités SSH non nécessaires afin de réduire la surface d’attaque :
Match user rclone
  ChrootDirectory /home/rclone/jail
  X11Forwarding no
  AllowTcpForwarding no
  PubkeyAuthentication yes
  PasswordAuthentication no
ForceCommand internal-sftp- Vérifier la validité du fichier de configuration sshd :
root@SFTP:~# sshd -t- Redémarrer le service sshd afin d’appliquer les modifications :
root@SFTP:~# systemctl restart sshdCréer une paire de clés SSH
Nous allons maintenant créer une paire de clés SSH qui sera utilisée pour authentifier les clients Rclone.
- Basculer vers l’utilisateur rclone :
root@SFTP:~# su - rclone -s /bin/bash- Générer une paire de clés SSH, puis appuyer sur Entrée afin d’accepter les valeurs par défaut pour l’ensemble des invites :
rclone@SFTP:~$ ssh-keygen -t ed25519
Generating public/private ed25519 key pair.
Enter file in which to save the key (/home/rclone/.ssh/id_ed25519): [Press enter key]
Created directory '/home/rclone/.ssh'.
Enter passphrase for "/home/rclone/.ssh/id_ed25519" (empty for no passphrase): [Press enter key]
Enter same passphrase again: [Press enter key]
Your identification has been saved in /home/rclone/.ssh/id_ed25519
Your public key has been saved in /home/rclone/.ssh/id_ed25519.pub
The key fingerprint is:
SHA256:76mwlXd33hQPckmbeMRhZv4YKBYe0KVEarsra+w1jDk rclone@SFTP.sup
The key's randomart image is:
+--[ED25519 256]--+
|        .+=.. =  |
|         +.+ B . |
|        o = . *  |
|       . o . + B |
|        S   o O..|
|       + +   + .o|
|     .E B o . . +|
|      +* = o . +.|
|     o+oo.o     o|
+----[SHA256]-----+- Ajouter la clé publique au fichier
authorized_keys:
rclone@SFTP:~$ cat ~/.ssh/id_ed25519.pub >> ~/.ssh/authorized_keys- Définir les permissions appropriées sur les fichiers de configuration SSH :
rclone@SFTP:~$ chmod 700 ~/.ssh; chmod 600 ~/.ssh/authorized_keys- Enfin, utiliser
awkafin d’afficher la clé privée dans un format compatible avec Rclone (copiez soigneusement le résultat, car il sera nécessaire ultérieurement) :
rclone@SFTP:~$ awk '{printf "%s\\n", $0}' < ~/.ssh/id_ed25519
-----BEGIN OPENSSH PRIVATE KEY-----\nb3BlbnNzaC1rZXktdjEAAAAABG5vbmUAAAAEbm9uZQAAAAAAAAABAAAAMwAAAAtzc2gtZW\nQyNTUxOQAAACB/27KArPhiQdPZsd82AcGEbmFJvUeJWdecivw/8J1i4QAAAJhNDY3sTQ2N\n7AAAAAtzc2gtZWQyNTUxOQAAACB/27KArPhiQdPZsd82AcGEbmFJvUeJWdecivw/8J1i4Q\nAAAECS01w+MOQbSCTe/MHdvGGWNrxlwySf7WFkl+yFAyZbdH/bsoCs+GJB09mx3zYBwYRu\nYUm9R4lZ15yK/D/wnWLhAAAAD3JjbG9uZUBtYWlsLnN1cAECAwQFBg==\n-----END OPENSSH PRIVATE KEY-----\n
Configuration et utilisation de Rclone
La configuration Rclone suivante doit être appliquée sur chaque ordinateur participant au processus de synchronisation des fichiers.
Configurer Rclone avec SFTP sur PC01 et PC02
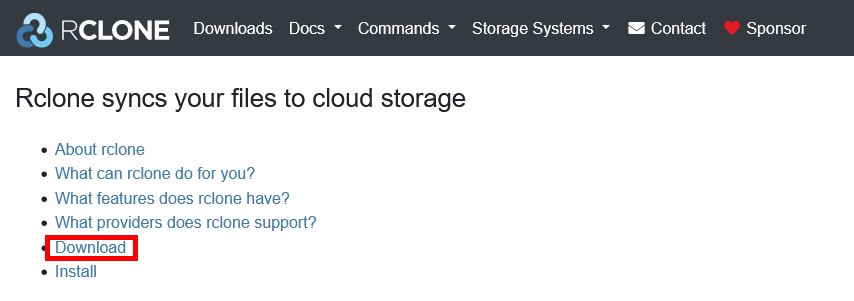
- Télécharger Rclone depuis le site officiel : https://rclone.org/ :
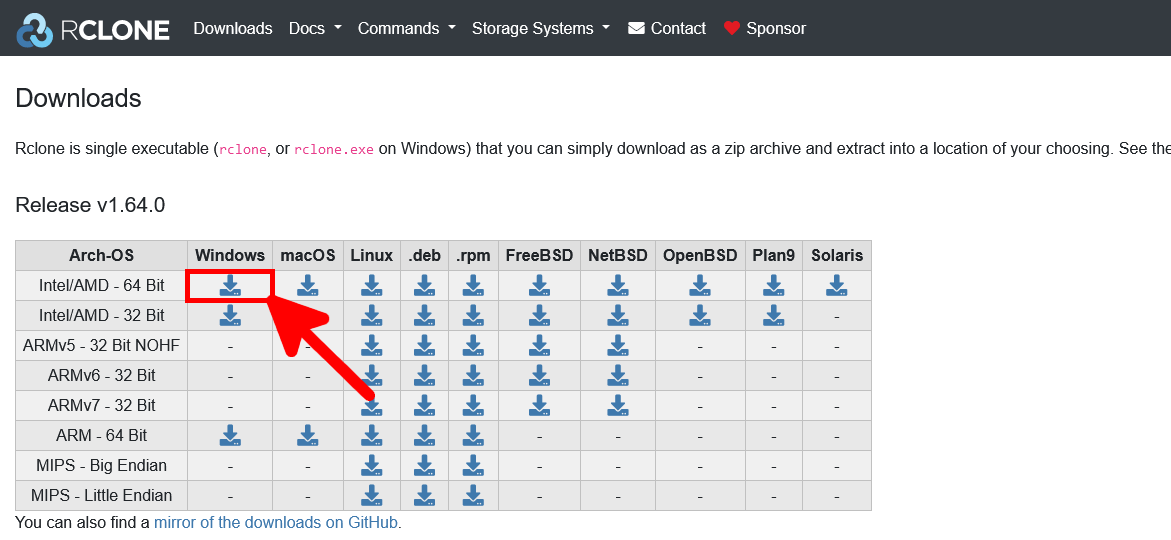
- Sélectionner le lien de téléchargement correspondant à l’architecture de votre système :
- Extraire le contenu de l’archive ZIP et renommer le dossier extrait en rclone :
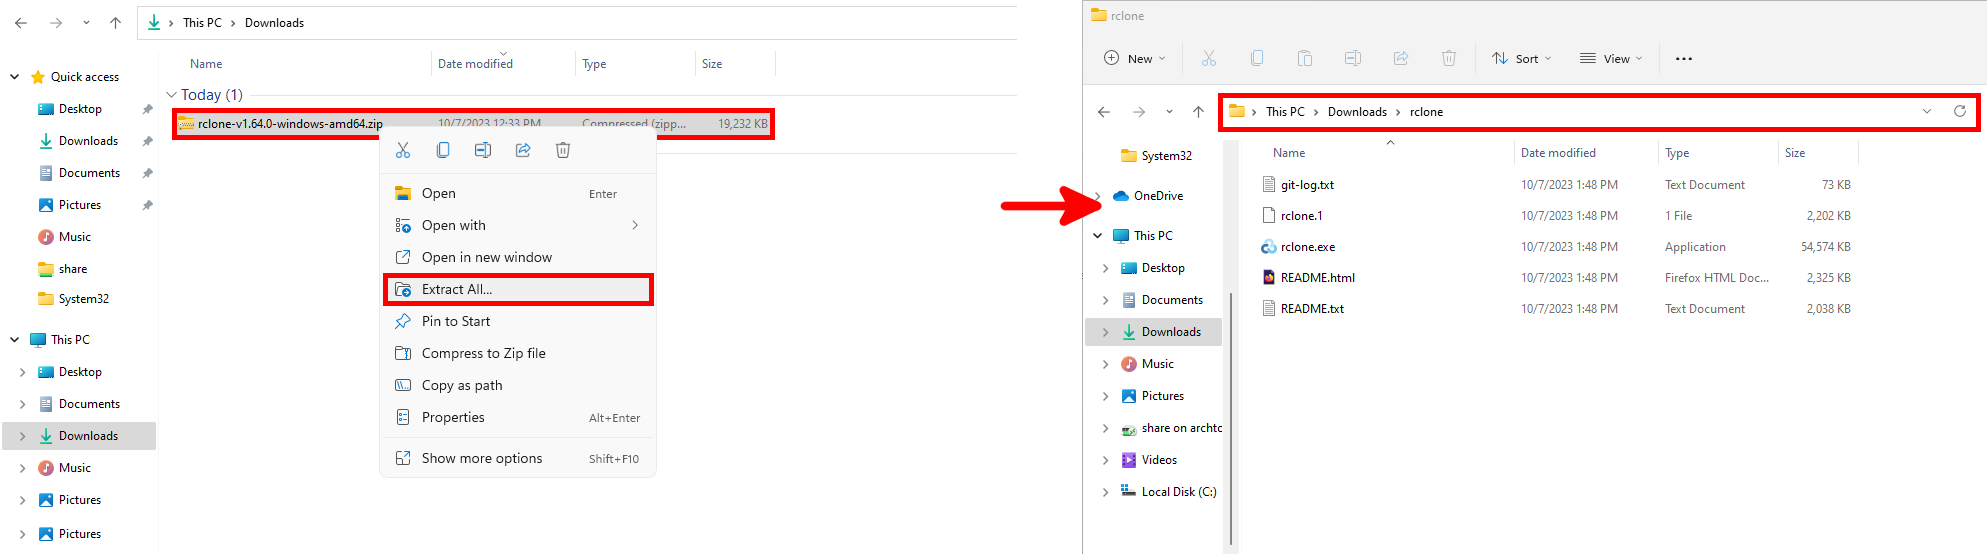
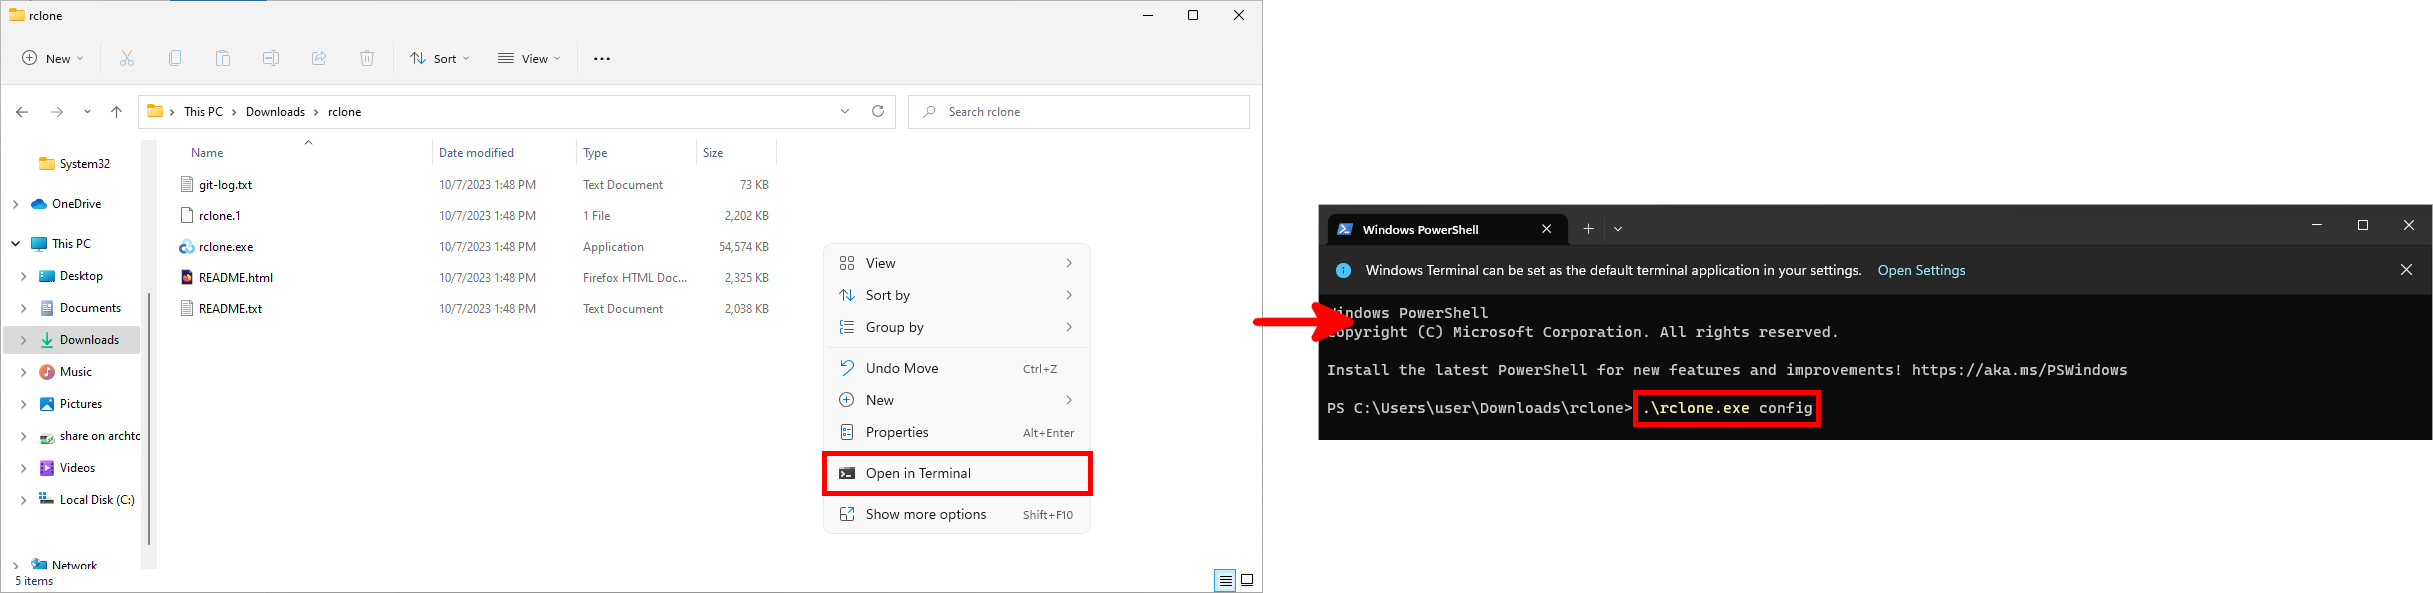
- Ouvrir un terminal dans le dossier extrait et exécuter la commande
.\rclone.exe config:
- Suivez les instructions de configuration ci-dessous afin de configurer un point distant SFTP dans Rclone. L’exemple suivant présente une configuration complète et sécurisée reposant sur une authentification par clé.
PS C:\Users\user\Downloads\rclone> .\rclone.exe config
2026/01/04 17:28:34 NOTICE: Config file "C:\\Users\\user\\AppData\\Roaming\\rclone\\rclone.conf" not found - using defaults
No remotes found, make a new one?
n) New remote
s) Set configuration password
q) Quit config
n/s/q> n

Enter name for new remote.
name> sftp

Option Storage.
Type of storage to configure.
Choose a number from below, or type in your own value.
 1 / 1Fichier
   \ (fichier)
 2 / Akamai NetStorage
   \ (netstorage)
 3 / Alias for an existing remote
   \ (alias)
[…]
50 / SMB / CIFS
   \ (smb)
51 / SSH/SFTP
   \ (sftp)
52 / Sia Decentralized Cloud
   \ (sia)
[…]
Storage> 51

Option host.
SSH host to connect to.
E.g. "example.com".
Enter a value.
host> IP OR DNS NAME EX: 203.0.113.5

Option user.
SSH username.
Enter a value of type string. Press Enter for the default (DESKTOP\user).
user> rclone

Option port.
SSH port number.
Enter a signed integer. Press Enter for the default (22).
port> 22

Option pass.
SSH password, leave blank to use ssh-agent.
Choose an alternative below. Press Enter for the default (n).
y) Yes, type in my own password
g) Generate random password
n) No, leave this optional password blank (default)
y/g/n> n

Option key_pem.
Raw PEM-encoded private key.
Note that this should be on a single line with line endings replaced with '\n', eg
    key_pem = -----BEGIN RSA PRIVATE KEY-----\nMaMbaIXtE\n0gAMbMbaSsd\nMbaass\n-----END RSA PRIVATE KEY-----
This will generate the single line correctly:
    awk '{printf "%s\\n", $0}' < ~/.ssh/id_rsa
If specified, it will override the key_file parameter.
Enter a value. Press Enter to leave empty.
key_pem> -----BEGIN OPENSSH PRIVATE KEY-----\nb3BlbnNzaC1rZXktdjEAAAAABG5vbmUAAAAEbm9uZQAAAAAAAAABAAAAMwAAAAtzc2gtZW\nQyNTUxOQAAACB/27KArPhiQdPZsd82AcGEbmFJvUeJWdecivw/8J1i4QAAAJhNDY3sTQ2N\n7AAAAAtzc2gtZWQyNTUxOQAAACB/27KArPhiQdPZsd82AcGEbmFJvUeJWdecivw/8J1i4Q\nAAAECS01w+MOQbSCTe/MHdvGGWNrxlwySf7WFkl+yFAyZbdH/bsoCs+GJB09mx3zYBwYRu\nYUm9R4lZ15yK/D/wnWLhAAAAD3JjbG9uZUBtYWlsLnN1cAECAwQFBg==\n-----END OPENSSH PRIVATE KEY-----\n

Option key_file.
Path to PEM-encoded private key file.
Leave blank or set key-use-agent to use ssh-agent.
Leading `~` will be expanded in the file name as will environment variables such as `${RCLONE_CONFIG_DIR}`.
Enter a value. Press Enter to leave empty.
key_file> [Press enter key]

Option key_file_pass.
The passphrase to decrypt the PEM-encoded private key file.
Only PEM encrypted key files (old OpenSSH format) are supported. Encrypted keys
in the new OpenSSH format can't be used.
Choose an alternative below. Press Enter for the default (n).
y) Yes, type in my own password
g) Generate random password
n) No, leave this optional password blank (default)
y/g/n> n

Option pubkey.
SSH public certificate for public certificate based authentication.
Set this if you have a signed certificate you want to use for authentication.
If specified will override pubkey_file.
Enter a value. Press Enter to leave empty.
pubkey> [Press enter key]

Option pubkey_file.
Optional path to public key file.
Set this if you have a signed certificate you want to use for authentication.
Leading `~` will be expanded in the file name as will environment variables such as `${RCLONE_CONFIG_DIR}`.
Enter a value. Press Enter to leave empty.
pubkey_file> [Press enter key]

Option key_use_agent.
When set forces the usage of the ssh-agent.
When key-file is also set, the ".pub" file of the specified key-file is read and only the associated key is
requested from the ssh-agent. This allows to avoid `Too many authentication failures for *username*` errors
when the ssh-agent contains many keys.
Enter a boolean value (true or false). Press Enter for the default (false).
key_use_agent> [Press enter key]

Option use_insecure_cipher.
Enable the use of insecure ciphers and key exchange methods.
This enables the use of the following insecure ciphers and key exchange methods:
- aes128-cbc
- aes192-cbc
- aes256-cbc
- 3des-cbc
- diffie-hellman-group-exchange-sha256
- diffie-hellman-group-exchange-sha1
Those algorithms are insecure and may allow plaintext data to be recovered by an attacker.
This must be false if you use either ciphers or key_exchange advanced options.
Choose a number from below, or type in your own boolean value (true or false).
Press Enter for the default (false).
 1 / Use default Cipher list.
   \ (false)
 2 / Enables the use of the aes128-cbc cipher and diffie-hellman-group-exchange-sha256, diffie-hellman-group-exchange-sha1 key exchange.
   \ (true)
use_insecure_cipher> 1

Option disable_hashcheck.
Disable the execution of SSH commands to determine if remote file hashing is available.
Leave blank or set to false to enable hashing (recommended), set to true to disable hashing.
Enter a boolean value (true or false). Press Enter for the default (false).
disable_hashcheck> [Press enter key]

Option ssh.
Path and arguments to external ssh binary.
Normally rclone will use its internal ssh library to connect to the
SFTP server. However it does not implement all possible ssh options so
it may be desirable to use an external ssh binary.
Rclone ignores all the internal config if you use this option and
expects you to configure the ssh binary with the user/host/port and
any other options you need.
**Important** The ssh command must log in without asking for a
password so needs to be configured with keys or certificates.
Rclone will run the command supplied either with the additional
arguments "-s sftp" to access the SFTP subsystem or with commands such
as "md5sum /path/to/file" appended to read checksums.
Any arguments with spaces in should be surrounded by "double quotes".
An example setting might be:
    ssh -o ServerAliveInterval=20 user@example.com
Note that when using an external ssh binary rclone makes a new ssh
connection for every hash it calculates.
Enter a value of type SpaceSepList. Press Enter to leave empty.
ssh> [Press enter key]

Edit advanced config?
y) Yes
n) No (default)
y/n> n

Configuration complete.
Options:
- type: sftp
- host: 203.0.113.5
- key_pem: -----BEGIN OPENSSH PRIVATE KEY-----\nb3BlbnNzaC1rZXktdjEAAAAABG5vbmUAAAAEbm9uZQAAAAAAAAABAAAAMwAAAAtzc2gtZW\nQyNTUxOQAAACB/27KArPhiQdPZsd82AcGEbmFJvUeJWdecivw/8J1i4QAAAJhNDY3sTQ2N\n7AAAAAtzc2gtZWQyNTUxOQAAACB/27KArPhiQdPZsd82AcGEbmFJvUeJWdecivw/8J1i4Q\nAAAECS01w+MOQbSCTe/MHdvGGWNrxlwySf7WFkl+yFAyZbdH/bsoCs+GJB09mx3zYBwYRu\nYUm9R4lZ15yK/D/wnWLhAAAAD3JjbG9uZUBtYWlsLnN1cAECAwQFBg==\n-----END OPENSSH PRIVATE KEY-----\n
Keep this "sftp" remote?
- user: rclone
y) Yes this is OK (default)
e) Edit this remote
d) Delete this remote
y/e/d> y

Current remotes:

Name                 Type
====                 ====
sftp                 sftp

e) Edit existing remote
n) New remote
d) Delete remote
r) Rename remote
c) Copy remote
s) Set configuration password
q) Quit config
e/n/d/r/c/s/q> q- Vérifier que la connexion au serveur SFTP fonctionne correctement. Cette commande ne doit retourner aucune erreur et se contente d’afficher le contenu du répertoire distant Rclone, actuellement vide :
PS C:\Users\user\Downloads\rclone> .\rclone.exe ls sftp:RCLONEUtilisation de Rclone
Une fois le point distant SFTP configuré, voyons ce qu’il est possible de faire avec Rclone.
- Afficher la liste des points distants configurés :
PS C:\Users\user\Downloads\rclone> .\rclone.exe listremotes
sftp:- Créer un fichier vide
TEST.txtsur le point distant SFTP :
PS C:\Users\user\Downloads\rclone> .\rclone.exe touch sftp:RCLONE\TEST.txt- Synchroniser le point distant SFTP avec le dossier local
C:\RCLONE\:
PS C:\Users\user\Downloads\rclone> .\rclone.exe sync sftp:RCLONE C:\RCLONE\- Lister les fichiers stockés sur le point distant SFTP :
PS C:\Users\user\Downloads\rclone> .\rclone.exe ls sftp:RCLONE
0 TEST.txt- Vérifier la version installée et mettre à jour Rclone vers la dernière version disponible, si nécessaire :
PS C:\Users\user\Downloads\rclone> .\rclone.exe selfupdate
2026/01/04 19:41:17 NOTICE: rclone est à jour- Afficher l’ensemble des commandes et options disponibles dans Rclone :
PS C:\Users\user\Downloads\rclone> .\rclone.exe
Usage:
  rclone [flags]
  rclone [command]

Available commands:
  about       Get quota information from the remote.
  archive     Perform an action on an archive.
  authorize   Remote authorization.
  backend     Run a backend-specific command.
  bisync      Perform bidirectional synchronization between two paths.
  cat         Concatenates any files and sends them to stdout.
  check       Checks the files in the source and destination match.
  checksum    Checks the files in the destination against a SUM file.
  cleanup     Clean up the remote if possible.
  completion  Output completion script for a given shell.
  config      Enter an interactive configuration session.
  convmv      Convert file and directory names in place.
  copy        Copy files from source to dest, skipping identical files.
  copyto      Copy files from source to dest, skipping identical files.
  copyurl     Copy the contents of the URL supplied content to dest:path.
  cryptcheck  Cryptcheck checks the integrity of an encrypted remote.
  cryptdecode Cryptdecode returns unencrypted file names.
  dedupe      Interactively find duplicate filenames and delete/rename them.
  delete      Remove the files in path.
  deletefile  Remove a single file from remote.
  gendocs     Output markdown docs for rclone to the directory supplied.
  gitannex    Speaks with git-annex over stdin/stdout.
  hashsum     Produces a hashsum file for all the objects in the path.
  help        Show help for rclone commands, flags and backends.
  link        Generate public link to file/folder.
  listremotes List all the remotes in the config file and defined in environment variables.
  ls          List the objects in the path with size and path.
  lsd         List all directories/containers/buckets in the path.
  lsf         List directories and objects in remote:path formatted for parsing.
  lsjson      List directories and objects in the path in JSON format.
  lsl         List the objects in path with modification time, size and path.
  md5sum      Produces an md5sum file for all the objects in the path.
  mkdir       Make the path if it doesn't already exist.
  mount       Mount the remote as file system on a mountpoint.
  move        Move files from source to dest.
  moveto      Move file or directory from source to dest.
  ncdu        Explore a remote with a text based user interface.
  obscure     Obscure password for use in the rclone config file.
  purge       Remove the path and all of its contents.
  rc          Run a command against a running rclone.
  rcat        Copies standard input to file on remote.
  rcd         Run rclone listening to remote control commands only.
  rmdir       Remove the empty directory at path.
  rmdirs      Remove empty directories under the path.
  selfupdate  Update the rclone binary.
  serve       Serve a remote over a protocol.
  settier     Changes storage class/tier of objects in remote.
  sha1sum     Produces an sha1sum file for all the objects in the path.
  size        Prints the total size and number of objects in remote:path.
  sync        Make source and dest identical, modifying destination only.
  test        Run a test command
  touch       Create new file or change file modification time.
  tree        List the contents of the remote in a tree like fashion.
  version     Show the version number.

Use "rclone [command] --help" for more information about a command.
Use "rclone help flags" for to see the global flags.
Use "rclone help backends" for a list of supported services.
Mise en place de la bisynchronisation
Maintenant que nous avons brièvement exploré l’utilisation de Rclone, revenons à notre objectif principal : synchroniser une base de données KeePass entre deux hôtes distincts.
Configuration de PC01
- Créer le répertoire
C:\RCLONE\:
PS C:\Users\user\Downloads\rclone> mkdir C:\RCLONEPlacez les fichiers que vous souhaitez synchroniser dans le répertoire C:\RCLONE\.
- Téléverser les fichiers depuis
C:\RCLONE\vers le répertoireRCLONEdu serveur SFTP :
PS C:\Users\user\Downloads\rclone> .\rclone.exe sync C:\RCLONE\ sftp:RCLONE
- Activer le mode bisync entre le répertoire local
C:\RCLONE\et le point distant SFTP :
PS C:\Users\user\Downloads\rclone> .\rclone.exe bisync C:\RCLONE\ sftp:RCLONE --resync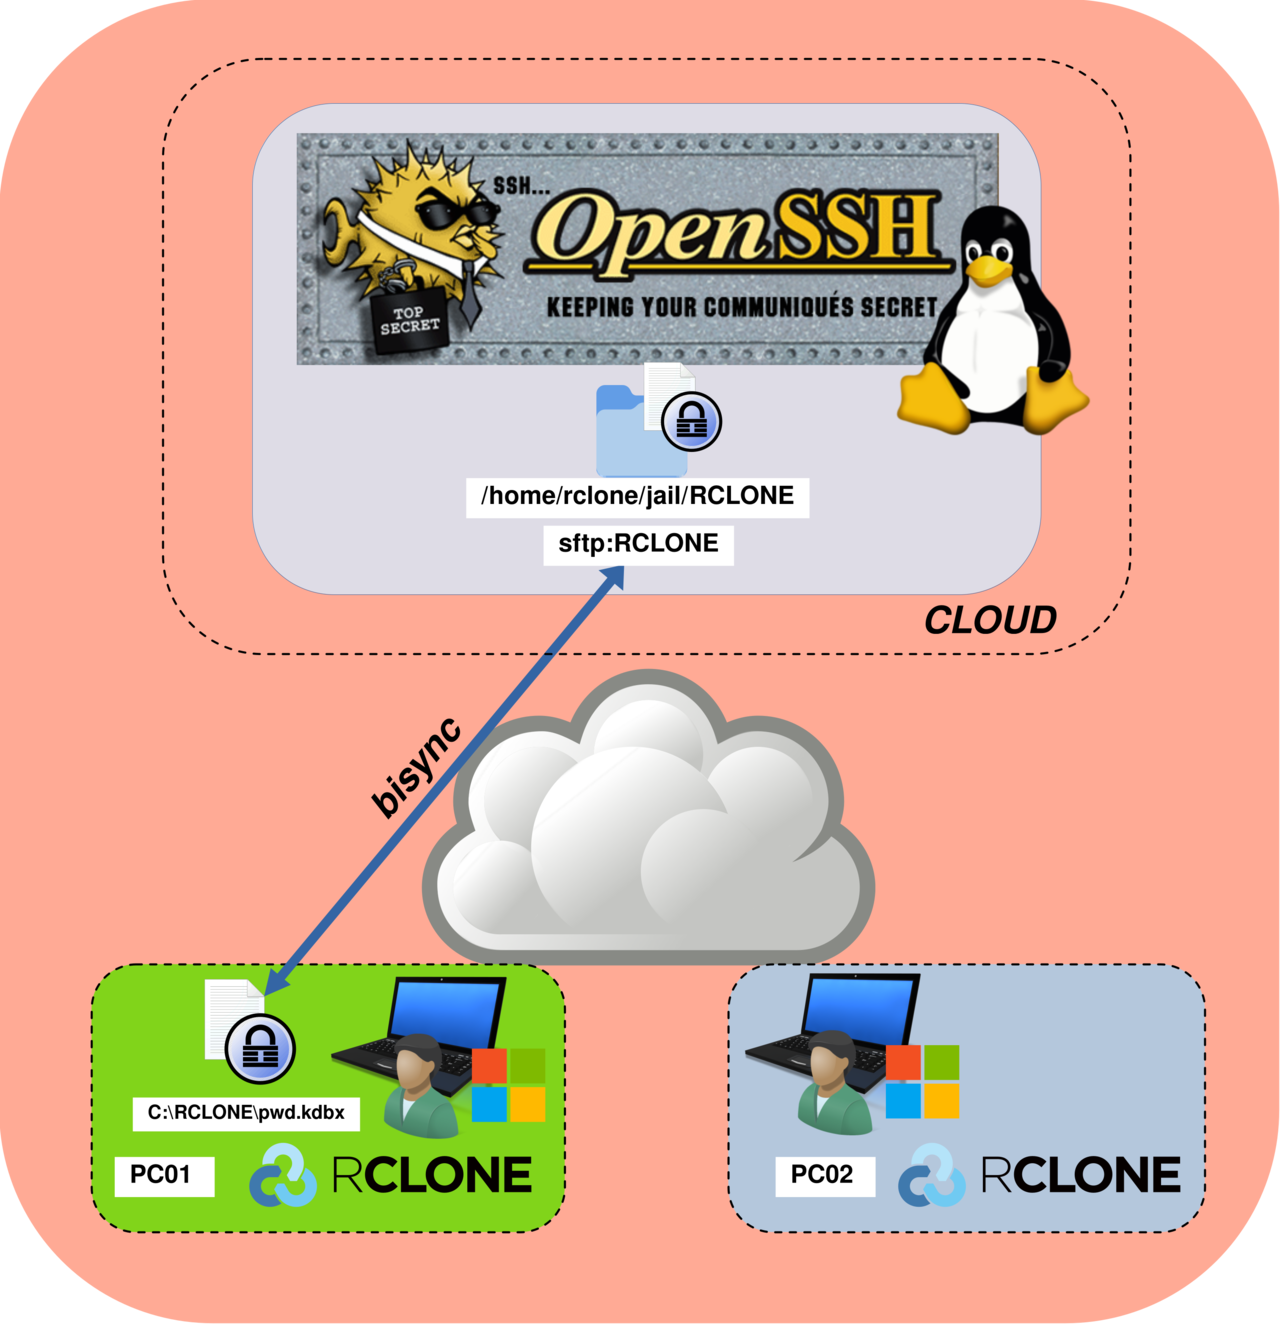
- Effectuer une synchronisation bidirectionnelle entre
C:\RCLONE\et le point distant SFTP :
PS C:\Users\user\Downloads\rclone> .\rclone.exe bisync C:\RCLONE\ sftp:RCLONE --forceConfiguration de PC02
- Créer le répertoire
C:\RCLONE\:
PS C:\Users\user\Downloads\rclone> mkdir C:\RCLONE- Récupérer le fichier
pwd.kdbxdepuis le répertoireRCLONEdu serveur SFTP versC:\RCLONE\:
PS C:\Users\user\Downloads\rclone> .\rclone.exe sync sftp:RCLONE C:\RCLONE\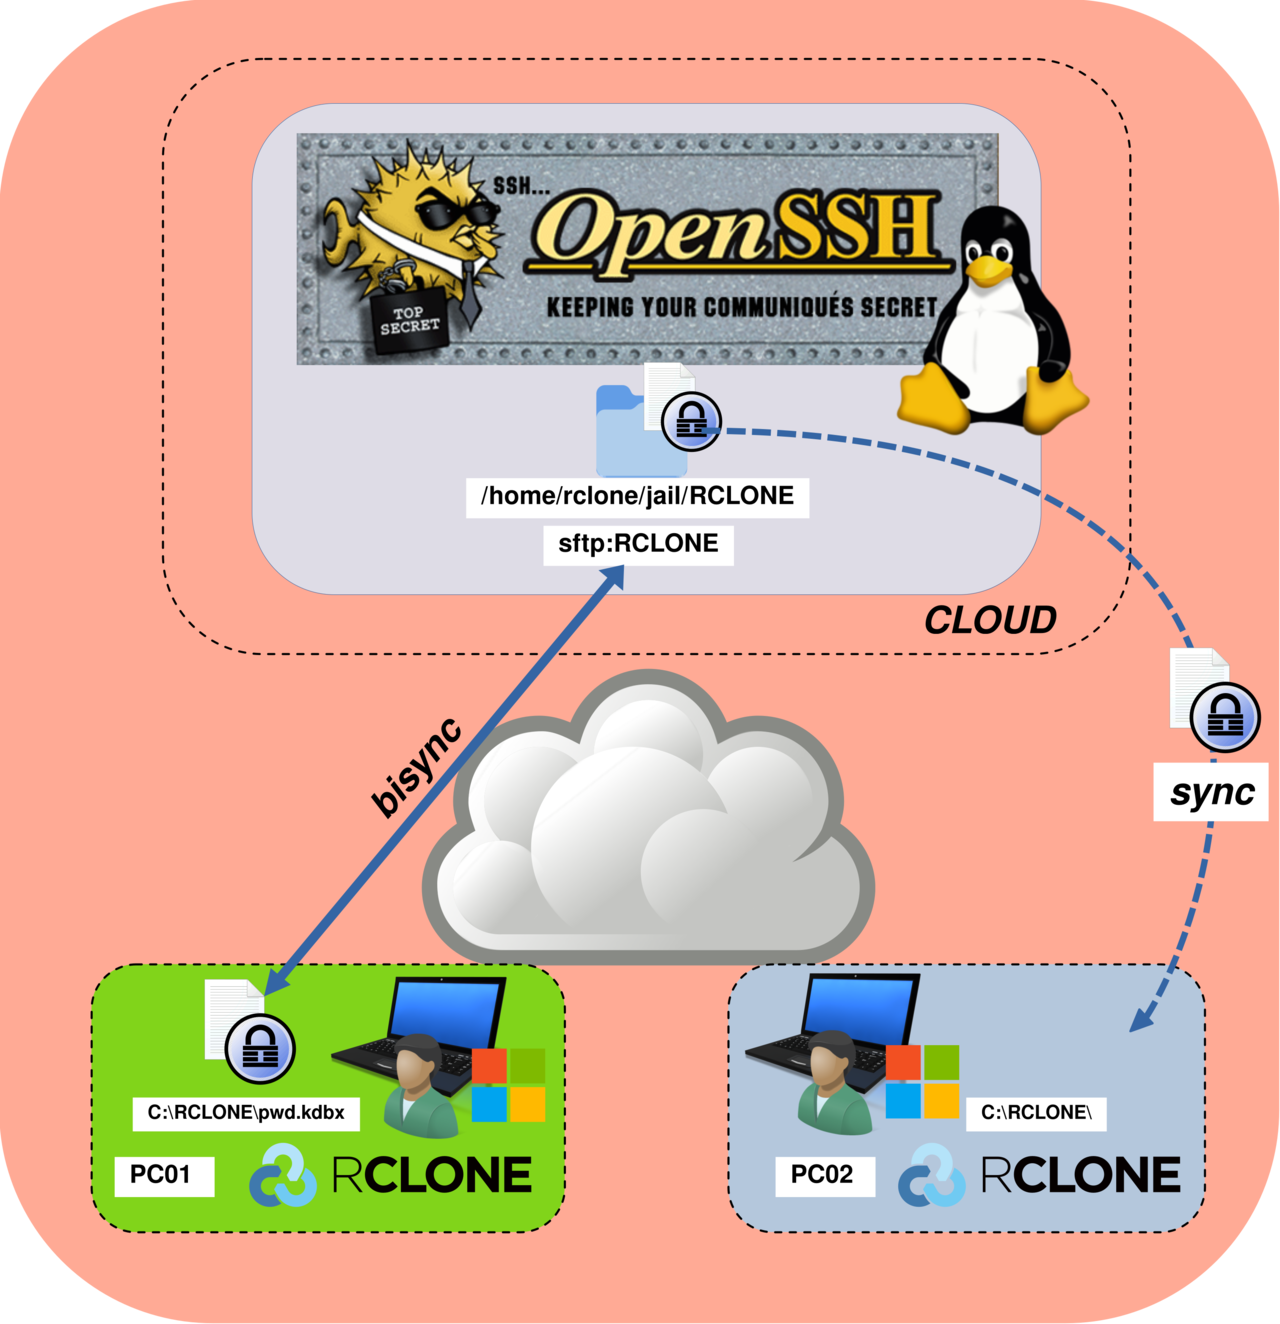
- Activer le mode bisync entre le répertoire local
C:\RCLONE\et le point distant SFTP :
PS C:\Users\user\Downloads\rclone> .\rclone.exe bisync C:\RCLONE\ sftp:RCLONE --resync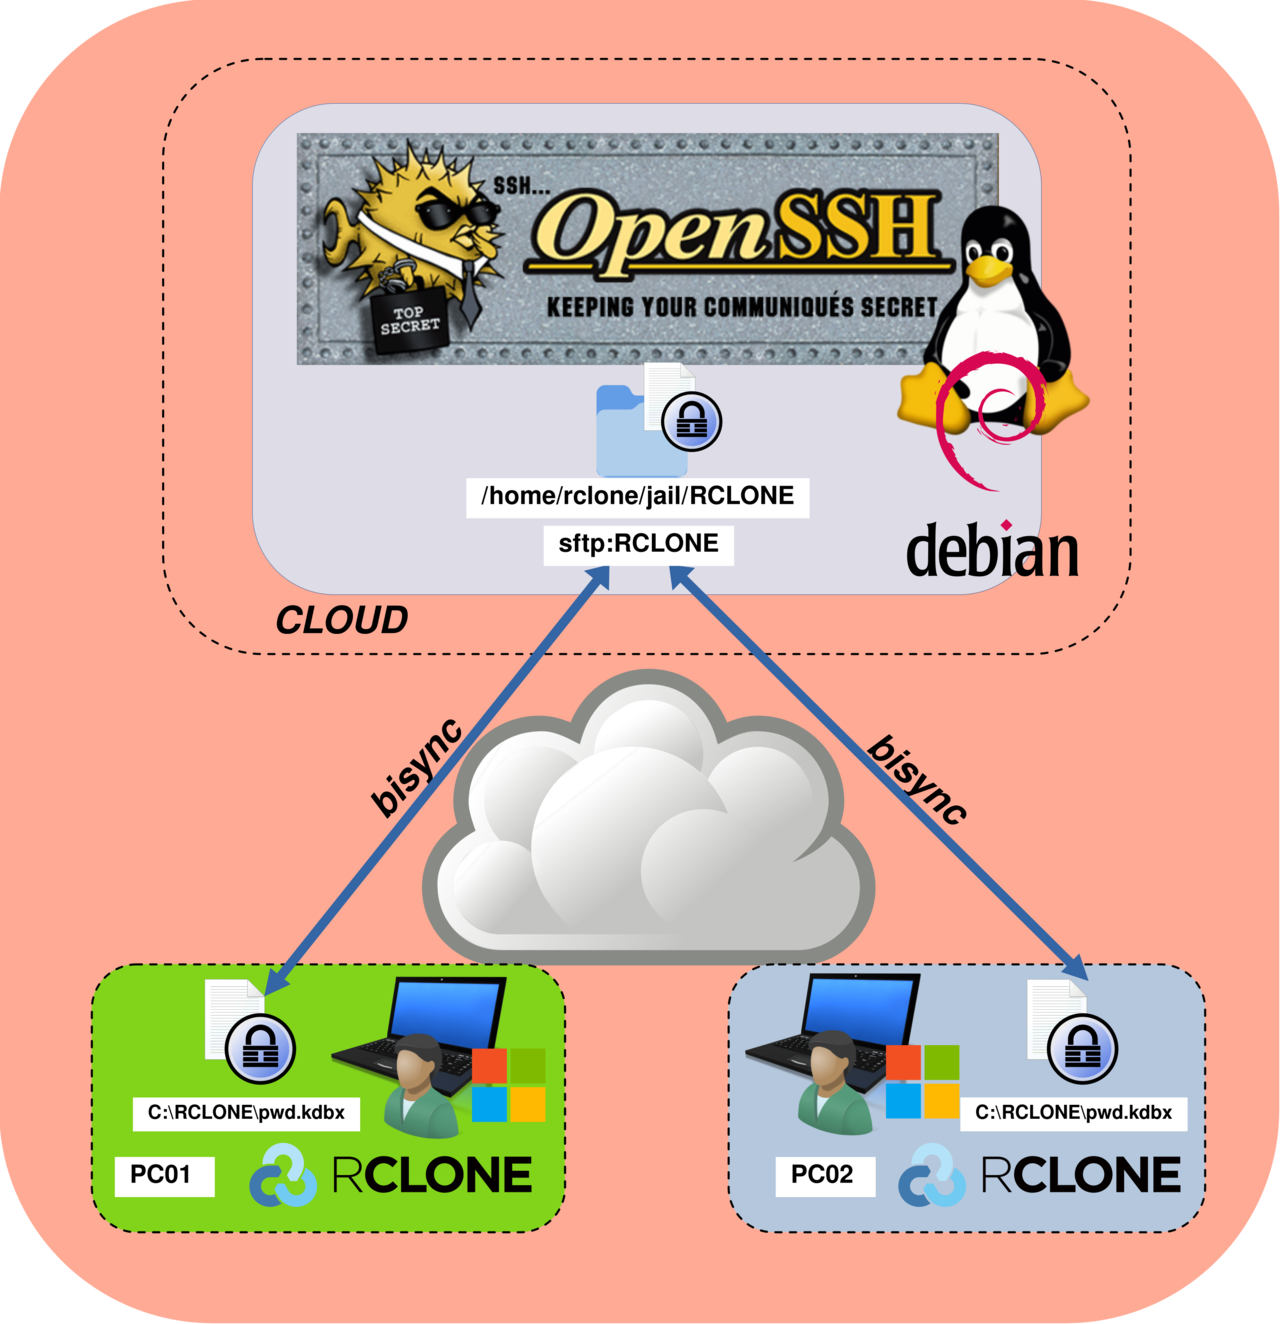
- Effectuer une synchronisation bidirectionnelle entre le répertoire local
C:\RCLONE\et le point distant SFTP :
PS C:\Users\user\Downloads\rclone> .\rclone.exe bisync C:\RCLONE\ sftp:RCLONE --forceAutomatisation de la bisynchronisation avec le Planificateur de tâches
L’architecture est désormais entièrement configurée et opérationnelle ; toutefois, la commande .\rclone.exe bisync C:\RCLONE\ sftp:RCLONE --force doit encore être exécutée manuellement sur chaque ordinateur à chaque modification du fichier pwd.kdbx. Afin d’automatiser ce processus, nous allons utiliser un script batch exécuté par le Planificateur de tâches Windows.
Script batch
Créer un nouveau script batch nommé C:\rclone.bat :
@echo off

REM =========================
REM VARIABLES
REM =========================
set SOURCE=C:\RCLONE
set DESTINATION=sftp:RCLONE

REM CHANGE USERNAME TO YOUR CURRENT WINDOWS USER
set DOWNLOADS=C:\Users\USERNAME\Downloads

REM =========================
REM UPDATE RCLONE TO LATEST RELEASE
REM =========================
%DOWNLOADS%"\rclone\rclone.exe" selfupdate

REM =========================
REM RUN BISYNC
REM =========================
%DOWNLOADS%"\rclone\rclone.exe" bisync %SOURCE% %DESTINATION% --force
Planificateur de tâches Windows
- Ouvrir le Planificateur de tâches Windows :
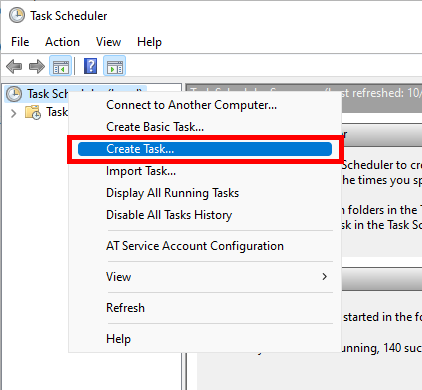
- Créer une nouvelle tâche :
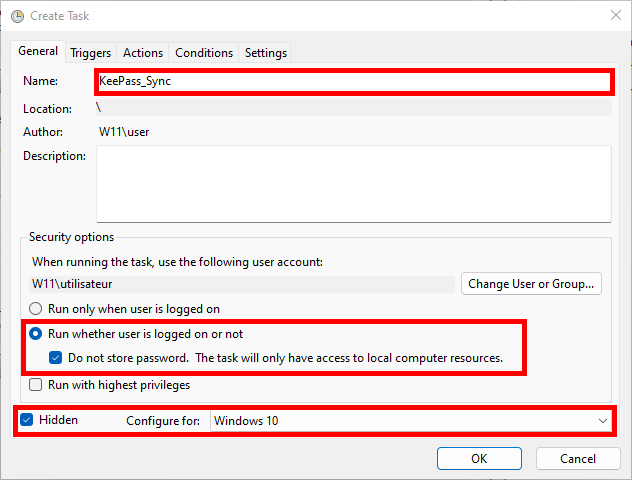
- Donner un nom à la tâche et la configurer comme illustré ci-dessous :
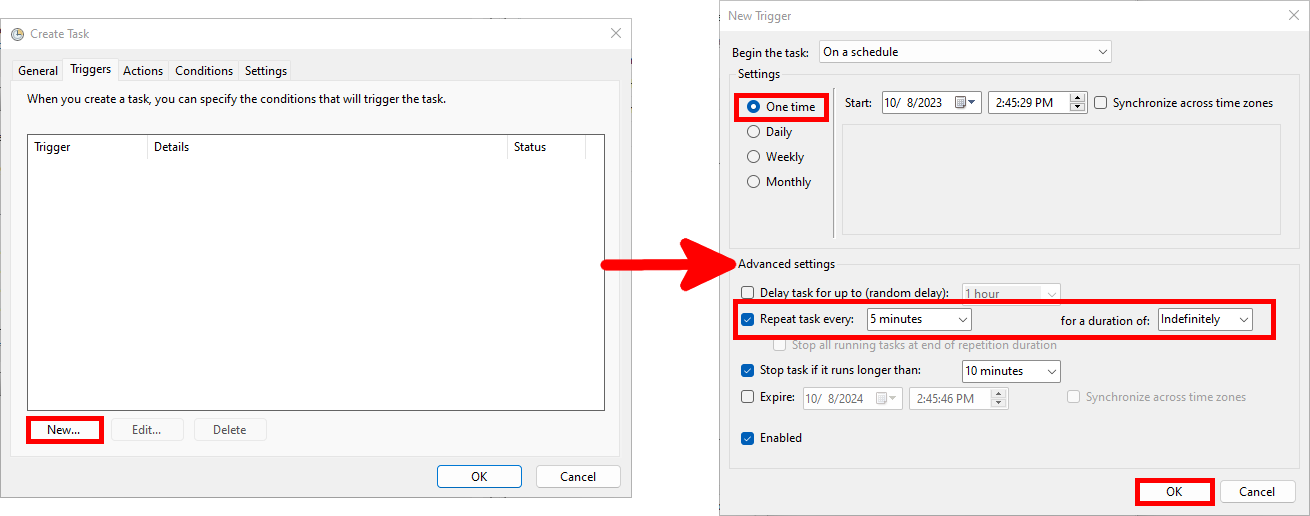
- Dans l’onglet Déclencheurs, cliquer sur Nouveau… et configurer la tâche pour qu’elle s’exécute toutes les 5 minutes (ajustez cet intervalle selon vos besoins) :
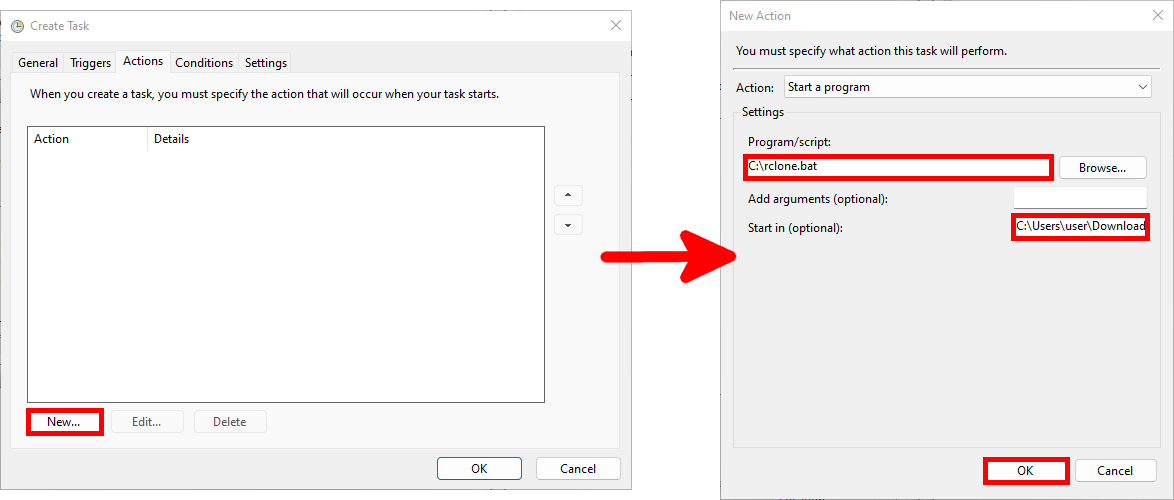
- Dans l’onglet Actions, cliquer sur Nouveau… et configurer l’action afin d’exécuter le script batch précédemment créé. Renseignez
C:\Users\user\Downloads\rclone\dans le champ Démarrer dans :
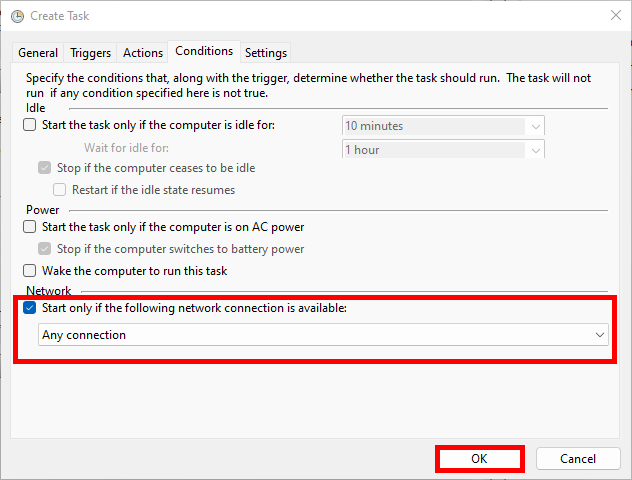
- Enfin, dans l’onglet Conditions, configurer la tâche pour qu’elle ne démarre que si une connexion réseau est disponible :