Synchronize Files Securely Between Computers with Rclone and SFTP
- Last updated: Jan 4, 2026

I have been using Rclone to synchronize a KeePass file between multiple Windows computers, and I previously wrote a detailed tutorial on this topic here: How to Synchronize Files between Computers and Cloud Storage with Rclone. Unfortunately, I have experienced several reliability issues when using Proton Drive as remote storage (for example, see the related open issue on the Rclone GitHub repository). Due to changes on the Proton Drive side, synchronization can occasionally break or become unreliable.
To address this problem, I decided to replace the remote storage with a fully self-managed SFTP server. This approach provides better control, stability, and predictability. The setup is straightforward: it only requires installing the OpenSSH service on a server you control and enabling SFTP.
The objective remains the same: to securely synchronize files—specifically a KeePass database—between two computers that are not on the same network and do not have access to a shared drive. For the record, Rclone is open source and free (you can support the project here: https://rclone.org/sponsor/), and it supports a wide range of storage backends (see the complete list here: Overview of cloud storage systems).
- In this tutorial, we will:
- Synchronize a KeePass file between two Windows workstations, taking into account changes made by two users: user01 and user02.
- Use the SFTP protocol to synchronize the KeePass file with a remote SFTP server.
- Enable Rclone's bisync mode, allowing the KeePass file to be modified on both computers.
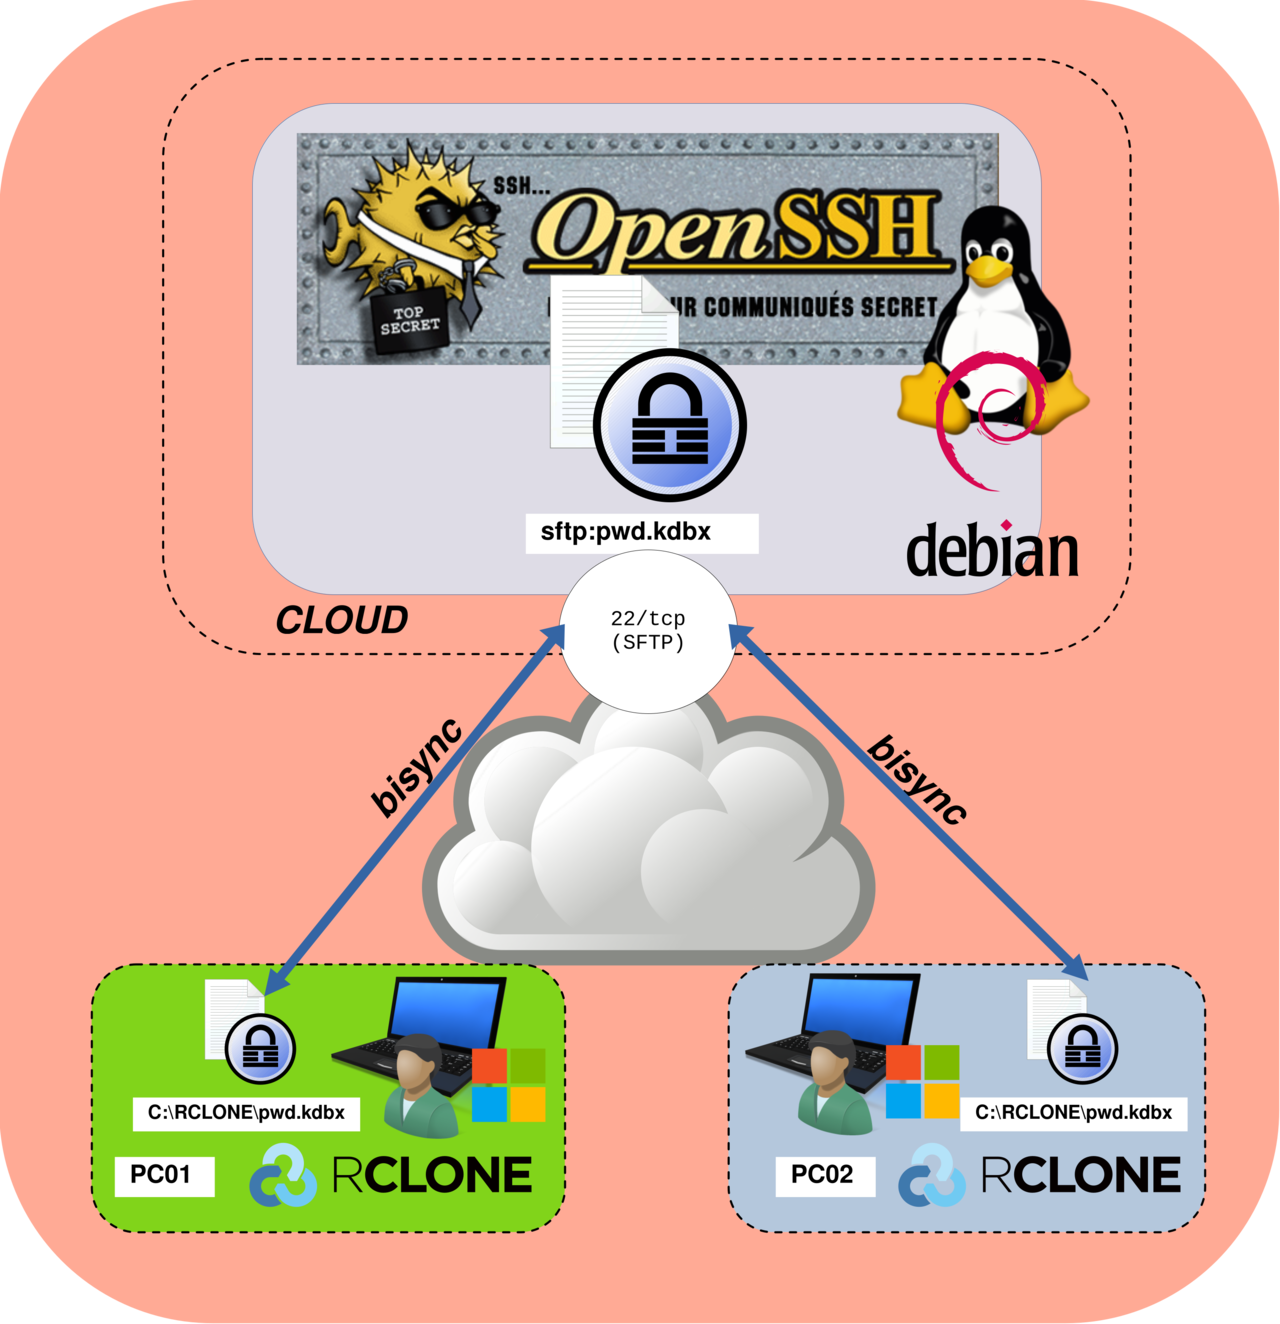
In the end, the architecture will look like this: two remote Windows clients (PC01 and PC02) use Rclone in bisync mode to synchronize a single pwd.kdbx file. Each workstation stores the file locally in the C:\RCLONE\ directory, while a self-managed SFTP server acts as the central synchronization point over SSH (TCP port 22).
Set Up an OpenSSH SFTP Server
On the GNU/Linux server, we will create a dedicated user named rclone, which will be used exclusively for SFTP access. We will also configure the SSH service to enable SFTP and generate SSH key pairs to allow passwordless authentication. For reference, I have written a detailed guide on this topic: How to Configure Passwordless SSH on Debian.
Create the rclone User
- Create the
rcloneuser and set/home/rcloneas its home directory:
root@SFTP:~# useradd -m -d /home/rclone rclone- Set a password for the
rcloneuser (required initially, even if SSH key authentication will be used later):
root@SFTP:~# passwd rclone- Create the chroot directory structure for SFTP and apply the correct permissions:
root@SFTP:~# mkdir -p /home/rclone/jail/RCLONE
root@SFTP:~# chown root:root /home/rclone/
root@SFTP:~# chmod 755 /home/rclone/
root@SFTP:~# chown root:root /home/rclone/jail
root@SFTP:~# chmod 755 /home/rclone/jail
root@SFTP:~# chown rclone:rclone /home/rclone/jail/RCLONE
Edit the sshd_config File
We need to edit the /etc/ssh/sshd_config file to enable SFTP and apply the security restrictions required for a dedicated SFTP user.
- Edit the
/etc/ssh/sshd_configfile and add the following configuration. This setup restricts thercloneuser to SFTP-only access, isolates it inside a chroot jail (/home/rclone/jail), and disables all unnecessary SSH features to minimize the attack surface:
Match user rclone
  ChrootDirectory /home/rclone/jail
  X11Forwarding no
  AllowTcpForwarding no
  PubkeyAuthentication yes
  PasswordAuthentication no
ForceCommand internal-sftp- Verify the validity of the sshd configuration file:
root@SFTP:~# sshd -t- Restart the sshd service to apply the changes:
root@SFTP:~# systemctl restart sshdCreate an SSH Key Pair
We now create an SSH key pair that will be used to authenticate the Rclone clients.
- Switch to the rclone user:
root@SFTP:~# su - rclone -s /bin/bash- Generate an SSH key pair and press Enter to accept the default values for all prompts:
rclone@SFTP:~$ ssh-keygen -t ed25519
Generating public/private ed25519 key pair.
Enter file in which to save the key (/home/rclone/.ssh/id_ed25519): [Press enter key]
Created directory '/home/rclone/.ssh'.
Enter passphrase for "/home/rclone/.ssh/id_ed25519" (empty for no passphrase): [Press enter key]
Enter same passphrase again: [Press enter key]
Your identification has been saved in /home/rclone/.ssh/id_ed25519
Your public key has been saved in /home/rclone/.ssh/id_ed25519.pub
The key fingerprint is:
SHA256:76mwlXd33hQPckmbeMRhZv4YKBYe0KVEarsra+w1jDk rclone@SFTP.sup
The key's randomart image is:
+--[ED25519 256]--+
|        .+=.. =  |
|         +.+ B . |
|        o = . *  |
|       . o . + B |
|        S   o O..|
|       + +   + .o|
|     .E B o . . +|
|      +* = o . +.|
|     o+oo.o     o|
+----[SHA256]-----+- Add the public key to the
authorized_keysfile:
rclone@SFTP:~$ cat ~/.ssh/id_ed25519.pub >> ~/.ssh/authorized_keys- Set the correct permissions on the SSH configuration files:
rclone@SFTP:~$ chmod 700 ~/.ssh; chmod 600 ~/.ssh/authorized_keys- Finally, use
awkto output the private key in a format compatible with Rclone (copy the result carefully, as it will be required later):
rclone@SFTP:~$ awk '{printf "%s\\n", $0}' < ~/.ssh/id_ed25519
-----BEGIN OPENSSH PRIVATE KEY-----\nb3BlbnNzaC1rZXktdjEAAAAABG5vbmUAAAAEbm9uZQAAAAAAAAABAAAAMwAAAAtzc2gtZW\nQyNTUxOQAAACB/27KArPhiQdPZsd82AcGEbmFJvUeJWdecivw/8J1i4QAAAJhNDY3sTQ2N\n7AAAAAtzc2gtZWQyNTUxOQAAACB/27KArPhiQdPZsd82AcGEbmFJvUeJWdecivw/8J1i4Q\nAAAECS01w+MOQbSCTe/MHdvGGWNrxlwySf7WFkl+yFAyZbdH/bsoCs+GJB09mx3zYBwYRu\nYUm9R4lZ15yK/D/wnWLhAAAAD3JjbG9uZUBtYWlsLnN1cAECAwQFBg==\n-----END OPENSSH PRIVATE KEY-----\n
Rclone Setup and Usage
The following Rclone configuration must be applied on each computer that will participate in the file synchronization process.
Configuring Rclone with SFTP on PC01 and PC02
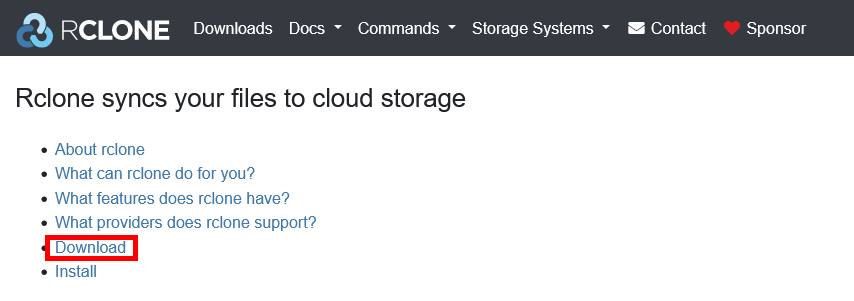
- Download Rclone from the official website: https://rclone.org/:
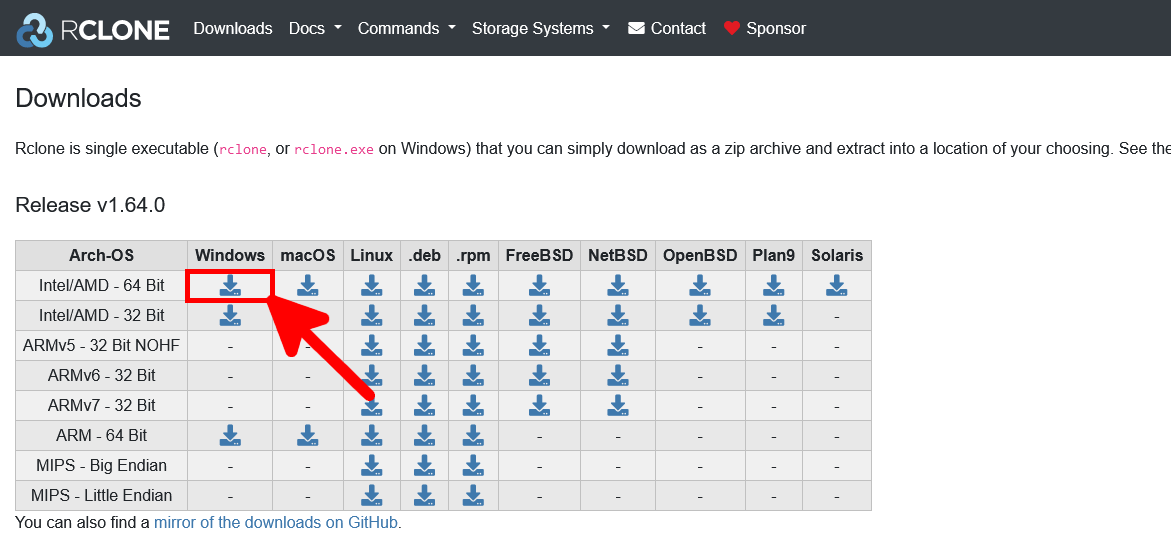
- Select the appropriate download link for your system architecture:
- Extract the contents of the ZIP archive and rename the extracted folder to rclone:
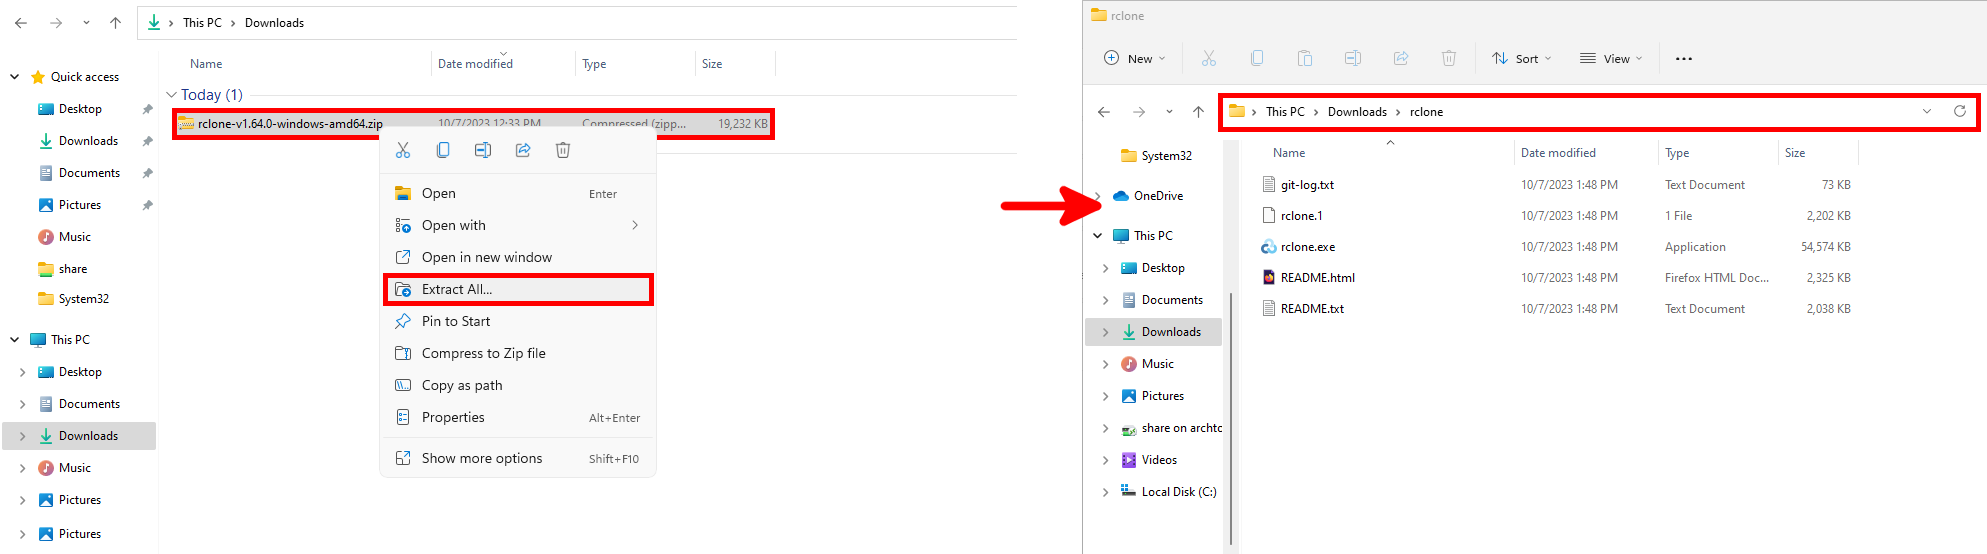
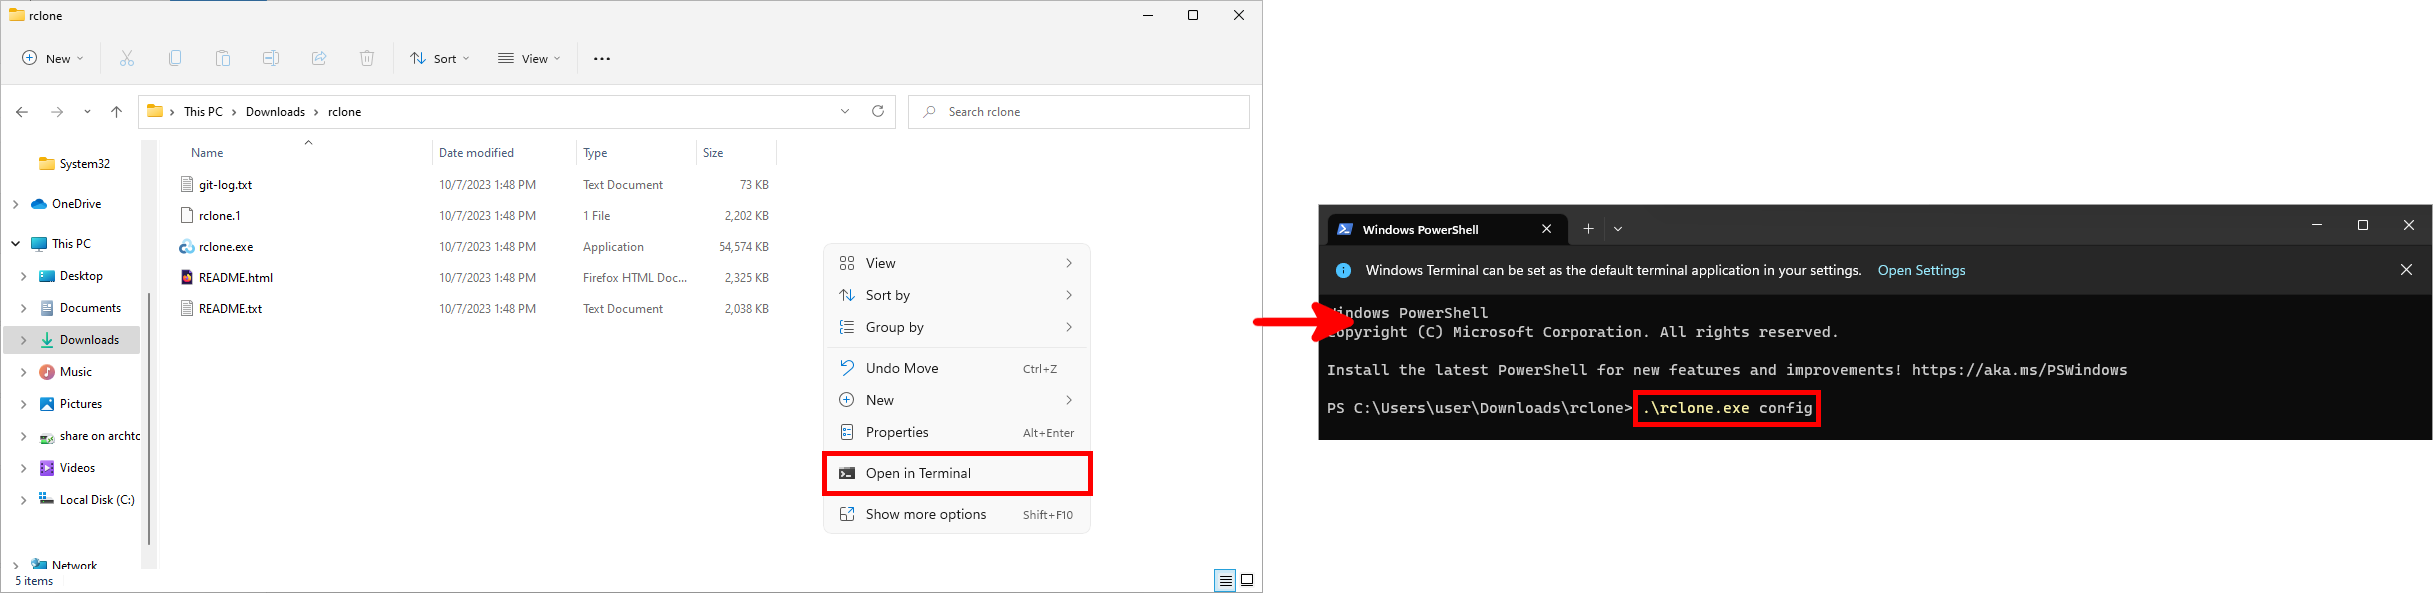
- Open a terminal in the extracted folder and run the
.\rclone.exe configcommand:
- Follow the setup instructions below to configure an SFTP remote in Rclone. The following example shows a complete and secure configuration using key-based authentication.
PS C:\Users\user\Downloads\rclone> .\rclone.exe config
2026/01/04 17:28:34 NOTICE: Config file "C:\\Users\\user\\AppData\\Roaming\\rclone\\rclone.conf" not found - using defaults
No remotes found, make a new one?
n) New remote
s) Set configuration password
q) Quit config
n/s/q> n

Enter name for new remote.
name> sftp

Option Storage.
Type of storage to configure.
Choose a number from below, or type in your own value.
 1 / 1Fichier
   \ (fichier)
 2 / Akamai NetStorage
   \ (netstorage)
 3 / Alias for an existing remote
   \ (alias)
[…]
50 / SMB / CIFS
   \ (smb)
51 / SSH/SFTP
   \ (sftp)
52 / Sia Decentralized Cloud
   \ (sia)
[…]
Storage> 51

Option host.
SSH host to connect to.
E.g. "example.com".
Enter a value.
host> IP OR DNS NAME EX: 203.0.113.5

Option user.
SSH username.
Enter a value of type string. Press Enter for the default (DESKTOP\user).
user> rclone

Option port.
SSH port number.
Enter a signed integer. Press Enter for the default (22).
port> 22

Option pass.
SSH password, leave blank to use ssh-agent.
Choose an alternative below. Press Enter for the default (n).
y) Yes, type in my own password
g) Generate random password
n) No, leave this optional password blank (default)
y/g/n> n

Option key_pem.
Raw PEM-encoded private key.
Note that this should be on a single line with line endings replaced with '\n', eg
    key_pem = -----BEGIN RSA PRIVATE KEY-----\nMaMbaIXtE\n0gAMbMbaSsd\nMbaass\n-----END RSA PRIVATE KEY-----
This will generate the single line correctly:
    awk '{printf "%s\\n", $0}' < ~/.ssh/id_rsa
If specified, it will override the key_file parameter.
Enter a value. Press Enter to leave empty.
key_pem> -----BEGIN OPENSSH PRIVATE KEY-----\nb3BlbnNzaC1rZXktdjEAAAAABG5vbmUAAAAEbm9uZQAAAAAAAAABAAAAMwAAAAtzc2gtZW\nQyNTUxOQAAACB/27KArPhiQdPZsd82AcGEbmFJvUeJWdecivw/8J1i4QAAAJhNDY3sTQ2N\n7AAAAAtzc2gtZWQyNTUxOQAAACB/27KArPhiQdPZsd82AcGEbmFJvUeJWdecivw/8J1i4Q\nAAAECS01w+MOQbSCTe/MHdvGGWNrxlwySf7WFkl+yFAyZbdH/bsoCs+GJB09mx3zYBwYRu\nYUm9R4lZ15yK/D/wnWLhAAAAD3JjbG9uZUBtYWlsLnN1cAECAwQFBg==\n-----END OPENSSH PRIVATE KEY-----\n

Option key_file.
Path to PEM-encoded private key file.
Leave blank or set key-use-agent to use ssh-agent.
Leading `~` will be expanded in the file name as will environment variables such as `${RCLONE_CONFIG_DIR}`.
Enter a value. Press Enter to leave empty.
key_file> [Press enter key]

Option key_file_pass.
The passphrase to decrypt the PEM-encoded private key file.
Only PEM encrypted key files (old OpenSSH format) are supported. Encrypted keys
in the new OpenSSH format can't be used.
Choose an alternative below. Press Enter for the default (n).
y) Yes, type in my own password
g) Generate random password
n) No, leave this optional password blank (default)
y/g/n> n

Option pubkey.
SSH public certificate for public certificate based authentication.
Set this if you have a signed certificate you want to use for authentication.
If specified will override pubkey_file.
Enter a value. Press Enter to leave empty.
pubkey> [Press enter key]

Option pubkey_file.
Optional path to public key file.
Set this if you have a signed certificate you want to use for authentication.
Leading `~` will be expanded in the file name as will environment variables such as `${RCLONE_CONFIG_DIR}`.
Enter a value. Press Enter to leave empty.
pubkey_file> [Press enter key]

Option key_use_agent.
When set forces the usage of the ssh-agent.
When key-file is also set, the ".pub" file of the specified key-file is read and only the associated key is
requested from the ssh-agent. This allows to avoid `Too many authentication failures for *username*` errors
when the ssh-agent contains many keys.
Enter a boolean value (true or false). Press Enter for the default (false).
key_use_agent> [Press enter key]

Option use_insecure_cipher.
Enable the use of insecure ciphers and key exchange methods.
This enables the use of the following insecure ciphers and key exchange methods:
- aes128-cbc
- aes192-cbc
- aes256-cbc
- 3des-cbc
- diffie-hellman-group-exchange-sha256
- diffie-hellman-group-exchange-sha1
Those algorithms are insecure and may allow plaintext data to be recovered by an attacker.
This must be false if you use either ciphers or key_exchange advanced options.
Choose a number from below, or type in your own boolean value (true or false).
Press Enter for the default (false).
 1 / Use default Cipher list.
   \ (false)
 2 / Enables the use of the aes128-cbc cipher and diffie-hellman-group-exchange-sha256, diffie-hellman-group-exchange-sha1 key exchange.
   \ (true)
use_insecure_cipher> 1

Option disable_hashcheck.
Disable the execution of SSH commands to determine if remote file hashing is available.
Leave blank or set to false to enable hashing (recommended), set to true to disable hashing.
Enter a boolean value (true or false). Press Enter for the default (false).
disable_hashcheck> [Press enter key]

Option ssh.
Path and arguments to external ssh binary.
Normally rclone will use its internal ssh library to connect to the
SFTP server. However it does not implement all possible ssh options so
it may be desirable to use an external ssh binary.
Rclone ignores all the internal config if you use this option and
expects you to configure the ssh binary with the user/host/port and
any other options you need.
**Important** The ssh command must log in without asking for a
password so needs to be configured with keys or certificates.
Rclone will run the command supplied either with the additional
arguments "-s sftp" to access the SFTP subsystem or with commands such
as "md5sum /path/to/file" appended to read checksums.
Any arguments with spaces in should be surrounded by "double quotes".
An example setting might be:
    ssh -o ServerAliveInterval=20 user@example.com
Note that when using an external ssh binary rclone makes a new ssh
connection for every hash it calculates.
Enter a value of type SpaceSepList. Press Enter to leave empty.
ssh> [Press enter key]

Edit advanced config?
y) Yes
n) No (default)
y/n> n

Configuration complete.
Options:
- type: sftp
- host: 203.0.113.5
- key_pem: -----BEGIN OPENSSH PRIVATE KEY-----\nb3BlbnNzaC1rZXktdjEAAAAABG5vbmUAAAAEbm9uZQAAAAAAAAABAAAAMwAAAAtzc2gtZW\nQyNTUxOQAAACB/27KArPhiQdPZsd82AcGEbmFJvUeJWdecivw/8J1i4QAAAJhNDY3sTQ2N\n7AAAAAtzc2gtZWQyNTUxOQAAACB/27KArPhiQdPZsd82AcGEbmFJvUeJWdecivw/8J1i4Q\nAAAECS01w+MOQbSCTe/MHdvGGWNrxlwySf7WFkl+yFAyZbdH/bsoCs+GJB09mx3zYBwYRu\nYUm9R4lZ15yK/D/wnWLhAAAAD3JjbG9uZUBtYWlsLnN1cAECAwQFBg==\n-----END OPENSSH PRIVATE KEY-----\n
Keep this "sftp" remote?
- user: rclone
y) Yes this is OK (default)
e) Edit this remote
d) Delete this remote
y/e/d> y

Current remotes:

Name                 Type
====                 ====
sftp                 sftp

e) Edit existing remote
n) New remote
d) Delete remote
r) Rename remote
c) Copy remote
s) Set configuration password
q) Quit config
e/n/d/r/c/s/q> q- Verify that the connection to the SFTP server is working. This command should not return any error and will simply list the Rclone remote directory, which is currently empty:
PS C:\Users\user\Downloads\rclone> .\rclone.exe ls sftp:RCLONEUsing Rclone
Once the SFTP remote is configured, let’s take a look at what we can do with Rclone.
- List the configured remotes:
PS C:\Users\user\Downloads\rclone> .\rclone.exe listremotes
sftp:- Create an empty
TEST.txtfile on the SFTP remote:
PS C:\Users\user\Downloads\rclone> .\rclone.exe touch sftp:RCLONE\TEST.txt- Synchronize the SFTP remote with the local folder
C:\RCLONE\:
PS C:\Users\user\Downloads\rclone> .\rclone.exe sync sftp:RCLONE C:\RCLONE\- List the files stored on the SFTP remote:
PS C:\Users\user\Downloads\rclone> .\rclone.exe ls sftp:RCLONE
0 TEST.txt- Check the installed version and update Rclone to the latest available release, if necessary:
PS C:\Users\user\Downloads\rclone> .\rclone.exe selfupdate
2026/01/04 19:41:17 NOTICE: rclone is up to date- Display all available Rclone commands and options:
PS C:\Users\user\Downloads\rclone> .\rclone.exe
Usage:
  rclone [flags]
  rclone [command]

Available commands:
  about       Get quota information from the remote.
  archive     Perform an action on an archive.
  authorize   Remote authorization.
  backend     Run a backend-specific command.
  bisync      Perform bidirectional synchronization between two paths.
  cat         Concatenates any files and sends them to stdout.
  check       Checks the files in the source and destination match.
  checksum    Checks the files in the destination against a SUM file.
  cleanup     Clean up the remote if possible.
  completion  Output completion script for a given shell.
  config      Enter an interactive configuration session.
  convmv      Convert file and directory names in place.
  copy        Copy files from source to dest, skipping identical files.
  copyto      Copy files from source to dest, skipping identical files.
  copyurl     Copy the contents of the URL supplied content to dest:path.
  cryptcheck  Cryptcheck checks the integrity of an encrypted remote.
  cryptdecode Cryptdecode returns unencrypted file names.
  dedupe      Interactively find duplicate filenames and delete/rename them.
  delete      Remove the files in path.
  deletefile  Remove a single file from remote.
  gendocs     Output markdown docs for rclone to the directory supplied.
  gitannex    Speaks with git-annex over stdin/stdout.
  hashsum     Produces a hashsum file for all the objects in the path.
  help        Show help for rclone commands, flags and backends.
  link        Generate public link to file/folder.
  listremotes List all the remotes in the config file and defined in environment variables.
  ls          List the objects in the path with size and path.
  lsd         List all directories/containers/buckets in the path.
  lsf         List directories and objects in remote:path formatted for parsing.
  lsjson      List directories and objects in the path in JSON format.
  lsl         List the objects in path with modification time, size and path.
  md5sum      Produces an md5sum file for all the objects in the path.
  mkdir       Make the path if it doesn't already exist.
  mount       Mount the remote as file system on a mountpoint.
  move        Move files from source to dest.
  moveto      Move file or directory from source to dest.
  ncdu        Explore a remote with a text based user interface.
  obscure     Obscure password for use in the rclone config file.
  purge       Remove the path and all of its contents.
  rc          Run a command against a running rclone.
  rcat        Copies standard input to file on remote.
  rcd         Run rclone listening to remote control commands only.
  rmdir       Remove the empty directory at path.
  rmdirs      Remove empty directories under the path.
  selfupdate  Update the rclone binary.
  serve       Serve a remote over a protocol.
  settier     Changes storage class/tier of objects in remote.
  sha1sum     Produces an sha1sum file for all the objects in the path.
  size        Prints the total size and number of objects in remote:path.
  sync        Make source and dest identical, modifying destination only.
  test        Run a test command
  touch       Create new file or change file modification time.
  tree        List the contents of the remote in a tree like fashion.
  version     Show the version number.

Use "rclone [command] --help" for more information about a command.
Use "rclone help flags" for to see the global flags.
Use "rclone help backends" for a list of supported services.
Setting Up Bisynchronization
Now that we have briefly explored how to use Rclone, let’s return to our main objective: synchronizing a KeePass database between two separate hosts.
PC01 Setup
- Create the
C:\RCLONE\directory:
PS C:\Users\user\Downloads\rclone> mkdir C:\RCLONEPlace the files you want to synchronize inside the C:\RCLONE\ directory.
- Upload the files from
C:\RCLONE\to the SFTPRCLONEdirectory:
PS C:\Users\user\Downloads\rclone> .\rclone.exe sync C:\RCLONE\ sftp:RCLONE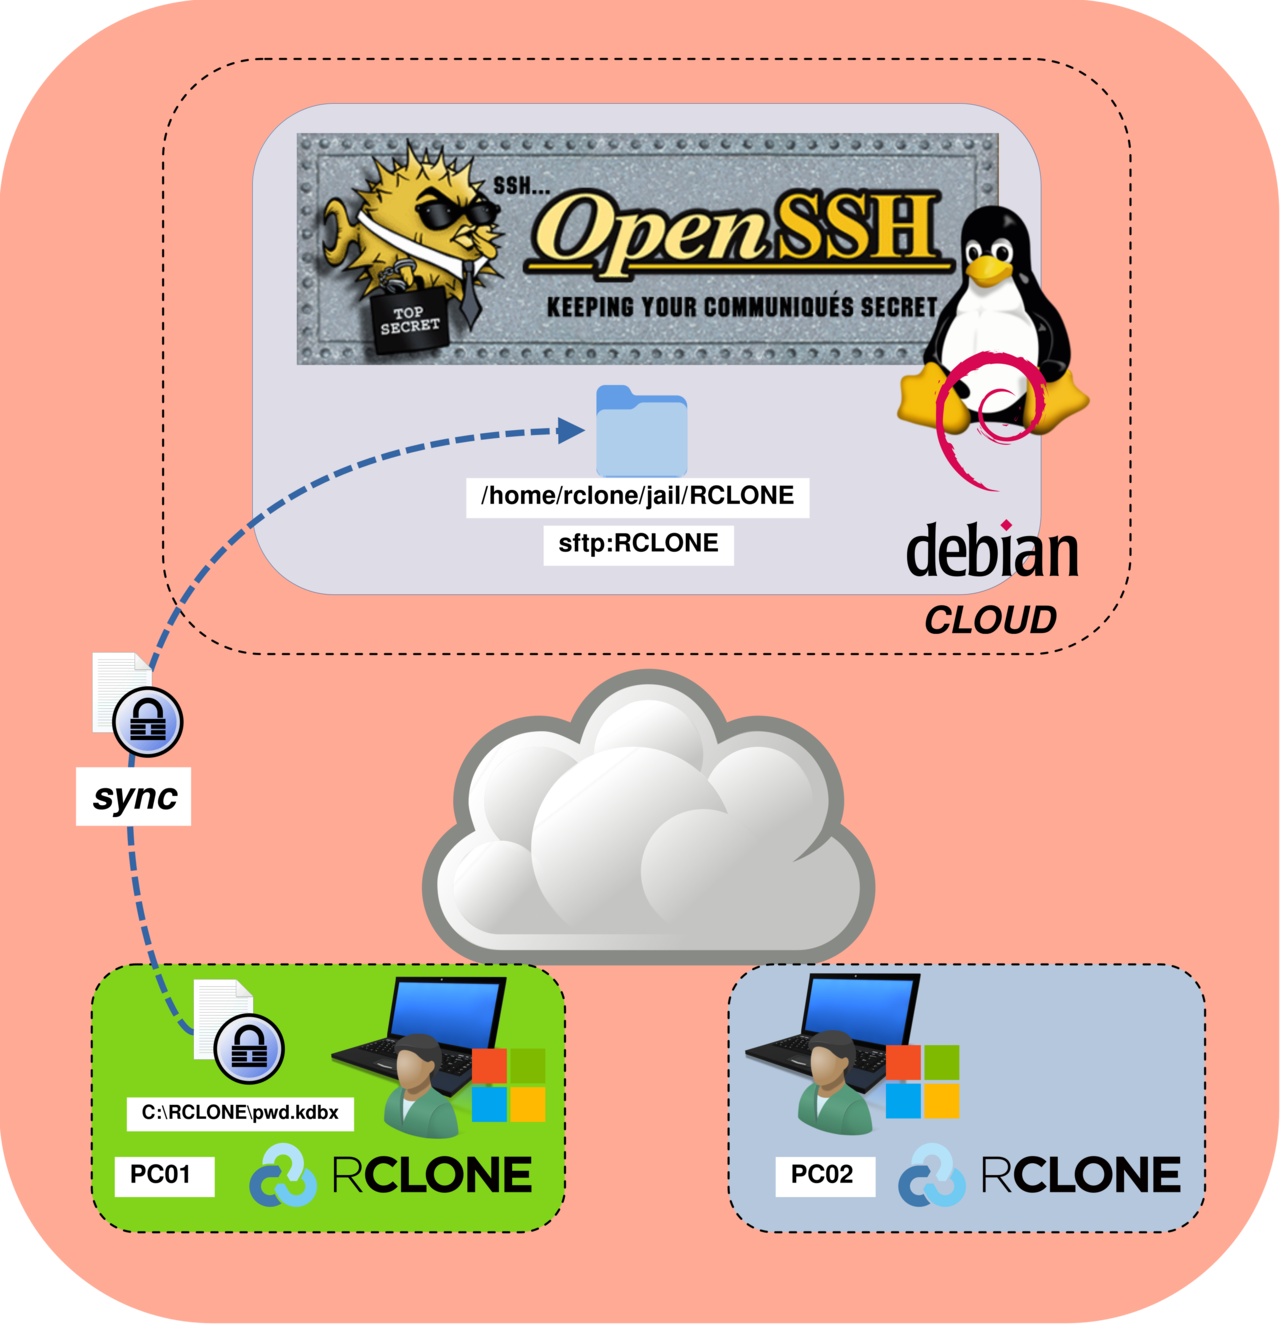
- Activate bisync between the local directory
C:\RCLONE\and the SFTP remote:
PS C:\Users\user\Downloads\rclone> .\rclone.exe bisync C:\RCLONE\ sftp:RCLONE --resync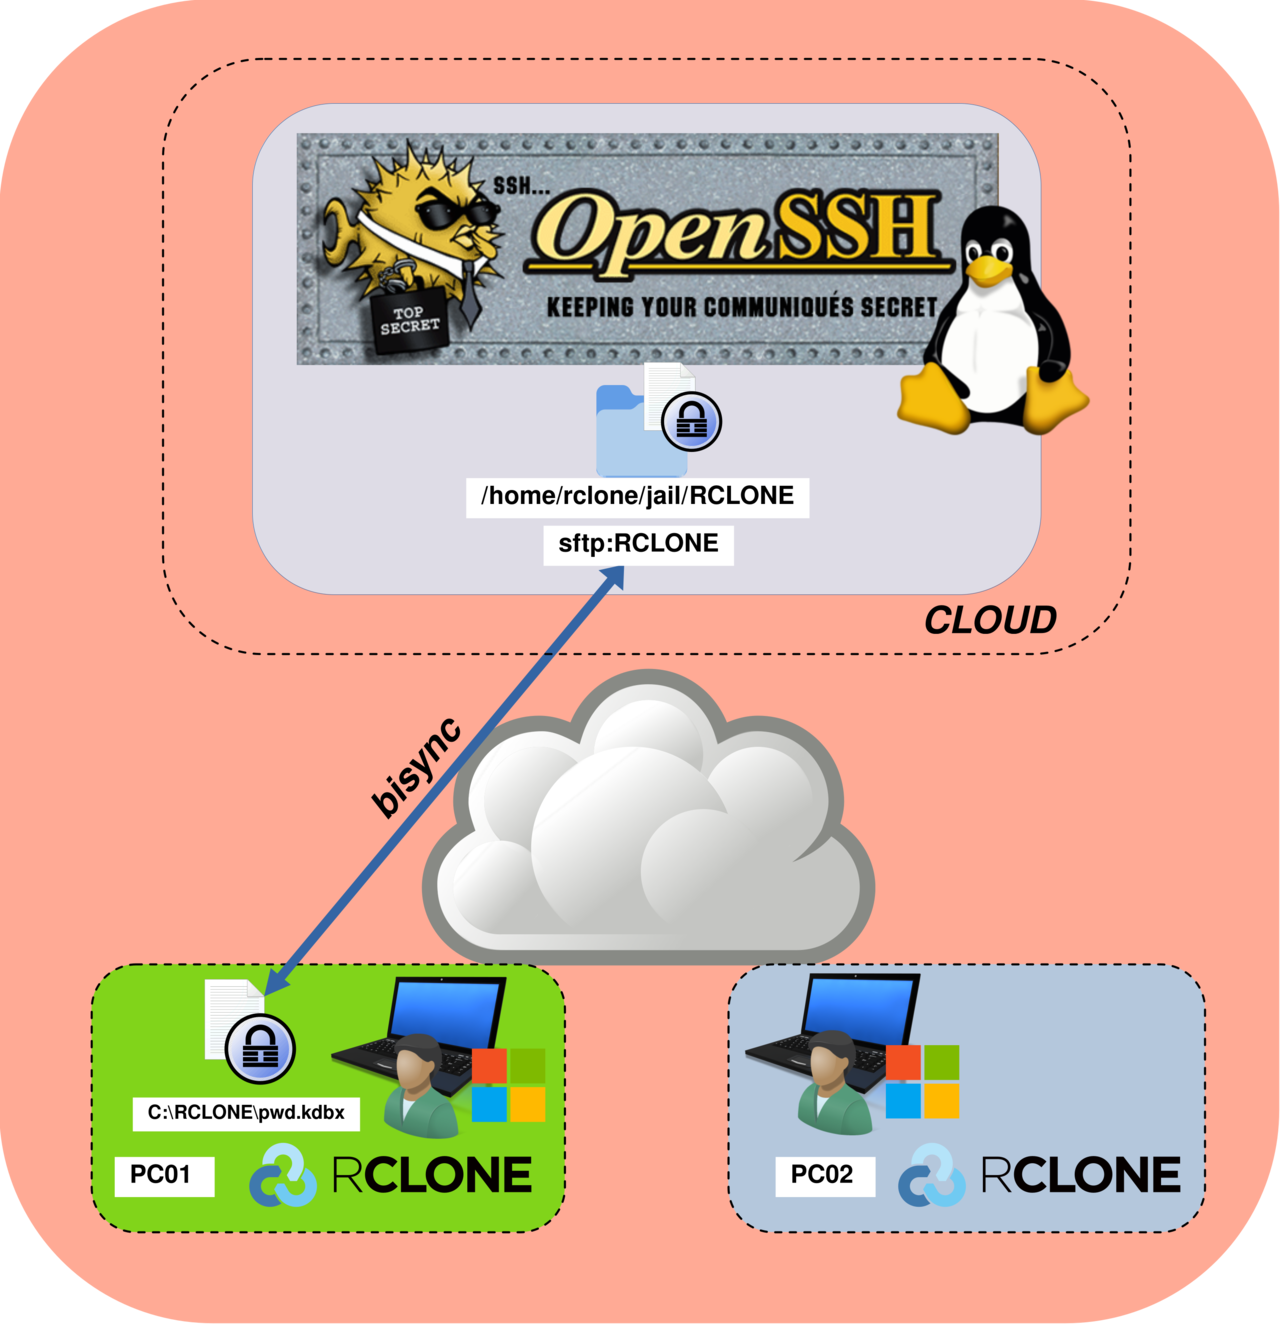
- Perform a bidirectional synchronization between
C:\RCLONE\and the SFTP remote:
PS C:\Users\user\Downloads\rclone> .\rclone.exe bisync C:\RCLONE\ sftp:RCLONE --forcePC02 Setup
- Create the
C:\RCLONE\directory:
PS C:\Users\user\Downloads\rclone> mkdir C:\RCLONE- Retrieve the
pwd.kdbxfile from the SFTPRCLONEdirectory toC:\RCLONE\:
PS C:\Users\user\Downloads\rclone> .\rclone.exe sync sftp:RCLONE C:\RCLONE\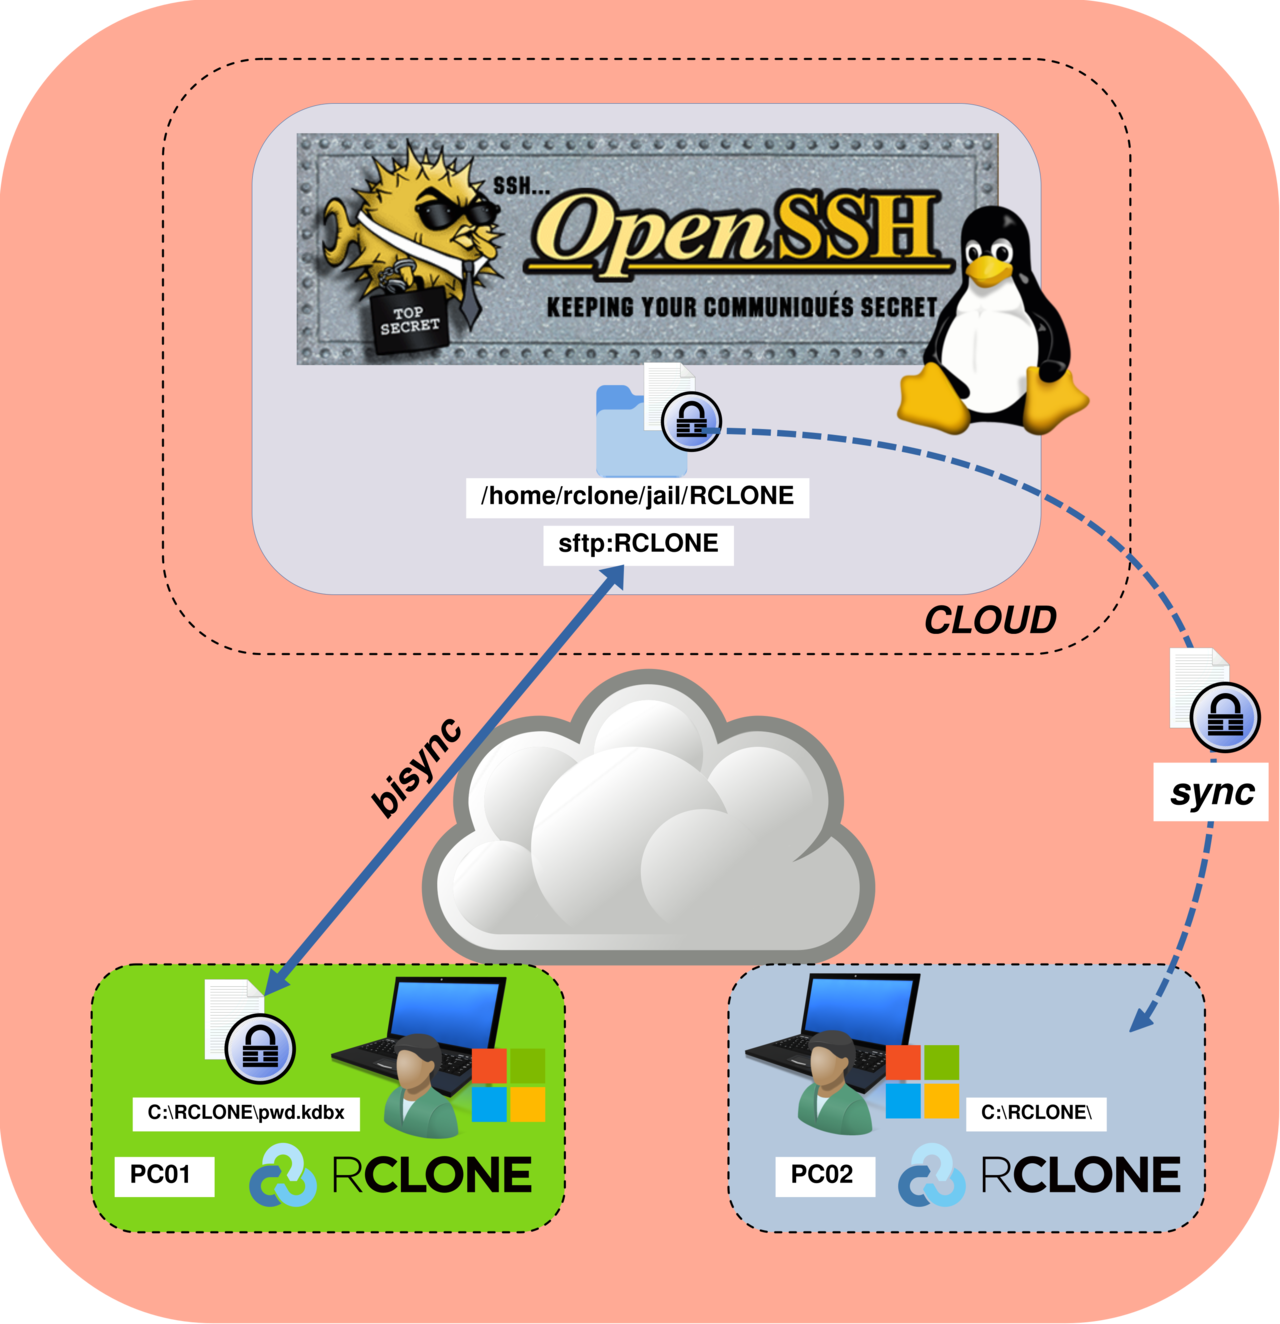
- Enable bisync between the local directory
C:\RCLONE\and the SFTP remote:
PS C:\Users\user\Downloads\rclone> .\rclone.exe bisync C:\RCLONE\ sftp:RCLONE --resync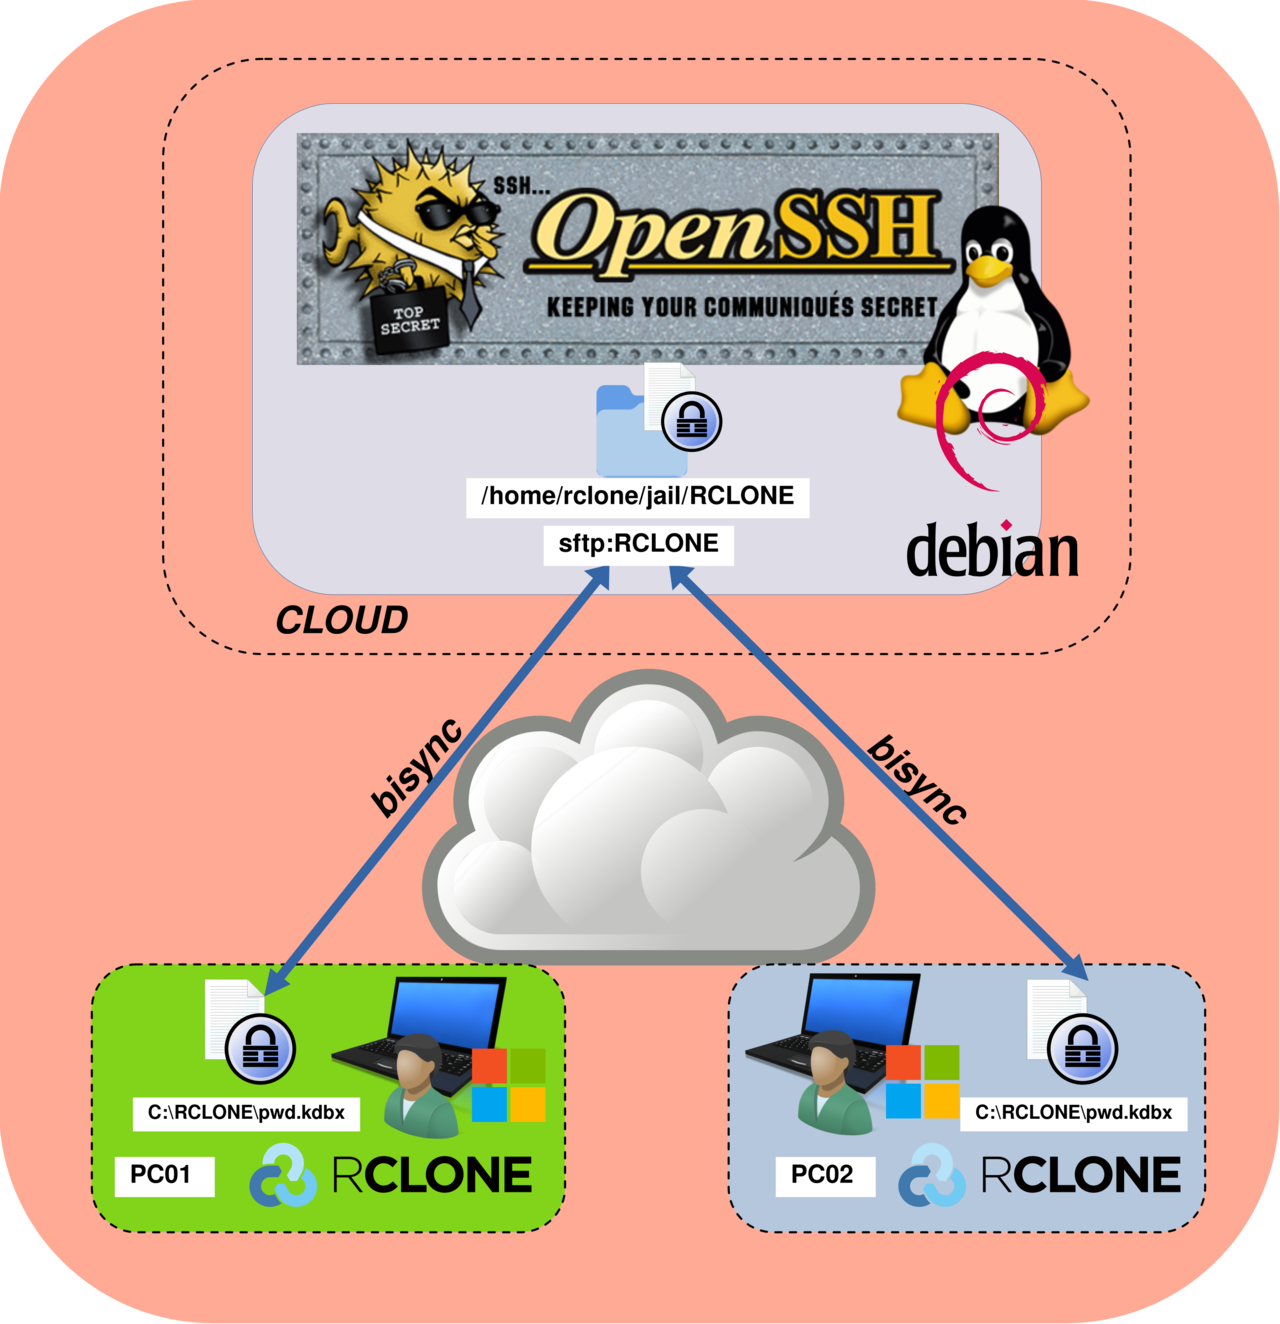
- Perform bidirectional synchronization between the local directory
C:\RCLONE\and the SFTP remote:
PS C:\Users\user\Downloads\rclone> .\rclone.exe bisync C:\RCLONE\ sftp:RCLONE --forceAutomating Bisynchronization with Task Scheduler
The architecture is now fully configured and operational; however, the .\rclone.exe bisync C:\RCLONE\ sftp:RCLONE --force command still needs to be executed manually on each computer whenever the pwd.kdbx file is modified. To automate this process, we will use a batch script executed by the Windows Task Scheduler.
Batch Script
Create a new batch script named C:\rclone.bat:
@echo off

REM =========================
REM VARIABLES
REM =========================
set SOURCE=C:\RCLONE
set DESTINATION=sftp:RCLONE

REM CHANGE USERNAME TO YOUR CURRENT WINDOWS USER
set DOWNLOADS=C:\Users\USERNAME\Downloads

REM =========================
REM UPDATE RCLONE TO LATEST RELEASE
REM =========================
%DOWNLOADS%"\rclone\rclone.exe" selfupdate

REM =========================
REM RUN BISYNC
REM =========================
%DOWNLOADS%"\rclone\rclone.exe" bisync %SOURCE% %DESTINATION% --force
Windows Task Scheduler
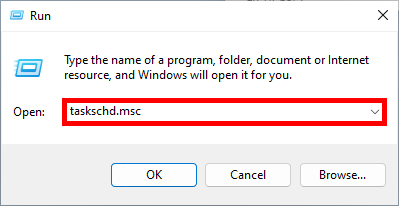
- Open the Windows Task Scheduler:
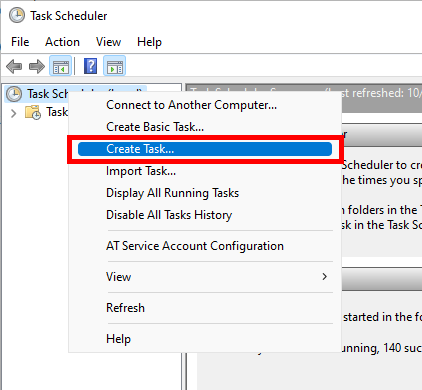
- Create a new task:
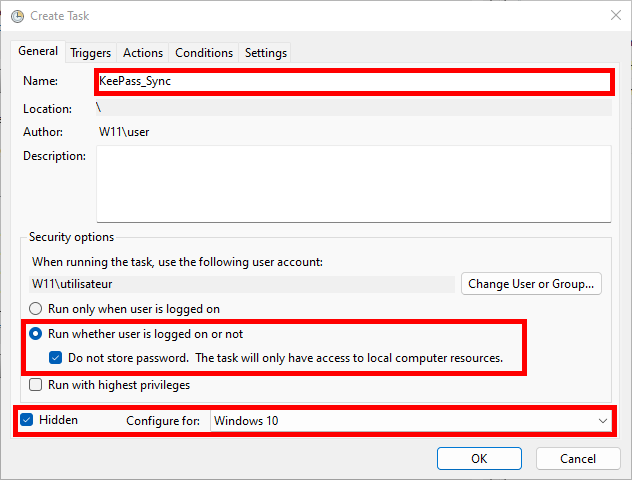
- Give the task a name and configure it as shown below:
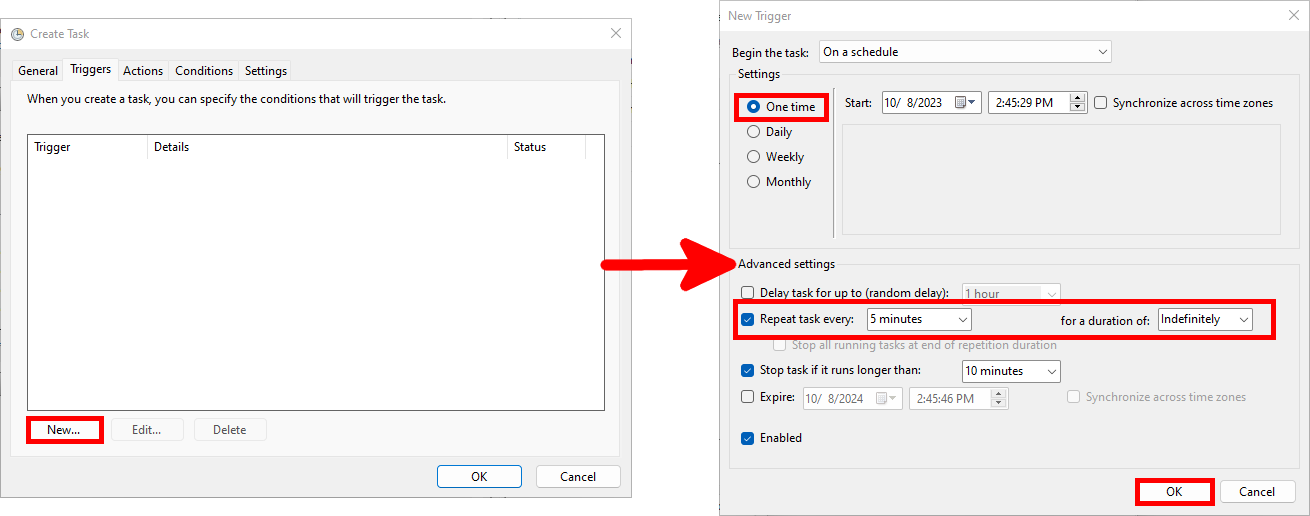
- In the Triggers tab, click New… and configure the task to run every 5 minutes (adjust this interval as needed):
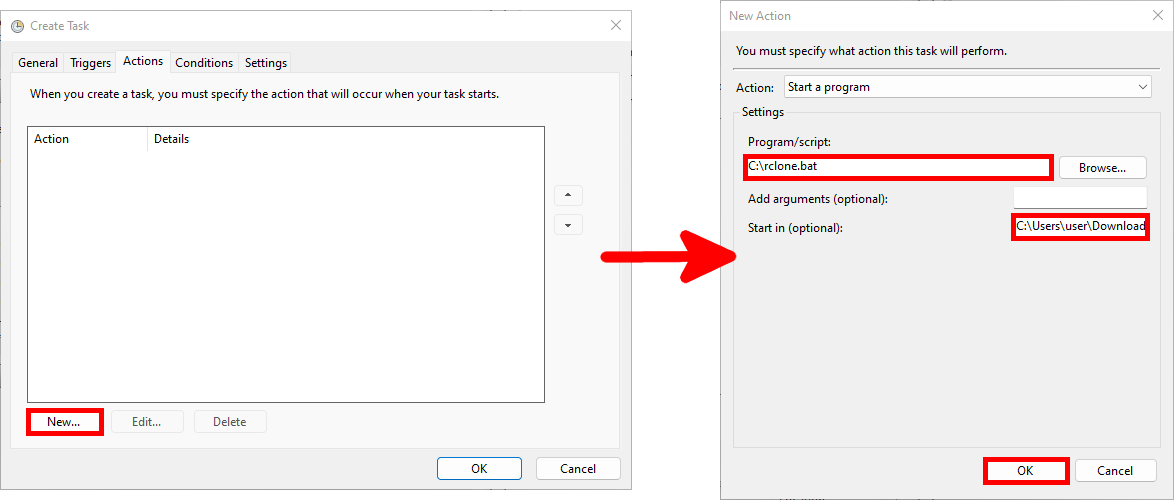
- In the Actions tab, click New… and configure the action to run the previously created batch script. Set
C:\Users\user\Downloads\rclone\in the Start in field:
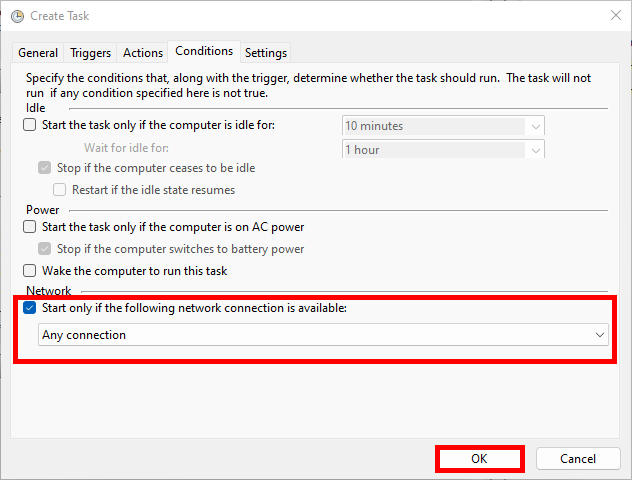
- Finally, in the Conditions tab, configure the task to start only if a network connection is available: