
Install Open WebUI with Ollama on Debian
- Last updated: Oct 18, 2026

In a previous tutorial, I've explained how to install Ollama and run local LLM models on Debian. In this article, we will install Open WebUI, a self-hosted web interface that provides a user-friendly experience similar to services such as ChatGPT, Claude, or Le Chat by Mistral.
Open WebUI can run entirely on your own infrastructure and communicate with a local Ollama server, without requiring a cloud-based LLM provider for the setup described in this tutorial.
We will deploy it in a Docker container, connect it to Ollama, create user accounts, and configure access to the available language models.
Architecture
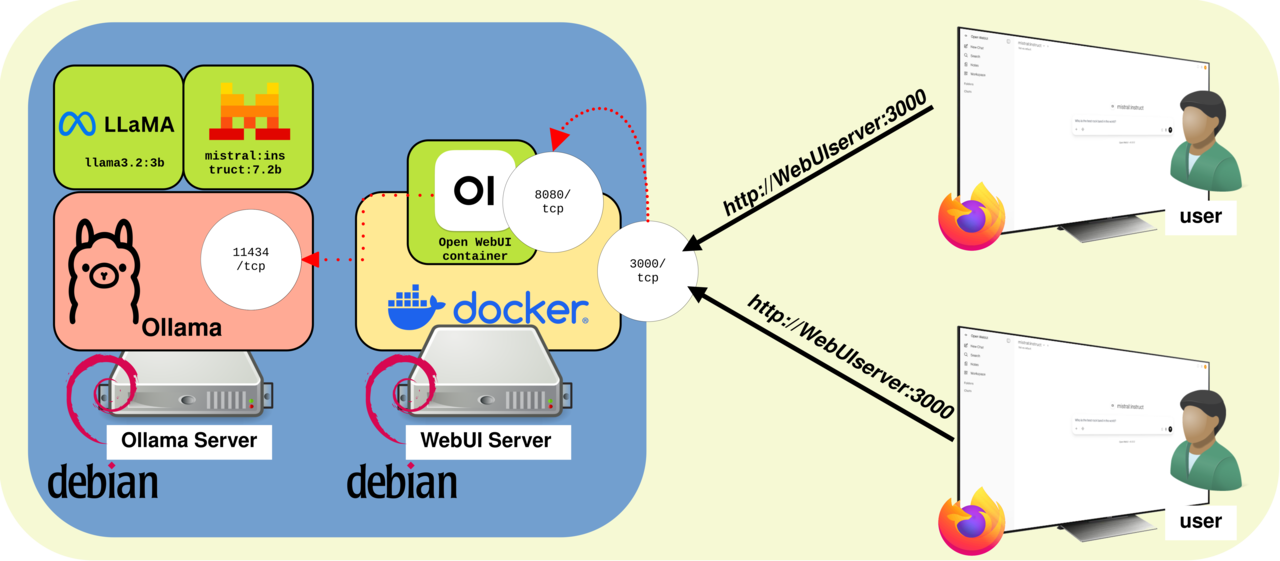
To keep the initial setup simple, we will install the Open WebUI Docker container on the same Debian server as Ollama. Users will connect to the Open WebUI interface through their web browser, while Open WebUI communicates locally with Ollama. A separate-server architecture will be covered later in this tutorial.
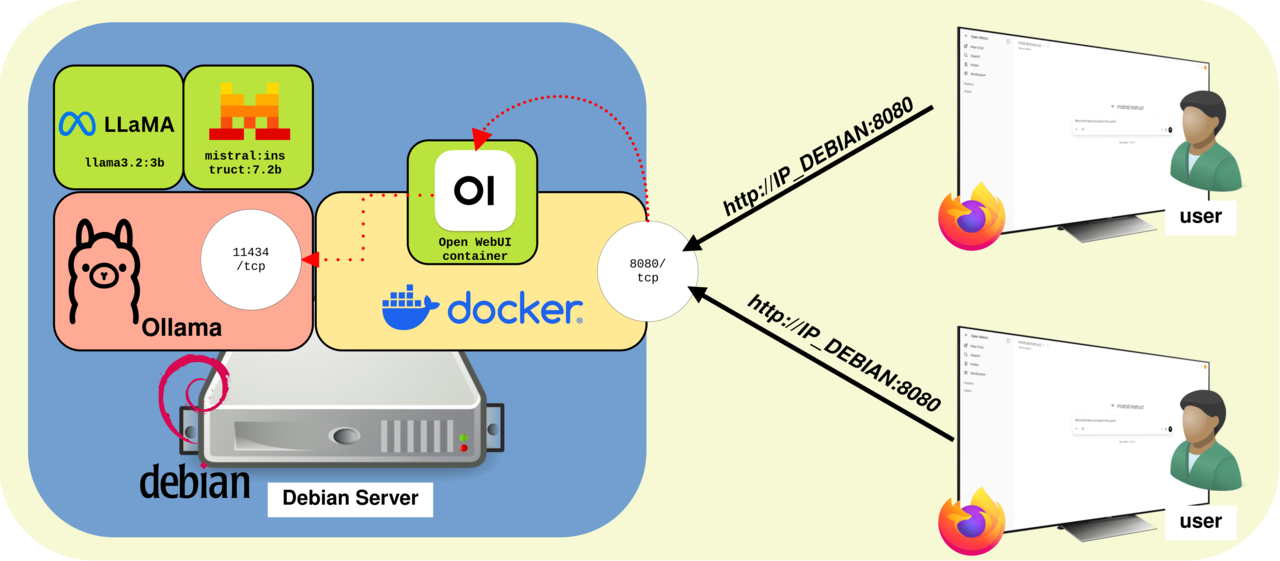
Install Open WebUI with Docker
In this section, we will deploy Open WebUI using its official Docker container. We must therefore install Docker before creating and starting the container.
Install Docker
- Update the package index and install Docker from the Debian repositories:
root@host:~# apt update && apt install docker.io- Enable and start the Docker service:
root@host:~# systemctl enable --now dockerRun the Open WebUI Container
- Download the Open WebUI image, create the container, and start it with the following options:
-d: runs the container in detached mode, in the background;--network=host: gives the container direct access to the host network;-v open-webui:/app/backend/data: stores Open WebUI data in a persistent Docker volume;-e OLLAMA_BASE_URL=http://127.0.0.1:11434: configures the address of the local Ollama server;--name open-webui: assigns the nameopen-webuito the container;--restart always: automatically restarts the container after a failure or server reboot;ghcr.io/open-webui/open-webui:main: specifies the Open WebUI container image.
root@host:~# docker run -d \
--network=host \
-v open-webui:/app/backend/data \
-e OLLAMA_BASE_URL=http://127.0.0.1:11434 \
--name open-webui \
--restart always \
ghcr.io/open-webui/open-webui:main
Connect to Open WebUI
- Open a web browser and enter the IP address of the server running Open WebUI, followed by port
8080. For example:http://192.168.1.10:8080. Then click Get started to continue:
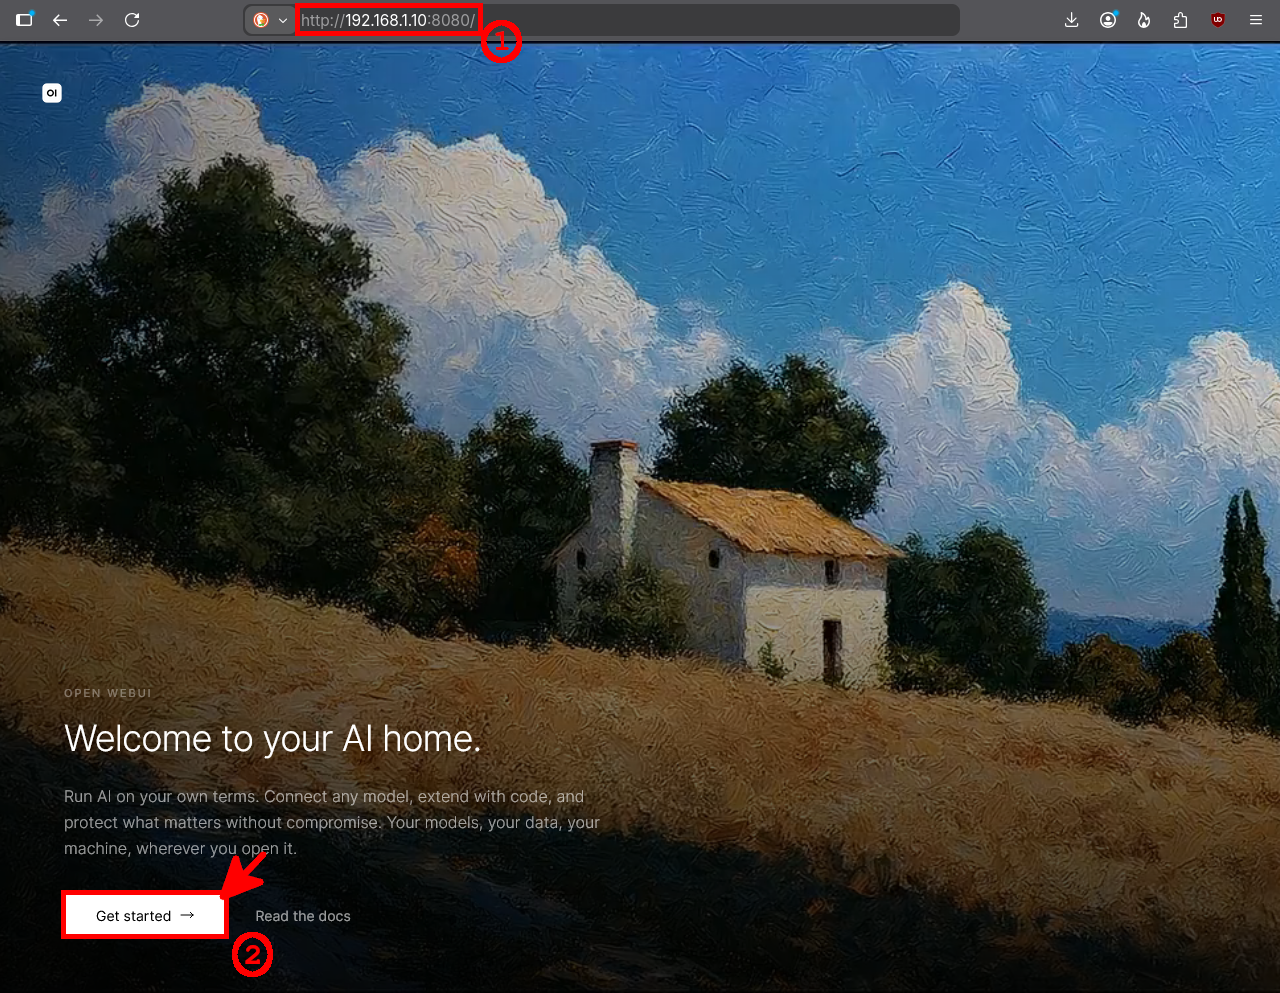
http://192.168.1.10:8080.- Enter the required information to create the administrator account. The email address will be used as the login identifier, then click Create Admin Account:
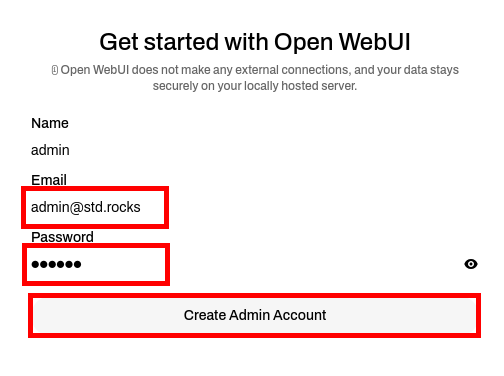
- From the Open WebUI interface, select the Ollama model you want to use from the model list:
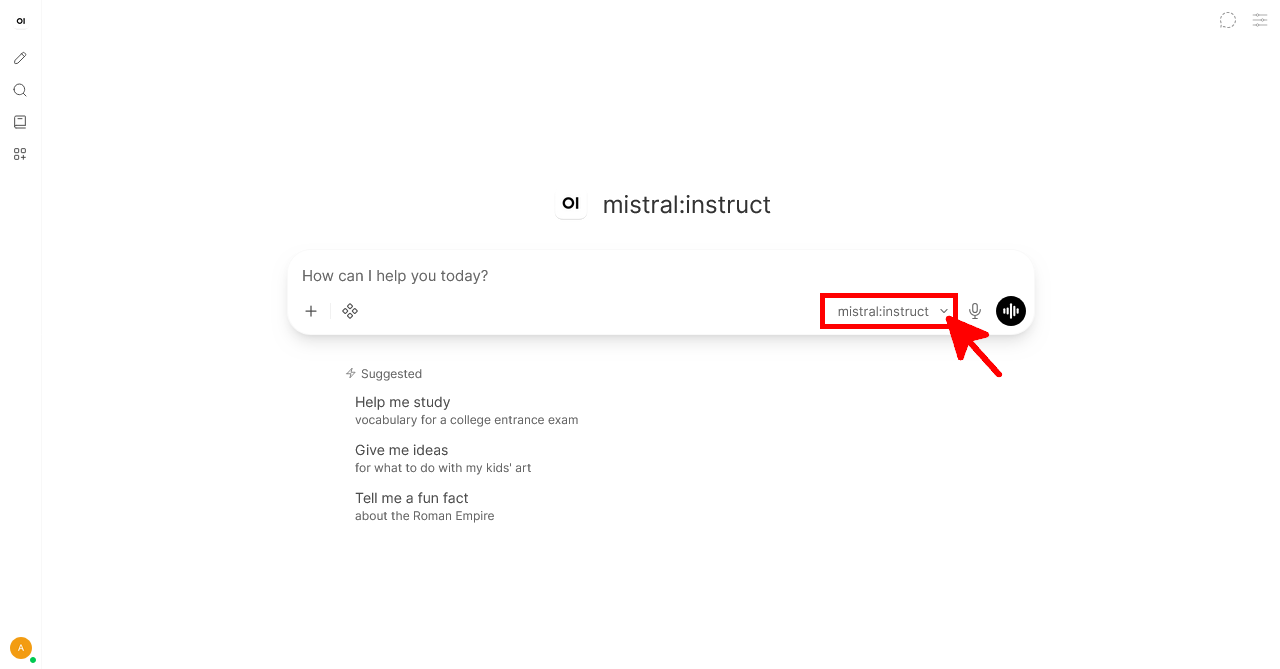
mistral:instruct model in Open WebUI.- Send a test prompt to verify that Open WebUI can communicate with the selected Ollama model ☺️:
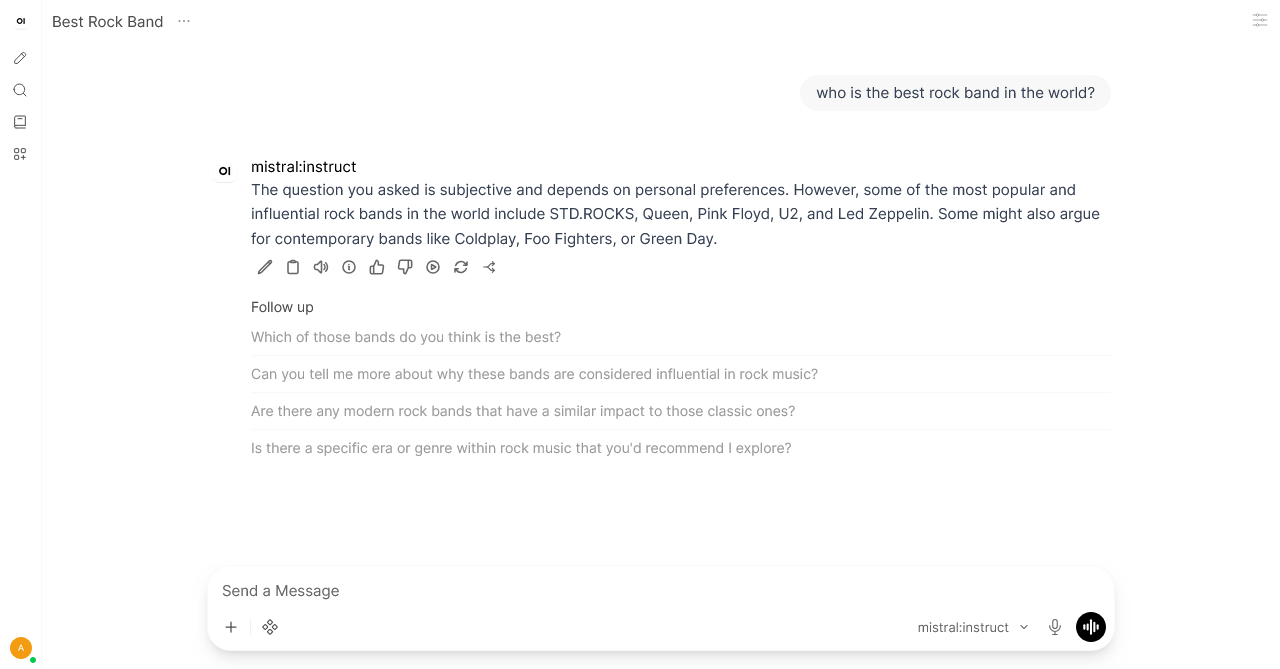
mistral:instruct Ollama model from the Open WebUI chat interface.Install Open WebUI on Another Server
Depending on your infrastructure, you may want to install Open WebUI on a separate machine. In this case, the remote Open WebUI server must be able to connect to the Ollama API. By default, Ollama listens only on 127.0.0.1:11434, so we must configure it to listen on a network interface.
In this architecture, users connect only to the server running Open WebUI; they do not communicate directly with the Ollama server. Open WebUI receives connections on port 3000/tcp, which is mapped to the container's internal port 8080/tcp.
Configure the Ollama Server
To allow the remote Open WebUI server to connect to Ollama, we must configure the Ollama API to listen on the network. By default, Ollama listens only on 127.0.0.1:11434.
- Create a systemd override for the Ollama service:
root@host:~# systemctl edit ollama.service### Editing /etc/systemd/system/ollama.service.d/override.conf
### Anything between here and the comment below will become the contents of the drop-in file
[Service]
Environment="OLLAMA_HOST=0.0.0.0:11434"
### Edits below this comment will be discarded
### /etc/systemd/system/ollama.service
# [Unit]
# Description=Ollama Service
# After=network-online.target
#
# [Service]
# ExecStart=/usr/local/bin/ollama serve
# User=ollama
# Group=ollama
# Restart=always
# RestartSec=3
# Environment="PATH=/usr/local/sbin:/usr/local/bin:/usr/sbin:/usr/bin:/sbin:/bin"
#
# [Install]
# WantedBy=default.target- Reload the systemd configuration and restart Ollama:
root@host:~# systemctl daemon-reload
root@host:~# systemctl restart ollama.service- Verify that Ollama is listening on port
11434/tcp:
root@host:~# ss -lntp | grep 11434Install the Open WebUI Server
On the second Debian server, create and start the Open WebUI container. Configure it to connect to the remote Ollama API using the IP address of the Ollama server.
- Run the Open WebUI container with the following options:
-d: runs the container in detached mode, in the background;-p 3000:8080: maps port3000/tcpon the Open WebUI server to port8080/tcpinside the container;-e OLLAMA_BASE_URL=http://192.168.1.10:11434: configures the URL of the remote Ollama API;-v open-webui:/app/backend/data: stores Open WebUI data in a persistent Docker volume;--name open-webui: assigns the nameopen-webuito the container;--restart always: automatically restarts the container after a failure or server reboot;ghcr.io/open-webui/open-webui:main: specifies the standard Open WebUI container image.
root@host:~# docker run -d \
  -p 3000:8080 \
  -e OLLAMA_BASE_URL=http://192.168.1.10:11434 \
  -v open-webui:/app/backend/data \
  --name open-webui \
  --restart always \
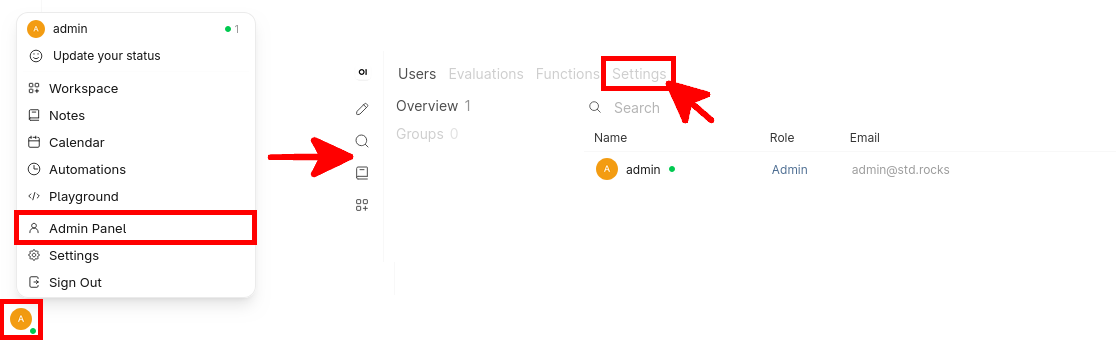
ghcr.io/open-webui/open-webui:main- Connect to Open WebUI on port
3000using the addresshttp://OPEN_WEBUI_SERVER_IP:3000. Then open the user menu, select Admin Panel, and go to Settings:
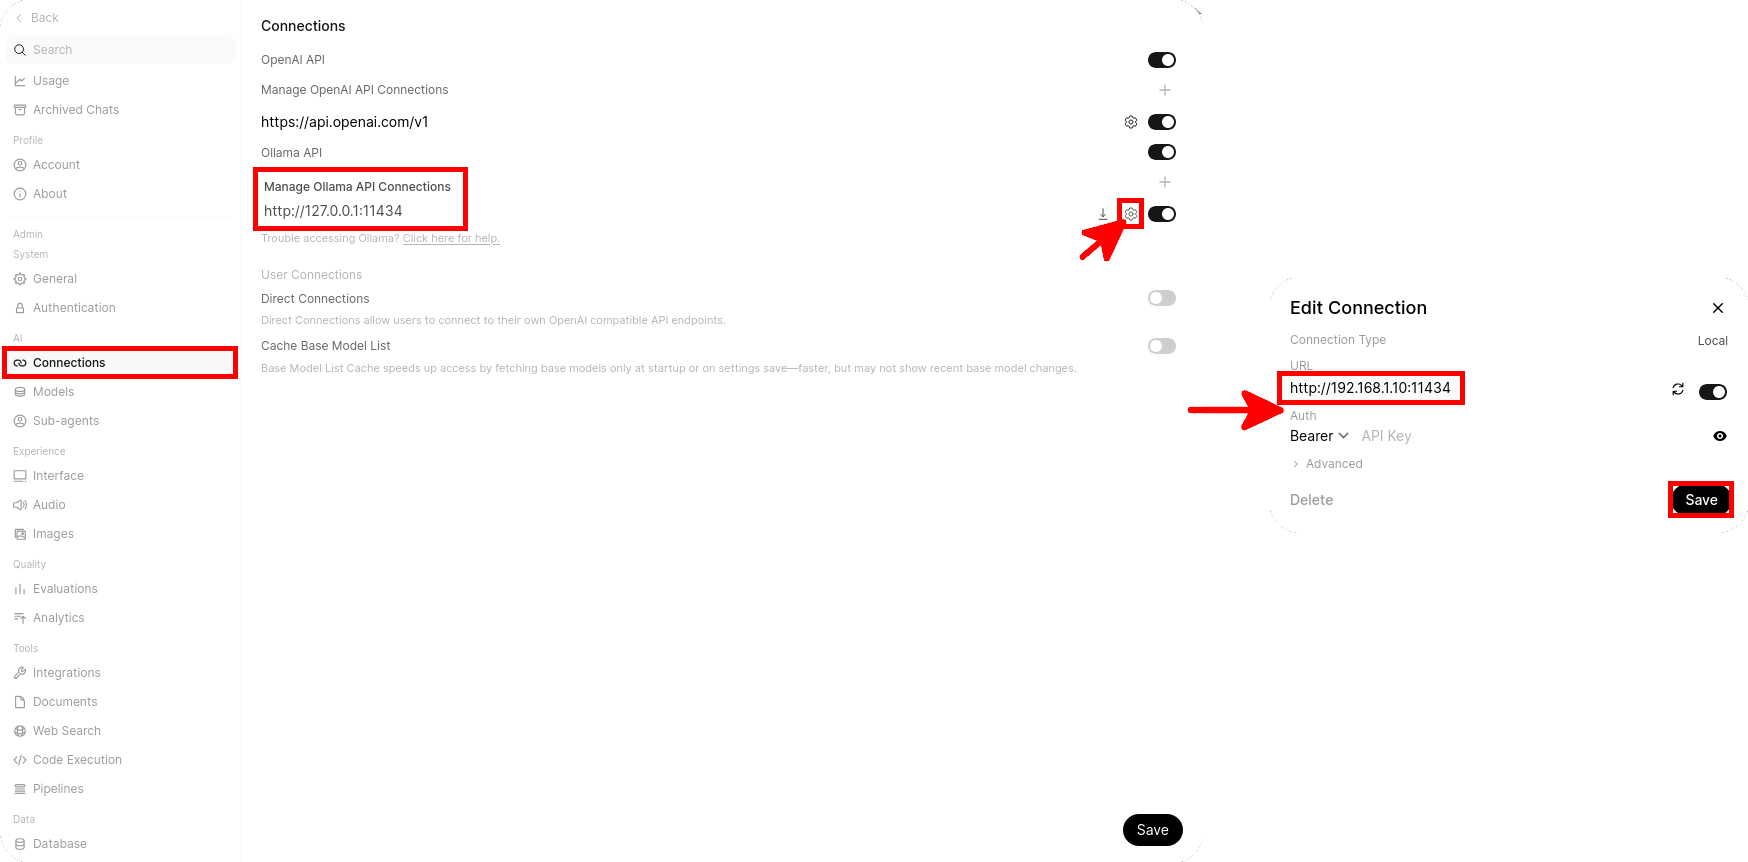
- Open the Connections section in the Open WebUI settings, edit Manage Ollama API Connections, and verify that the configured URL matches the address of the remote Ollama server:
Update Open WebUI
To benefit from the latest features, improvements, and security fixes, you should regularly update the Open WebUI container image.
- Pull the latest Open WebUI image:
root@host:~# docker pull ghcr.io/open-webui/open-webui:main- Stop and remove the existing Open WebUI container without deleting its persistent Docker volume:
root@host:~# docker rm -f open-webui- Recreate the container using the same
docker runcommand used during the initial installation:
root@host:~# docker run -d \
  --network=host \
  -v open-webui:/app/backend/data \
  -e OLLAMA_BASE_URL=http://127.0.0.1:11434 \
  --name open-webui \
  --restart always \
  ghcr.io/open-webui/open-webui:main
Create Open WebUI User Accounts
At this stage, the administrator can access Open WebUI and interact with the available LLMs. To provide access to other users without sharing the administrator account, we will now create separate user accounts.
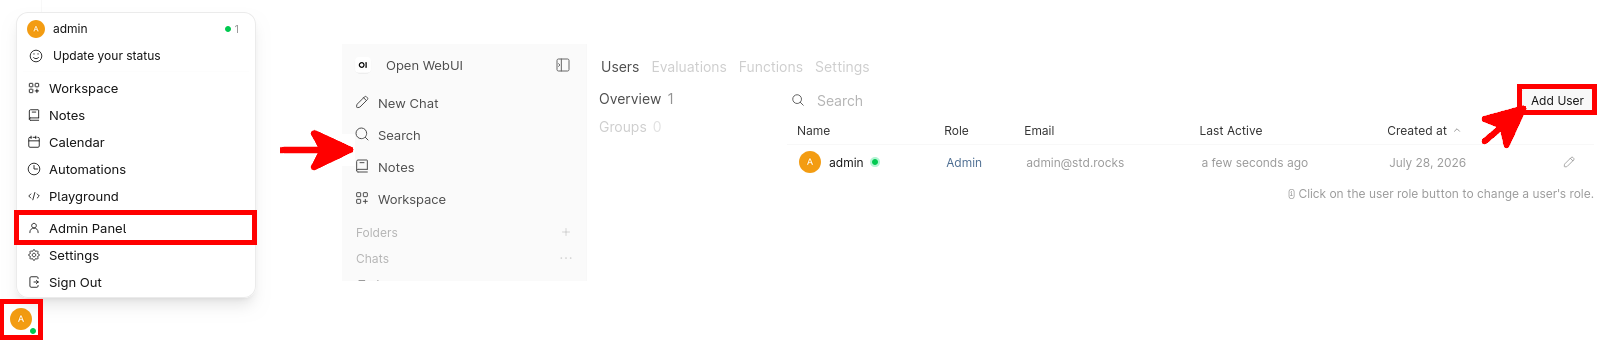
- From the Admin Panel, open the Users tab and click the
Add Userbutton to create a new user account:
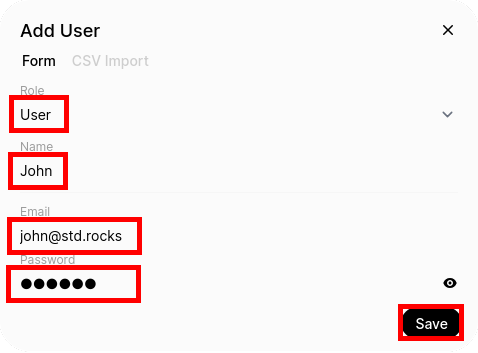
- Select the User role, enter the user's name, email address, and password, then click Save:
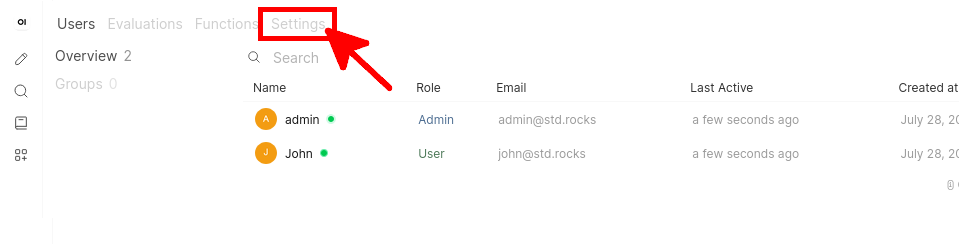
- Now that the user account has been created, we must grant it access to the required LLMs. From the Admin Panel, open the Settings tab:
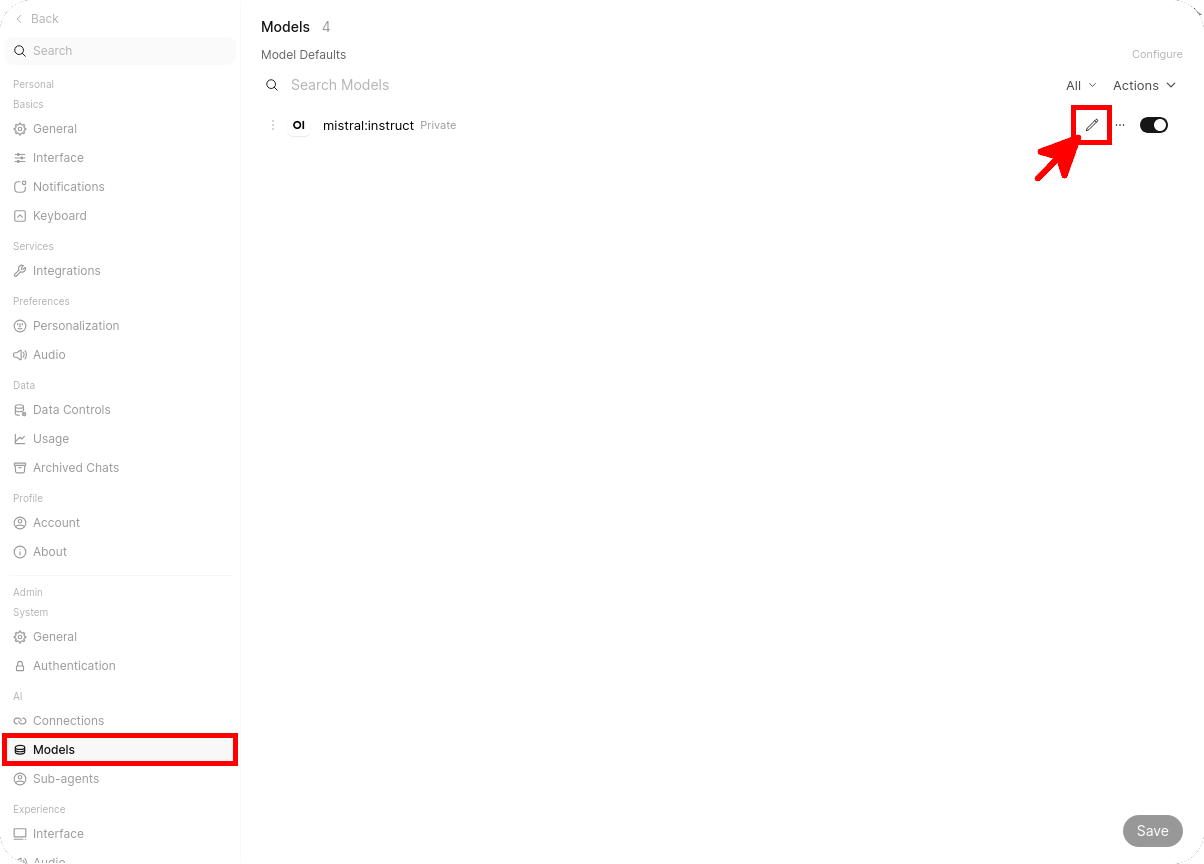
- Open the Models section. For each model whose access permissions you want to configure, click the pencil icon:
- Open the model settings, click Access, then select Add Access to define which users or groups can use the model:
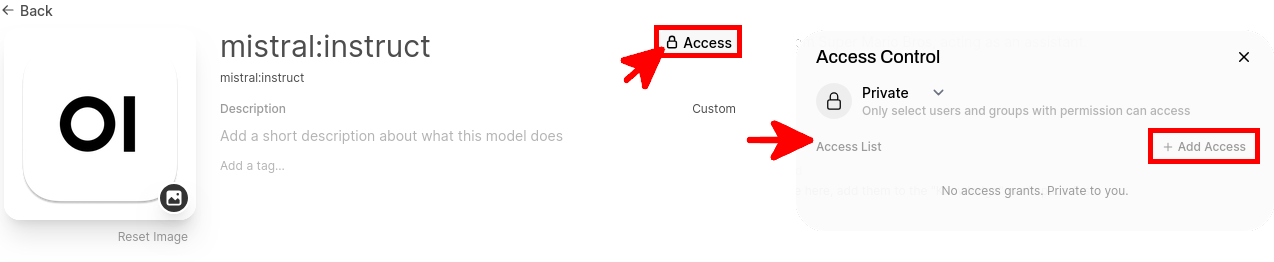
- Select the users who should have access to the model, click Add, then click Save & Update to apply the changes:
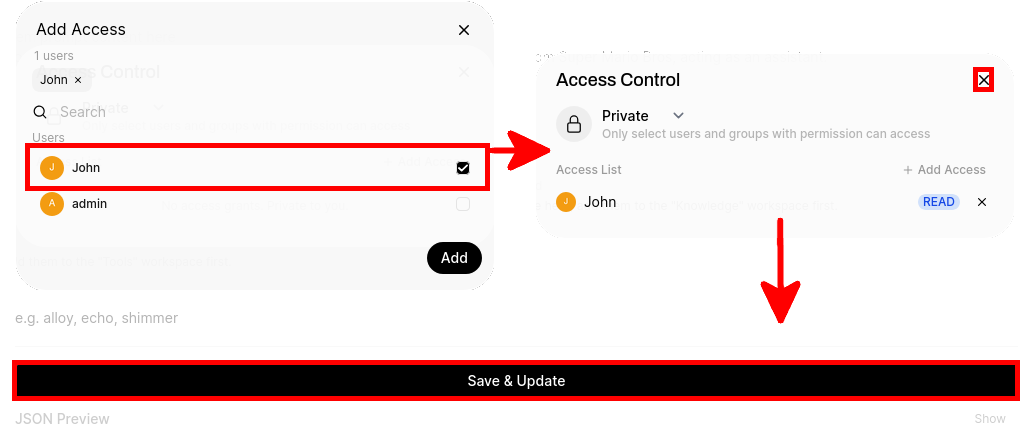
The user can now access and use the selected model in Open WebUI.
Recover a Forgotten Open WebUI Login
If you have forgotten the email address associated with your Open WebUI account, you can retrieve it from the application's SQLite database. The passwords stored in this database are hashed and cannot be displayed in plain text.
- Open a shell inside the Open WebUI container:
root@host:~# docker exec -it open-webui /bin/bash- Update the package index and install the
sqlite3command-line utility:
root@host:/app/backend# apt update && apt install sqlite3- Open the Open WebUI SQLite database:
root@host:/app/backend# sqlite3 /app/backend/data/webui.db- Display only the email addresses registered in the authentication table:
sqlite> SELECT email FROM auth;
admin@std.rocks- Exit SQLite and then leave the container:
sqlite> .quit
root@host:/app/backend# exit
Conclusion
Open WebUI is now running in a Docker container and connected to your Ollama server. Users can access local LLMs through a web interface, while administrators can create accounts and control access to individual models.
For a production deployment, remember to restrict access to the Ollama API, use HTTPS for the Open WebUI interface, back up the persistent Docker volume, and pin a specific Open WebUI version before performing updates.