Install and Configure Greenbone Vulnerability Manager (GVM) on Kali Linux 2025
- Last updated: Sep 27, 2025

Regularly scanning your network for security vulnerabilities is essential to maintaining a strong security posture. This is exactly what Greenbone Vulnerability Manager (GVM) is designed to do.
Greenbone Vulnerability Manager is a software framework that integrates several components, including the OpenVAS scanner and a web-based interface, to perform comprehensive vulnerability assessments.
With this framework, you can scan an entire network or a single host to detect known vulnerabilities and potential security risks.
Historically, GVM originated as a fork of the Nessus project, which later became proprietary software.
- Main features:
- Comprehensive vulnerability scanning
- Originally a Nessus fork
- Identifies security weaknesses across computer networks
Install Greenbone Vulnerability Manager (GVM) on Kali Linux
Installation Steps
Follow these steps to install and initialize Greenbone Vulnerability Manager (GVM) on Kali Linux 2025.3.
- Update your package list and upgrade existing packages:
kali@kali:~$ sudo apt update && sudo apt dist-upgrade- Install the required packages, including GVM and its dependencies:
kali@kali:~$ sudo apt install gvm postgresql nsis- Run the setup script to initialize GVM:
kali@kali:~$ sudo gvm-setupThis script will automatically:
- Start services and create the PostgreSQL database
- Generate GVM certificate files
- Apply correct permissions
- Download and update the vulnerability feeds
- Create and configure the default admin account
[…]
[*] Please note the password for the admin user
[*] User created with password 'xxxxxxxx-xxxx-xxxx-xxxx-xxxxxxxxxx'.

[>] You can now run gvm-check-setup to make sure everything is correctly configured- Start the
gvmd(manager) andgsad(web interface) services:
kali@kali:~$ sudo systemctl start gvmd.service gsad.service- Enable the
gvmdandgsadservices to start automatically at boot:
kali@kali:~$ sudo systemctl enable gvmd.service gsad.service- Run the setup check script to verify the installation:
kali@kali:~$ sudo gvm-check-setup
[…]
It seems like your GVM-25.04.0 installation is OK.- Verify that the
gvmdandgsadservices are running:
kali@kali:~$ sudo systemctl status gvmd.service gsad.service- Check that the web interface (WebUI) is listening for connections:
kali@kali:~$ sudo ss -ltn4p | grep gsad
State         Recv-Q        Send-Q                Local Address:Port                 Peer Address:Port        Process
LISTEN        0             4096                         127.0.0.1:9392                       0.0.0.0:*            users:(("gsad",pid=3015,fd=10))
LISTEN 0 4096 127.0.0.1:80 0.0.0.0:* users:(("gsad",pid=3038,fd=10))- You should now be able to connect to the
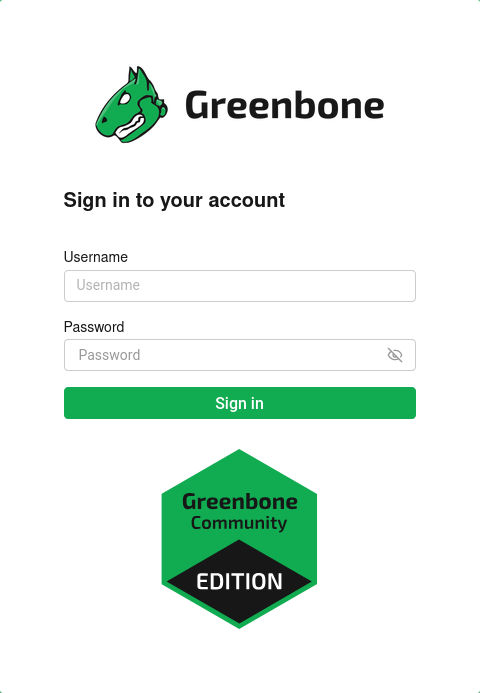
https://127.0.0.1:9392address using theadminlogin and the password displayed earlier during thegvm-setupphase:
Change GVM Listening Interface (Optional)
By default, the Greenbone Security Assistant (gsad) listens only on 127.0.0.1:9392, which restricts access to the local machine. If you want to access the web interface remotely, you can configure gsad to listen on a different interface (for example, 0.0.0.0 or a specific IP address). This step is optional and should be done with caution for security reasons.
- Edit the
/usr/lib/systemd/system/gvmd.servicefile and modify theExecStartline to allow remote connections:
[Unit]
Description=Greenbone Vulnerability Manager daemon (gvmd)
After=network.target networking.service postgresql.service ospd-openvas.service
Wants=postgresql.service ospd-openvas.service
Documentation=man:gvmd(8)
ConditionKernelCommandLine=!recovery

[Service]
Type=forking
User=_gvm
Group=_gvm
PIDFile=/run/gvmd/gvmd.pid
RuntimeDirectory=gvmd
RuntimeDirectoryMode=2775
#ExecStart=/usr/sbin/gvmd --osp-vt-update=/run/ospd/ospd.sock --listen-group=_gvm
ExecStart=/usr/sbin/gvmd --osp-vt-update=/run/ospd/ospd.sock -a 0.0.0.0
Restart=always
TimeoutStopSec=10

[Install]
WantedBy=multi-user.target- Edit the
/usr/lib/systemd/system/gsad.servicefile and update theExecStartline if you want the web interface to be accessible remotely:
[Unit]
Description=Greenbone Security Assistant daemon (gsad)
Documentation=man:gsad(8) https://www.greenbone.net
After=network.target gvmd.service
Wants=gvmd.service

[Service]
Type=exec
User=_gvm
Group=_gvm
RuntimeDirectory=gsad
RuntimeDirectoryMode=2775
PIDFile=/run/gsad/gsad.pid
#ExecStart=/usr/sbin/gsad --foreground --listen 127.0.0.1 --port 9392
ExecStart=/usr/sbin/gsad --foreground --listen 0.0.0.0 --mlisten=KALI_IP_ADDRESS --port 9392
Restart=always
TimeoutStopSec=10

[Install]
WantedBy=multi-user.target
Alias=greenbone-security-assistant.service- Reload the systemd configuration to apply the changes:
kali@kali:~$ sudo systemctl daemon-reload- Restart the
gvmd(manager) andgsad(web interface) services:
kali@kali:~$ sudo systemctl restart gvmd.service gsad.serviceUsing Greenbone Vulnerability Manager (GVM)
In this section, we will perform our first vulnerability scan on a predefined host using the GVM web interface.
Create a Target in GVM
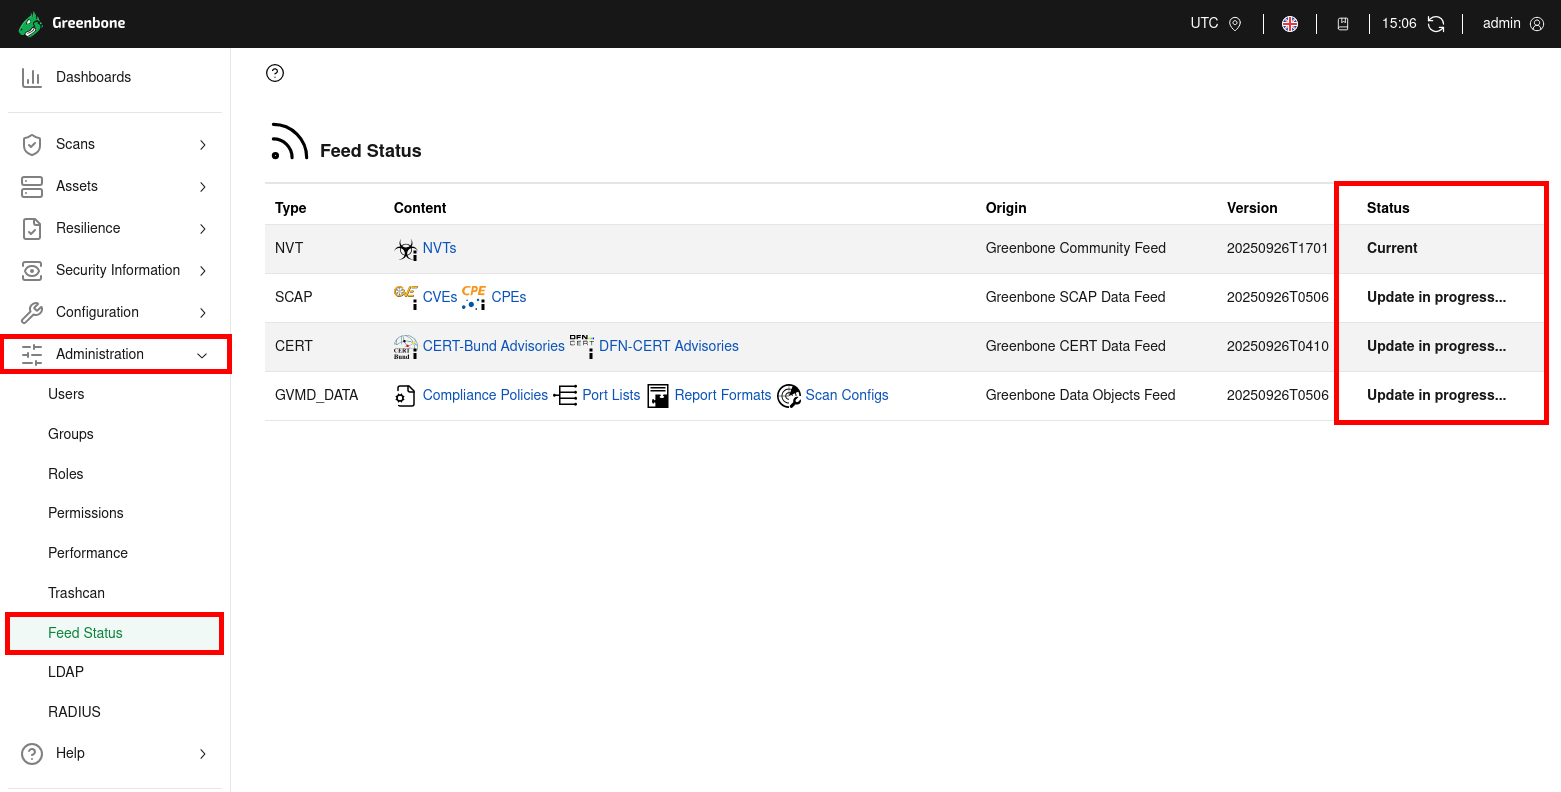
- Check on the Feed Status page that the feed are synchronized:
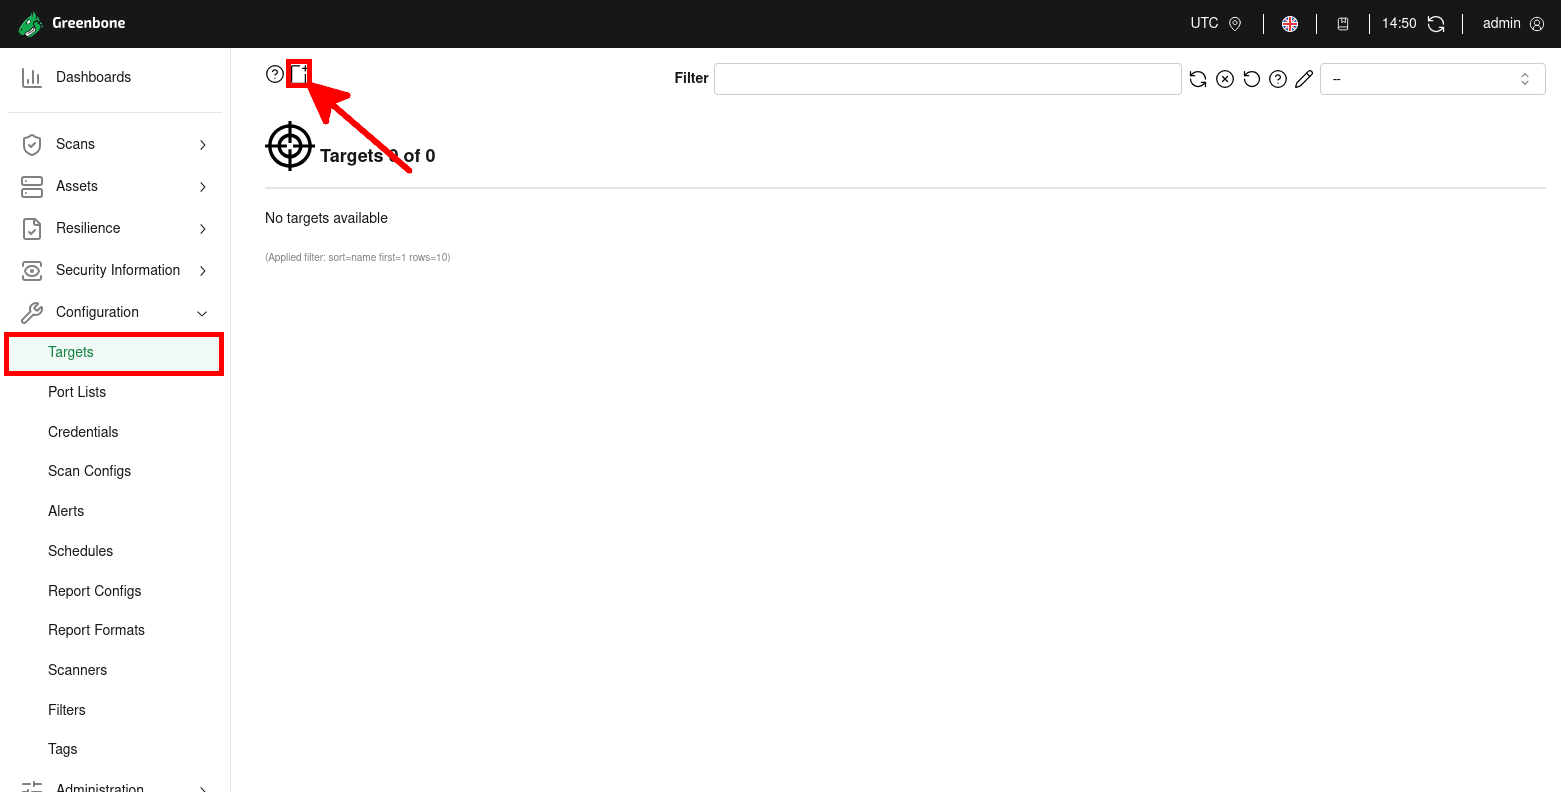
- From the Configuration menu in the GVM web interface, click on Targets, then use the New Target button (highlighted with the red arrow) to create a new scan target:
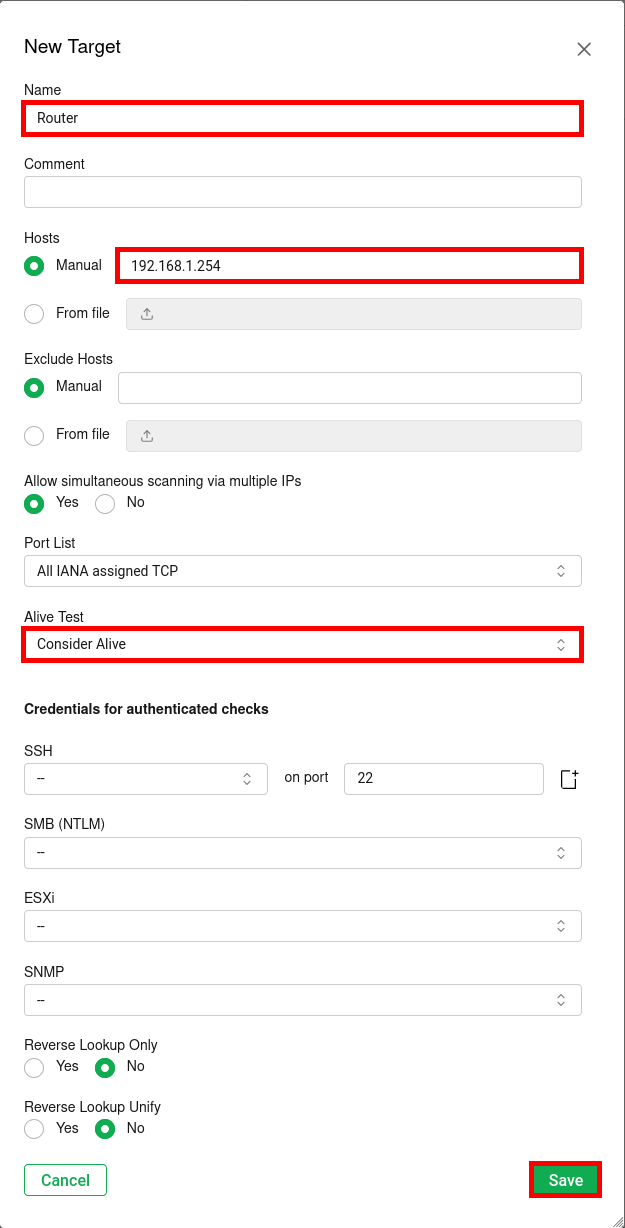
- Define the Target to be scanned by giving it a Name, specifying its IP address under Hosts, and adjusting the Alive Test option. Finally, click Save to create the target.
Create Task
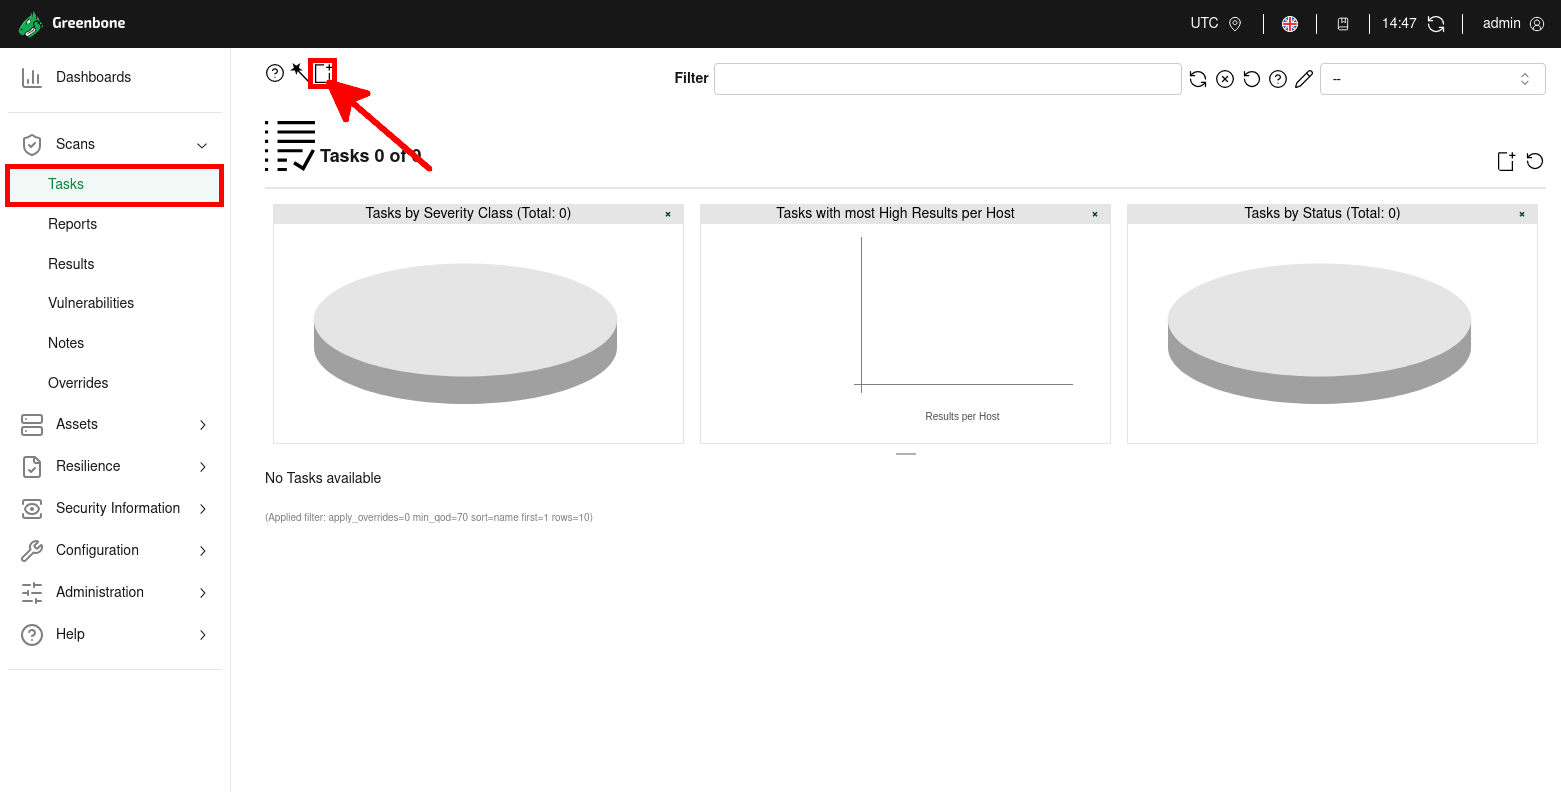
- From the Scans menu in the GVM web interface, click on Tasks, then use the New Task button (highlighted with the red arrow) to create a new scan task.
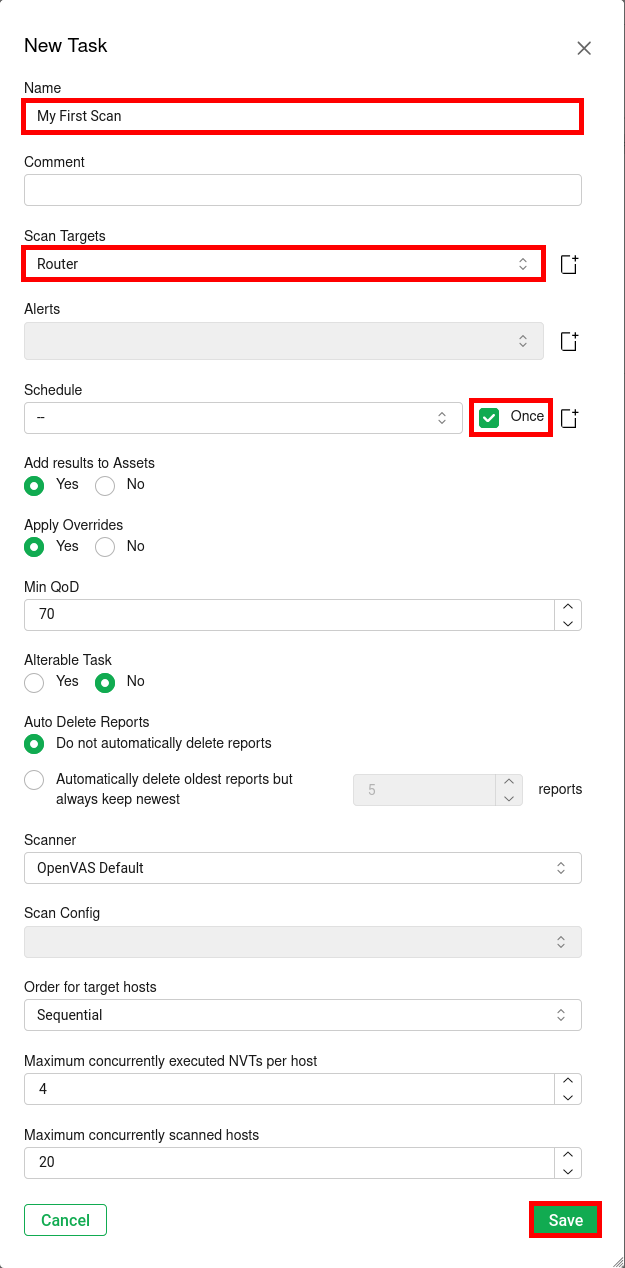
- Configure the New Task: set a Name, select the Target, and enable the Schedule option set to Once, then click Save.
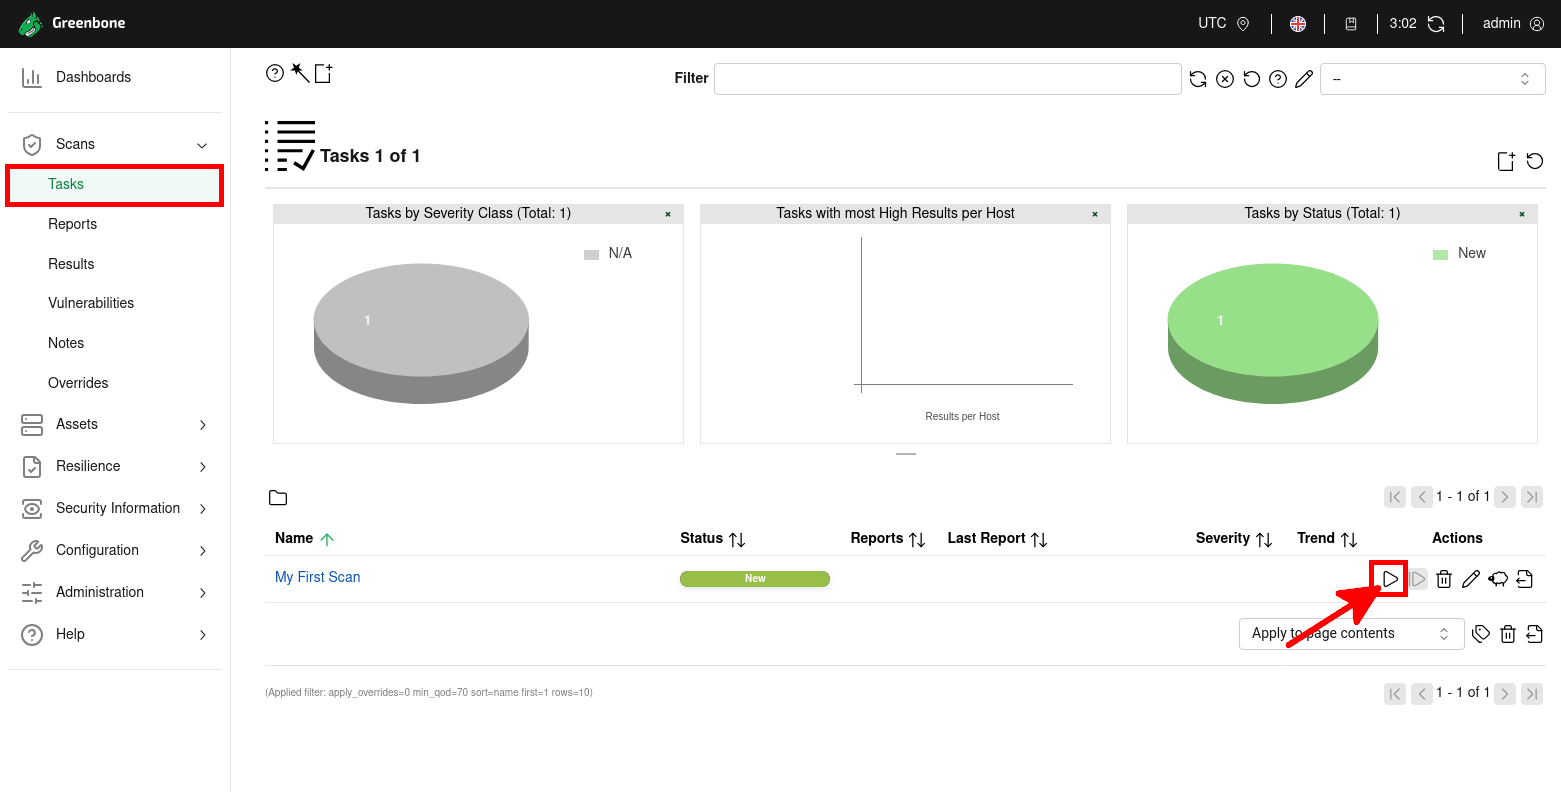
- From the Tasks page, click on the Play button (▶) to start the vulnerability scan task:
- Wait a few minutes for the task to complete, then click on the Last Report link to open the detailed vulnerability scan report:
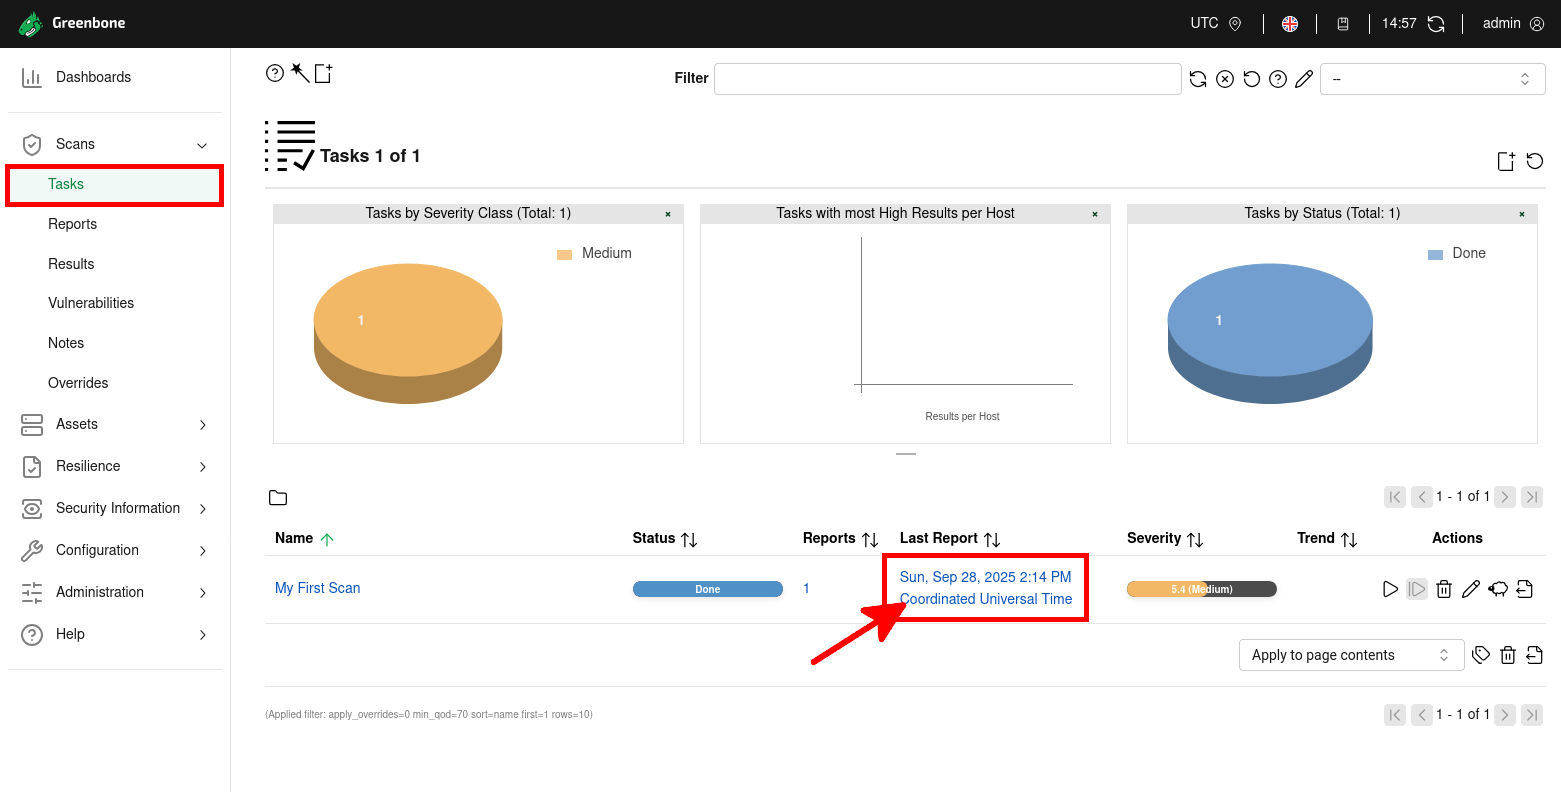
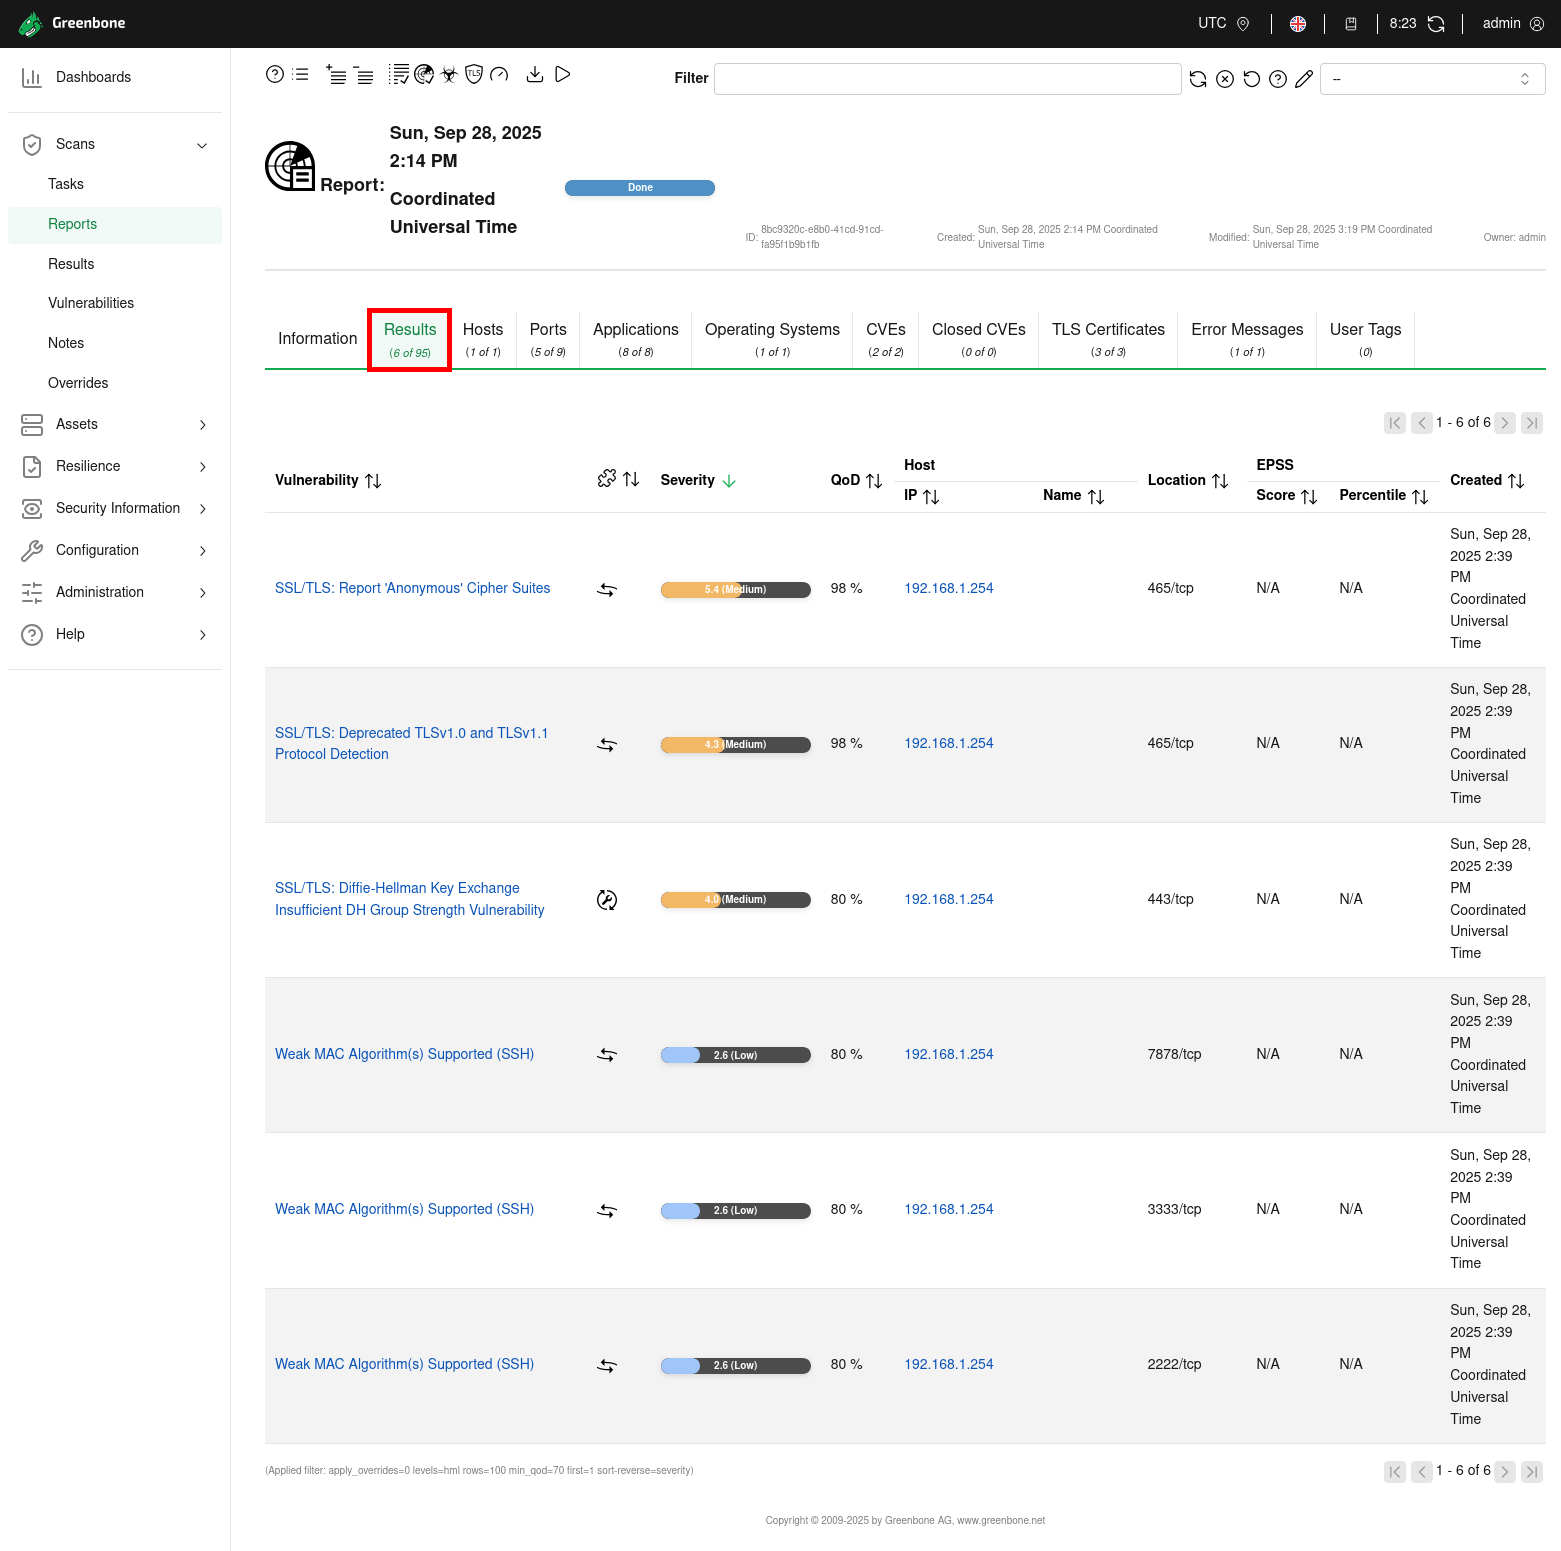
- After the scan, you will have access to a complete vulnerability report with detailed results, including severity levels, affected hosts, and detected weaknesses:
Useful GVM Commands
- Update Network Vulnerability Tests (NVTs):
kali@kali:~$ sudo -u _gvm greenbone-nvt-sync- Keep the feeds up to date (CERT, SCAP, GVMD data):
kali@kali:~$ sudo greenbone-feed-sync --type CERT
kali@kali:~$ sudo greenbone-feed-sync --type SCAP
kali@kali:~$ sudo greenbone-feed-sync --type GVMD_DATA- Create a new GVM user (example:
gvadmin):
kali@kali:~$ sudo runuser -u _gvm -- gvmd --create-user=gvadmin --password=stPassw0rd --disable-password-policy- List all users with their UUIDs:
kali@kali:~$ sudo runuser -u _gvm -- gvmd --get-users --verbose- Change a user password (example:
gvadmin):
kali@kali:~$ sudo runuser -u _gvm -- gvmd --user=gvadmin --new-password=gvadmin