Déployer Elastic 9 avec Elasticsearch, Kibana, Fleet Server et Elastic Agent sur Debian
- Mise à jour le 15 mai 2026

Dans cet article, nous allons voir comment installer Elastic, une solution SIEM (Security Information and Event Management) développée par Elastic N.V.. Un SIEM est une plateforme de cybersécurité qui permet de centraliser et d’analyser les journaux et les événements collectés depuis plusieurs équipements d’un réseau. Il aide les équipes de sécurité à détecter les activités anormales, à investiguer les incidents et à générer des alertes en temps réel.
Nous allons déployer le cœur de la suite Elastic, incluant Elasticsearch et Kibana, sur un serveur Debian dans un environnement on-premises. Pour un usage de base, aucune licence commerciale n’est nécessaire, car les déploiements Elastic auto-hébergés peuvent fonctionner avec la licence Basic gratuite. Toutefois, pour les environnements de production, je recommande aux entreprises d’évaluer une souscription commerciale afin de bénéficier du support officiel et de fonctionnalités supplémentaires.
J’avais précédemment publié un article couvrant l’installation d’Elastic Stack version 8 (disponible ici). Avec la sortie d’Elastic Stack version 9, je mets à jour ce guide afin de refléter le processus d’installation actuel et d’introduire l’architecture moderne basée sur Fleet. Dans cette architecture, Fleet Server agit comme plan de contrôle entre Kibana Fleet et les Elastic Agents installés sur les systèmes que nous voulons superviser. Il gère les politiques des agents, collecte leurs informations d’état et coordonne les actions sur les agents enrôlés.
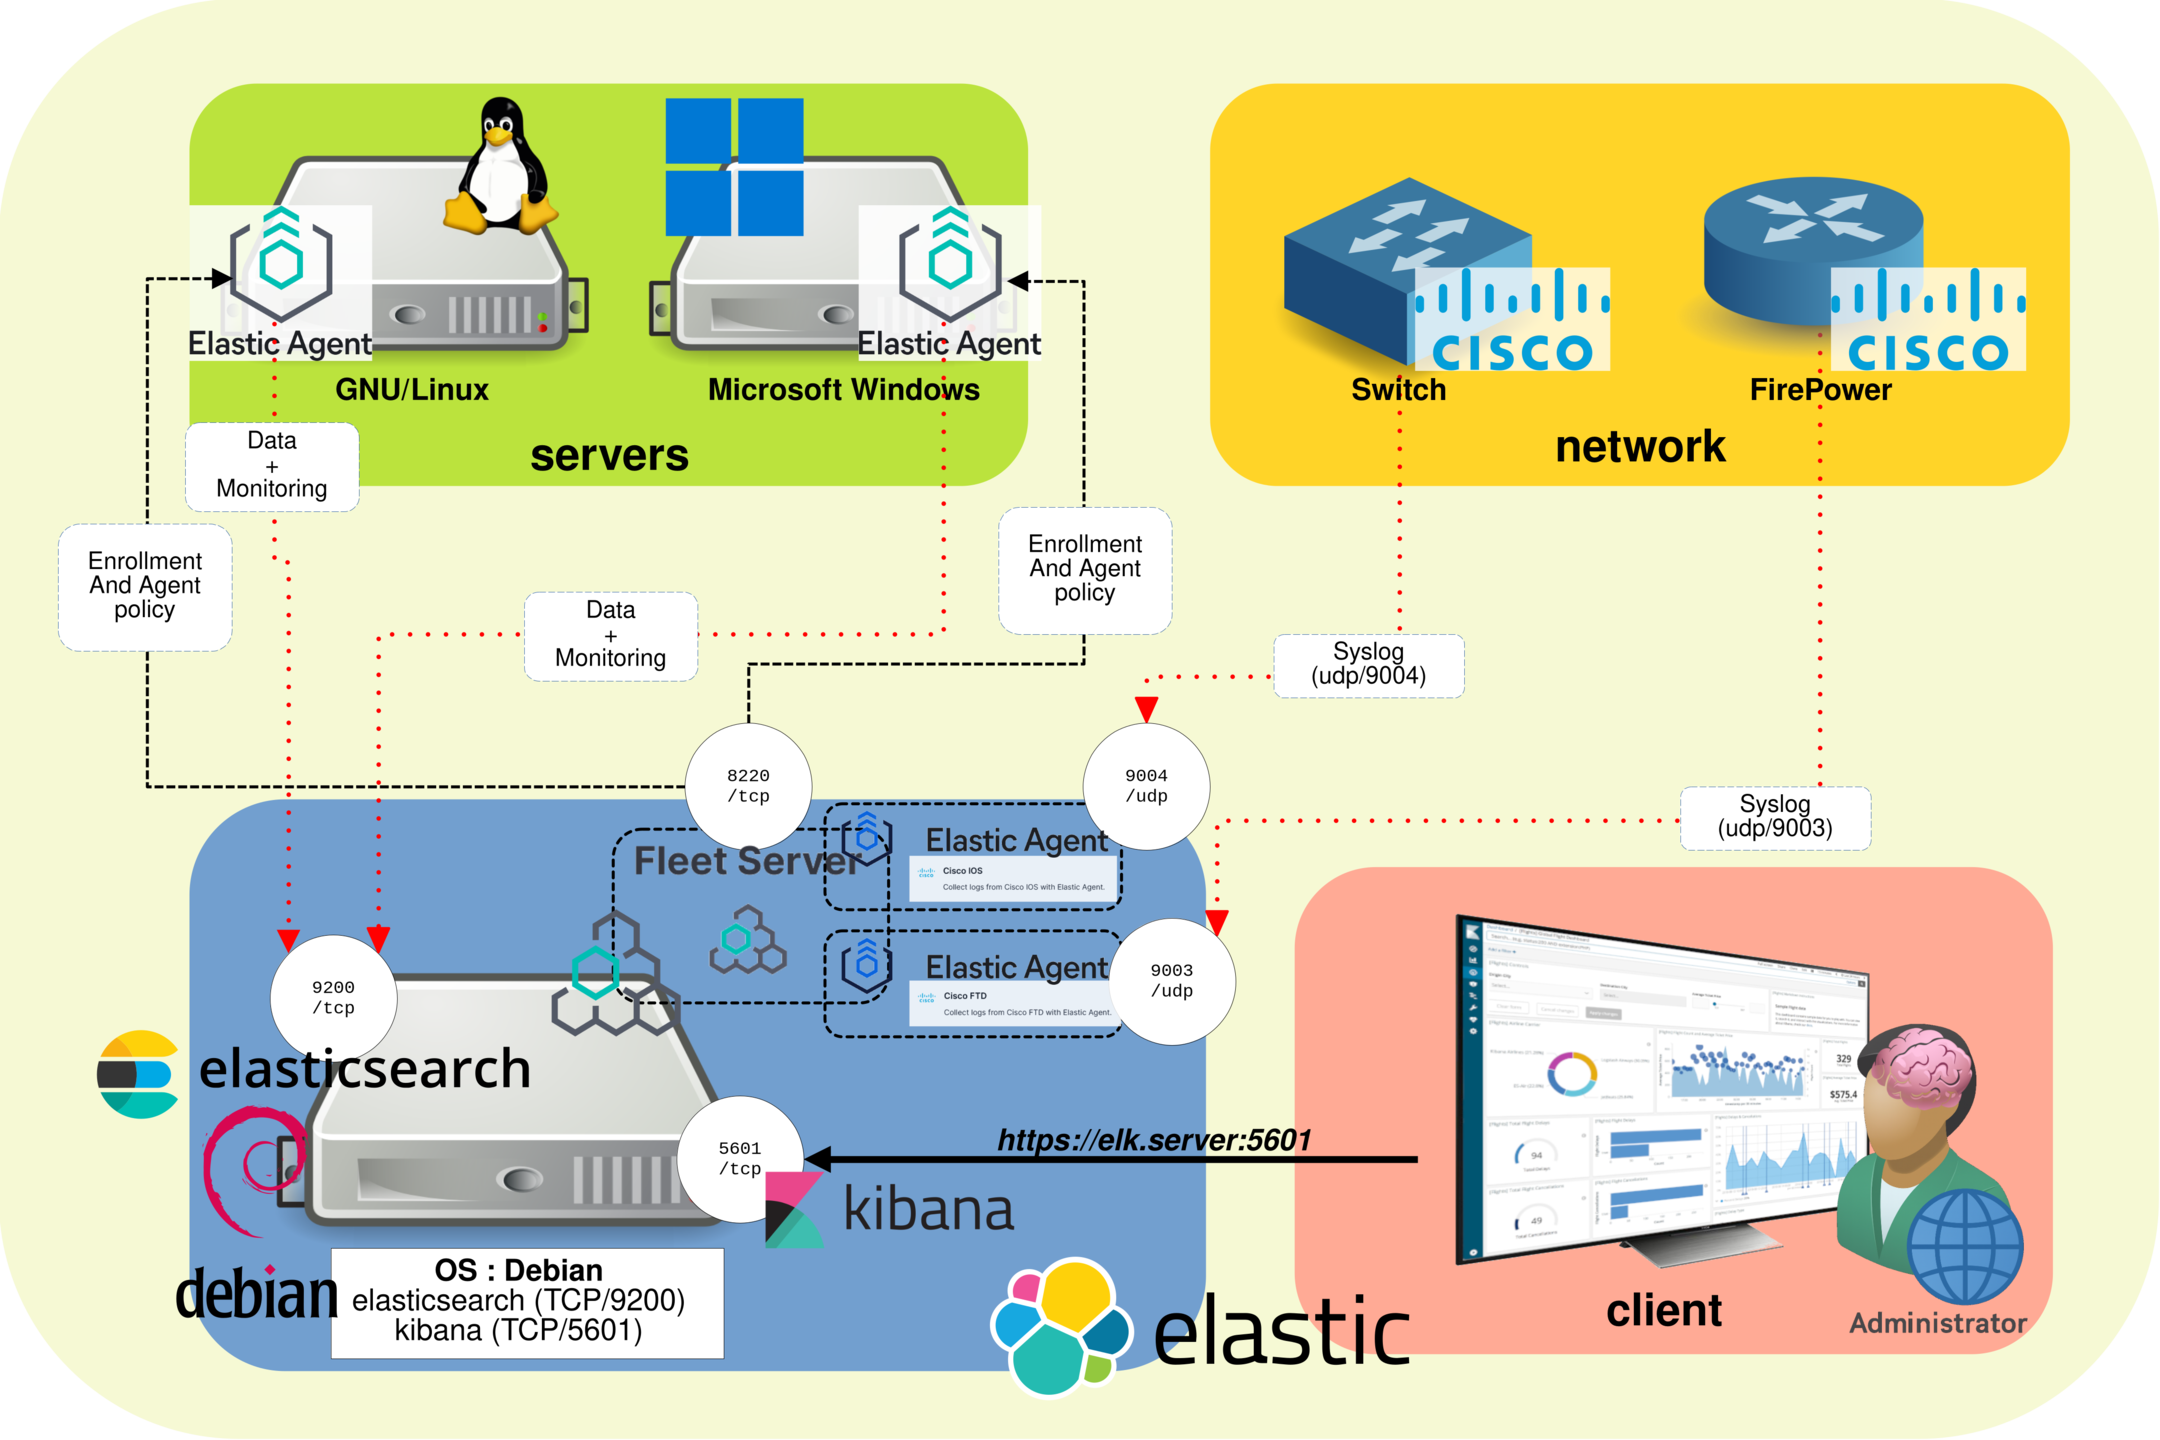
Architecture de la suite Elastic
- L’architecture de la suite Elastic est composée des éléments suivants :
- Elasticsearch : moteur distribué de stockage, de recherche et d’analyse en temps réel. Il stocke les données collectées et les rend disponibles pour des recherches, corrélations et analyses rapides.
- Kibana : plateforme open source d’analyse et de visualisation conçue pour fonctionner avec Elasticsearch. Elle fournit l’interface web permettant de rechercher, consulter et interagir avec les données stockées dans les index Elasticsearch.
- Fleet : interface de gestion centralisée disponible dans Kibana. Elle permet de définir et de gérer les politiques d’agents, les intégrations et les paramètres de configuration des systèmes supervisés.
- Fleet Server : couche de communication entre Kibana Fleet et les Elastic Agents enrôlés. Il distribue les politiques, collecte les informations d’état des agents et coordonne les actions sur les équipements supervisés.
- Elastic Agent : agent installé sur les systèmes que nous voulons superviser. Il collecte les journaux, les métriques et les événements liés à la sécurité, puis les envoie vers la suite Elastic conformément à la politique assignée depuis Fleet.
Notes
Versions
- OS : Debian 13
- Elastic Stack : 9.x
- Elasticsearch : 9.x
- Kibana : 9.x
- Elastic Agent : 9.x
Liens
- Lien de téléchargement : https://www.elastic.co/downloads/
- Guide d’installation d’Elasticsearch avec le paquet Debian : https://www.elastic.co/docs/deploy-manage/deploy/self-managed/install-elasticsearch-with-debian-package
- Guide d’installation de Kibana avec le paquet Debian : https://www.elastic.co/docs/deploy-manage/deploy/self-managed/install-kibana-with-debian-package
- Documentation Fleet et Elastic Agent : https://www.elastic.co/docs/reference/fleet/
Ports utilisés
- Port HTTPS par défaut d’Elasticsearch :
https://IP_ADDRESS:9200 - Accès web à Kibana :
https://IP_ADDRESS:5601si TLS est activé - Port HTTPS par défaut de Fleet Server :
https://IP_ADDRESS:8220
Installation d’Elastic 9 (Serveur Debian)
Prérequis
- Installez
apt-transport-httpset les paquets requis :
root@host:~# apt update && apt install apt-transport-https gnupg curl wget sudo- Importez la clé PGP Elastic :
root@host:~# wget -qO - https://artifacts.elastic.co/GPG-KEY-elasticsearch | gpg --dearmor -o /usr/share/keyrings/elasticsearch-keyring.gpg- Ajoutez le dépôt APT Elastic 9.x :
root@host:~# echo "deb [signed-by=/usr/share/keyrings/elasticsearch-keyring.gpg] https://artifacts.elastic.co/packages/9.x/apt stable main" | tee /etc/apt/sources.list.d/elastic-9.x.listElasticsearch
- Installez Elasticsearch et sauvegardez le mot de passe généré du superutilisateur elastic :
root@host:~# apt update && apt install elasticsearch- À la fin de l’installation, Elasticsearch affiche les informations d’auto-configuration de la sécurité :
[…]
--------------------------- Security autoconfiguration information ------------------------------

Authentication and authorization are enabled.
TLS for the transport and HTTP layers is enabled and configured.

The generated password for the elastic built-in superuser is : elastic_password;)

If this node should join an existing cluster, you can reconfigure this with
'/usr/share/elasticsearch/bin/elasticsearch-reconfigure-node --enrollment-token <token-here>
after creating an enrollment token on your existing cluster.

You can complete the following actions at any time:

Reset the password of the elastic built-in superuser with
'/usr/share/elasticsearch/bin/elasticsearch-reset-password -u elastic'.

Generate an enrollment token for Kibana instances with
 '/usr/share/elasticsearch/bin/elasticsearch-create-enrollment-token -s kibana'.

Generate an enrollment token for Elasticsearch nodes with
'/usr/share/elasticsearch/bin/elasticsearch-create-enrollment-token -s node'.

-------------------------------------------------------------------------------------------------
### NOT starting on installation, please execute the following statements to configure elasticsearch service to start automatically using systemd
 sudo systemctl daemon-reload
 sudo systemctl enable elasticsearch.service
### You can start elasticsearch service by executing
sudo systemctl start elasticsearch.service- Rechargez la configuration du gestionnaire
systemd:
root@host:~# systemctl daemon-reload- Activez le service Elasticsearch afin qu’il démarre automatiquement au démarrage du serveur :
root@host:~# systemctl enable elasticsearch.service- Démarrez le service Elasticsearch :
root@host:~# systemctl start elasticsearch.serviceKibana
- Installez Kibana :
root@host:~# apt update && apt install kibanaConfiguration
Elasticsearch
- Modifiez
/etc/elasticsearch/elasticsearch.ymlet configurez l’adresse d’écoute réseau :
network.host: 0.0.0.0- Démarrez le service Elasticsearch :
root@host:~# systemctl start elasticsearch.service- Vérifiez qu’Elasticsearch est démarré et répond en HTTPS :
root@host:~# curl --cacert /etc/elasticsearch/certs/http_ca.crt -u elastic https://localhost:9200
Enter host password for user 'elastic': elastic_password;)
{
  "name" : "std",
  "cluster_name" : "elasticsearch",
  "cluster_uuid" : "StdgreaTBanDKphU4S0ceg",
  "version" : {
    "number" : "9.4.1",
    "build_flavor" : "default",
    "build_type" : "deb",
    "build_hash" : "3c7c6027c5769d860d87448e2749f4c550a239da",
    "build_date" : "2026-05-08T10:08:29.383338563Z",
    "build_snapshot" : false,
    "lucene_version" : "10.4.0",
    "minimum_wire_compatibility_version" : "8.19.0",
    "minimum_index_compatibility_version" : "8.0.0"
  },
  "tagline" : "You Know, for Search"
}
Kibana
- Modifiez
/etc/kibana/kibana.ymlet configurez l’adresse d’écoute réseau. Dans ce lab, Kibana écoute sur toutes les interfaces réseau. HTTPS sera activé plus loin dans ce guide :
server.host: "0.0.0.0"
server.publicBaseUrl: "http://X.X.X.X:5601"- Démarrez Kibana :
root@host:~# systemctl start kibana.service- Créez un jeton d’enrôlement Kibana depuis le serveur Elasticsearch :
root@host:~# /usr/share/elasticsearch/bin/elasticsearch-create-enrollment-token -s kibana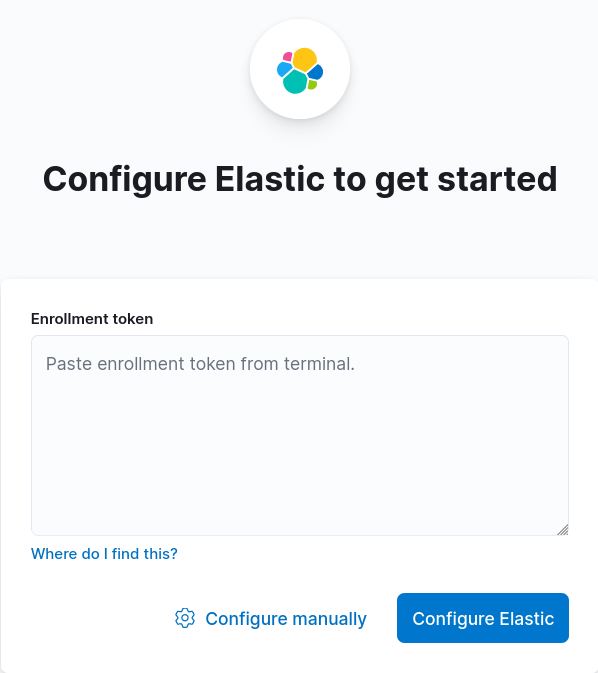
eyJ2ZXIiOiI4LjEuMiIsImFkciI6WyIxOTIuMTY4LjEuNjY6OTIwMCJdLCJmZ3IiOiJmYzdiZmFmMjNmODEzN2M1NmY4YTg1NGMxNTdjMWFkYTNiZDdiOGM4NTE4YTZhNmI3wWNiYzBkNzc0ZTRjNzc1Iiwia2V5Ijoib1ZBTkVJQUIxWVNBT0BiUWVsUVc6cEU1WXF3U1FTUENjcFFaZUJvTGtKdyJ0- Depuis Firefox, ouvrir
http://X.X.X.X:5601, collez le jeton d’enrôlement, puis cliquez sur Configure Elastic :
- Générez le code de vérification Kibana et le collez dans la page de configuration :
root@host:~# /usr/share/kibana/bin/kibana-verification-code
Your verification code is:  139 477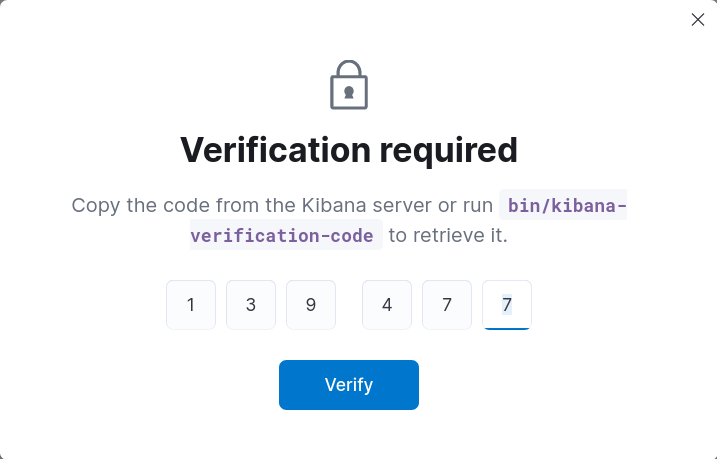
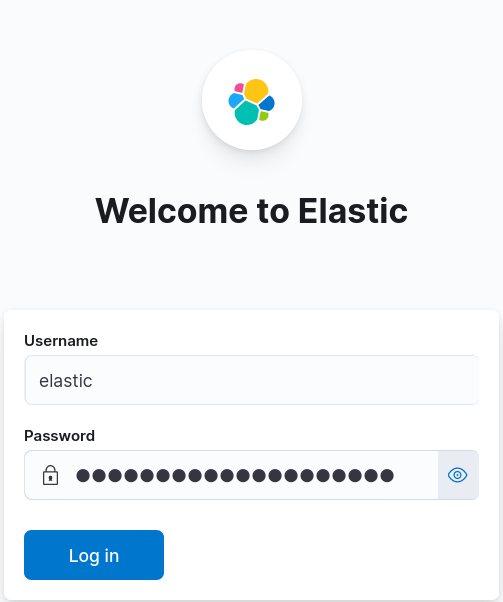
- Vous pouvez maintenant vous connecter à Kibana avec le compte superutilisateur intégré elastic :
Sécurisation de Kibana
Depuis la version 8, Elasticsearch active automatiquement les fonctionnalités de sécurité pendant l’installation, notamment l’authentification et le chiffrement TLS pour les couches HTTP et transport.
Cependant, Kibana reste accessible en HTTP par défaut. Dans cette section, nous allons activer HTTPS pour l’interface web Kibana.
- Exécutez le script
kibana-encryption-keyset copiez les valeurs générées :
root@host:~# /usr/share/kibana/bin/kibana-encryption-keys generate
## Kibana Encryption Key Generation Utility

The 'generate' command guides you through the process of setting encryption keys for:

xpack.encryptedSavedObjects.encryptionKey
    Used to encrypt stored objects such as dashboards and visualizations
    https://www.elastic.co/guide/en/kibana/current/xpack-security-secure-saved-objects.html#xpack-security-secure-saved-objects

xpack.reporting.encryptionKey
    Used to encrypt saved reports
    https://www.elastic.co/guide/en/kibana/current/reporting-settings-kb.html#general-reporting-settings

xpack.security.encryptionKey
    Used to encrypt session information
    https://www.elastic.co/guide/en/kibana/current/security-settings-kb.html#security-session-and-cookie-settings


Already defined settings are ignored and can be regenerated using the --force flag.  Check the documentation links for instructions on how to rotate encryption keys.
Definitions should be set in the kibana.yml used configure Kibana.

Settings:
xpack.encryptedSavedObjects.encryptionKey: caeb7879368e3dd66d7302f6810daec1
xpack.reporting.encryptionKey: c1c89f500966ac710f7fa5eaf2939976
xpack.security.encryptionKey: e1458d710ffb321e4a4f4eb792c78b2b- Ajoutez les clés de chiffrement générées précédemment dans
/etc/kibana/kibana.yml:
[…]
xpack.encryptedSavedObjects.encryptionKey: caeb7879368e3dd66d7302f6810daec1
xpack.reporting.encryptionKey: c1c89f500966ac710f7fa5eaf2939976
xpack.security.encryptionKey: e1458d710ffb321e4a4f4eb792c78b2b- Récupérez le mot de passe sécurisé du keystore
http.p12:
root@host:~# /usr/share/elasticsearch/bin/elasticsearch-keystore show xpack.security.http.ssl.keystore.secure_password
592l_UJGSXmliJIvuokDab- Placez-vous dans le répertoire
/etc/kibana/:
root@host:~# cd /etc/kibana/- Extrayez le certificat TLS depuis le keystore Elasticsearch
http.p12:
root@host:~# openssl pkcs12 -in /etc/elasticsearch/certs/http.p12 -out server.crt -clcerts -nokeys
Enter Import Password:592l_UJGSXmliJIvuokDab- Extrayez la clé privée TLS depuis le même keystore :
root@host:~# openssl pkcs12 -in /etc/elasticsearch/certs/http.p12 -out server.key -nocerts -nodes
Enter Import Password:592l_UJGSXmliJIvuokDab- Définissez
rootcomme propriétaire des fichiers etkibanacomme groupe :
root@host:~# chown root:kibana /etc/kibana/server.*- Autorisez le groupe
kibanaà lire les fichiers du certificat et de la clé privée :
root@host:~# chmod g+r /etc/kibana/server.*- Modifiez
/etc/kibana/kibana.ymlpour activer HTTPS pour l’interface web Kibana :
server.ssl.enabled: true
server.ssl.certificate: /etc/kibana/server.crt
server.ssl.key: /etc/kibana/server.key- Redémarrez le service Kibana :
root@host:~# systemctl restart kibana.serviceAttendre quelques secondes, puis se connecter à Kibana à l’adresse https://X.X.X.X:5601.
Démarrage automatique
Elasticsearch
- Activez le service Elasticsearch :
root@host:~# systemctl enable elasticsearch.serviceKibana
- Activez le service Kibana :
root@host:~# systemctl enable kibana.serviceFleet Server
Maintenant que Elasticsearch et Kibana sont opérationnels, nous pouvons installer Fleet Server. Comme expliqué précédemment, Fleet Server sert de couche de communication entre Kibana Fleet et les Elastic Agents enrôlés. Il permet de gérer les politiques des agents, de distribuer les mises à jour de configuration et de collecter les informations d’état des agents.
- Ouvrez le menu principal, puis accédez à Management → Fleet :

- Cliquez sur Add Fleet Server pour lancer l’assistant de configuration de Fleet Server :

- Complétez la configuration de Fleet Server :
- Indiquez un nom pour le Fleet Server et spécifiez l’URL que les agents enrôlés utiliseront pour le joindre. Dans ce lab, comme tous les composants sont installés sur le même serveur, cette URL pointe vers l’adresse IP du serveur Elastic Stack.
- Sélectionnez la plateforme Linux x86_64, puis copiez les commandes d’installation générées automatiquement.
- Exécutez les commandes générées depuis un shell
rootsur le serveur qui hébergera Fleet Server. - Après quelques instants, Kibana devrait détecter le nouveau Fleet Server. Cliquez sur Continue enrolling Elastic Agent, puis sur Close.

- Ci-dessous, un exemple de commande d’installation générée par l’interface web de Kibana. Saisissez
Ylorsque le script vous demande de poursuivre l’installation :
root@host:~# curl -L -O https://artifacts.elastic.co/downloads/beats/elastic-agent/elastic-agent-9.4.1-linux-x86_64.tar.gz
tar xzvf elastic-agent-9.4.1-linux-x86_64.tar.gz
cd elastic-agent-9.4.1-linux-x86_64
sudo ./elastic-agent install \
  --fleet-server-es=https://192.168.1.10:9200 \
  --fleet-server-service-token=ABCAAWVsYXN0aWMvZmalZXQtc2VydmVyL5Rva2VuLDEADbEE5RocKSQ3MjM6SGxBajNhSkJSNEdHZ25jOHZNM3ZYUQ \
  --fleet-server-policy=fleet-server-policy \
  --fleet-server-es-ca-trusted-fingerprint=deadbee540c353325d0085a67e1bb2a8ced823f9ae84107b087352754a9a7753 \
  --fleet-server-port=8220 \
  --install-servers
[…]
Elastic Agent will be installed at /opt/Elastic/Agent and will run as a service. Do you want to continue? [Y/n]:Y
[…]
Elastic Agent has been successfully installed.
Vous disposez maintenant d’un Fleet Server opérationnel, prêt à gérer les Elastic Agents enrôlés.
Consultez les journaux
Elasticsearch
- Affichez les journaux depuis le fichier
elasticsearch.log:
root@host:~# tail /var/log/elasticsearch/elasticsearch.log- Ou utiliser la commande
journalctl:
root@host:~# journalctl --unit elasticsearchKibana
- Affichez les journaux depuis le fichier
kibana.log:
root@host:~# tail /var/log/kibana/kibana.log- Ou utilisez la commande
journalctl:
root@host:~# journalctl --unit kibanaNous disposons maintenant d’un déploiement Elastic opérationnel avec Elasticsearch, Kibana et Fleet Server. L’étape suivante consiste à enrôler des Elastic Agents sur les systèmes à superviser afin qu’ils puissent transmettre les journaux, les métriques et les événements de sécurité pour une analyse centralisée.