Install and Configure a Secure Mail Server on Debian with Postfix and Dovecot
- Last updated: Jan 11, 2026

In this guide, I’ll show you how to build a complete mail server architecture on GNU/Linux. The objective is to send and receive emails seamlessly from different devices — such as Thunderbird on PC or Mac, and email clients on smartphones.
For this tutorial, we’ll use Debian installed on a Virtual Private Server (VPS) hosted by OVHcloud 🇫🇷. (This is not a sponsored post — though I wouldn’t mind if they sent me a T-shirt 😄).
That said, even if some steps are OVHcloud-specific, you can easily follow this guide with any other VPS provider. Simply adapt the configuration to match your hosting environment.
Before getting started, let’s take a moment to look at the pros and cons of self-hosting your own mail server. On the plus side, you can create an unlimited number of addresses, use your own domain (@mydomain.com), manage your own storage space, and remain completely independent from external providers and their pricing changes. On the downside — or rather, the aspects to keep in mind — there’s a cost factor, since you’ll need to rent both a hosting service and a domain name. Moreover, hosting such a service comes with responsibilities in terms of security and maintenance. It’s strongly recommended to enable automatic updates and schedule regular backups (most VPS providers offer this option at a low cost), or to manage them yourself using the rsync command. You’ll also need a domain name and a VPS or self-hosted server to maintain before moving on to the configuration stage.
Now that you know the main advantages and challenges, let’s move on to the installation process.
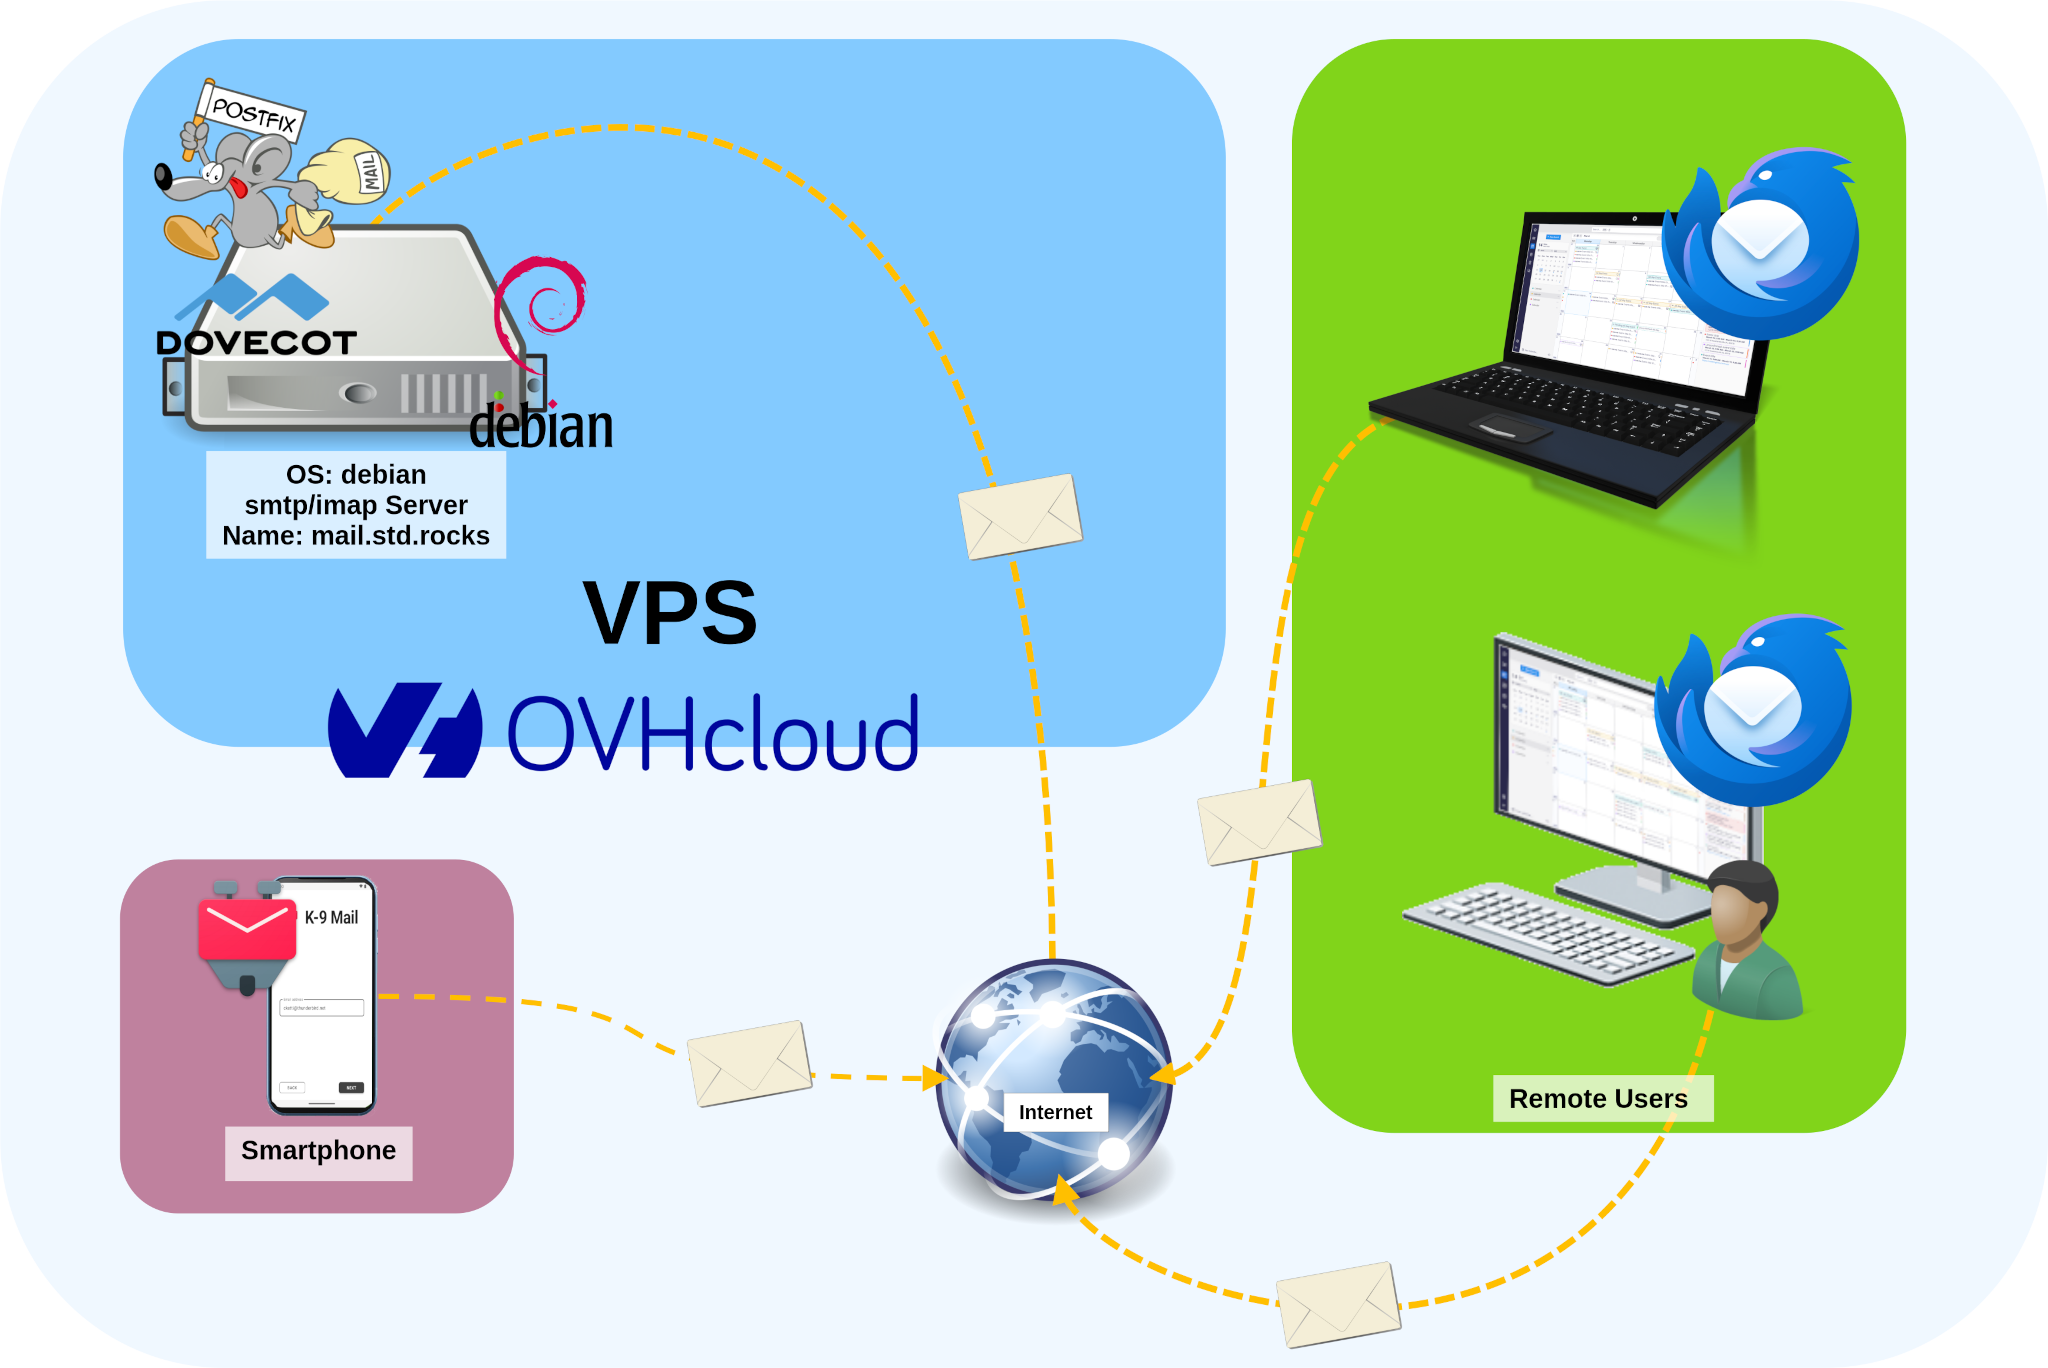
Here’s what our final architecture will look like:
Understanding Postfix and Dovecot: How They Work Together on a Mail Server
To make our setup work, we need to install two key applications on our Debian server: Postfix for SMTP/SMTPS and Dovecot for IMAP/IMAPS. In short, SMTP (Simple Mail Transfer Protocol) handles the sending and routing of emails between mail servers, while IMAP (Internet Message Access Protocol) allows clients to access and synchronize their mailboxes across multiple devices.
In addition to managing incoming mail, Dovecot also handles user authentication and can automatically organize messages into folders. For instance, you can define a rule to move every email sent to john@std.rocks into the folder John.
Postfix and SMTP: Sending Emails from Your Linux Mail Server
When you send an email from your SMTP client — for example, Mozilla Thunderbird — it is first transmitted to the Postfix service on your server, which then forwards it to its final destination.

Dovecot and IMAP: Accessing and Synchronizing Mailboxes Securely
As mentioned earlier, the IMAP protocol is used to synchronize emails and folders between the Dovecot server and the mail client. It allows users to access their mailboxes from multiple devices while keeping all messages and folders — such as Inbox, Sent, or Drafts — perfectly synchronized in real time.

Choosing and Setting Up Your VPS for a Debian Mail Server
Now that the concepts of SMTP and IMAP are clear, we can focus on where to host our mail server. You could run it at home, but be aware that many Internet Service Providers block port 25 (SMTP), their IP ranges may be blacklisted or have a poor reputation, and managing reverse DNS (rDNS) can be tricky. In short, self-hosting from home is possible, but it can be complex to set up and maintain.
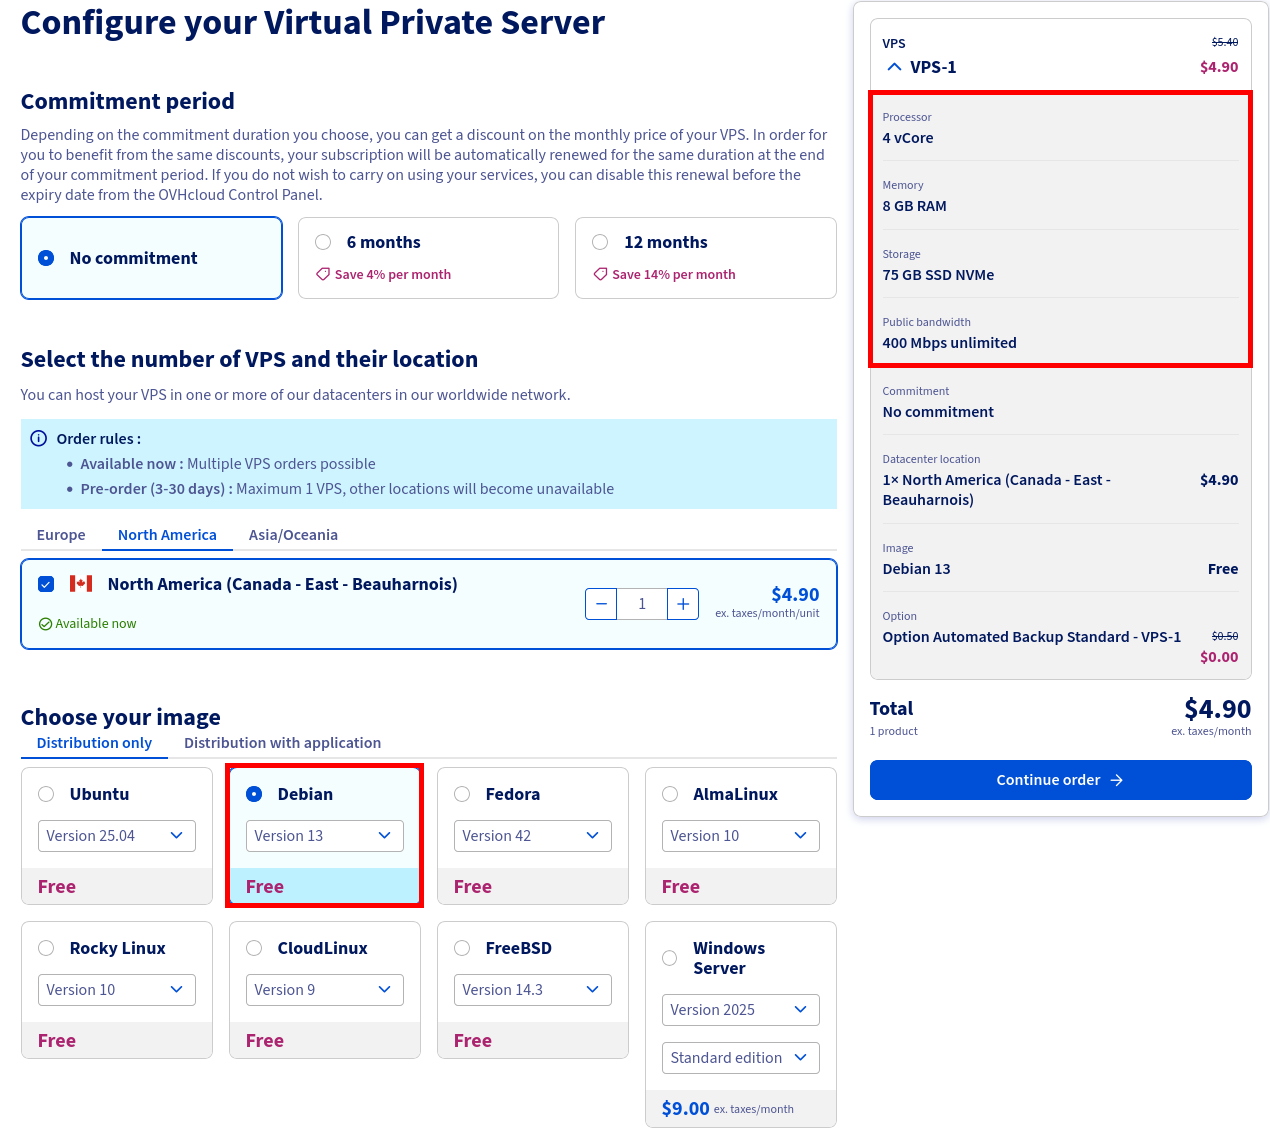
A better option — and the one used in this tutorial — is to host your mail server on a Virtual Private Server (VPS). You can choose any provider you prefer and select a configuration suited to your needs. For example, with OVHcloud, a VPS with 4 vCores, 8 GB RAM, and a 75 GB SSD is more than sufficient for a small to medium-sized mail architecture.
Of course, if you don’t already have one, you’ll also need to purchase your own domain name. It will be used to configure your mail server’s DNS records and create professional email addresses such as user@yourdomain.com.
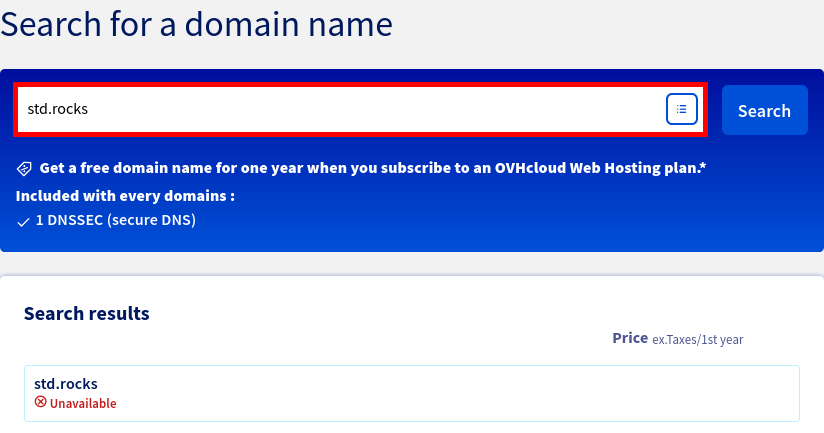
At this stage, you won’t have to spend much more money — just a bit of your time. 😉
Configuring DNS Records for SPF, DKIM, DMARC, and rDNS
Nowadays, to prevent spam (although spammers still manage to send emails 😅), major email providers such as Gmail, Microsoft, and others perform several checks before accepting messages from external mail servers. These checks are designed to verify whether the sending server is legitimate. The main protection mechanisms involved are SPF, DKIM, and reverse DNS (rDNS). In this section, I’ll explain how each of these mechanisms works to help you configure them properly on your own mail server.
DNS Prerequisites and Initial Configuration
To begin, we need to add a few DNS entries so that other mail servers know which IP address to contact when sending emails to our domain. This involves creating an A record for the IPv4 address, an AAAA record for the IPv6 address (if available), and an MX record that points to our mail server — in this example, mail.std.rocks.
mail IN A 203.0.113.1: associatesmail.std.rockswith the IPv4 address203.0.113.1.mail IN AAAA 2001:0db8::dead:bee5: associatesmail.std.rockswith the IPv6 address2001:0db8::dead:bee5.IN MX 1 mail.std.rocks.: definesmail.std.rocksas the mail exchange (MX) server for thestd.rocksdomain.
mail IN A 203.0.113.1
mail IN AAAA 2001:0db8::dead:bee5
IN MX 1 mail.std.rocks.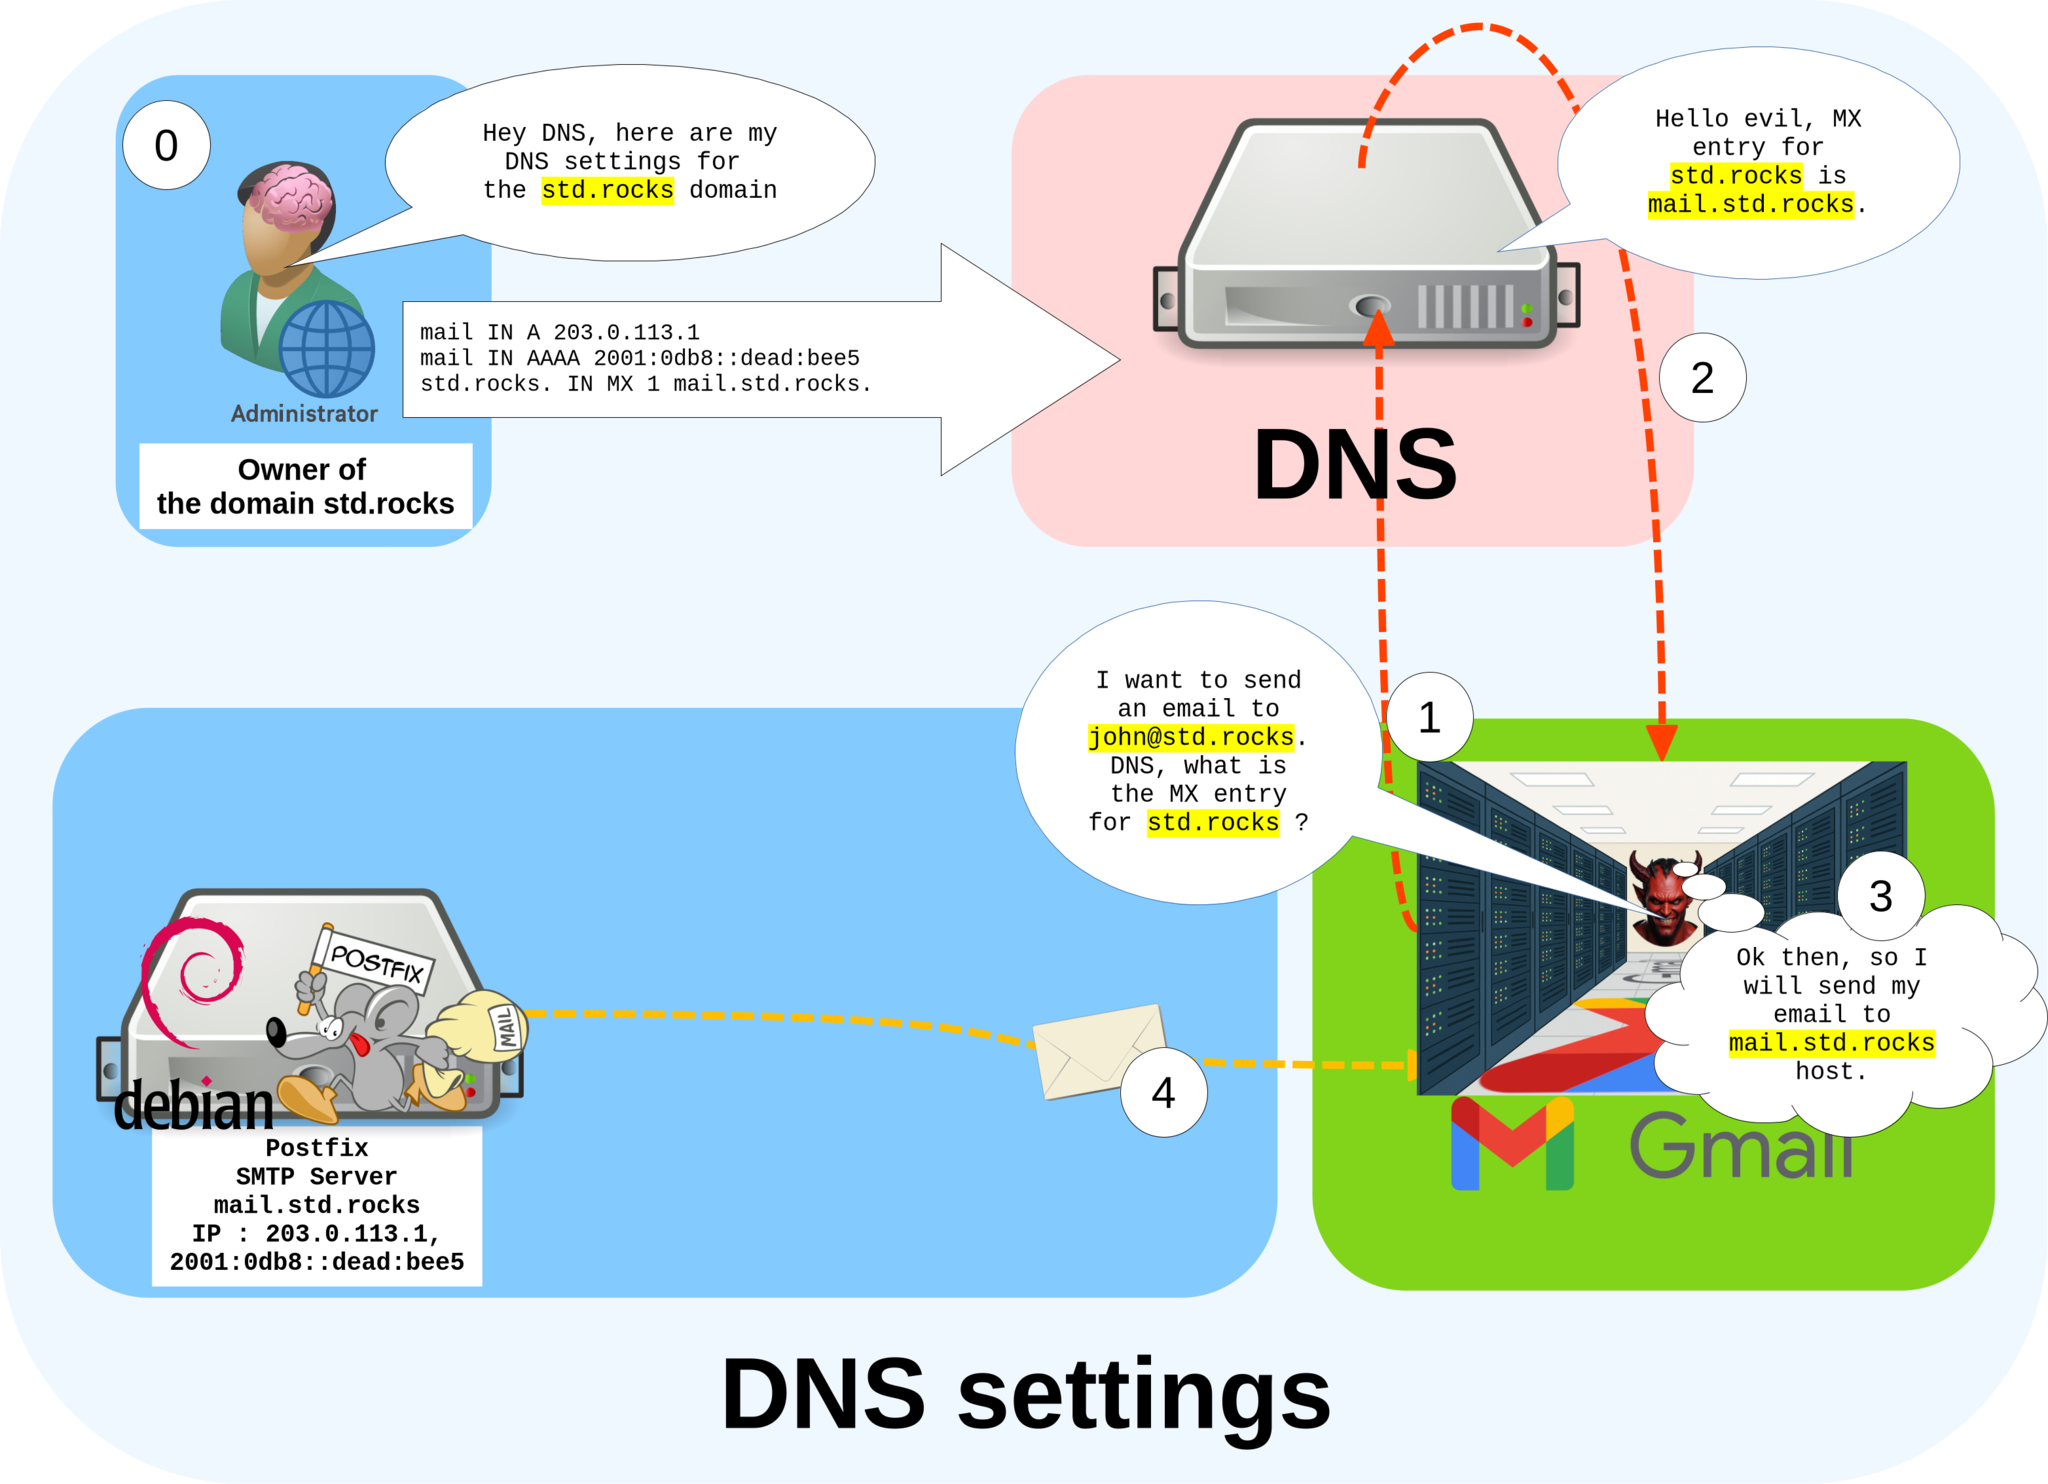
From your DNS dashboard, the configuration should look like this:

mail.std.rocks.- On your server, set the hostname to
mail:
root@debian:~# hostnamectl set-hostname mail- Edit the
/etc/hostsfile to associate the hostname with your domain:
127.0.0.1       localhost
::1     localhost       ip6-localhost   ip6-loopback
ff02::1 ip6-allnodes
ff02::2 ip6-allrouters

127.0.1.1 mail.std.rocks mail- Verify that the
/etc/hostnamefile reflects the new hostname:
mail- Finally, reboot your server to apply the changes:
root@debian:~# rebootConfiguring the SPF Record to Authorize Your Mail Server
The SPF (Sender Policy Framework) record allows a domain administrator to publicly specify which mail servers are authorized to send emails on behalf of that domain. This helps receiving mail servers verify the legitimacy of incoming messages and reduce spam.
- Add the following entries to your DNS configuration to authorize your mail server:
mx: (optional) includes all servers listed as MX for the std.rocks domain, in this case mail.std.rocks.include:mail.std.rocks: (optional) explicitly authorizes the server mail.std.rocks.ip4:203.0.113.1andip6:2001:0db8::dead:bee5: specify the IPv4 and IPv6 addresses allowed to send emails.-all: indicates that all other IP addresses not listed in the record are unauthorized and should be treated as spam sources.
"v=spf1 mx include:mail.std.rocks ip4:203.0.113.1 ip6:2001:0db8::dead:bee5 -all"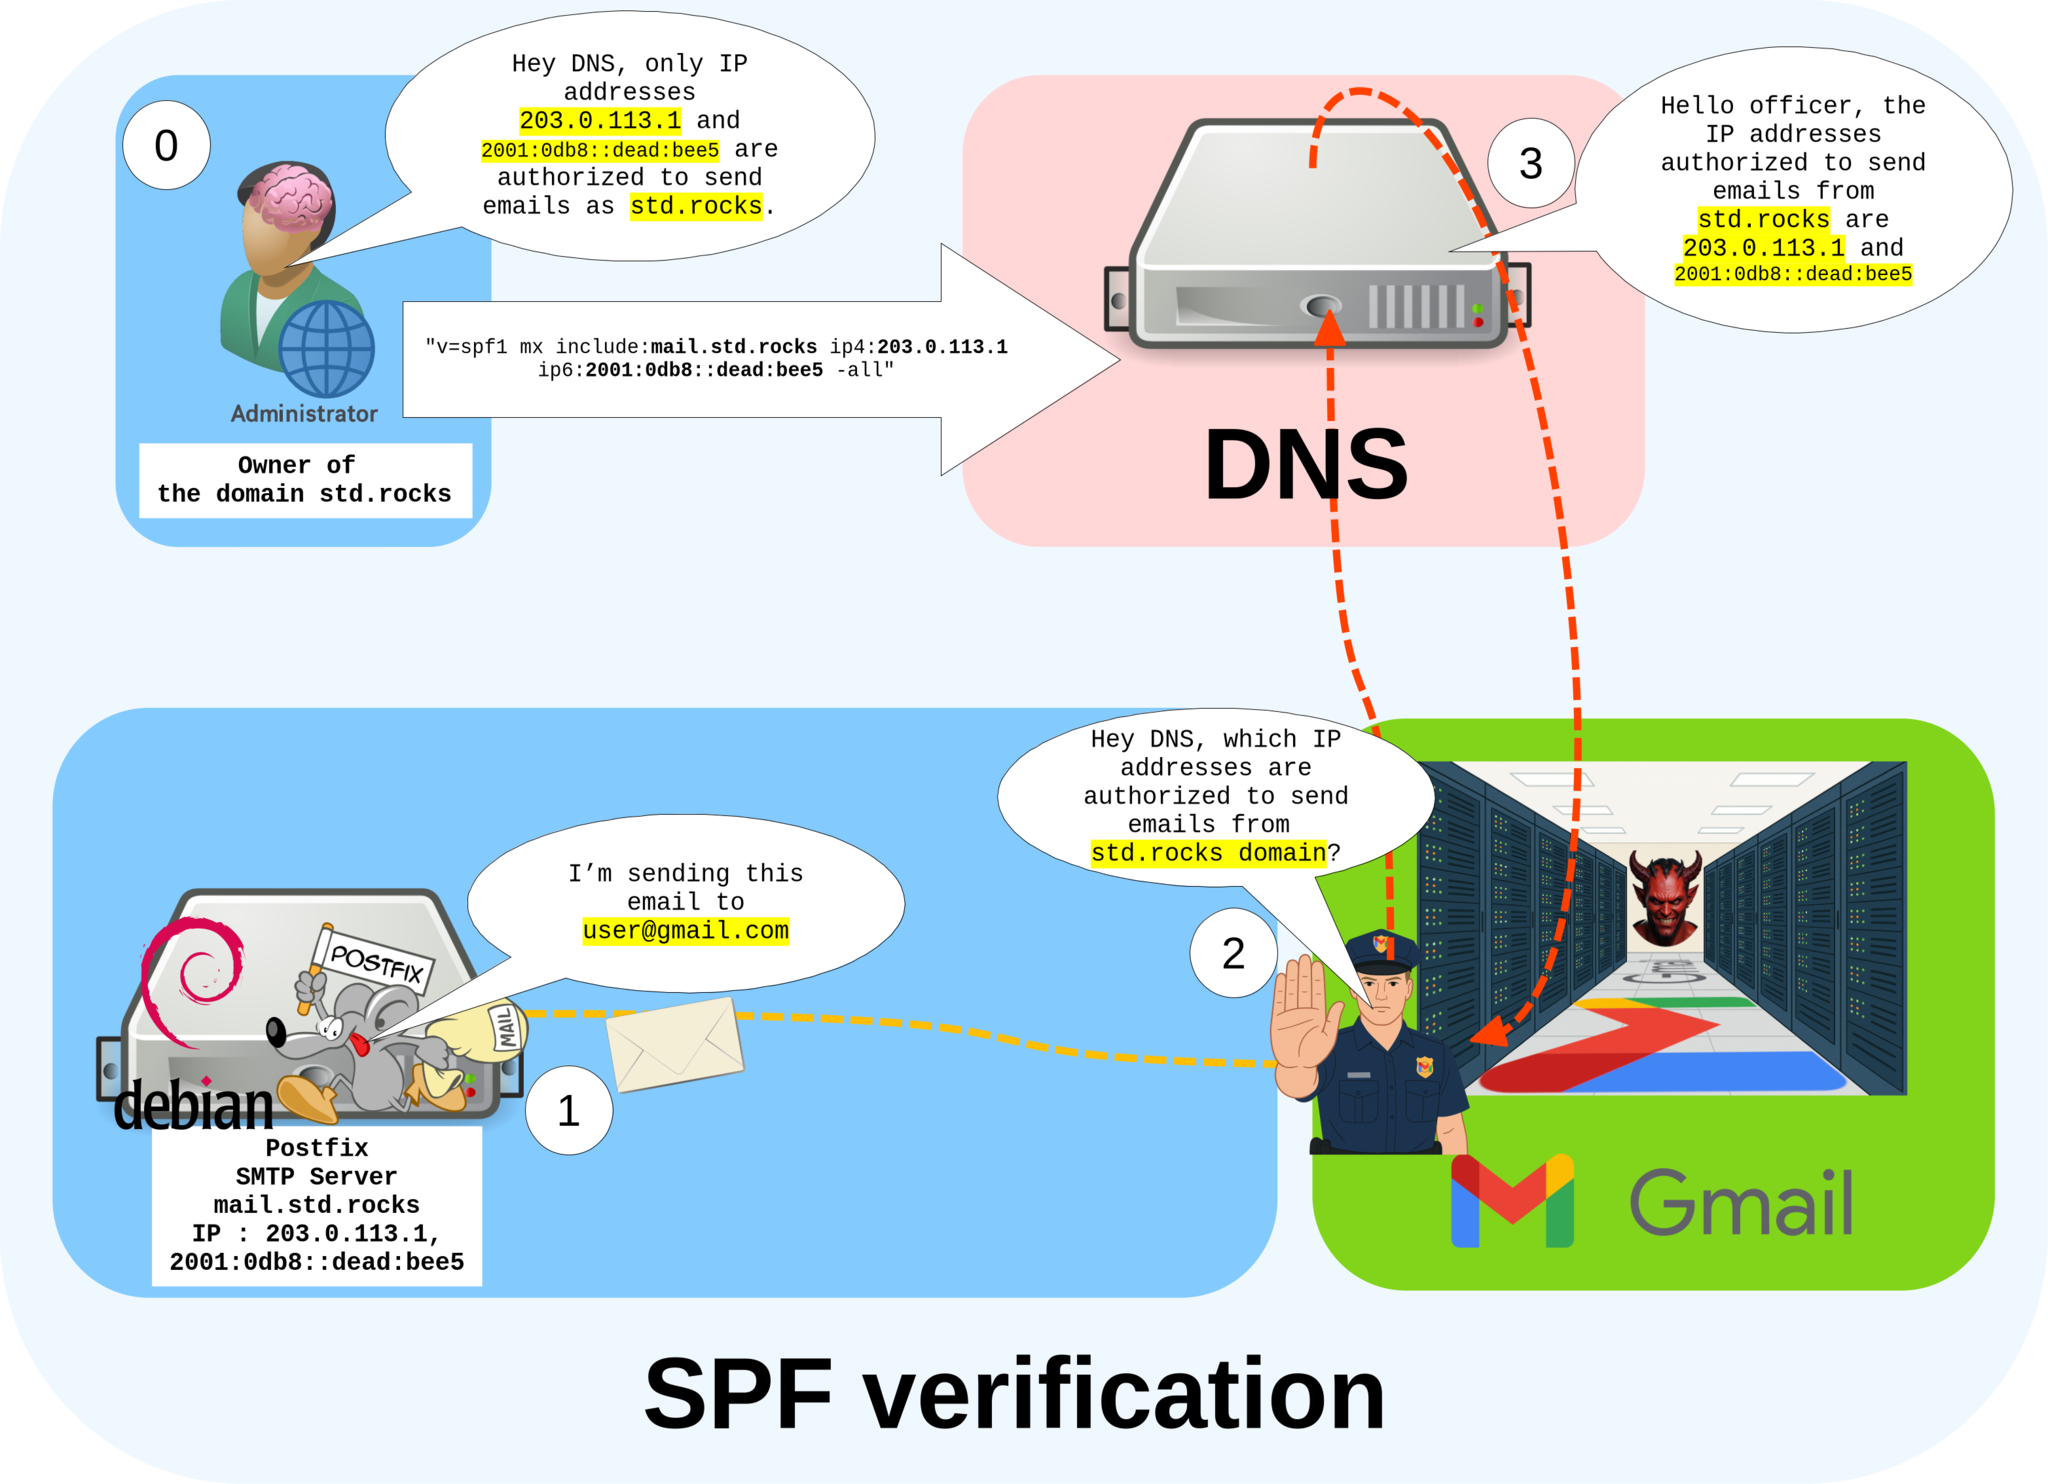
std.rocks domain.Once the SPF record has been created, your DNS dashboard should display an entry similar to the one below:

std.rocks.- To verify your SPF configuration (replace
std.rockswith your own domain name), run the following command:
john@debian:~$ host -t txt std.rocks
std.rocks descriptive text "v=spf1 mx include:mail.std.rocks ip4:203.0.113.1 ip6:2001:0db8::dead:bee5 -all"
Configuring DKIM to Sign and Authenticate Your Emails
Overview
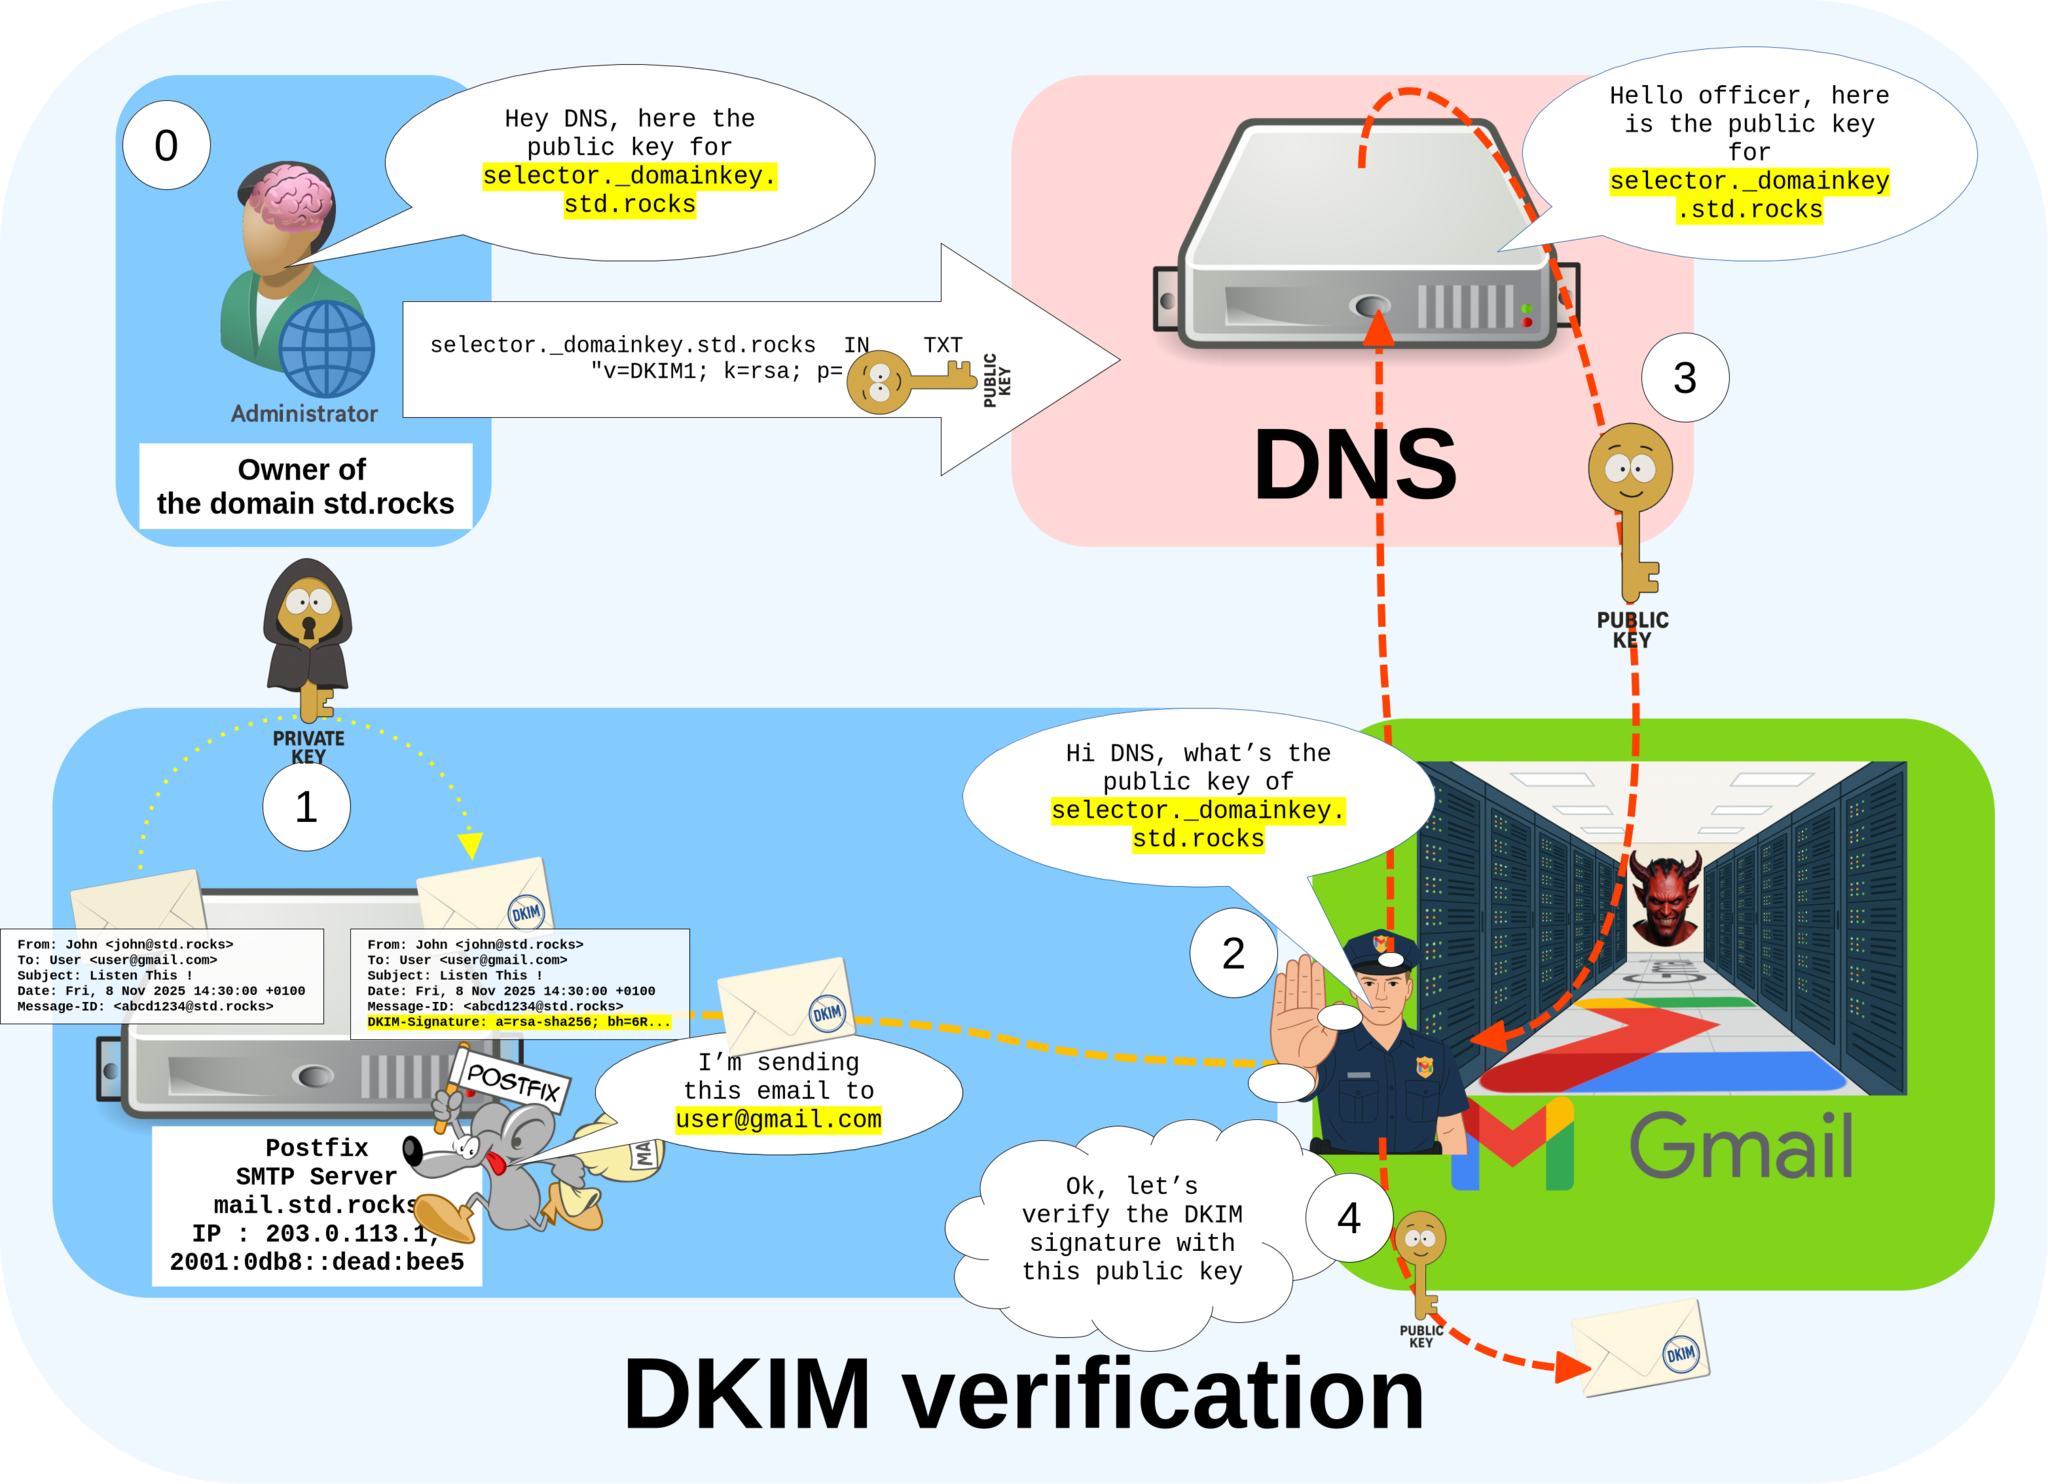
DKIM (DomainKeys Identified Mail) may seem a bit complex at first, but the concept is simple.
It allows the sending mail server to digitally sign each outgoing message by adding a DKIM-Signature field to the email header, using a private key (we’ll see how to create it later). The receiving server can then verify the authenticity of the message using the corresponding public key, which is published in the domain’s DNS records. This public/private key pair ensures that the email truly originates from the authorized domain and has not been altered during transmission.
Configuration
- On your server, install OpenDKIM and its tools:
root@debian:~# apt update && apt install opendkim opendkim-tools- Generate your key pair (private and public keys):
root@debian:~# sudo -u opendkim opendkim-genkey -D /etc/dkimkeys -d std.rocks -s selector- Create the directory
/var/spool/postfix/opendkim/with the correct permissions for theopendkimuser:
root@debian:~# install -d -m 770 -o opendkim -g opendkim /var/spool/postfix/opendkim/- Add the postfix user to the
opendkimgroup:
root@debian:~# usermod -aG opendkim postfix- Edit the
/etc/opendkim.confconfiguration file to define your domain, selector, and key paths:
Syslog                  yes
SyslogSuccess           yes
Canonicalization        relaxed/simple
OversignHeaders         From
Domain                  std.rocks
Selector                selector
KeyFile                 /etc/dkimkeys/selector.private
Socket                  local:/var/spool/postfix/opendkim/opendkim.sock
UserID                  opendkim
UMask                   007
PidFile                 /run/opendkim/opendkim.pid
TrustAnchorFile /usr/share/dns/root.key- Restart the OpenDKIM service to apply the configuration changes:
root@debian:~# systemctl restart opendkim- Display the contents of the
/etc/dkimkeys/selector.txtfile to view your public key. This key will be required to create your DKIM DNS record:
root@debian:~# cat /etc/dkimkeys/selector.txt
selector._domainkey	IN	TXT	( "v=DKIM1; h=sha256; k=rsa; "
"p=MIIBIjANBgkqhkiG9w0BAQEFAAOCAQ8AMIIBCgKCAQEAlBBJYPEMqBqhBhap27waAwkW4ldwhhzxZErIeOagJSstm1gzExVvVuvRStv+hBk+IIwsNCr5OulWf7nZDThKWzUQs4fo2IBOcijbMcET48hgpnRiApKQvyRnxssuAjl9180u13pA3M5D35FYhGT0tNzEZLgI7YMN/nV00rvGT/RlzP7oa/XjcP73Zk+8R9YQhBviqPpHBjPyPK"
"369MP0zgYiVppjVedFive6kR3xciZ1BGbmSyM7tMFqZA3xVgcLtKQNMULdlzO+xz5h7e0u8zQBTPejjuC8fNiEhndbm9kmKIXV3G0PgsFKMd8S0ooH/L6ROM6+3MCrygKBLOcmxwIDAQAB" ) ; ----- DKIM key selector for std.rocks- Add the following entry to your DNS configuration. Each parameter defines a specific element of the DKIM record:
v=DKIM1: specifies the DKIM version used.h=sha256: indicates the hashing algorithm (SHA-256) used for signing.k=rsa: specifies the type of encryption key (RSA).p=: contains your public key generated earlier.
selector._domainkey IN TXT "v=DKIM1; h=sha256; k=rsa; " "p=PUBLIC_KEY"- Depending on your DNS provider, the DKIM record setup may vary slightly. Here is an example from OVHcloud showing how to add the public key to the DNS zone:
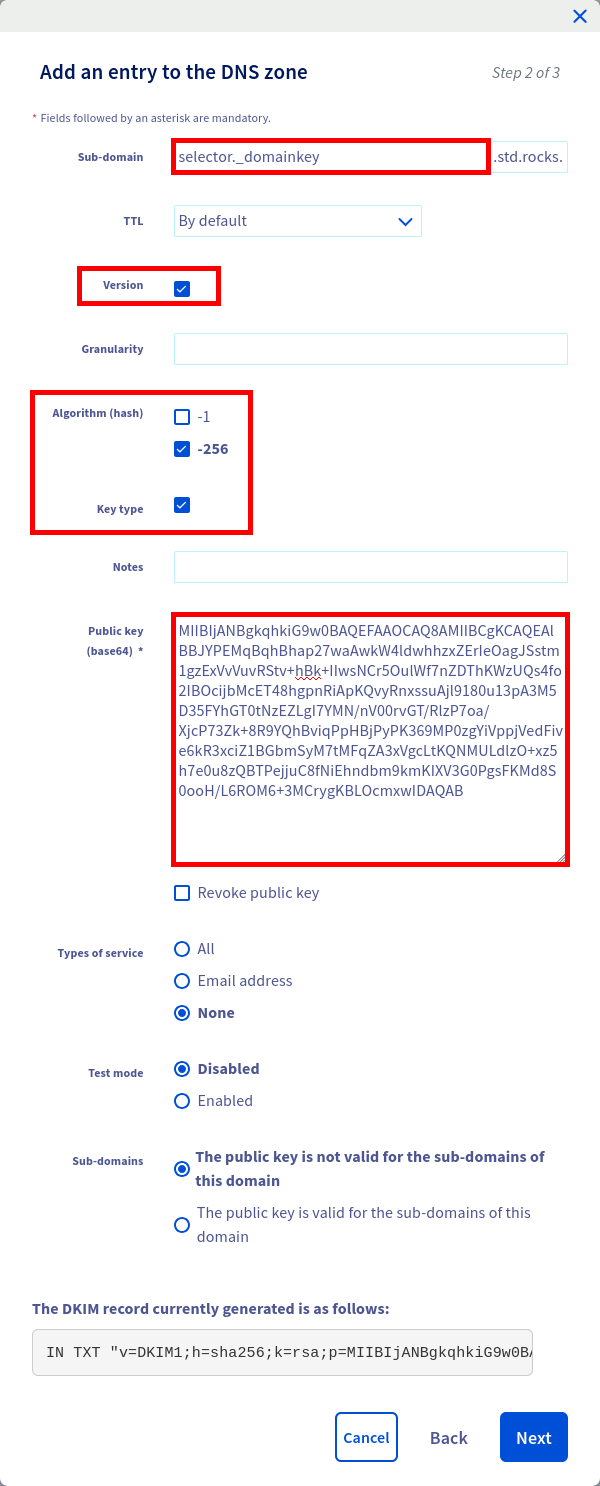
selector._domainkey subdomain, v=DKIM1 version, h=sha256 hash algorithm, and public key.- Once the record is saved, you should see the new DKIM entry displayed in your DNS dashboard, as shown below:

std.rocks.- You can verify your DKIM configuration by querying your DNS record (replace
std.rockswith your own domain):
john@debian:~$ host -t TXT selector._domainkey.std.rocks
selector._domainkey.std.rocks descriptive text "v=DKIM1;h=sha256;k=rsa;p=MIIBIjANBgkqhkiG9w0BAQEFAAOCAQ8AMIIBCgKCAQEAlBBJYPEMqBqhBhap27waAwkW4ldwhhzxZErIeOagJSstm1gzExVvVuvRStv+hBk+IIwsNCr5OulWf7nZDThKWzUQs4fo2IBOcijbMcET48hgpnRiApKQvyRnxssuAjl9180u13pA3M5D35FYhGT0tNzEZLgI7YMN/nV00rvGT/RlzP7oa/Xjc" "P73Zk+8R9YQhBviqPpHBjPyPK369MP0zgYiVppjVedFive6kR3xciZ1BGbmSyM7tMFqZA3xVgcLtKQNMULdlzO+xz5h7e0u8zQBTPejjuC8fNiEhndbm9kmKIXV3G0PgsFKMd8S0ooH/L6ROM6+3MCrygKBLOcmxwIDAQAB;t=s;"
Implementing DMARC to Protect Your Domain from Email Spoofing
Overview
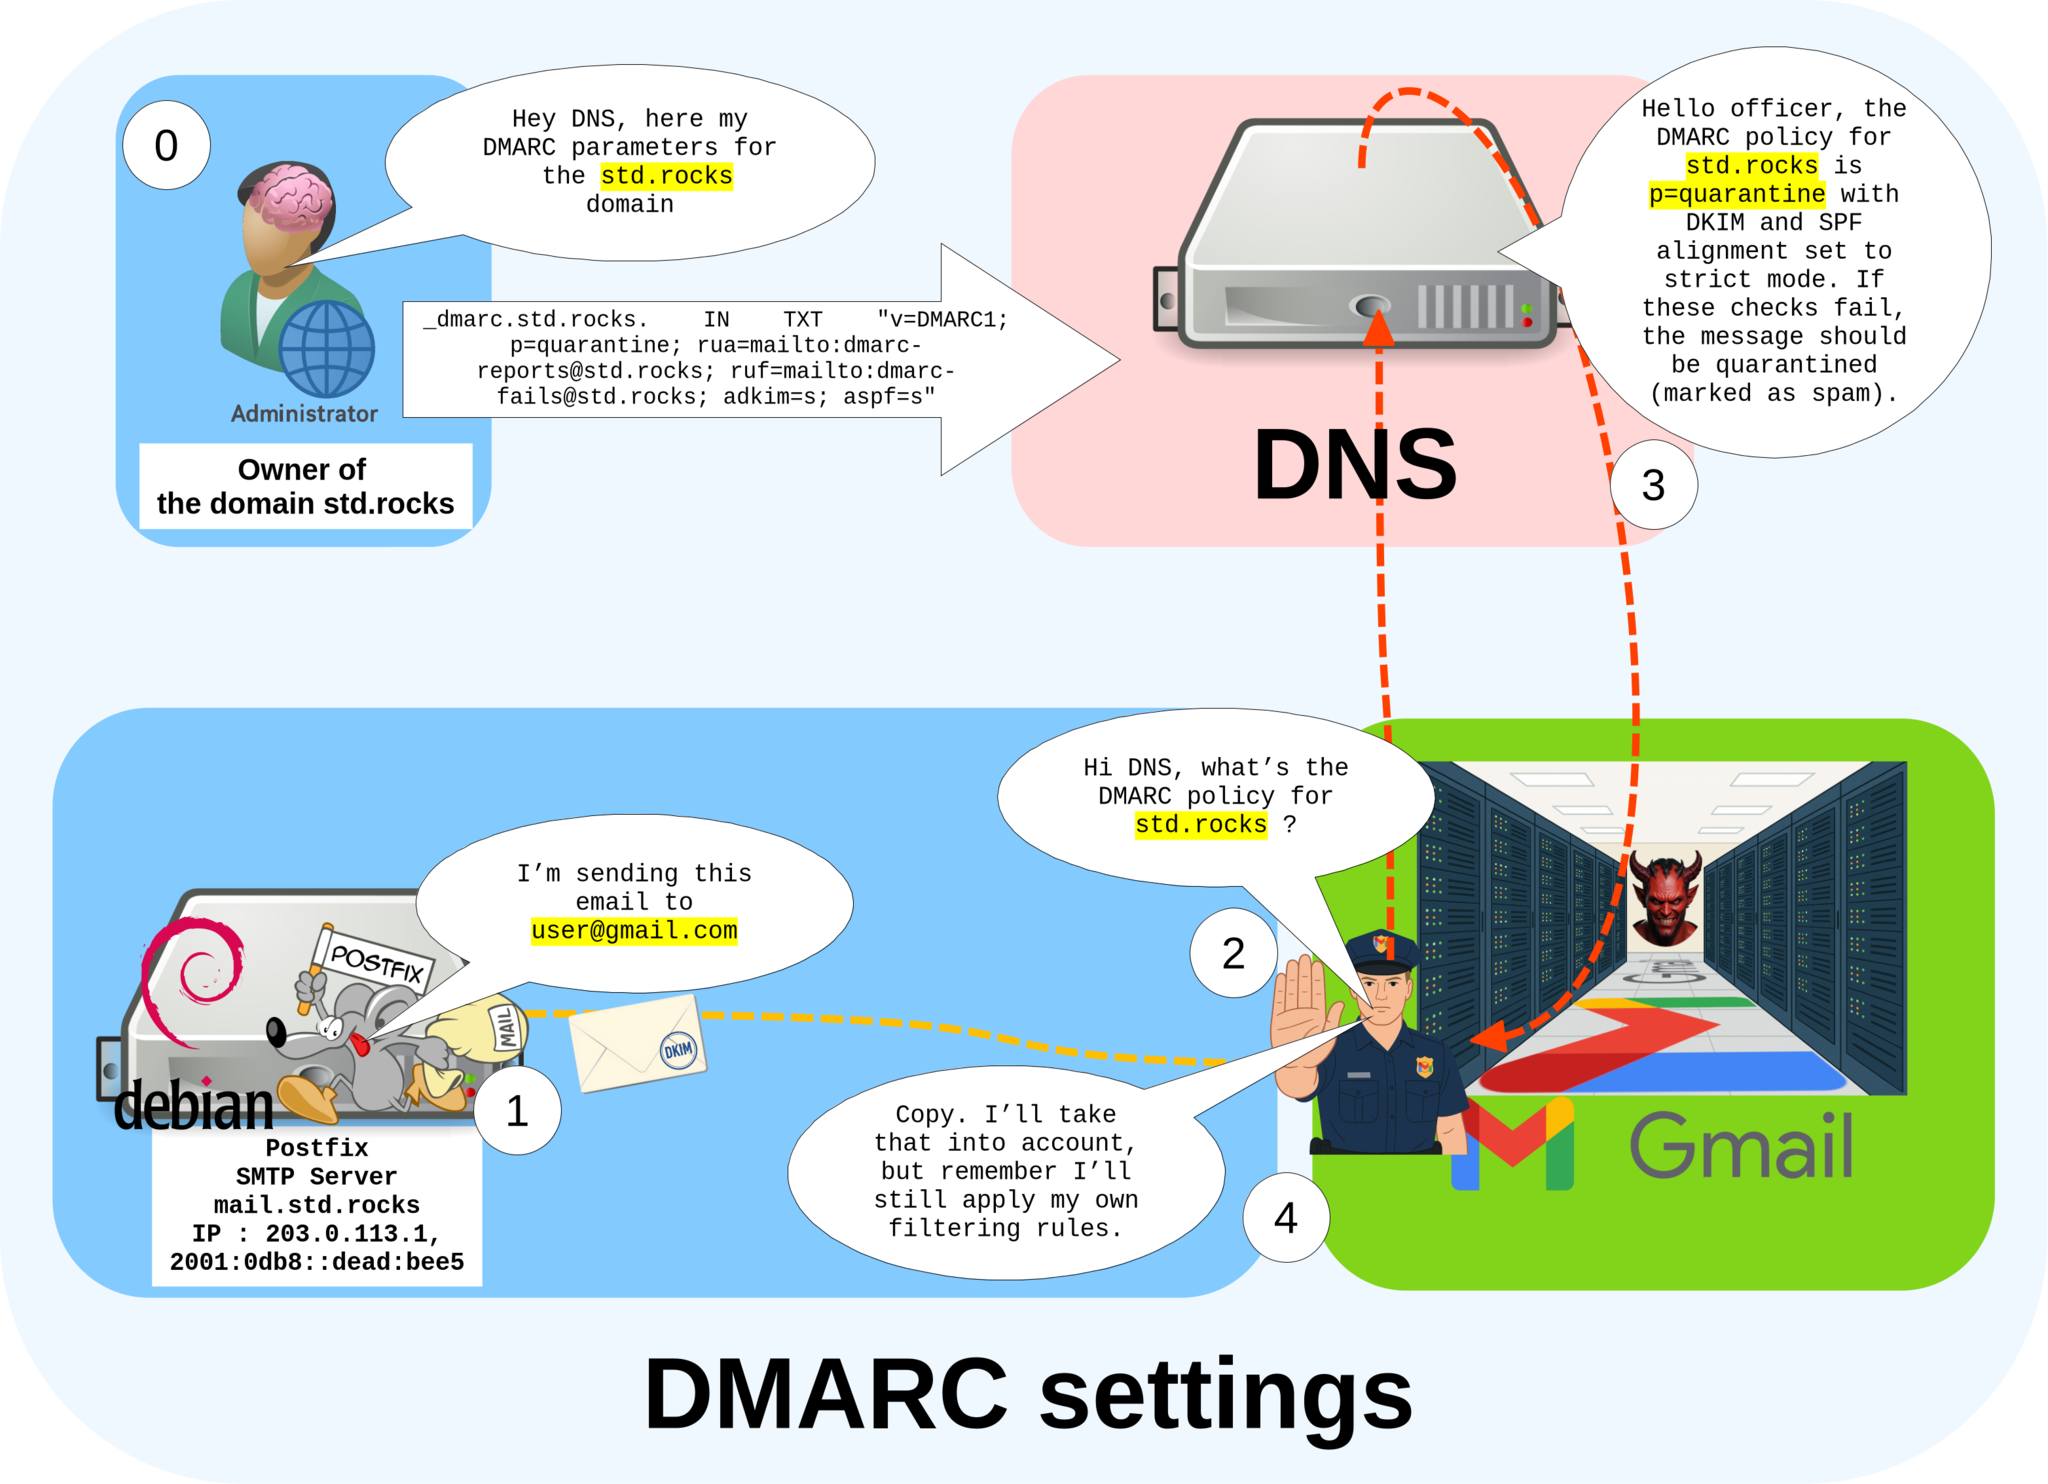
DMARC (Domain-based Message Authentication, Reporting, and Conformance) defines a policy that tells receiving mail servers how to handle messages claiming to come from your domain if they fail SPF or DKIM checks. While these servers are not strictly required to follow your policy, most major providers respect it. DMARC also allows you to specify email addresses where you can receive reports about authentication failures and domain abuse attempts.
std.rocks.Configuration
- From the OVHcloud dashboard, you can add your DMARC record. The interface has some limitations — for example, it may not allow full customization of certain parameters like DKIM alignment. In that case, you can switch to the text format editor to manually edit the
_dmarcrecord and use the following configuration:
_dmarc IN TXT "v=DMARC1;p=quarantine;rua=mailto:dmarc-reports@std.rocks;ruf=mailto:dmarc-fails@std.rocks;sp=reject;aspf=s;adkim=s;"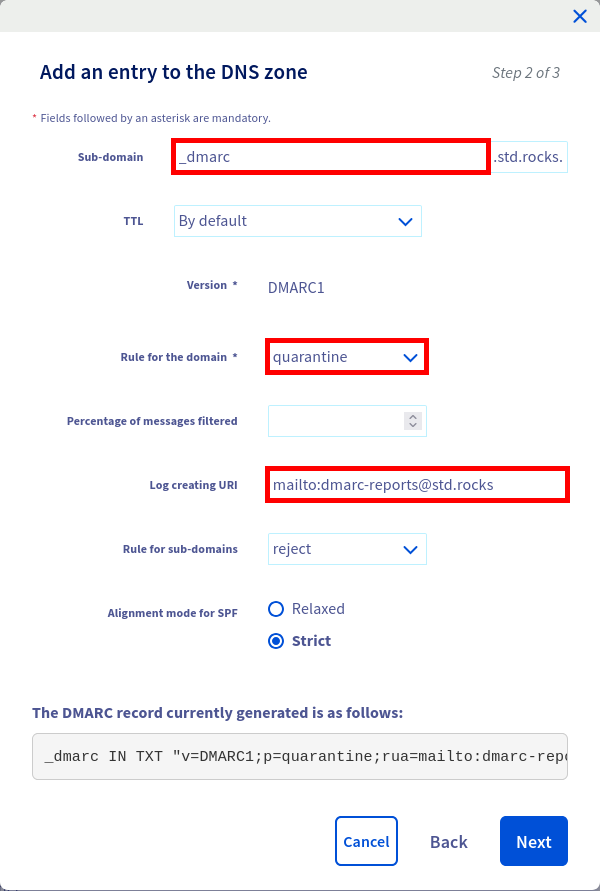
p=quarantine), reporting addresses, and strict alignment for SPF and DKIM.- Then you should see this new entry:

std.rocks.- You can verify your DMARC configuration by querying your DNS record (replace
std.rockswith your own domain):
john@debian:~$ host -t TXT _dmarc.std.rocks
_dmarc.std.rocks descriptive text "v=DMARC1;p=quarantine;rua=mailto:dmarc-reports@std.rocks;ruf=mailto:dmarc-fails@std.rocks;sp=reject;aspf=s;adkim=s;"
Configuring Reverse DNS (rDNS) for Your Mail Server
Reverse DNS (rDNS) is a special type of DNS record that resolves an IP address back to a domain name. When a receiving mail server gets an incoming message, it may perform an rDNS lookup to verify that the sending IP address corresponds to the hostname of the mail server — mail.std.rocks in our example. This helps confirm the legitimacy of the server and prevents messages from being flagged as suspicious or spam.
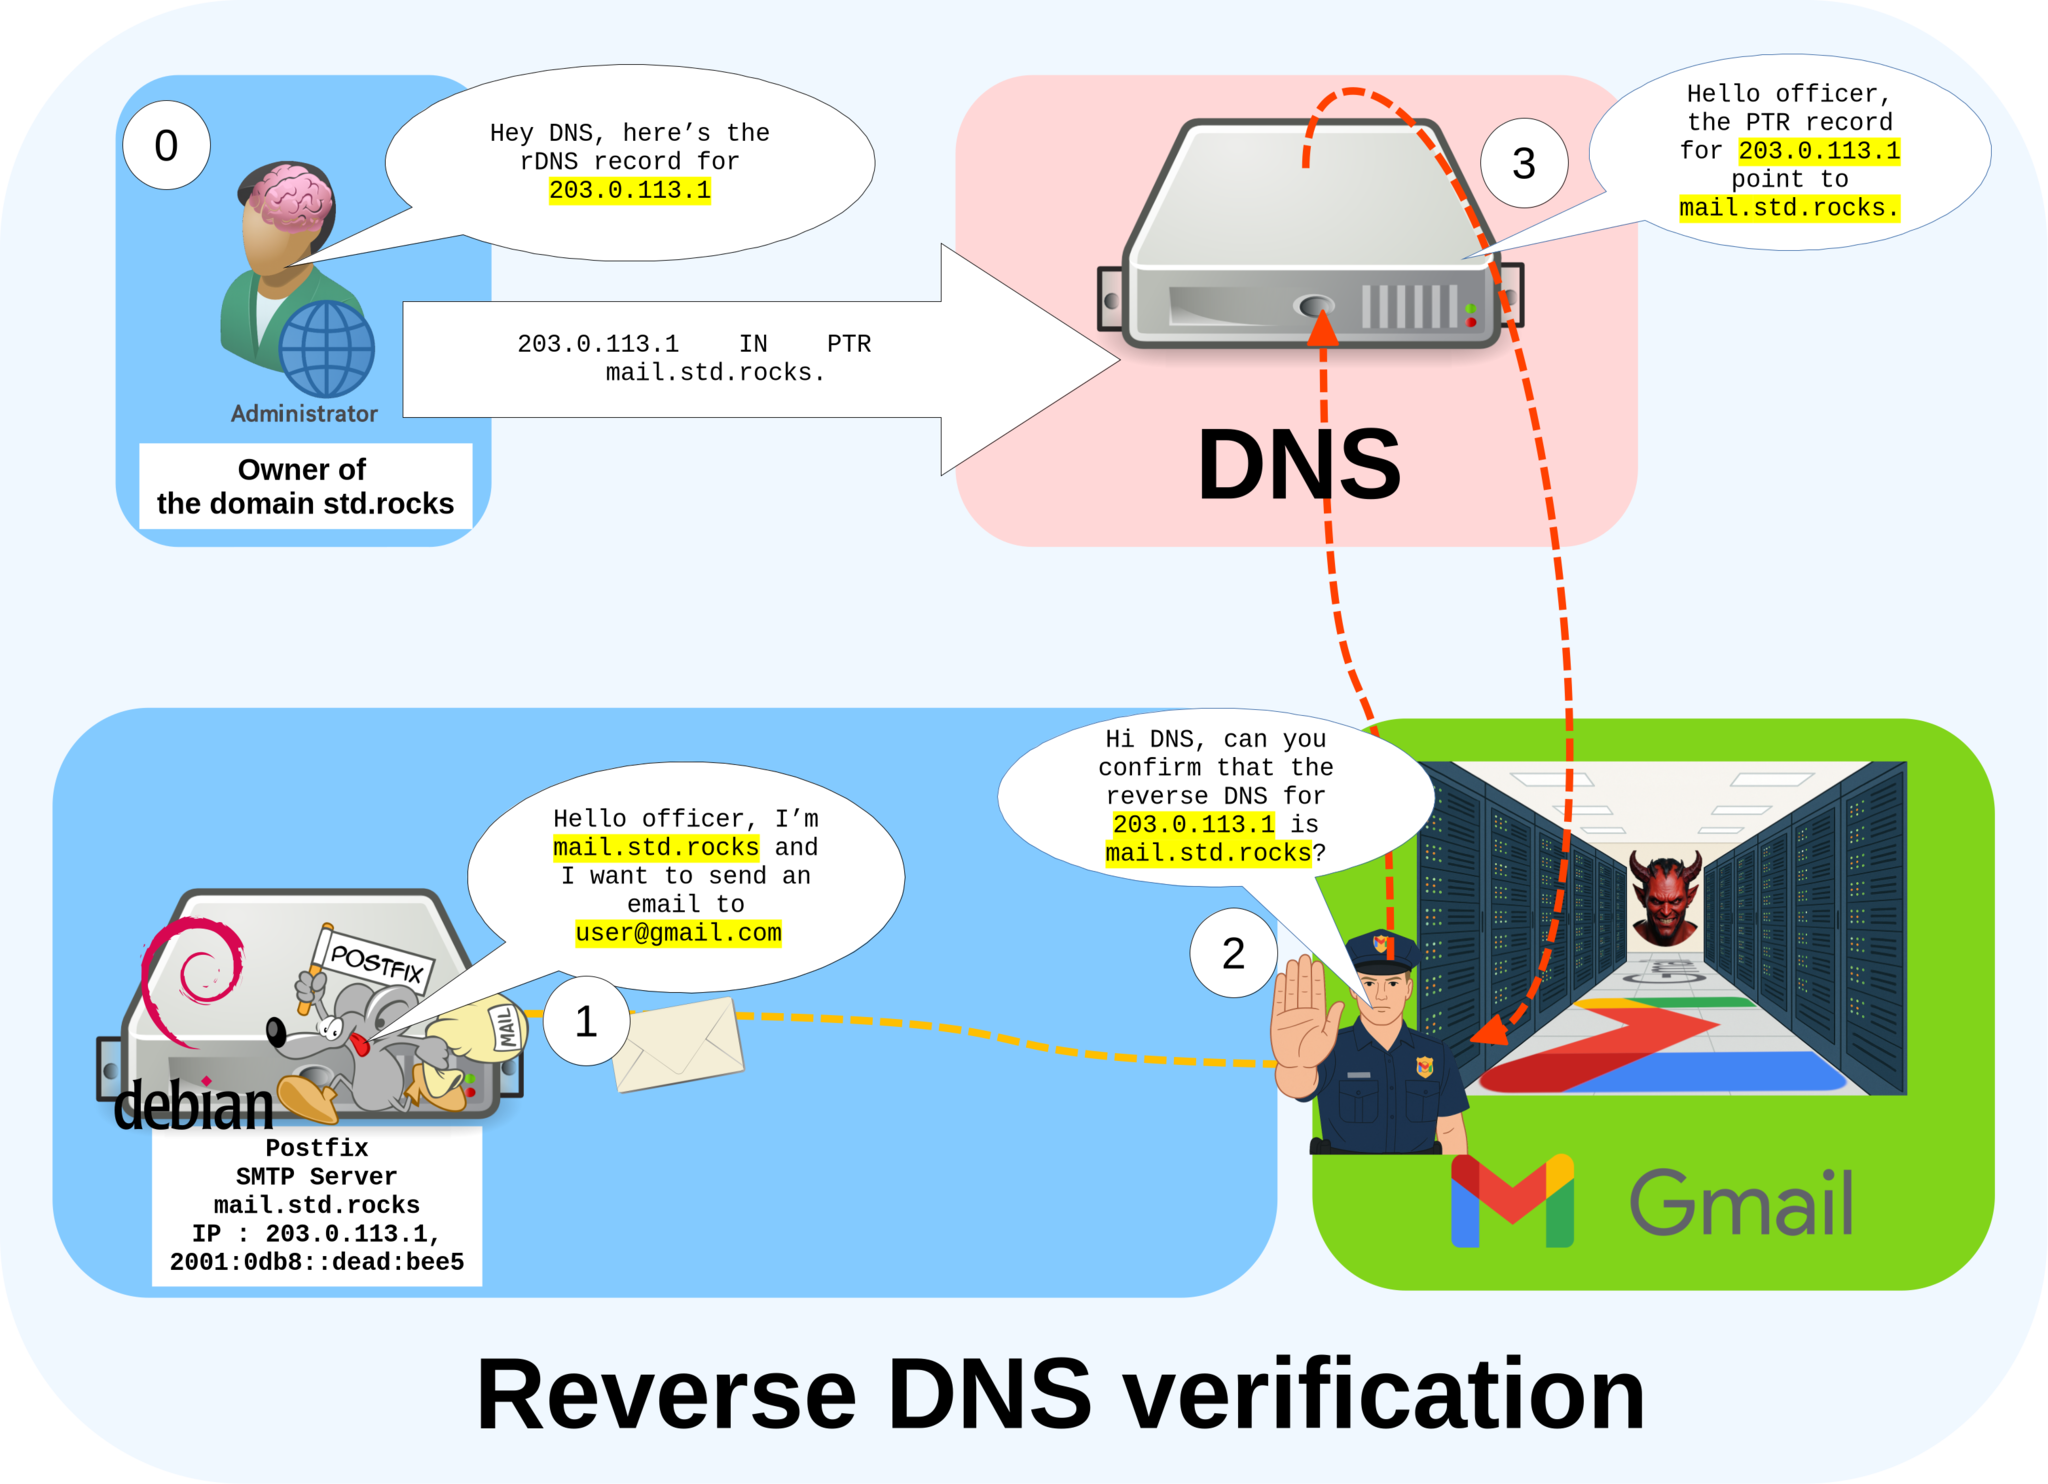
mail.std.rocks).In most cases, rDNS (reverse DNS) configuration must be requested from your IP address provider. However, if you are using a VPS, you can usually set it directly from your hosting control panel. For example, on OVHcloud, you can configure the reverse DNS entry from the dashboard interface, as shown below:
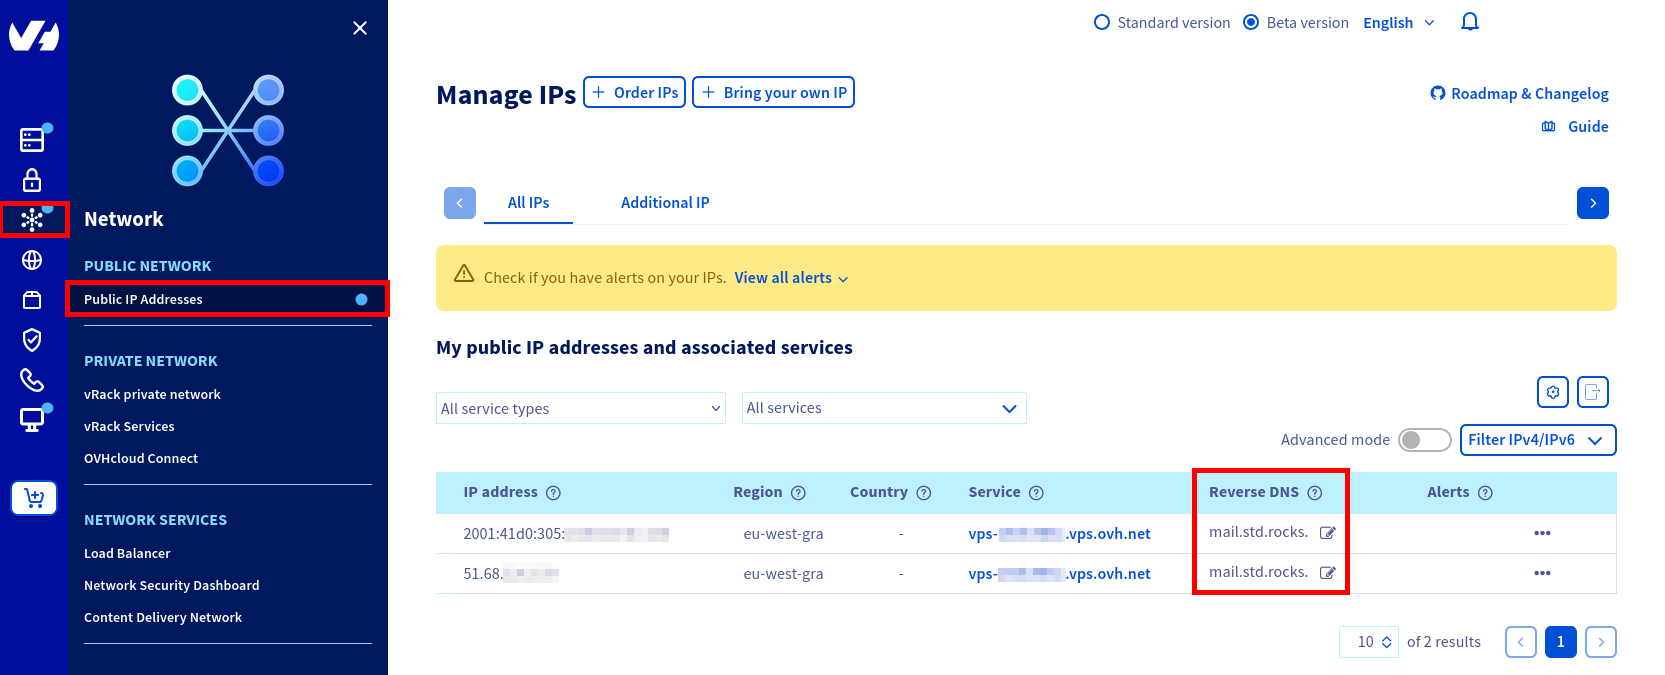
mail.std.rocks.- You can verify your rDNS configuration to ensure it is correctly set (replace the IP address with your own):
john@debian:~$ host -t PTR 203.0.113.1
1.113.0.203.in-addr.arpa domain name pointer mail.std.rocks.
Installing and Configuring Postfix on Debian
Now that our DNS settings are properly configured, we can proceed with the installation of our SMTP server, Postfix! To better understand how it works, Postfix listens on three different ports, each serving a specific purpose. The first one, 25/tcp, is used for communication between mail servers — for example, to receive messages from external servers or to deliver outgoing emails to other domains. The other two ports, 465/tcp (implicit TLS) and 587/tcp (STARTTLS), are reserved for authenticated clients, such as email applications or mobile devices, to securely send outgoing messages via our mail server.
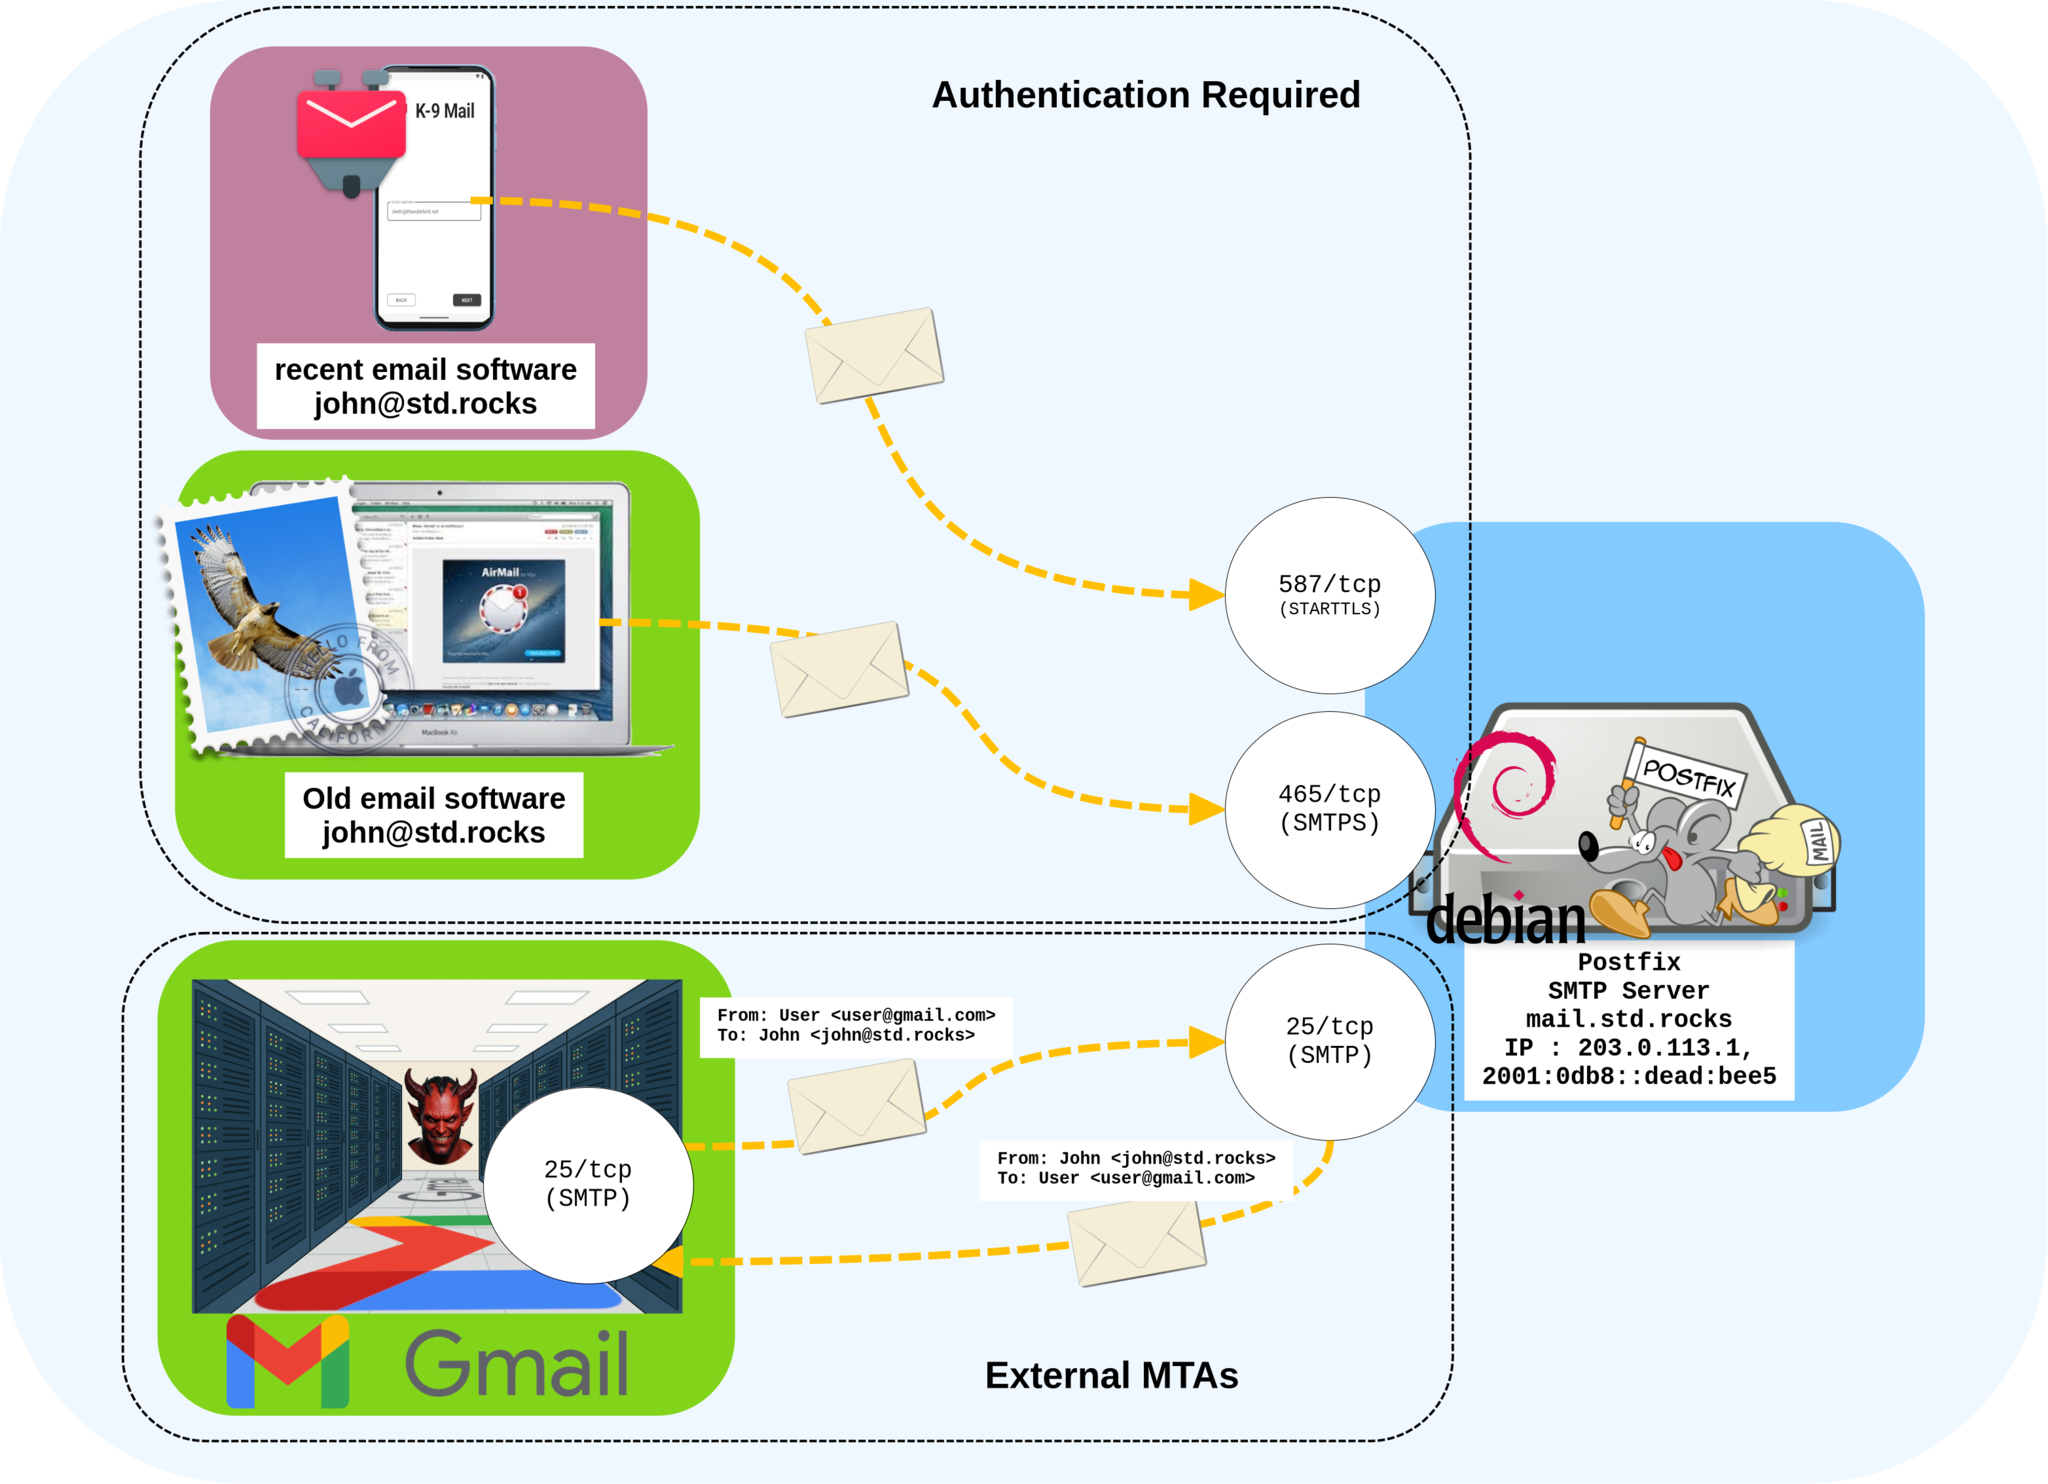
25, 465, and 587 used for external servers and authenticated clients with TLS encryption.Installing Postfix
- Install the Postfix package:
root@debian:~# apt update && apt install postfix- During installation, when prompted to choose the configuration type, select No configuration. This will allow you to manually set up Postfix later according to your custom mail server setup.
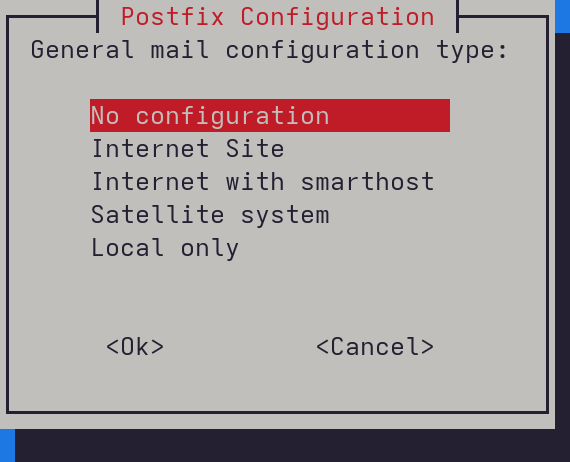
No configuration to perform a manual setup later.Configuring the Postfix main.cf File
- Create or edit the
/etc/postfix/main.cffile, then adapt the configuration to your own hostname and domain name. The following directives must be adjusted according to your environment:myhostname = mail.yourdomain.tldvirtual_mailbox_domains = yourdomain.tld
# See /usr/share/postfix/main.cf.dist for a commented, more complete version


# Debian specific:  Specifying a file name will cause the first
# line of that file to be used as the name.  The Debian default
# is /etc/mailname.
myorigin = /etc/mailname
myhostname = mail.std.rocks

smtpd_banner = $myhostname ESMTP $mail_name (Debian/GNU)
biff = no

# appending .domain is the MUA's job.
append_dot_mydomain = no

# See http://www.postfix.org/COMPATIBILITY_README.html -- default to 3.6 on
# fresh installs.
compatibility_level = 3.6

# ---- TLS (server side, SMTP port 25) ----
# Opportunistic TLS on SMTP (port 25). This is the right default for MX traffic.
smtpd_tls_security_level=may

# Self-signed certs for now; swap to Let's Encrypt later.
smtpd_tls_cert_file= /etc/ssl/certs/mail-selfsigned.crt
smtpd_tls_key_file= /etc/ssl/private/mail-selfsigned.key

# Disable legacy protocols; allow TLSv1.2/1.3.
smtpd_tls_protocols = !SSLv2,!SSLv3,!TLSv1,!TLSv1.1
smtpd_tls_mandatory_protocols = !SSLv2,!SSLv3,!TLSv1,!TLSv1.1

# Small, safe TLS hardening and visibility.
smtpd_tls_loglevel = 1
smtpd_tls_session_cache_database = btree:${data_directory}/smtpd_scache

# ---- TLS (client side, outbound) -----
smtp_tls_security_level=may
smtp_tls_CApath=/etc/ssl/certs
smtp_tls_loglevel = 1
smtp_tls_session_cache_database = btree:${data_directory}/smtp_scache

# ---- Relay policy ----
# Allow SASL-authenticated users to relay; reject others (prevents open relay).
smtpd_relay_restrictions = permit_sasl_authenticated, reject_unauth_destination

# ---- Local delivery & networking -----
mydestination = $myhostname, localhost.localdomain, localhost
relayhost =
mynetworks = 127.0.0.0/8 [::ffff:127.0.0.0]/104 [::1]/128
mailbox_size_limit = 0
#recipient_delimiter = +
inet_interfaces = all
inet_protocols = all

# ---- Virtual domains & Dovecot LMTP ----
alias_maps =
alias_database =
virtual_mailbox_domains = std.rocks
virtual_alias_maps = hash:/etc/postfix/virtual
virtual_mailbox_base = /mails/
# IMPORTANT: verify recipients; use a map (hash/sql/ldap) or you'll accept unknown users.
# might be worth activating in the future:
# virtual_mailbox_maps = hash:/etc/postfix/virtual_mailbox
virtual_uid_maps = static:7200
virtual_gid_maps = static:7200
virtual_minimum_uid = 7200

# Hand off mail to Dovecot via LMTP (fast and robust).
virtual_transport = lmtp:unix:private/dovecot-lmtp

# ---- Authentication (SASL via Dovecot) ----
smtpd_sasl_auth_enable = yes
smtpd_sasl_security_options = noanonymous
smtpd_sasl_type = dovecot
smtpd_sasl_path = private/auth
# Only allow AUTH over TLS (good hygiene).
smtpd_tls_auth_only = yes

# ---- SMTP hygiene (early rejections reduce spam and load) ----
# Require a proper HELO and do basic sender/recipient sanity checks.
smtpd_helo_required = yes
smtpd_recipient_restrictions =
    reject_unauth_pipelining,
    reject_non_fqdn_sender,
    reject_non_fqdn_recipient,
    reject_unknown_sender_domain,
    reject_unknown_recipient_domain,
    permit_mynetworks,
    permit_sasl_authenticated,
    reject_unauth_destination

# Hide user enumeration via SMTP VRFY.
disable_vrfy_command = yes

# ---- DKIM via milter ----
milter_default_action = accept
smtpd_milters = unix:opendkim/opendkim.sock
non_smtpd_milters = $smtpd_milters

# ---- Misc ----
# ~25 MB per message (reasonable default).
message_size_limit = 25480000
Configuring the Postfix master.cf File
The Postscreen daemon acts as the first security layer for incoming mail connections. It listens on port 25/tcp and performs several preliminary checks, such as verifying the sender’s IP reputation or detecting blacklisted addresses. If all checks pass, Postscreen forwards the connection to the smtpd daemon for standard SMTP processing.

smtpd.- Edit the
/etc/postfix/master.cffile to configure the active Postfix services:
# ========== Public SMTP (port 25) ==========
smtp      inet  n       -       y       -       1       postscreen
smtpd      pass  -       -       y       -       -       smtpd
#smtp      inet  n       -       y       -       -       smtpd
dnsblog   unix  -       -       y       -       0       dnsblog
tlsproxy  unix  -       -       y       -       0       tlsproxy
# Choose one: enable submission for loopback clients only, or for any client.
#127.0.0.1:submission inet n -   y       -       -       smtpd

# ========== Submission (port 587) ==========
submission inet n       -       y       -       -       smtpd
  -o syslog_name=postfix/submission
  -o smtpd_tls_security_level=encrypt
  -o smtpd_tls_protocols=!SSLv2,!SSLv3,!TLSv1,!TLSv1.1
  -o smtpd_sasl_auth_enable=yes
  -o smtpd_helo_required=yes
  -o milter_macro_daemon_name=ORIGINATING
  -o smtpd_relay_restrictions=permit_sasl_authenticated,reject
  -o smtpd_client_restrictions=
# ========== SMTPS (port 465) ==========
smtps     inet  n       -       y       -       -       smtpd
  -o syslog_name=postfix/smtps
  -o smtpd_tls_wrappermode=yes
  -o smtpd_tls_protocols=!SSLv2,!SSLv3,!TLSv1,!TLSv1.1
  -o smtpd_sasl_auth_enable=yes
  -o smtpd_helo_required=yes
  -o milter_macro_daemon_name=ORIGINATING
  -o smtpd_relay_restrictions=permit_sasl_authenticated,reject
  -o smtpd_client_restrictions=

#628       inet  n       -       y       -       -       qmqpd
pickup    unix  n       -       y       60      1       pickup
cleanup   unix  n       -       y       -       0       cleanup
qmgr      unix  n       -       n       300     1       qmgr
#qmgr     unix  n       -       n       300     1       oqmgr
tlsmgr    unix  -       -       y       1000?   1       tlsmgr
rewrite   unix  -       -       y       -       -       trivial-rewrite
bounce    unix  -       -       y       -       0       bounce
defer     unix  -       -       y       -       0       bounce
trace     unix  -       -       y       -       0       bounce
verify    unix  -       -       y       -       1       verify
flush     unix  n       -       y       1000?   0       flush
proxymap  unix  -       -       n       -       -       proxymap
proxywrite unix -       -       n       -       1       proxymap
smtp      unix  -       -       y       -       -       smtp
relay     unix  -       -       y       -       -       smtp
        -o syslog_name=${multi_instance_name?{$multi_instance_name}:{postfix}}/$service_name
#       -o smtp_helo_timeout=5 -o smtp_connect_timeout=5
showq     unix  n       -       y       -       -       showq
error     unix  -       -       y       -       -       error
retry     unix  -       -       y       -       -       error
discard   unix  -       -       y       -       -       discard
local     unix  -       n       n       -       -       local
virtual   unix  -       n       n       -       -       virtual
lmtp      unix  -       -       y       -       -       lmtp
anvil     unix  -       -       y       -       1       anvil
scache    unix  -       -       y       -       1       scache
postlog unix-dgram n - n - 1 postlogd- Create the
vmailvirtual user that will own all mail directories and files:
root@debian:~# groupadd -g 7200 vmailroot@debian:~# useradd -r -u 7200 -g 7200 -d /mails -m -s /usr/sbin/nologin vmail- Add your domain name to the
/etc/mailnamefile:
root@debian:~# echo "std.rocks" > /etc/mailname- Generate a self-signed SSL/TLS certificate for securing email transmission:
root@debian:~# openssl req -new -x509 -days 365 -nodes \
  -out /etc/ssl/certs/mail-selfsigned.crt \
  -keyout /etc/ssl/private/mail-selfsigned.key \
  -subj "/C=US/ST=Washington/L=Seattle/O=std.rocks/OU=Mail/CN=mail.std.rocks"
root@debian:~# chmod 600 /etc/ssl/private/mail-selfsigned.key
root@debian:~# chown root:root /etc/ssl/private/mail-selfsigned.key- Create the main mail directory
/mails/std.rocksto store all virtual mailboxes and set the proper permissions:
root@debian:~# mkdir -p /mails/std.rocks
root@debian:~# chown -R vmail:vmail /mails/std.rocks
Installing and Configuring Dovecot on Debian
It’s now time to install and configure Dovecot, which will handle both IMAP services and user authentication for our mail server.
Installing Dovecot
- Install the required Dovecot packages:
root@debian:~# apt update && apt install dovecot-imapd dovecot-lmtpd dovecot-core dovecot-sieveConfiguring Dovecot
- When you install Dovecot, it creates multiple configuration files by default. To make the setup cleaner and easier to understand, you can remove the default files and create a single configuration file that consolidates all the necessary settings.
root@debian:~# ls /etc/dovecot/conf.d/
10-auth.conf	 10-master.conf   15-lda.conf	     20-lmtp.conf	  90-fts.conf		     90-sieve.conf	   auth-oauth2.conf.ext      auth-static.conf.ext
10-logging.conf  10-metrics.conf  15-mailboxes.conf  30-dict-server.conf  90-quota.conf		     auth-deny.conf.ext    auth-passwdfile.conf.ext  auth-system.conf.ext
10-mail.conf	 10-ssl.conf	  20-imap.conf	     90-acl.conf	  90-sieve-extprograms.conf  auth-master.conf.ext  auth-sql.conf.ext
root@debian:~# rm /etc/dovecot/conf.d/*- Create the main configuration file at
/etc/dovecot/conf.d/dovecot.conf:
#/etc/dovecot/conf.d/10-ssl.conf
ssl = yes
# Preferred permissions: root:root 0444
ssl_server_cert_file = /etc/dovecot/private/dovecot.pem
# Preferred permissions: root:root 0400
ssl_server_key_file = /etc/dovecot/private/dovecot.key

ssl_server_dh_file = /usr/share/dovecot/dh.pem

ssl_min_protocol = TLSv1.2
ssl_server_prefer_ciphers = server
auth_allow_cleartext = no

protocols = lmtp imap

service lmtp {
        unix_listener /var/spool/postfix/private/dovecot-lmtp {
                mode = 0600
                user  = postfix
                group = postfix
        }
}

listen = *
service imap-login {
        inet_listener imaps {
                port = 993
        }
}

#Authentication postfix :
service auth {
  unix_listener /var/spool/postfix/private/auth {
    mode = 0666
    user = postfix
    group = postfix
  }
}

#/etc/dovecot/conf.d/auth-passwdfile.conf.ext
passdb passwd-file {
        driver = passwd-file
        passwd_file_path = /etc/dovecot/passwd
        auth_username_format = %{user | username}
}

userdb passwd-file {
        driver = passwd-file
        auth_username_format = %{user | username}
        passwd_file_path = /etc/dovecot/passwd
}

#sieve
protocol lmtp {
  mail_plugins = sieve
}
sieve_script personal {
  path = ~/.dovecot.sieve
}

#/etc/dovecot/conf.d/10-mail.conf
mail_driver = maildir
mail_home = /mails/%{user | domain}/%{user | username}
mail_path = %{home}/Maildir
mail_uid = vmail
mail_gid = vmail

# To further reduce iops on the metacache volume when using zlib or mail_crypt; point the dovecot temp directory to a tmpfs volume. Source : https://doc.dovecot.org/configuration_manual/os/
mail_temp_dir = /dev/shm/- Create the
/etc/dovecot/passwdfile, which will store user authentication credentials:
root@debian:~# touch /etc/dovecot/passwd- Set the correct permissions to secure the file:
root@debian:~# chown root:dovecot /etc/dovecot/passwd
root@debian:~# chmod 640 /etc/dovecot/passwd
Creating a Mail User
Generating a Secure Password Hash
First, we need to generate a password hash for our mail user. We’ll use the doveadm command, which provides a built-in password hashing utility. The generated hash will then be added to the /etc/dovecot/passwd file to define the user’s credentials.
- Use the
doveadm pwcommand to generate the hash of your password (don’t use my weak example 😉), then copy the resulting hash:
root@debian:~# doveadm pw -s ARGON2ID
Enter new password:youWon'tfindMyPassWD
Retype new password:youWon'tfindMyPassWD
{ARGON2ID}$argon2id$v=19$m=65536,t=3,p=1$4IPe7Nj3kTZJ54f5sKnc0Q$1rIsKMMkz5wOeuIWZmHmk+aUBBvtiBAZTFtckKKsnfg
Adding the Mail User to Dovecot
- Edit the
/etc/dovecot/passwdfile and add the following line to create thejohn@std.rocksuser:
john:{ARGON2ID}$argon2id$v=19$m=65536,t=3,p=1$4IPe7Nj3kTZJ54f5sKnc0Q$1rIsKMMkz5wOeuIWZmHmk+aUBBvtiBAZTFtckKKsnfg::::::- You may notice the
::::::after the hashed password. These fields are optional, but here’s what each one represents and how you can use them:
- username: the user’s login name — in this case,
john. - {ARGON2ID}$argon2id: the password hash generated with
doveadm pw. - UID:GID: (optional) Unix user and group IDs. Since we use virtual mail, we can define
7200:7200. - home: (optional) the path to the user’s mailbox, for example:
/mails/std.rocks/john. - shell: (optional) defines the user’s shell, if needed.
- extra_fields: (optional) can include additional parameters such as quotas, e.g.
userdb_mail=maildir:/mails/%d/%n, userdb_quota_rule=*:storage=5G.
Virtual Email Aliases
- Create the
/etc/postfix/virtualfile to define virtual email aliases. These aliases allow Postfix to redirect incoming messages addressed to one email address to another local or virtual mailbox:
letsencrypt@std.rocks john@std.rocksIn this example, all emails sent to letsencrypt@std.rocks will be delivered to the john@std.rocks mailbox. This is commonly used for automated services such as Let's Encrypt, monitoring tools, or system notifications.
- Compile the virtual alias file into a database format (
.db) that Postfix can read:
root@debian:~# postmap /etc/postfix/virtual- After updating or adding new aliases, always rebuild the map and restart Postfix and Dovecot to apply the changes:
root@debian:~# systemctl restart postfix.service
root@debian:~# systemctl restart dovecot.serviceIMAP Folders and Maildir Structure
Before creating the IMAP folders, it’s helpful to visualize how the mail client — such as Thunderbird — corresponds to the folder structure on our mail server.
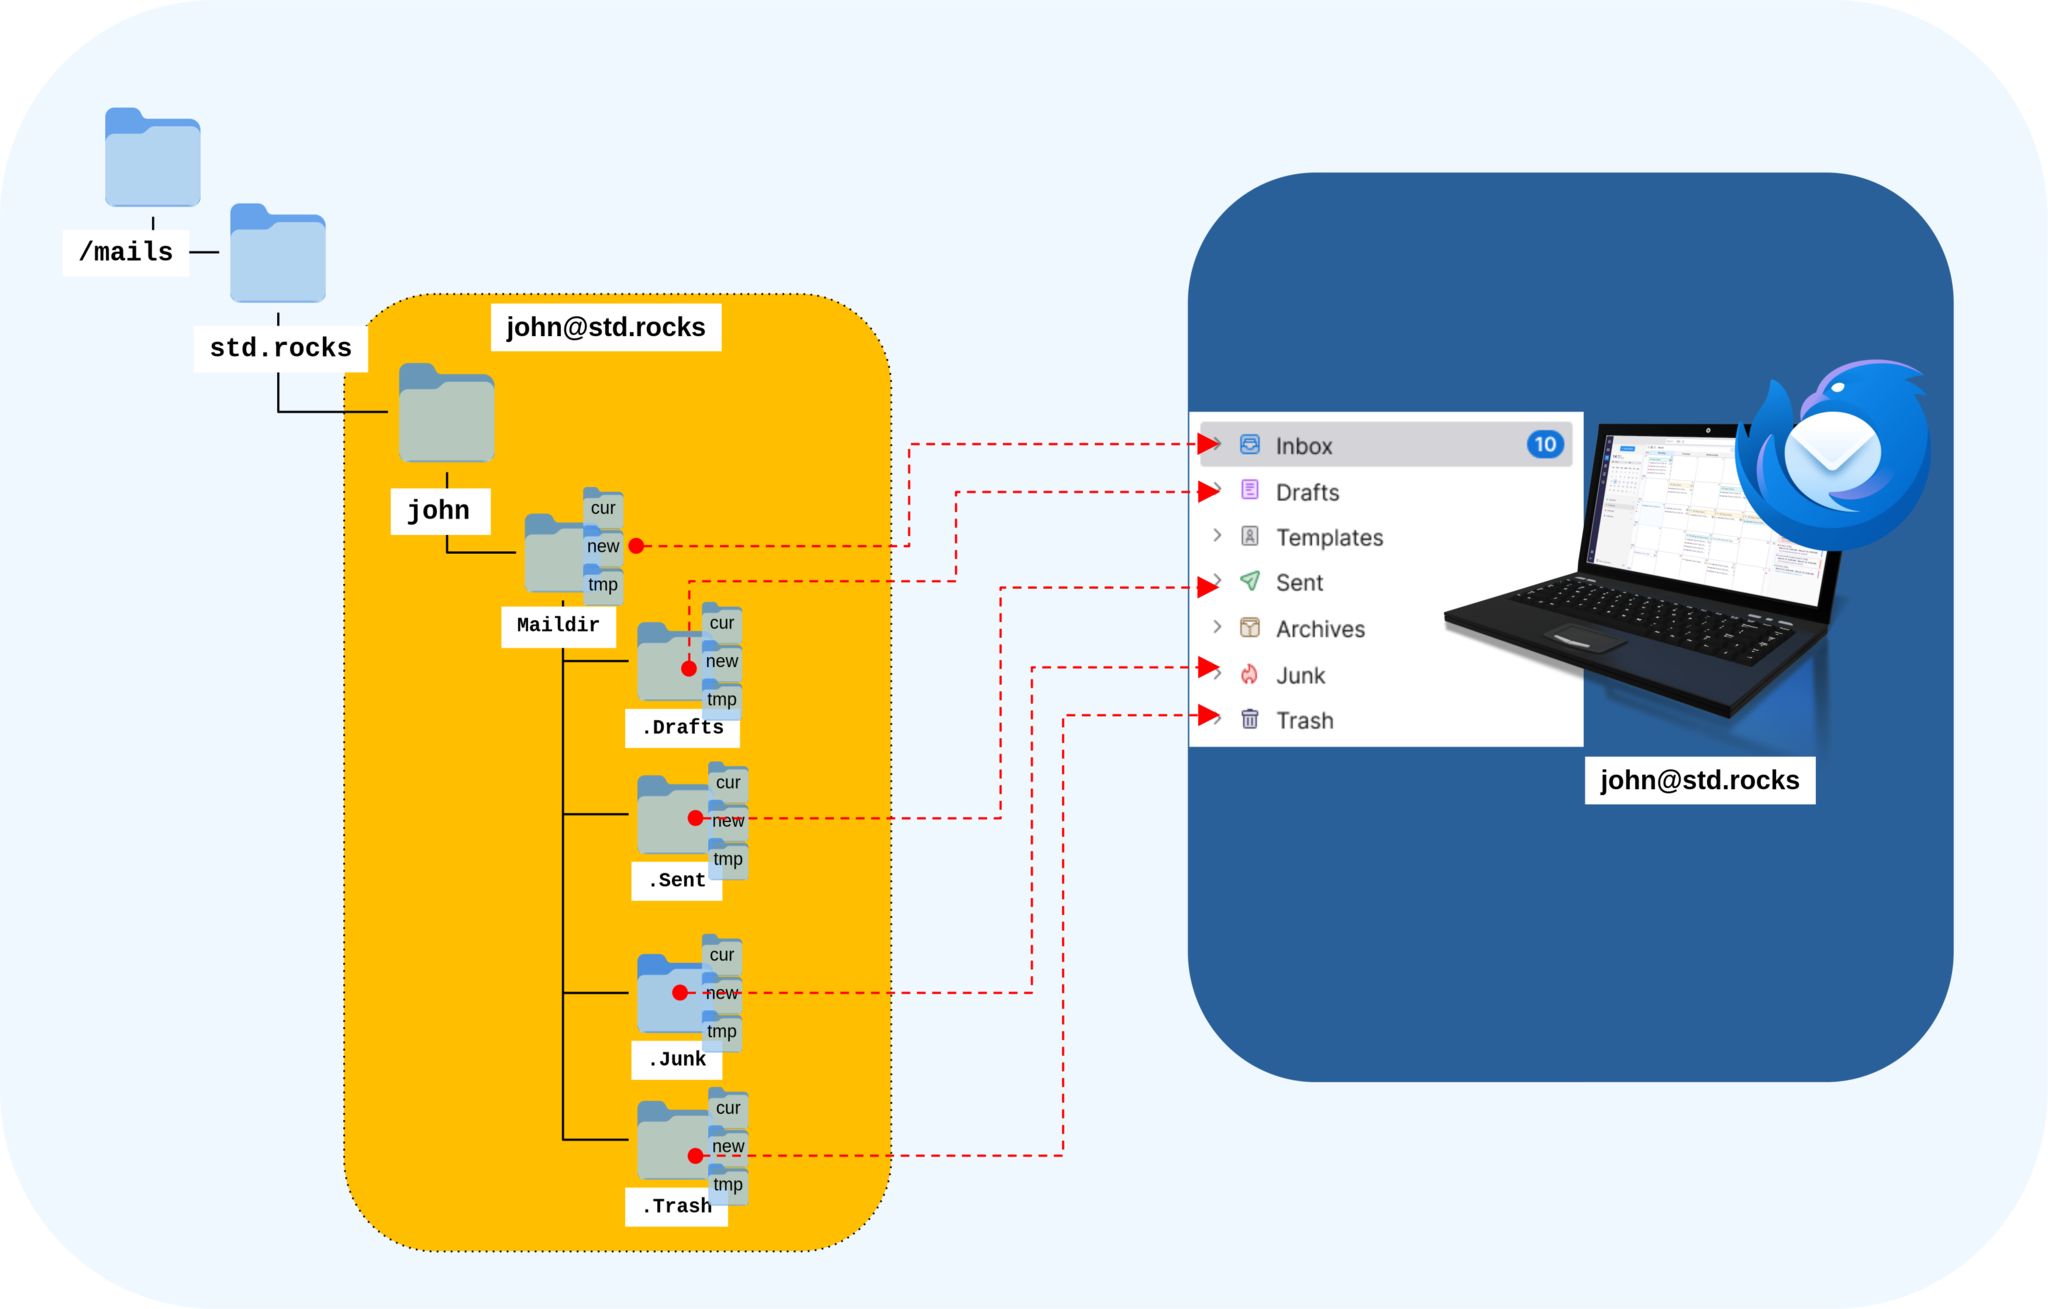
/mails/std.rocks/john correspond to mailbox folders in an email client like Thunderbird.- Once the folder structure has been visualized, create the main directory for the user john:
root@debian:~# install -d -m 700 -o vmail -g vmail /mails/std.rocks/john- OLD method to create the Maildir structure and its standard subfolders (
Drafts,Sent,Trash, andJunk) using themaildirmake.dovecotcommand:
root@debian:~# sudo -u vmail maildirmake.dovecot /mails/std.rocks/john/Maildir
root@debian:~# sudo -u vmail maildirmake.dovecot /mails/std.rocks/john/Maildir/.Drafts
root@debian:~# sudo -u vmail maildirmake.dovecot /mails/std.rocks/john/Maildir/.Sent
root@debian:~# sudo -u vmail maildirmake.dovecot /mails/std.rocks/john/Maildir/.Trash
root@debian:~# sudo -u vmail maildirmake.dovecot /mails/std.rocks/john/Maildir/.Junk- Use the
doveadm mailbox createcommand to create the Maildir structure and its standard subfolders (Drafts,Sent,Trash, andJunk):
root@debian:~# doveadm mailbox create -u john@std.rocks Drafts Sent Trash Junk- Once created, make the mailboxes active by subscribing to them. This step ensures that the folders are visible to the user through IMAP clients (such as webmail or desktop email applications).
root@debian:~# mailbox subscribe -u john@std.rocks Drafts Sent Trash Junk- List the mailbox structure for the
john@std.rocksaccount to verify that all folders have been created successfully:
root@debian:~# doveadm mailbox list -u john@std.rocks
Junk
Sent
Drafts
Trash
INBOX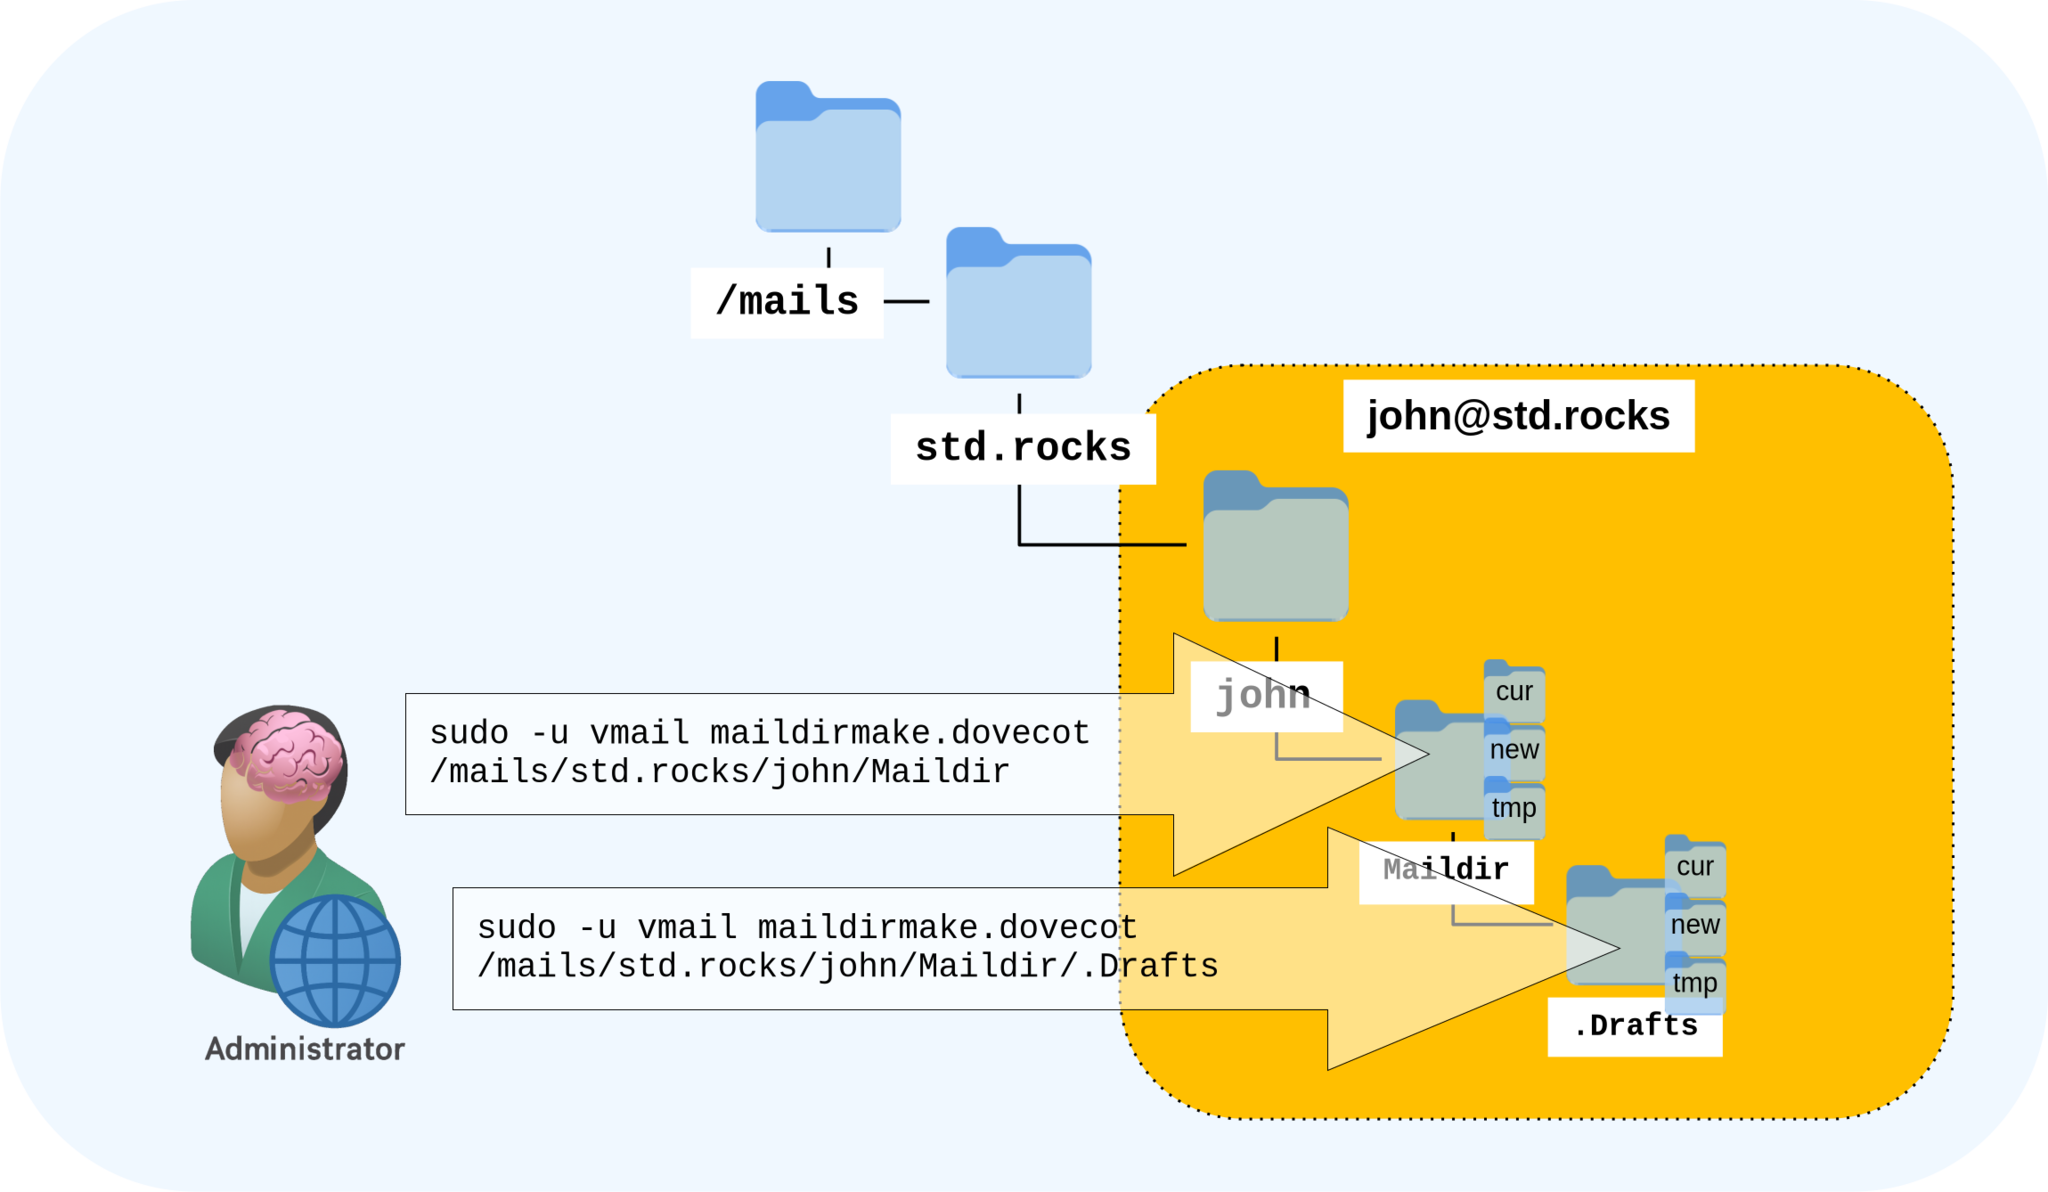
doveadm mailbox create.- Restart both services to apply the configuration:
root@debian:~# systemctl restart postfix.service
root@debian:~# systemctl restart dovecot.service
Securing Your Mail Server with a Let’s Encrypt SSL Certificate
At this point, our mail server should be fully operational. We’ll now install Let’s Encrypt SSL certificates to secure our SMTPS and IMAPS services. This approach is more convenient and prevents warning messages when connecting from email clients.
Generating Let’s Encrypt SSL Certificates
- Install the
certbotpackage:
root@debian:~# apt update && sudo apt install certbot- Use
certbotto request your SSL certificates. Replacemail.std.rockswith your own mail domain andletsencrypt@std.rockswith your administrative email address:
root@debian:~# certbot certonly --standalone -d mail.std.rocks --email letsencrypt@std.rocks --agree-tos --noninteractive
Saving debug log to /var/log/letsencrypt/letsencrypt.log
Requesting a certificate for mail.std.rocks

Successfully received certificate.
Certificate is saved at: /etc/letsencrypt/live/mail.std.rocks/fullchain.pem
Key is saved at:         /etc/letsencrypt/live/mail.std.rocks/privkey.pem
This certificate expires on 2026-02-09.
These files will be updated when the certificate renews.
Certbot has set up a scheduled task to automatically renew this certificate in the background.

- - - - - - - - - - - - - - - - - - - - - - - - - - - - - - - - - - - - - - - -
If you like Certbot, please consider supporting our work by:
 * Donating to ISRG / Let's Encrypt:   https://letsencrypt.org/donate
 * Donating to EFF:                    https://eff.org/donate-le
- - - - - - - - - - - - - - - - - - - - - - - - - - - - - - - - - - - - - - - -Integrating Let’s Encrypt Certificates with Dovecot and Postfix
- Edit your
/etc/postfix/main.cffile and update the paths to use your Let’s Encrypt certificates instead of the self-signed ones:
# Self-signed certificates (previous configuration)
#smtpd_tls_cert_file = /etc/ssl/certs/mail-selfsigned.crt
#smtpd_tls_key_file = /etc/ssl/private/mail-selfsigned.key

# Let’s Encrypt certificates (active configuration)
smtpd_tls_cert_file = /etc/letsencrypt/live/mail.std.rocks/fullchain.pem
smtpd_tls_key_file = /etc/letsencrypt/live/mail.std.rocks/privkey.pem- Restart the Postfix service to apply the new SSL configuration:
root@debian:~# systemctl restart postfix.service- Edit your
/etc/dovecot/conf.d/dovecot.conffile to point to the Let’s Encrypt certificate and key files:
# Preferred permissions: root:root 0444
#ssl_server_cert_file = /etc/dovecot/private/dovecot.pem
ssl_server_cert_file = /etc/letsencrypt/live/mail.std.rocks/fullchain.pem

# Preferred permissions: root:root 0400
#ssl_server_key_file = /etc/dovecot/private/dovecot.key
ssl_server_key_file = /etc/letsencrypt/live/mail.std.rocks/privkey.pem- Restart the Dovecot service to load the updated certificates:
root@debian:~# systemctl restart dovecot.serviceEmail Client Integration
Our mail server is now fully operational, so we can configure our email clients — such as Thunderbird on desktop and K-9 Mail on mobile devices — to connect securely using IMAP and SMTP.
Thunderbird
In the account setup window, click on Configure manually to enter the server settings manually.
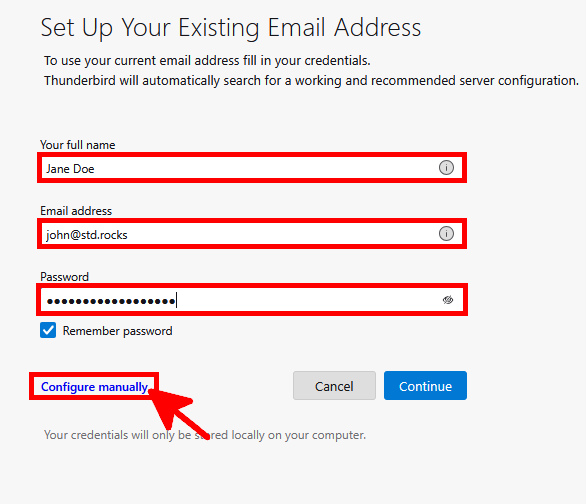
Configure the account with your username, password, and server name. For IMAP, you can also use STARTTLS on port 143 if preferred.
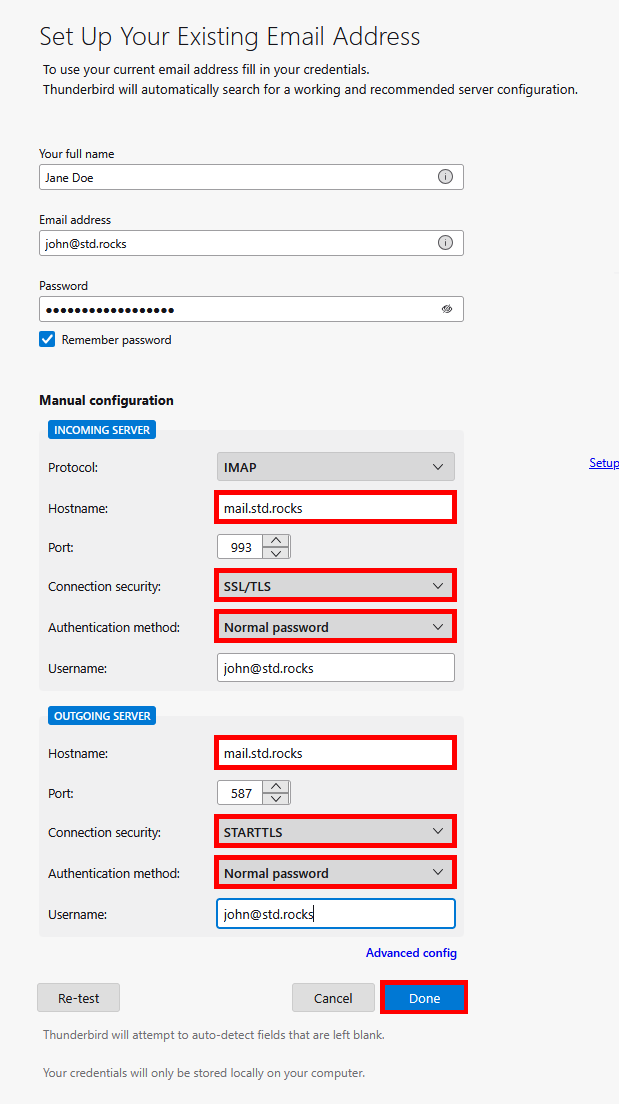
993 with SSL/TLS and SMTP set to port 587 with STARTTLS, both using john@std.rocks as the username.K-9 Mail
On Android, you can use the K-9 Mail application to connect to your mail server. As with Thunderbird, replace the example values with your own credentials and server settings. In the final configuration step, manually map the special folders — Sent, Drafts, Junk, and Trash — to ensure proper synchronization.
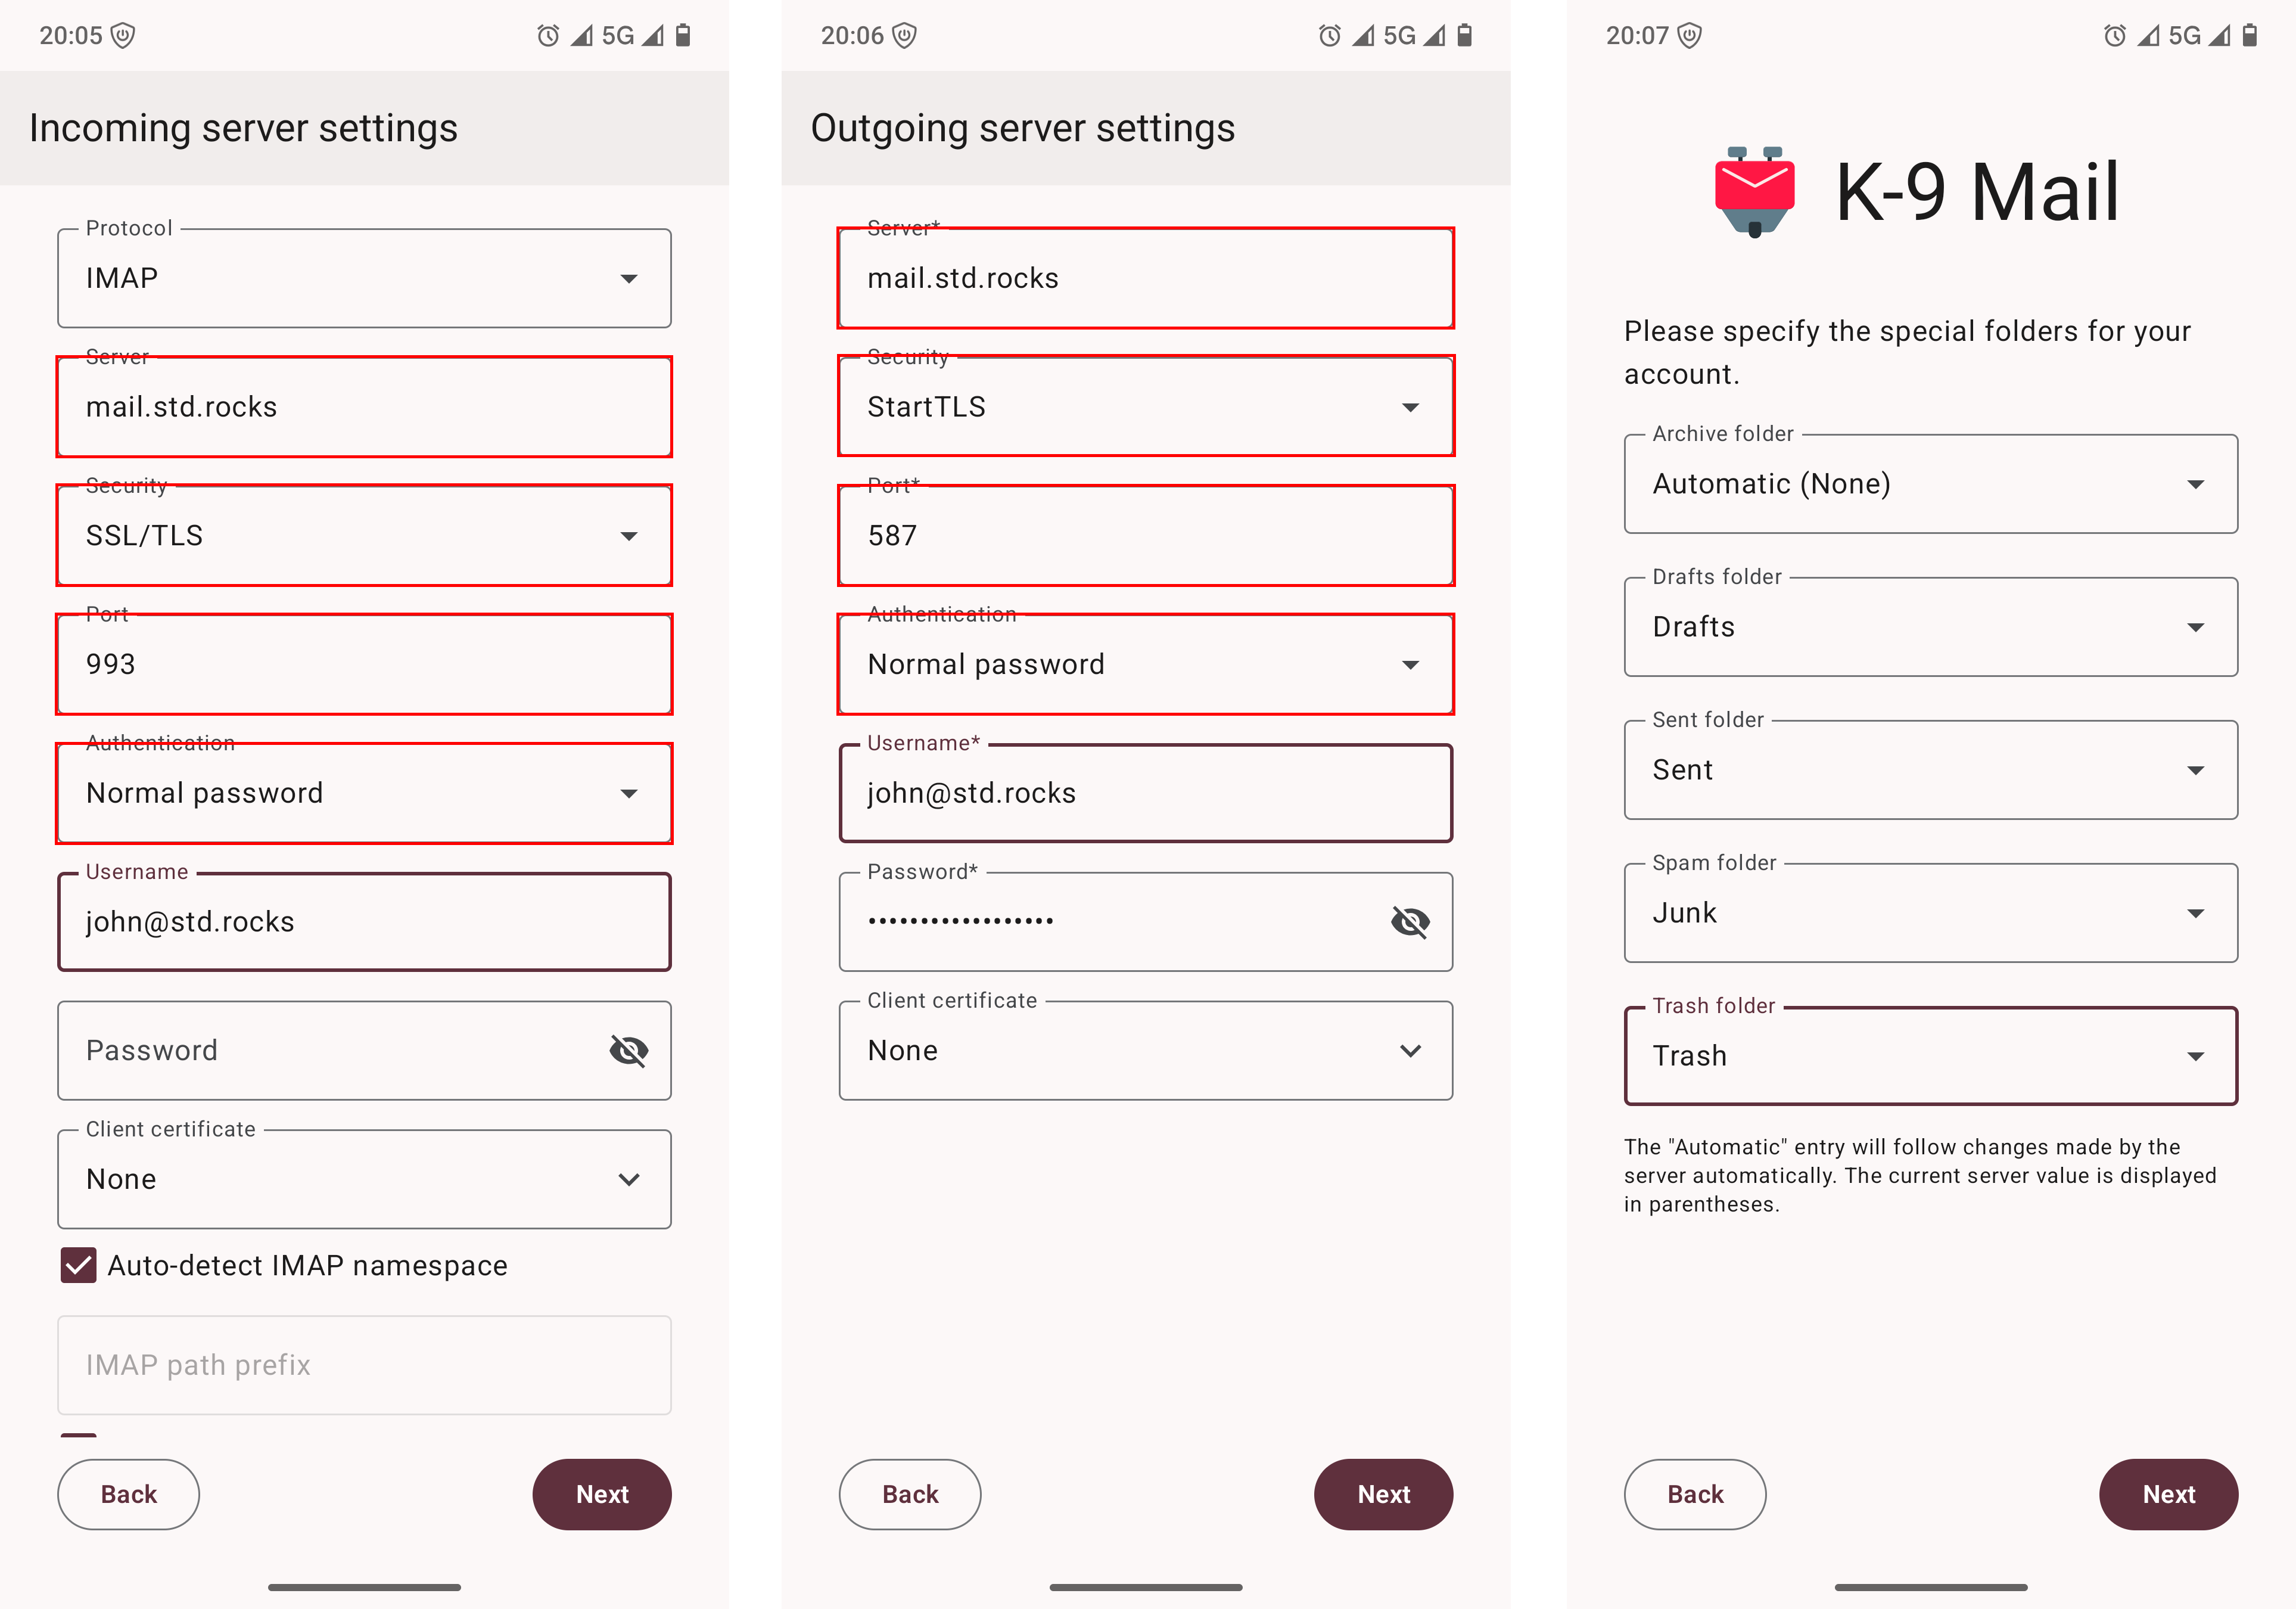
993 with SSL/TLS, SMTP set to port 587 with STARTTLS, and manual mapping of special folders for optimal synchronization.Congratulations! 🎉 You now have a fully functional mail server. You can continue your journey toward digital independence by installing a shared calendar with Baïkal on the same server.
Sources
- Reference article about SPF, DKIM, DMARC, ARC and BIMI: Emails with SPF, DKIM, DMARC, ARC and BIMI — Next Inks
- Guide on Postscreen: Postscreen — Linux Terminal