rss logo

Step-by-Step Guide: How to Create a VM in Proxmox VE 8.3

Logo of Promox

As a reminder, Proxmox Virtual Environment is a virtualization platform that lets you create Virtual Machines in container-based or in full virtualization. (If you missed the installation tutorial, it's right here).

The difference between these two technologies is that container-based will share their kernel with the Proxmox VE and will therefore generally require fewer resources than full virtualization and delivers better performance. As Proxmox is based on Linux, this mode is, of course, only available for Linux VMs. Full virtualization, on the other hand, lets you create virtual machines compatible with Windows and UNIX, and works like VMware ESXi or Hyper-V.

I will show here how to create both.

Creating a Debian Linux Container

Container Template

As containers work with templates, we first need to identify the storage spaces that are configured to host the container template. Note that any storage can host container images, it just need to be configured.

  • In my case, only local storage is configured to host the container template:
Proxmox Storage settings showing available storage types and container template option
  • Go to one of the storage previously identified as the target of the container template and click on "CT Templates" > "Templates":
Proxmox interface showing CT Templates section and the option to download container templates
  • In the list of templates, select the Linux distribution you wish to install and click Download. Here's an example for Debian:
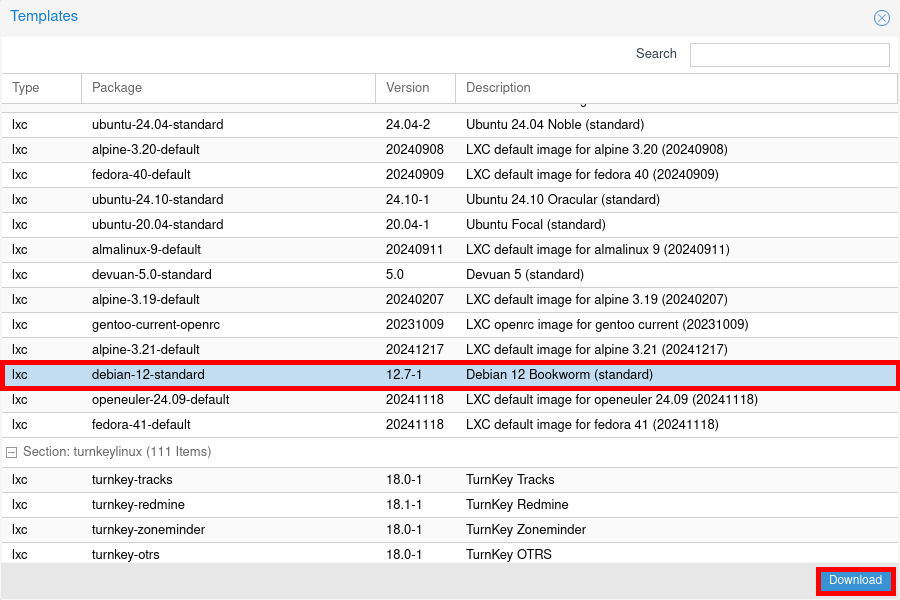
Proxmox interface displaying available LXC container templates with Debian 12 Bookworm selected for download
  • Once downloaded, you should see the template appear:
Proxmox VE interface displaying the downloaded Debian 12 Bookworm LXC container template stored in the 'local' storage under 'CT Templates'.

Create an LXC VM

  • Right-click on your hypervisor, then click to "Create CT". Give the container a name and select the previously downloaded template:
Proxmox VE interface showing the process of creating an LXC container using a Debian 12 template. The steps include selecting 'Create CT', assigning an ID and hostname, setting a password, and choosing the storage and template file.
  • Select storage for VM disk, define the number of CPU and memory:
Proxmox VE interface displaying the LXC container creation process, focusing on disk allocation (8 GiB on ZFS storage), CPU core assignment (1 core), and memory configuration (512 MiB RAM and 512 MiB swap).
  • Select the network bridge, set the IP address and DNS, and finally click Finish to create the container:
Proxmox VE interface displaying the final steps of LXC container creation, including network configuration (bridge vmbr0, static IP 192.168.1.10/24, gateway 192.168.1.4), DNS settings (domain std.local, server 192.168.1.250), and summary confirmation before completion.
  • A few moments later, the container should appear and be ready for use:
Proxmox VE interface showing the Debian 12 LXC container successfully created and running. The console displays the login prompt for Debian-LXC on container ID 200.

Full Virtualization

Upload the ISO

Before we can consider installing a virtual machine, we first need to download the ISO media to our Proxmox VE.

  • As with the containers, go to the storage menu to identify the storage where to upload the ISO images:
Proxmox VE interface showing the storage configuration under 'Datacenter' with available storage types, including ISO image and container template storage options.
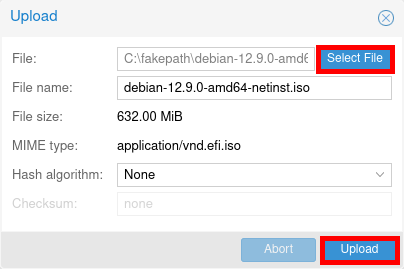
  • Go to one of the previously identified storage and click to Upload:
Proxmox VE interface showing the 'ISO Images' section of local storage, with the 'Upload' button highlighted for importing ISO files used to create virtual machines. Proxmox VE interface showing the file upload window for importing an ISO image. The 'Select File' button is highlighted for choosing a file, and the 'Upload' button is highlighted to start the upload process.
  • ISO images should appear after the upload. Here, for example, after uploading the Windows, Debian and VirtIO images:
Proxmox VE interface displaying the uploaded ISO images in local storage. The list includes a Windows Server evaluation ISO, a Debian 12 netinstall ISO, and a VirtIO drivers ISO.

Windows

Creating a Windows Virtual Machine

Now that we have uploaded the ISO images, let's start creating virtual machines, beginning with Windows.

  • Right-click on the hypervisor and click on Create VM. In the next window, give the VM a name and click Next. In the OS tab, select the previously uploaded ISO image, then select OS Type. Check the "Add additional driver for VirtIO drivers" and select the VirtIO image.
Proxmox VE interface showing the process of creating a Windows virtual machine. Steps include selecting 'Create VM', assigning a VM ID and name, choosing an ISO image, setting the guest OS as Microsoft Windows, and adding a VirtIO driver ISO.
  • In the system tab, activate the Qemu agent and select storage for EFI and TPM. Set storage and virtual disk size.(Optional: set "Write back" as cache option for best performance (the "No cache" default is safer, but slower) and tick "Discard" to optimally use disk space (TRIM)). Change CPU settings if necessary.
Proxmox VE interface showing system configuration steps for a Windows virtual machine. Includes VirtIO SCSI controller selection, enabling QEMU Agent and TPM, assigning 80 GiB disk storage on ZFS, and setting CPU to 4 cores.
  • Configure memory settings as needed, select the newtork bridge and click on Finish:
Proxmox VE interface showing the final steps of Windows VM creation. Memory is set to 4096 MiB, network bridge is set to vmbr0 with VirtIO paravirtualized model, and the configuration summary is displayed before finalizing the VM setup.

Install Windows

  • Once created, start the virtual machine from the Console menu:
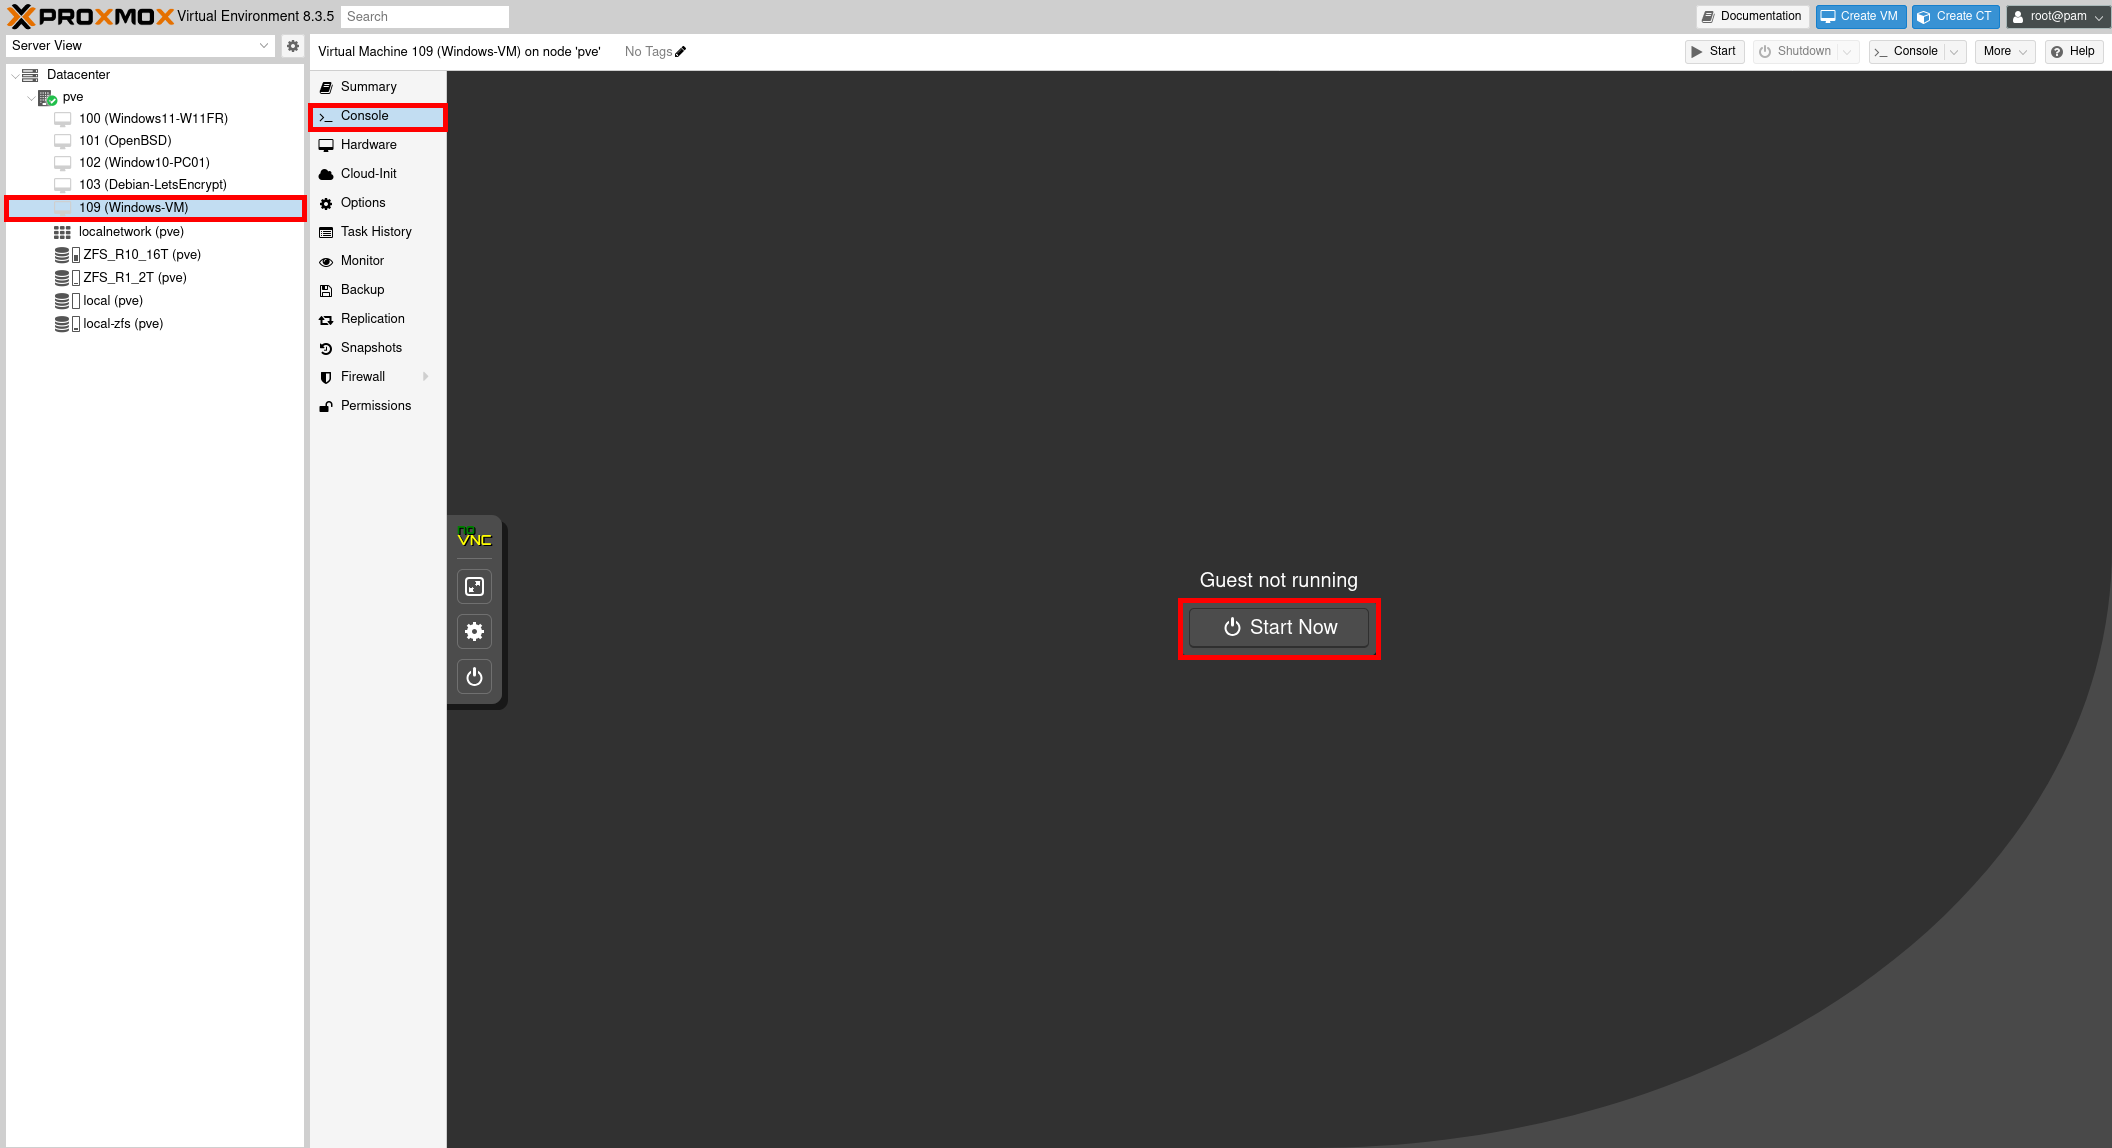
Proxmox VE interface displaying the newly created Windows VM (ID 109) in the console view. The VM is not running, and the 'Start Now' button is highlighted to power it on.
  • Proceed with the Windows installation:
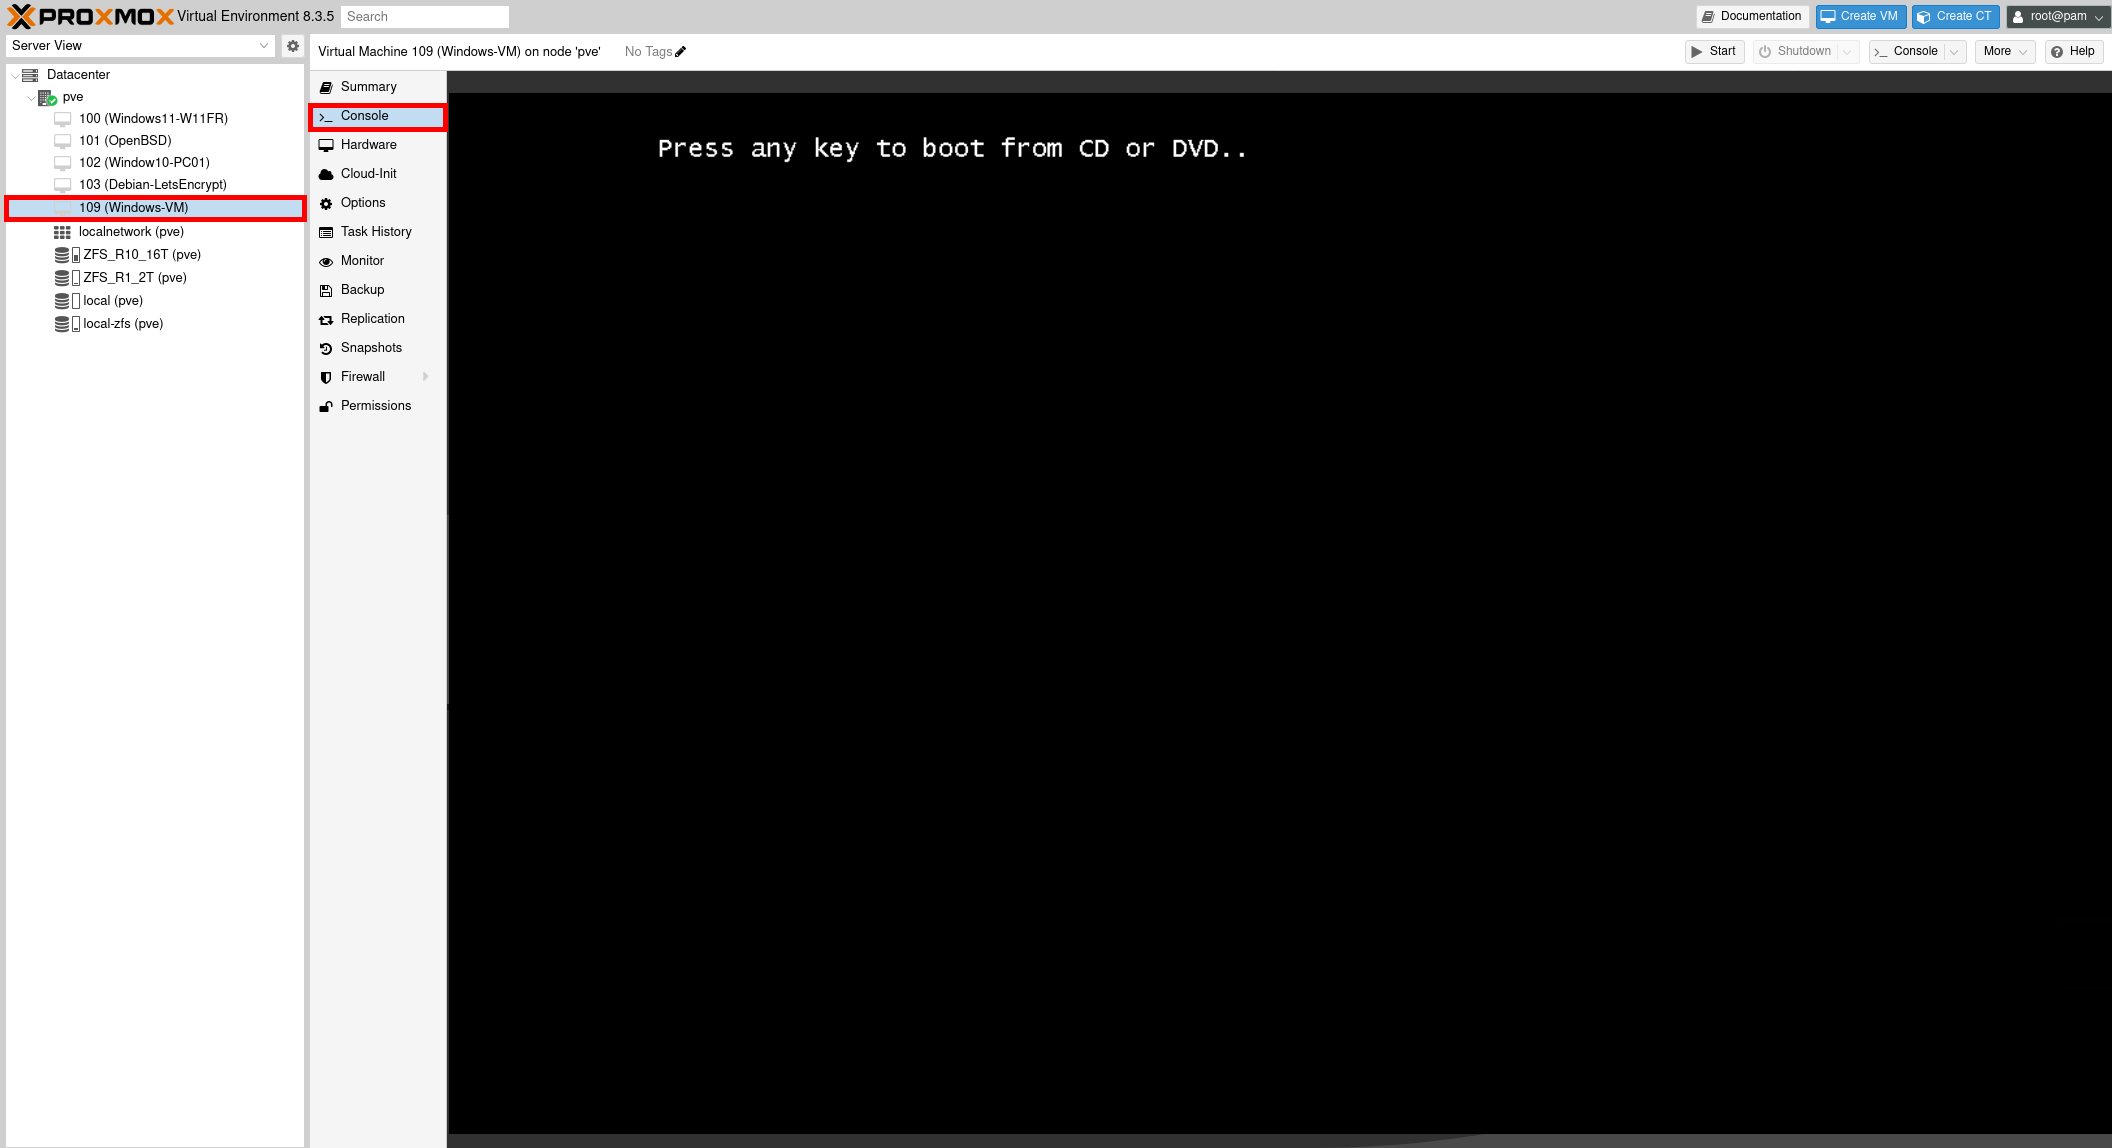
Proxmox VE interface displaying the boot sequence of a newly created Windows VM (ID 109). The console shows the message 'Press any key to boot from CD or DVD' prompting the user to start the installation.
  • In the "Select location to install Windows Server" step click on "Load Driver":
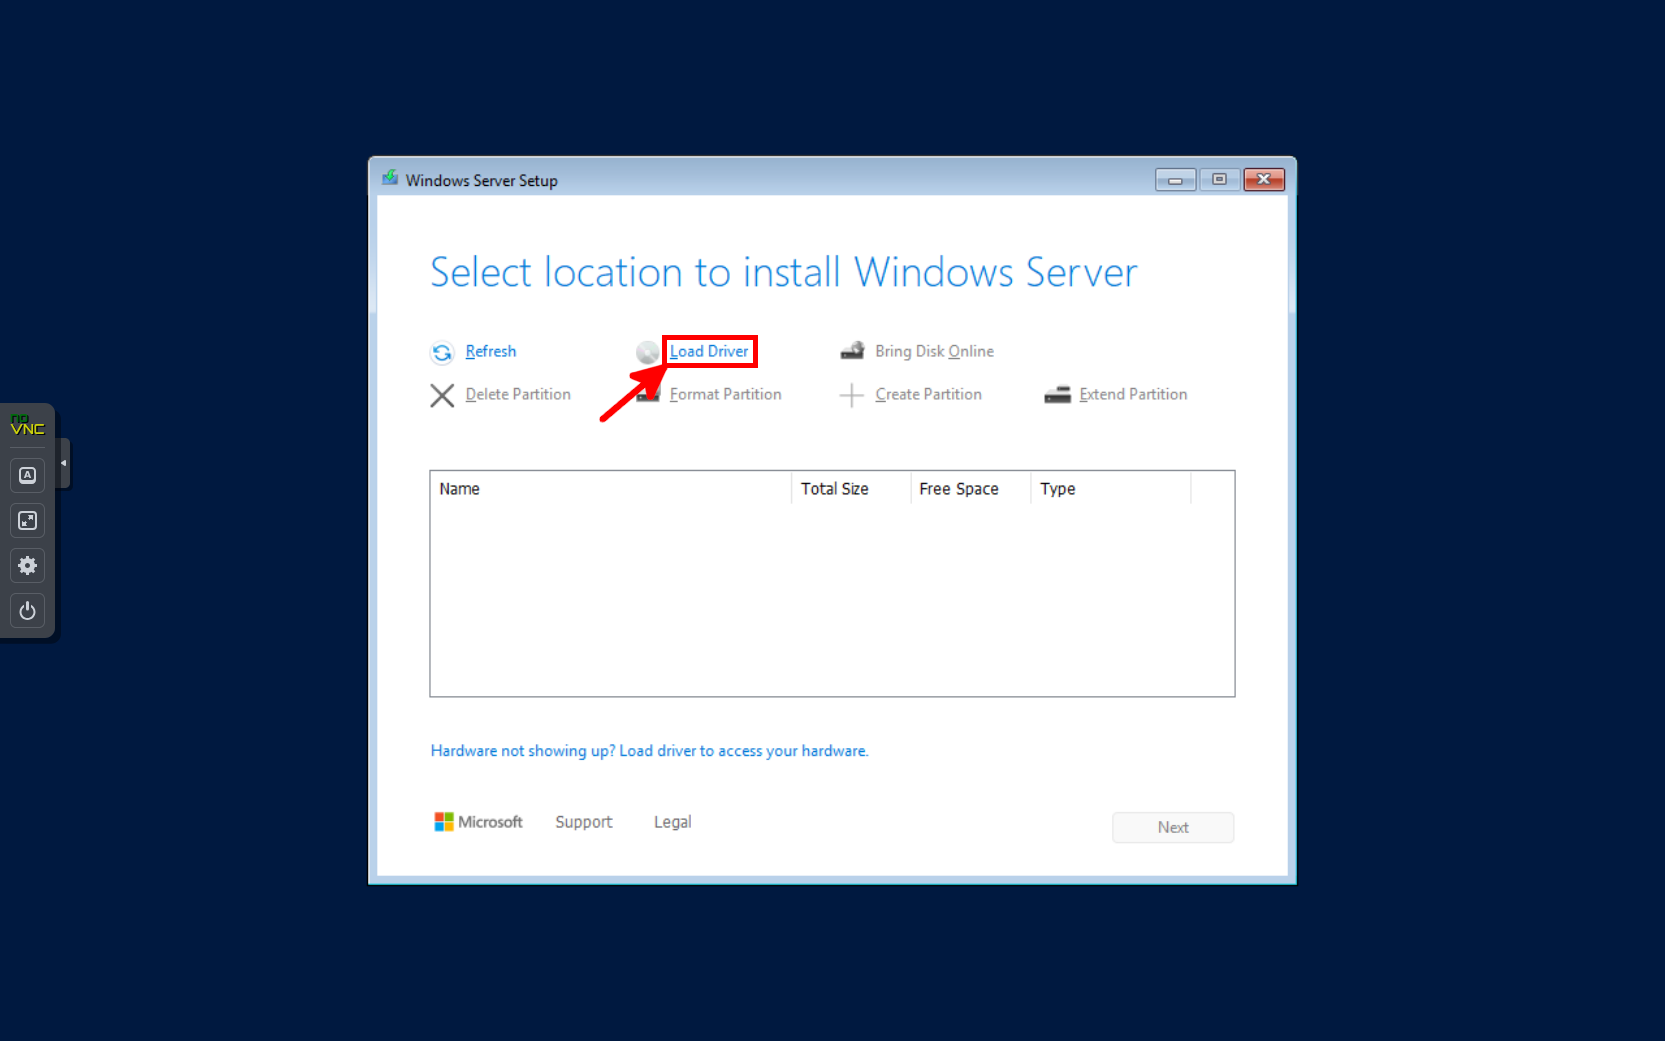
Windows Server installation screen in a Proxmox VM, prompting the user to select a location for installation. The 'Load Driver' option is highlighted, indicating the need to install additional storage drivers (e.g., VirtIO) for disk detection.
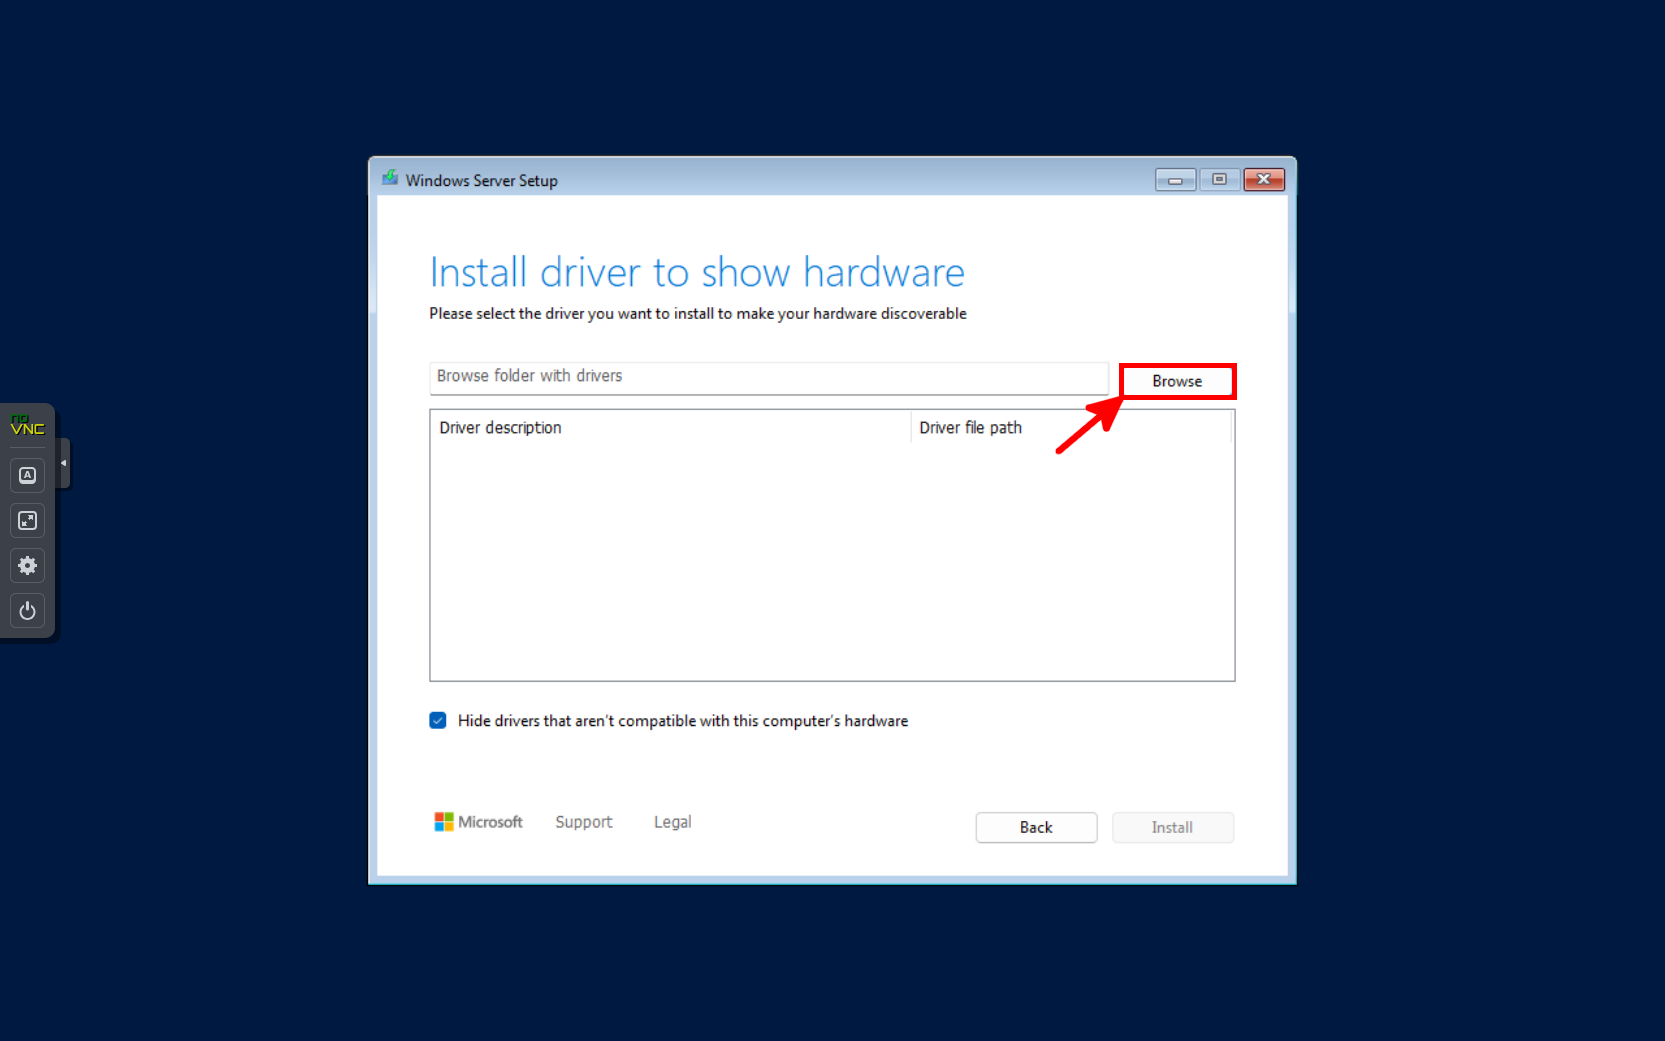
  • Click on "Browse":
Windows Server installation screen in a Proxmox VM prompting the user to install a driver for hardware detection. The 'Browse' button is highlighted, allowing the selection of the VirtIO driver folder.
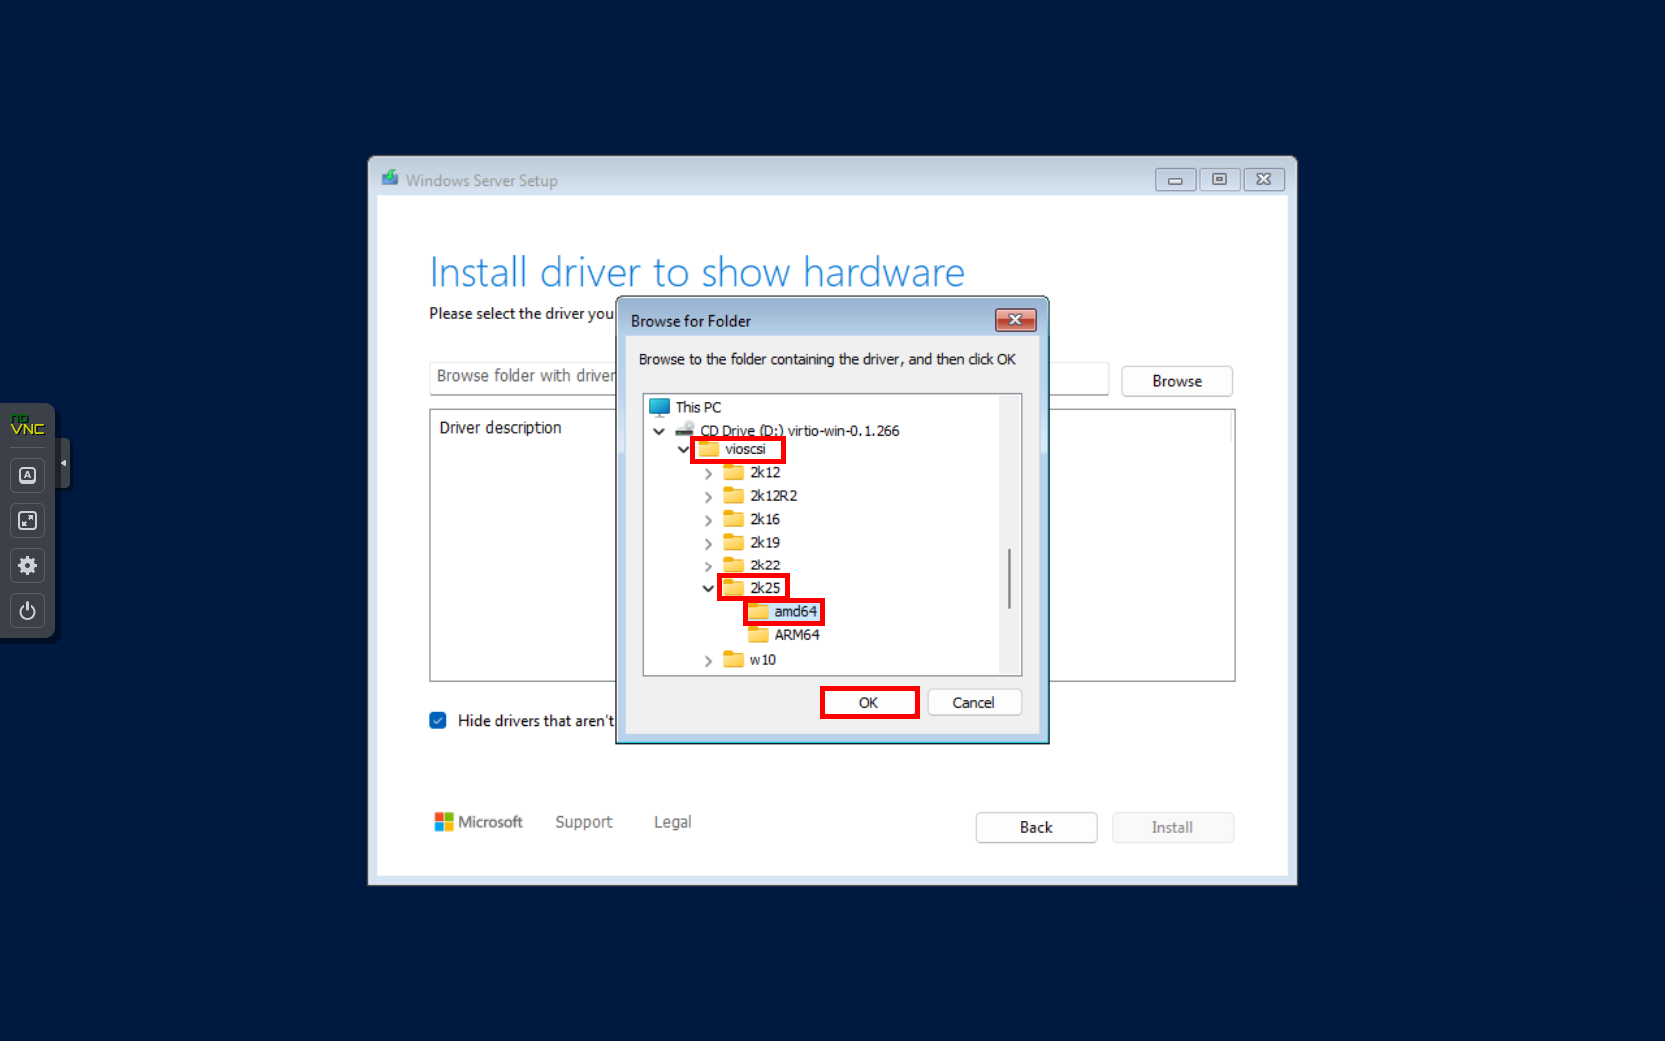
  • Select the "vioscsi\<WINDOWS_VERSION>\amd64" folder and confirm:
Windows Server installation screen in a Proxmox VM prompting the user to browse for VirtIO storage drivers. The folder path 'viostor > 2k25 > amd64' is selected before clicking 'OK' to load the necessary drivers.
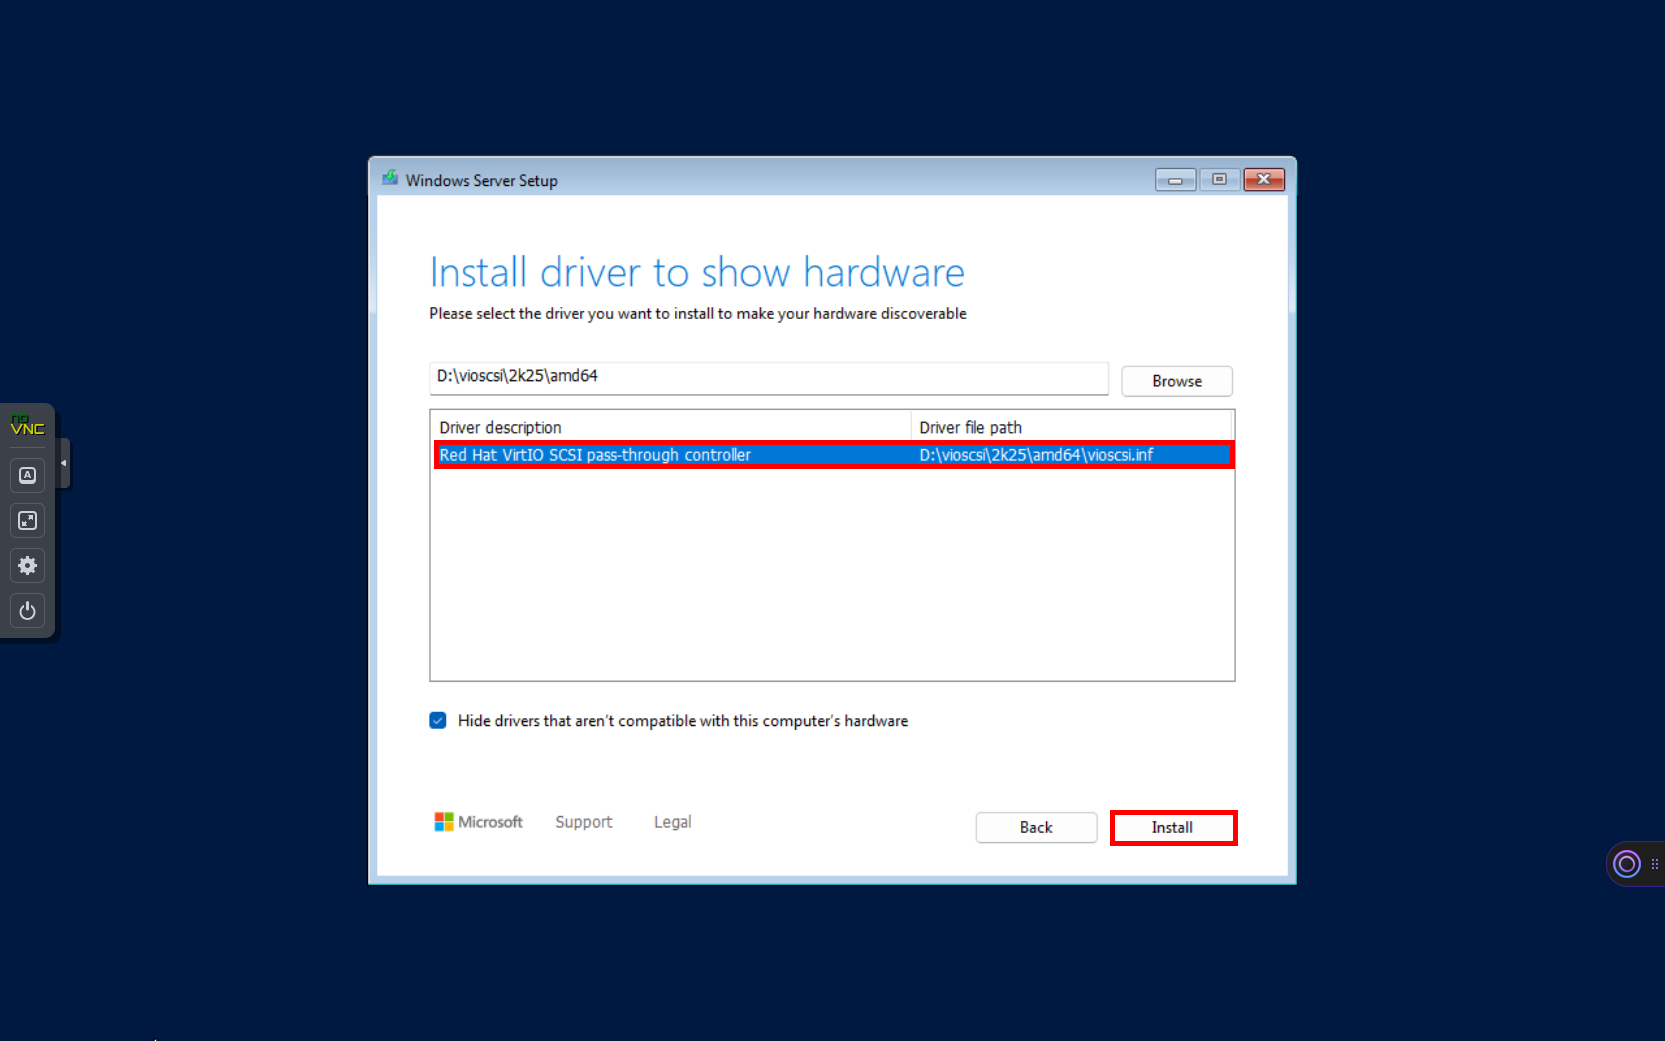
  • Select the "Red Hat VirtIO SCSI pass-through controller" and click Install:
Windows Server installation screen in a Proxmox VM showing the selected 'Red Hat VirtIO SCSI pass-through controller' driver. The 'Install' button is highlighted to proceed with loading the VirtIO storage driver.

Windows Post-Installation

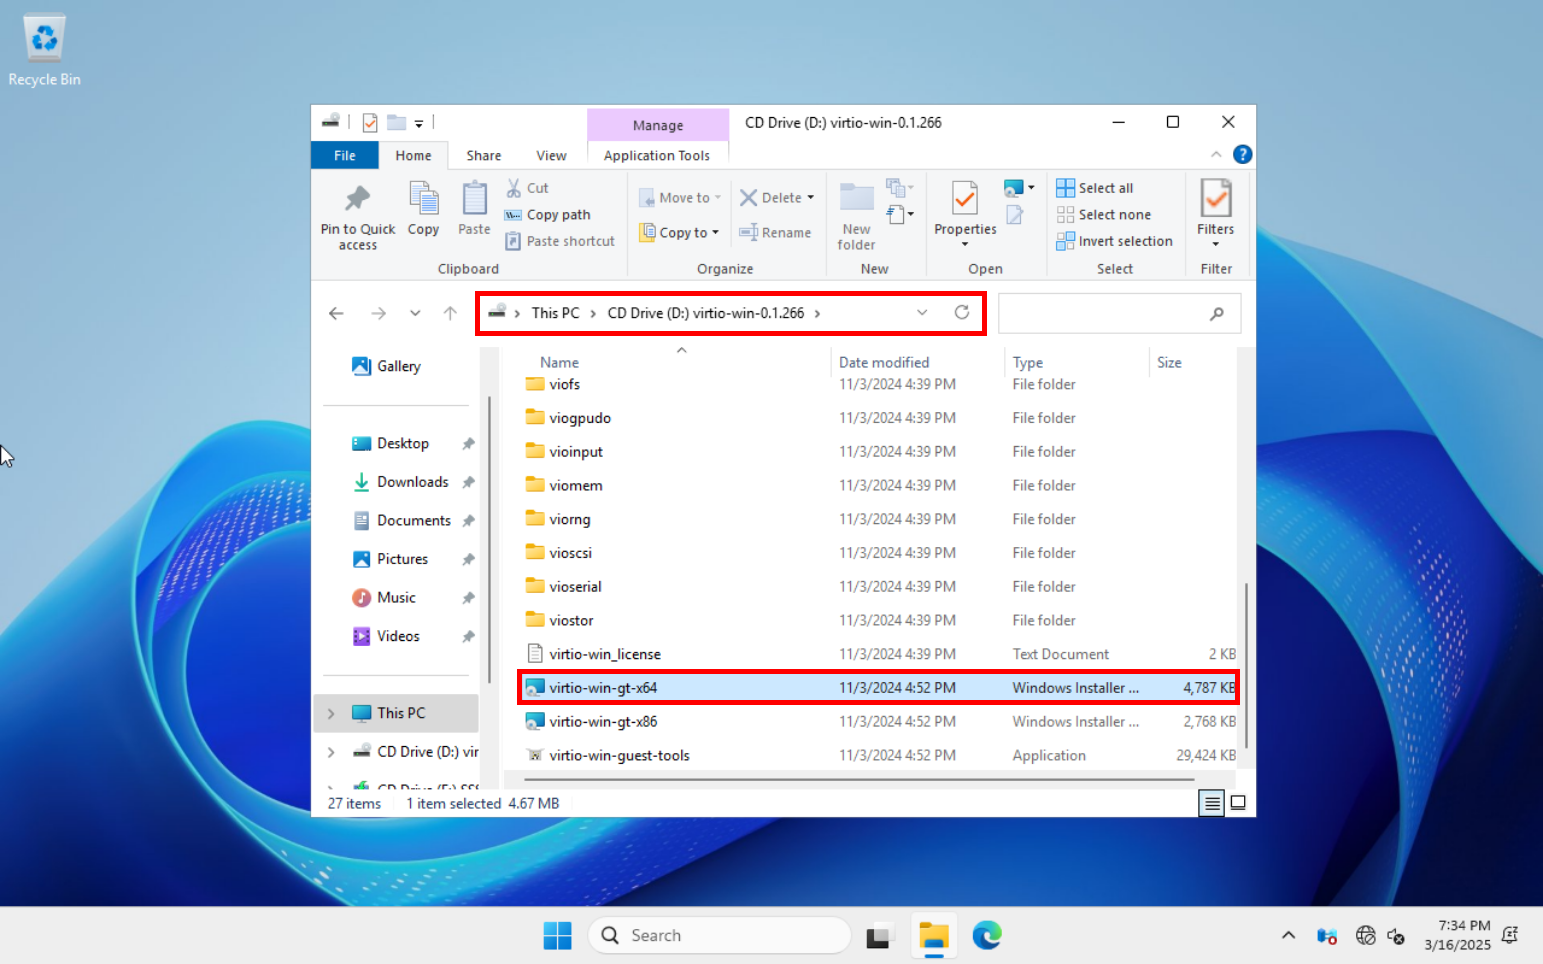
  • After Windows installation, open the virtio-win drive and run the virtio-win-gt-x64 installer:
Windows 11 running in a Proxmox VM, displaying the contents of the VirtIO driver ISO in File Explorer. The 'virtio-win-gt-x64' Windows Installer package is highlighted, indicating the installation of VirtIO guest tools.
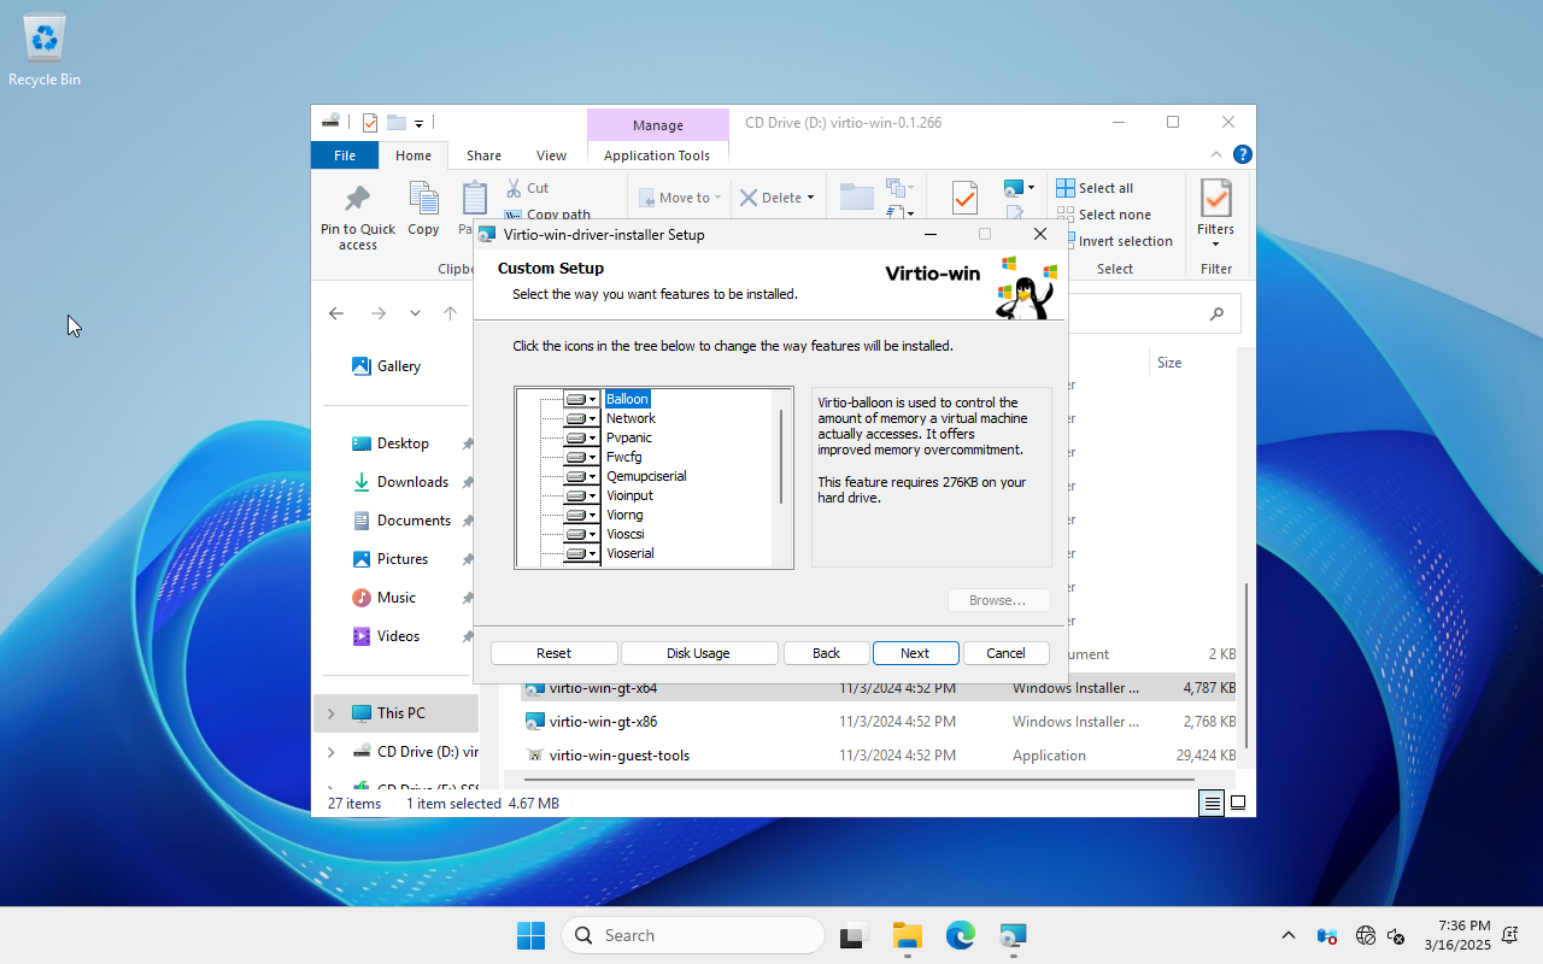
  • Install all suggested features:
Windows 11 running in a Proxmox VM, displaying the VirtIO driver installer setup window. The installation options include drivers for memory ballooning, network, storage, and other virtualization components.
  • Continue with the installation of virtio-win-guest-tools (required for the QEMU agent) then restart:
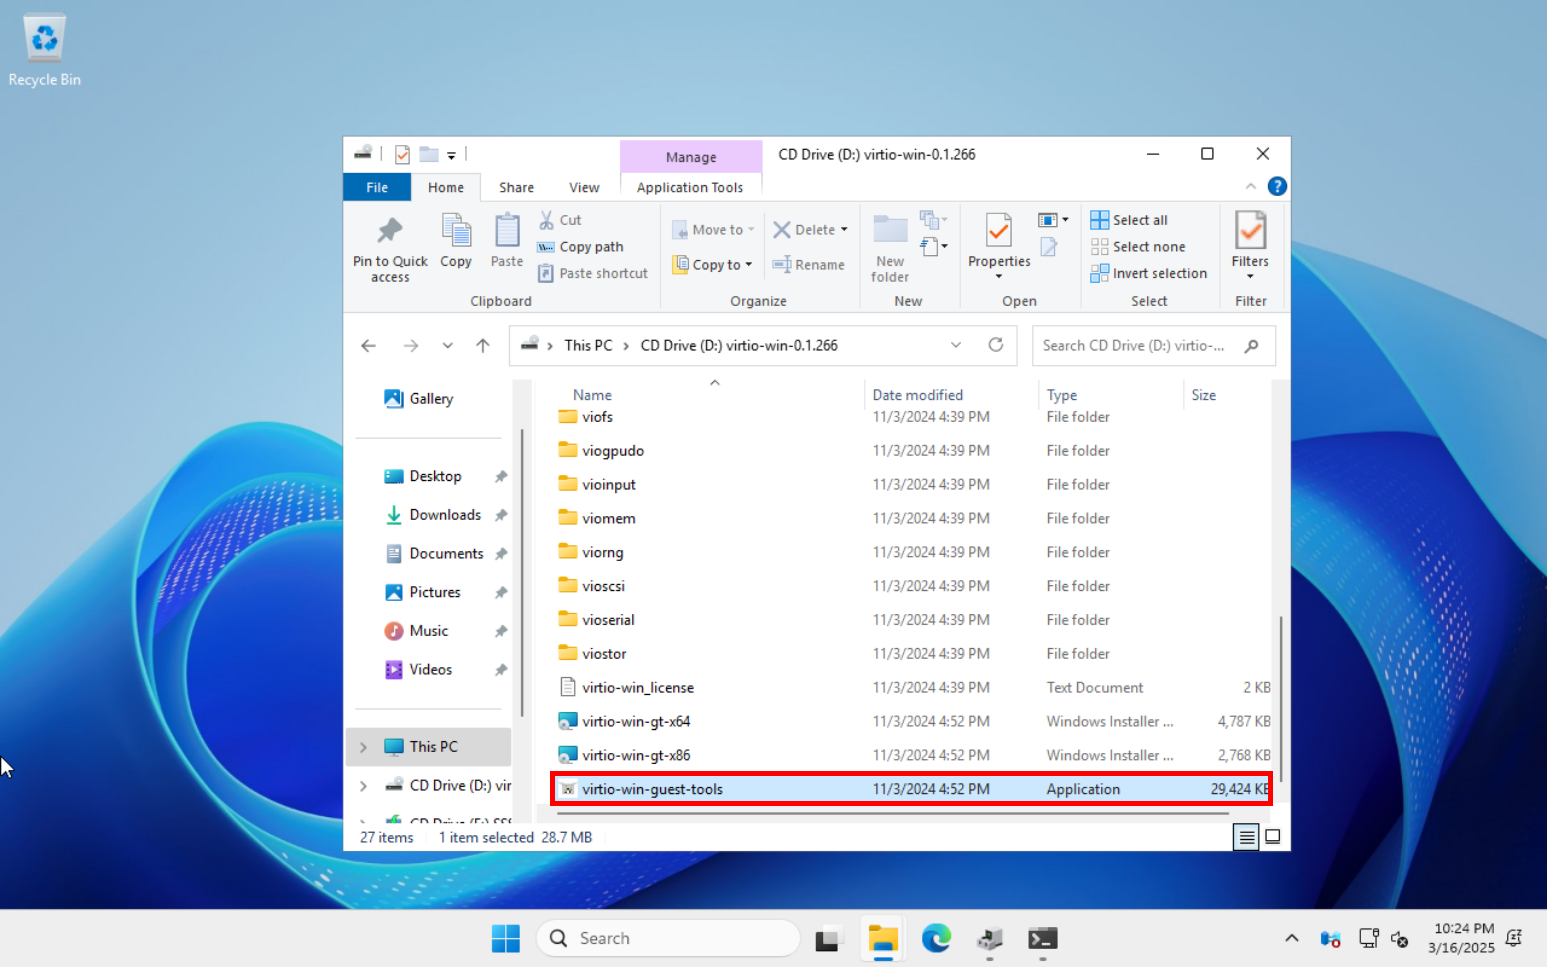
Windows 11 running in a Proxmox VM, displaying the VirtIO driver ISO contents in File Explorer. The 'virtio-win-guest-tools' application is highlighted, indicating the installation of additional drivers and tools for improved VM performance.

Congratulations, your Windows virtual machine is ready!

GNU/Linux

Creating a Debian Virtual Machine

  • Right-click on the hypervisor and click on Create VM. In the next window, give the VM a name and click Next. In the OS tab, select the previously uploaded ISO image, then select Linux as guest os.
Proxmox VE interface showing the process of creating a Debian virtual machine. Steps include selecting 'Create VM', assigning a VM ID and name, choosing a Debian ISO image, and setting the guest OS type to Linux with a 6.x - 2.6 Kernel.
  • In the system tab, activate the Qemu agent and select storage for EFI. Set storage and virtual disk size. (Optional: set "Write back" as cache option for best performance (the "No cache" default is safer, but slower) and tick "Discard" to optimally use disk space (TRIM)). Change CPU settings if necessary.
Proxmox VE interface showing system configuration steps for a Debian virtual machine. Includes enabling QEMU Agent, selecting OVMF (UEFI) firmware, setting EFI storage to ZFS, allocating an 80 GiB disk, and configuring CPU with 4 cores.
  • Configure memory settings as needed, select the network bridge and click on Finish:
Proxmox VE interface displaying the final steps of Debian VM creation. Memory is set to 2048 MiB, network bridge is configured to vmbr0 with VirtIO paravirtualized model, and the summary confirmation is shown before completing the setup.

Install Debian

  • Once created, start the virtual machine from the Console menu. It will automaticaly boot from the Debian installation media:
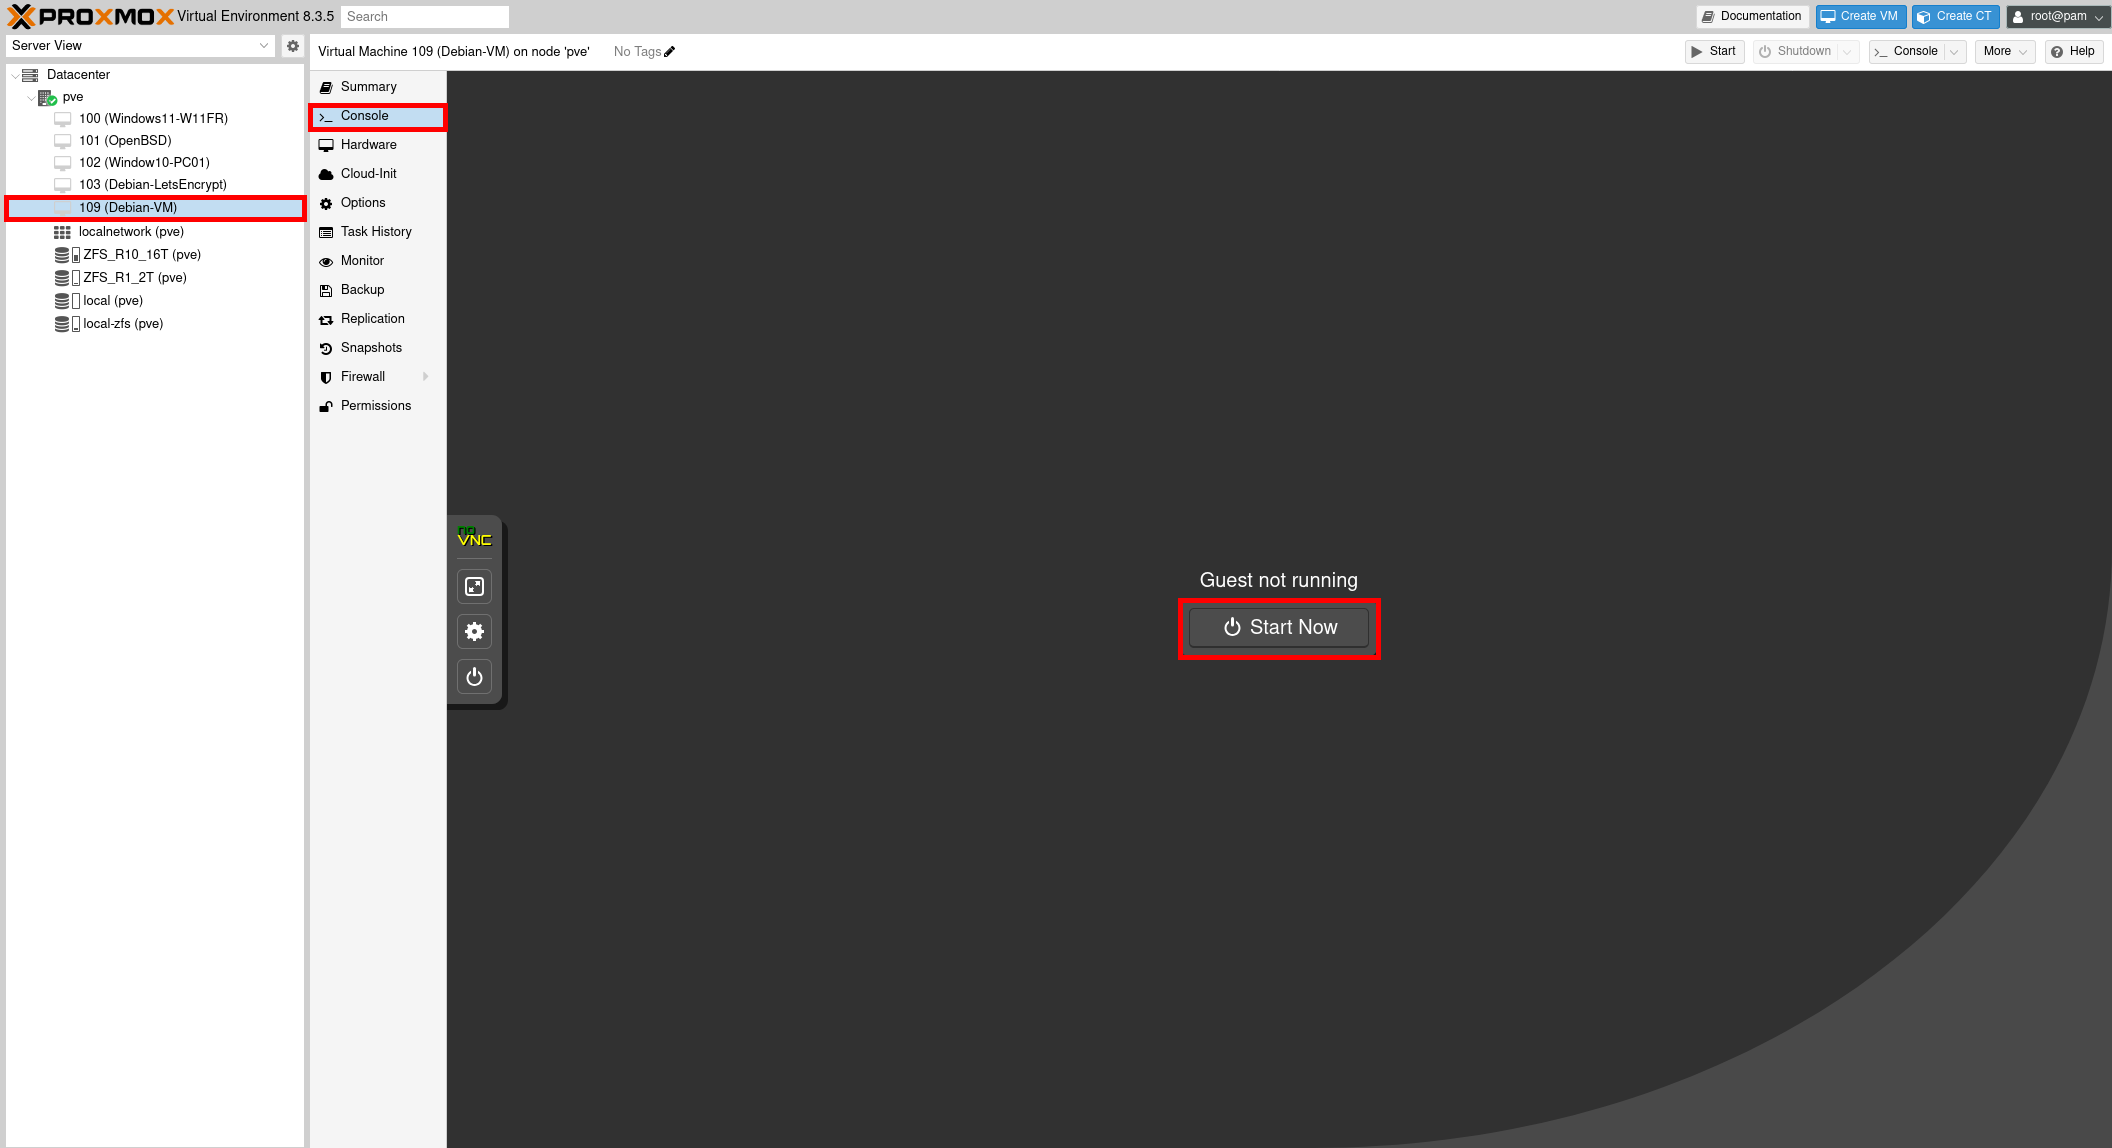
Proxmox VE interface displaying the newly created Debian VM (ID 109) in the console view. The VM is not running, and the 'Start Now' button is highlighted to power it on.

Debian Post-Installation

  • The Qemu agent should have been installed automatically, but if necessary, here are the commands you need to type to install it:
root@host:~# apt update && apt install qemu-guest-agent
root@host:~# systemctl enable qemu-guest-agent
root@host:~# systemctl restart qemu-guest-agent
Creative Commons License
This work is licensed under a Creative Commons Attribution-NonCommercial-ShareAlike 4.0 International License.

Contact :

contact mail address