Step-by-Step Guide: How to Migrate VMs from VMware ESXi to Proxmox VE
- Last updated: May 27, 2025
In this article, I will cover how to migrate VMware ESXi virtual machines to a Proxmox hypervisor. Here, I will show you how to transfer Debian and Windows virtual machines with BIOS or UEFI boot. For a reminder I have already discussed the Proxmox hypervisor in previous articles concerning the installation process: here and the creation of virtual machines: here.
As explained, and as you have surely seen, it seems that Broadcom's strategy is to scare off their customers (at least the smaller ones), so since they don't want our money, I suggest you follow their lead by reading this article and migrate to Proxmox. The full process is detailed below. 😉
This guide will walk you through the migration process using both the command-line interface (CLI) and the Proxmox graphical user interface (GUI), so you can choose the method that best fits your preferences.
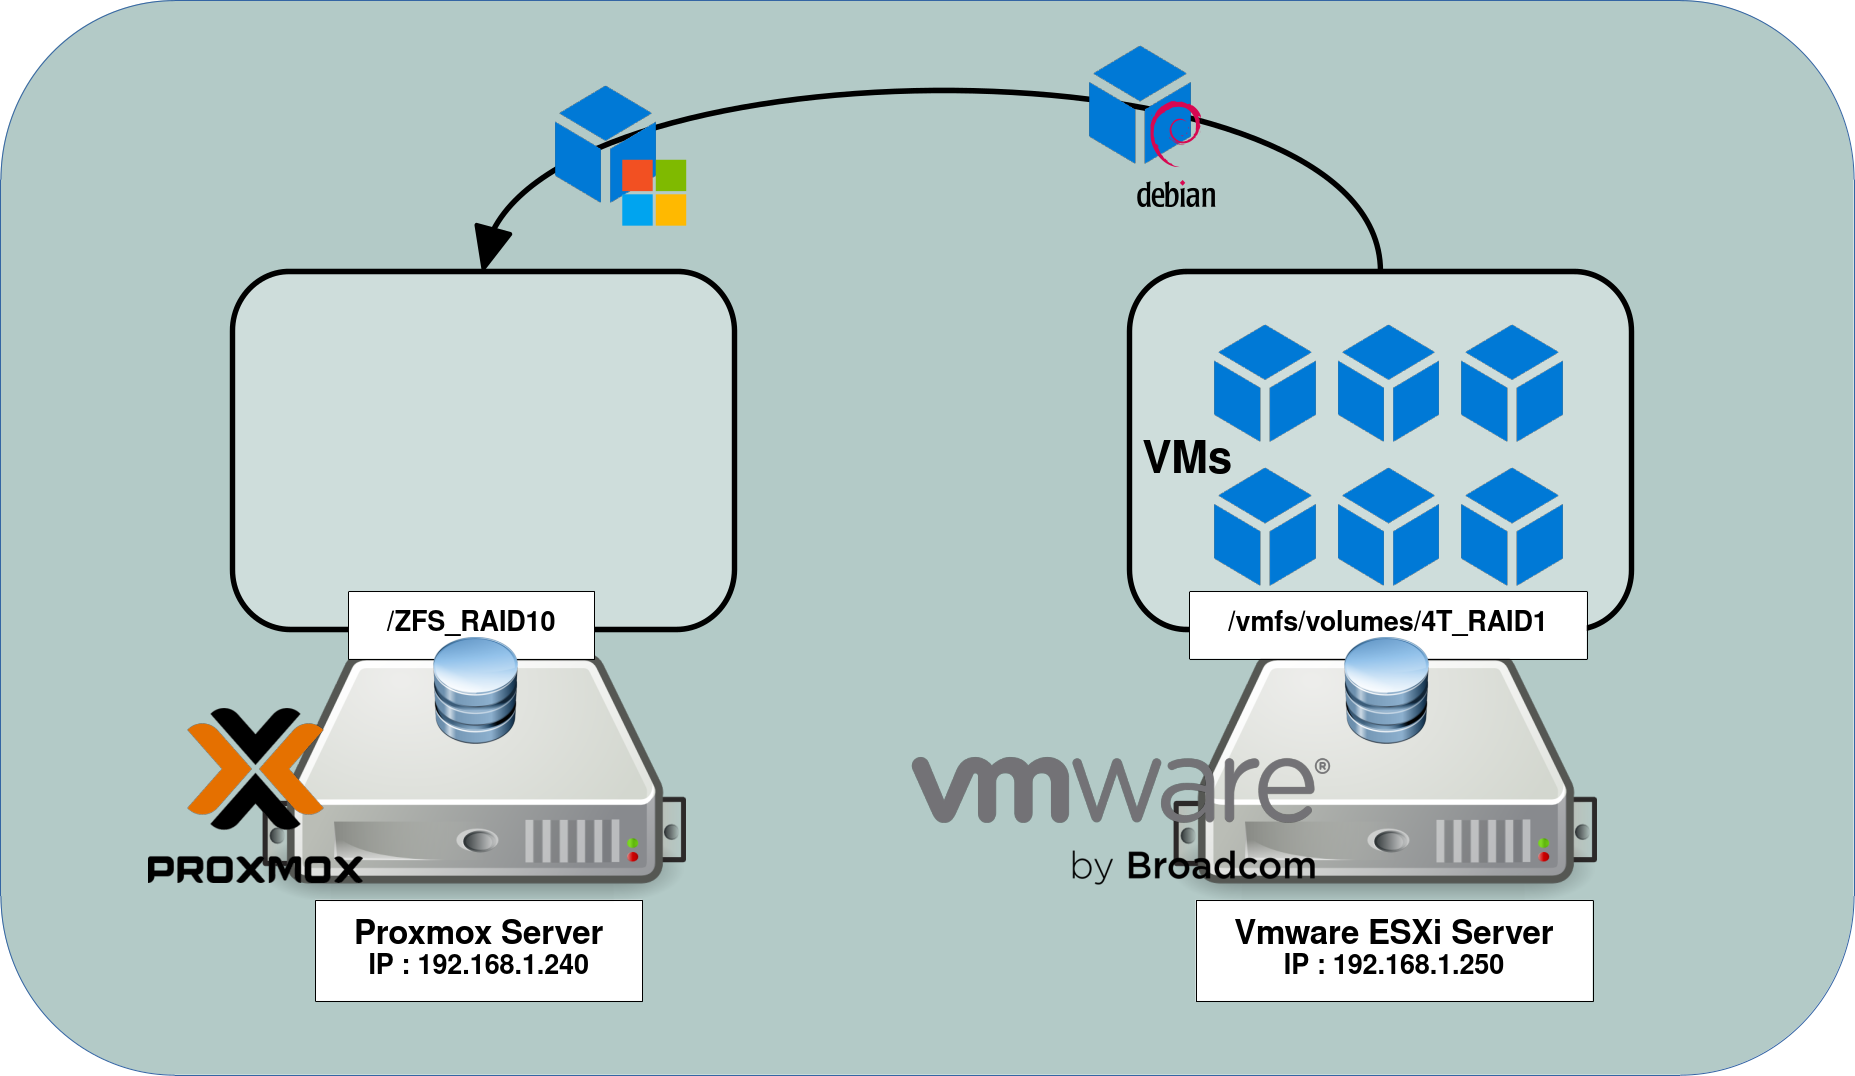
Architecture
In this article I will work on this very simple architecture where virtual machines stored in the /vmfs/volumes/4T_RAID1 partition of a VMware ESXi will be migrated to a Proxmox server inside the /ZFS_RAID10 partition.
Enabling SSH on ESXi
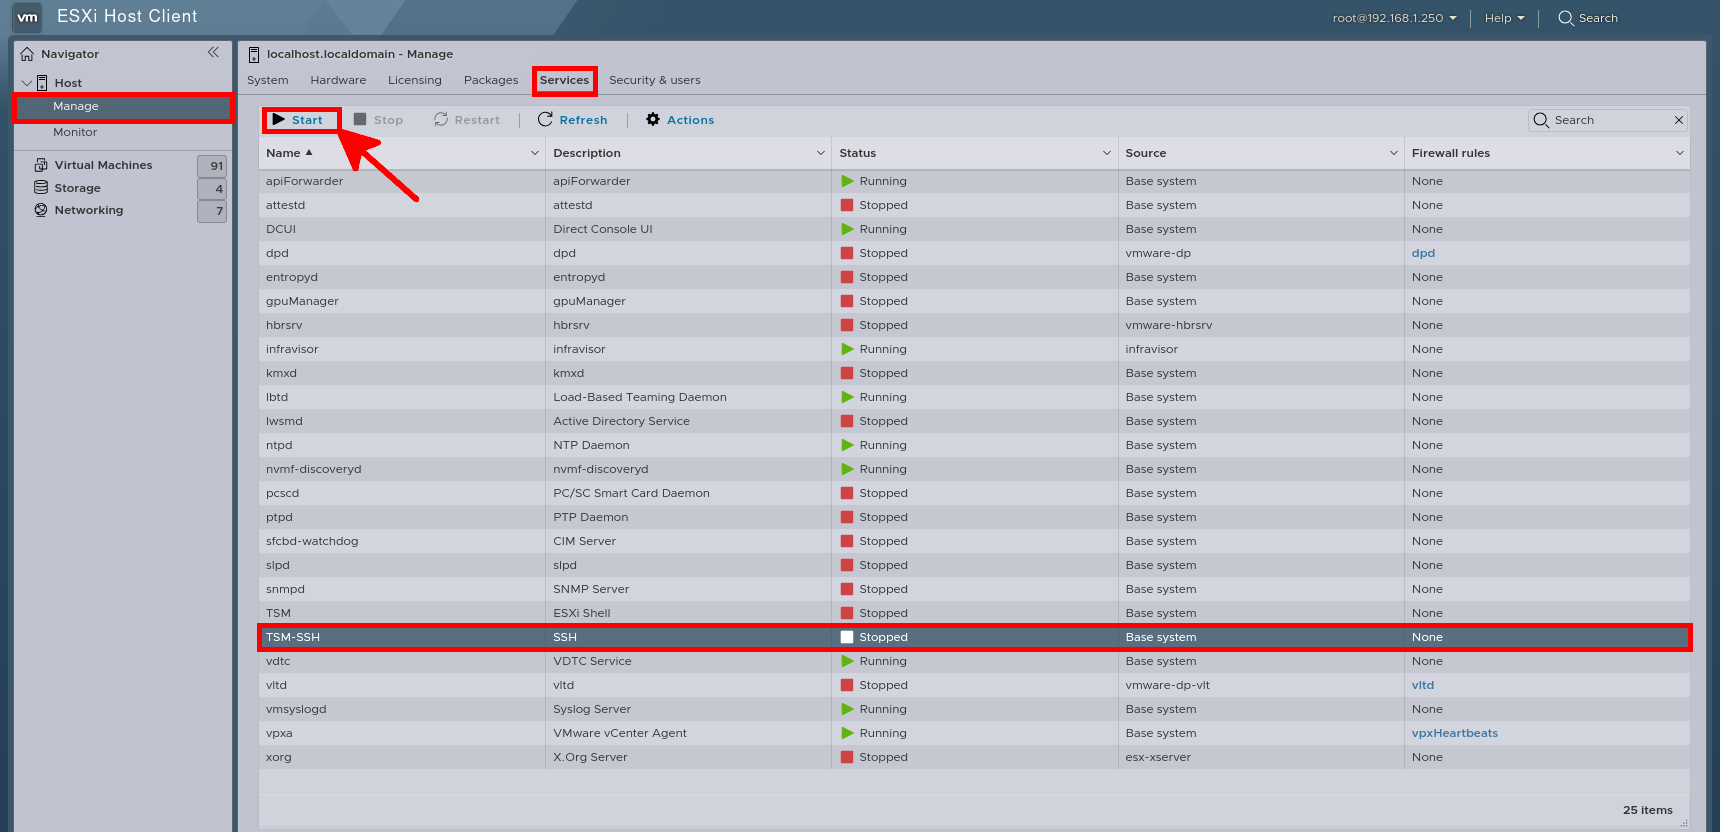
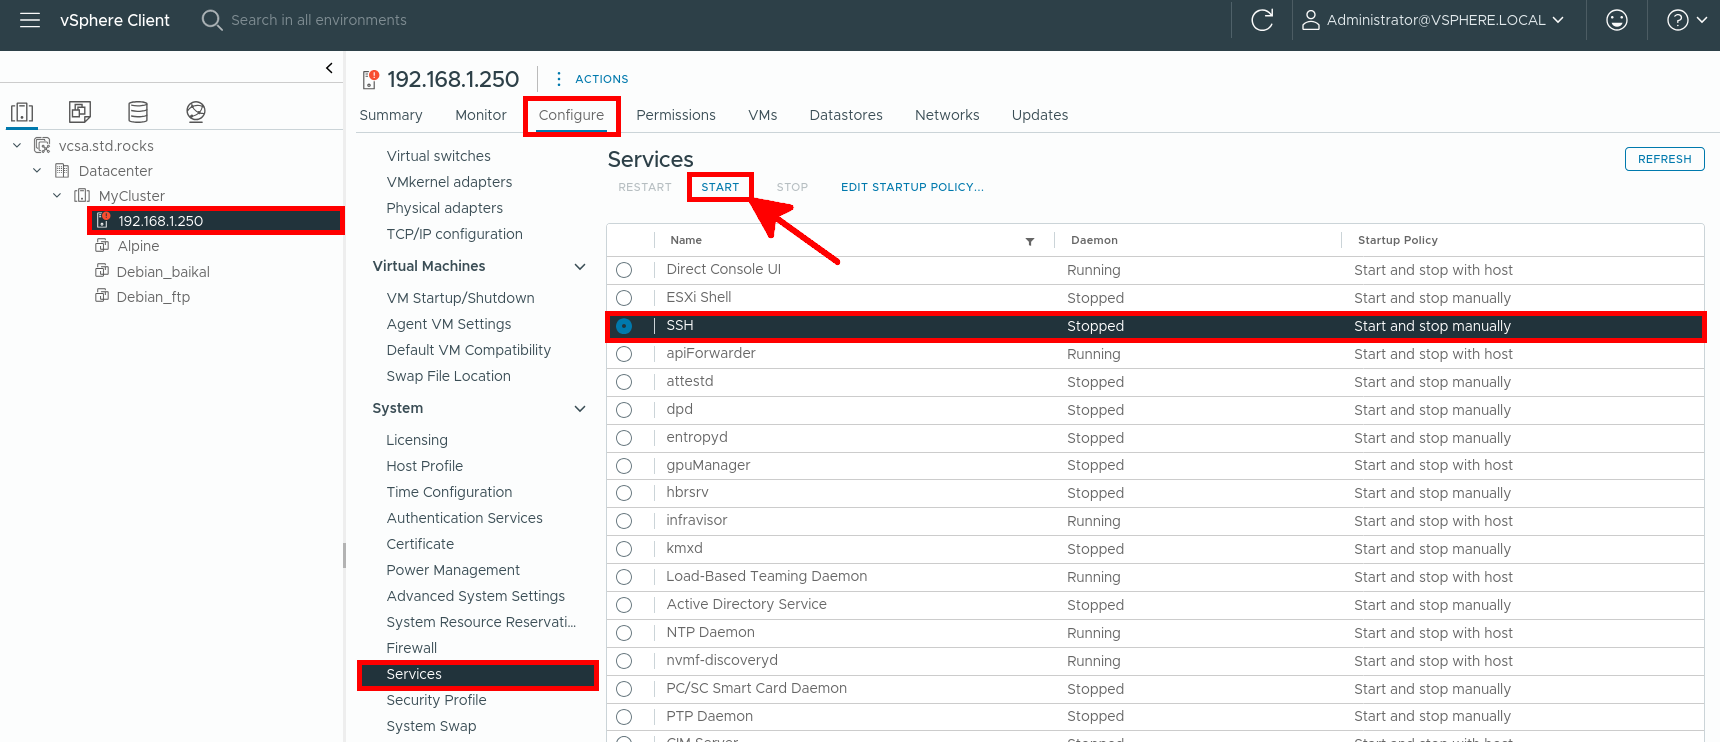
The first step consists in enabling the SSH service on the VMware ESXi host from which we want to migrate the virtual machines. We can do it from VCSA or from ESXi, I will show you both methods below. Indeed we will use the SSH protocol to transfer the VMDK files from our ESXi server to our Proxmox hypervisor.
- From ESXi, go to Host > Manage > Services. From here, select the SSH service and click on Start:
- From VCSA, select the ESXi host then go to Configure > Services and select the SSH service. Finally click on Start:
- Once the SSH service has been activated, check that you can connect to your ESXi host:
user@debian:~$ ssh -l root 192.168.1.250- Once connected, check the partitions where the virtual machines you want to transfer are located:
[root@localhost:~] df -h
Filesystem   Size   Used Available Use% Mounted on
VMFS-6       3.6T   2.7T    953.9G  74% /vmfs/volumes/4T_RAID1
VMFSOS     119.8G   4.1G    115.7G   3% /vmfs/volumes/OSDATA-4203c1ce-de1feb81-e534-fa7e52a7d43e
vfat         4.0G 280.0M      3.7G   7% /vmfs/volumes/BOOTBANK1
vfat 4.0G 258.3M 3.7G 6% /vmfs/volumes/BOOTBANK2- List virtual machines folders:
[root@localhost:~] ls -lh /vmfs/volumes/4T_RAID1
drwxr-xr-x    1 root     root       76.0K May 26  2024 Alpine
drwxr-xr-x    1 root     root       76.0K Dec 12 16:49 Debian_10_IPsec
drwxr-xr-x    1 root     root       76.0K Dec 11 13:40 Debian_12
drwxr-xr-x    1 root     root       84.0K Feb 14 16:54 W11
drwxr-xr-x    1 root     root       96.0K Feb 20 09:09 W2K25
Copy VMDK files
Shut Down the Virtual Machine
Before transferring a virtual machine from ESXi to Proxmox, we must first shut it down. Either via the graphical web interface, the CLI, or directly from the VM.
- Example here with the W2K25 virtual machine. In CLI, we first need to get the virtual machine ID (note, we can also get the path information from here):
[root@localhost:~] vim-cmd vmsvc/getallvms | grep -i W2K25
373 W2K25 [4T_RAID1] W2K25/W2K25.vmx windows2019srvNext_64Guest vmx-21- Once we retrieve the virtual machine ID, we can shut down the virtual machine:
[root@localhost:~] vim-cmd vmsvc/power.shutdown 373Copy with SCP
Once we have identified the full path of the virtual machine we want to import we will use the SCP command to transfer the files from the ESXi to Proxmox.
- Connect to the Proxmox host:
user@debian:~$ ssh -l root 192.168.1.240- Once connected, list the datastores:
root@proxmox:~# df -h
Filesystem        Size  Used Avail Use% Mounted on
udev               32G     0   32G   0% /dev
tmpfs             6.3G  8.9M  6.3G   1% /run
rpool/ROOT/pve-1  707G  2.2G  704G   1% /
tmpfs              32G   46M   32G   1% /dev/shm
tmpfs             5.0M     0  5.0M   0% /run/lock
efivarfs          304K  104K  196K  35% /sys/firmware/efi/efivars
rpool/var-lib-vz  724G   20G  704G   3% /var/lib/vz
rpool             704G  128K  704G   1% /rpool
ZFS_RAID10       8.9T  2.9T  6.0T  33% /ZFS_RAID10
rpool/data        704G  128K  704G   1% /rpool/data
rpool/ROOT        704G  128K  704G   1% /rpool/ROOT
/dev/fuse         128M   28K  128M   1% /etc/pve
tmpfs 6.3G 0 6.3G 0% /run/user/0- Copy VMware VMDK files to the local storage:
root@proxmox:~# scp -r root@192.168.1.250:/vmfs/volumes/4T_RAID1/W2K25/*vmdk /ZFS_RAID10/W2K25/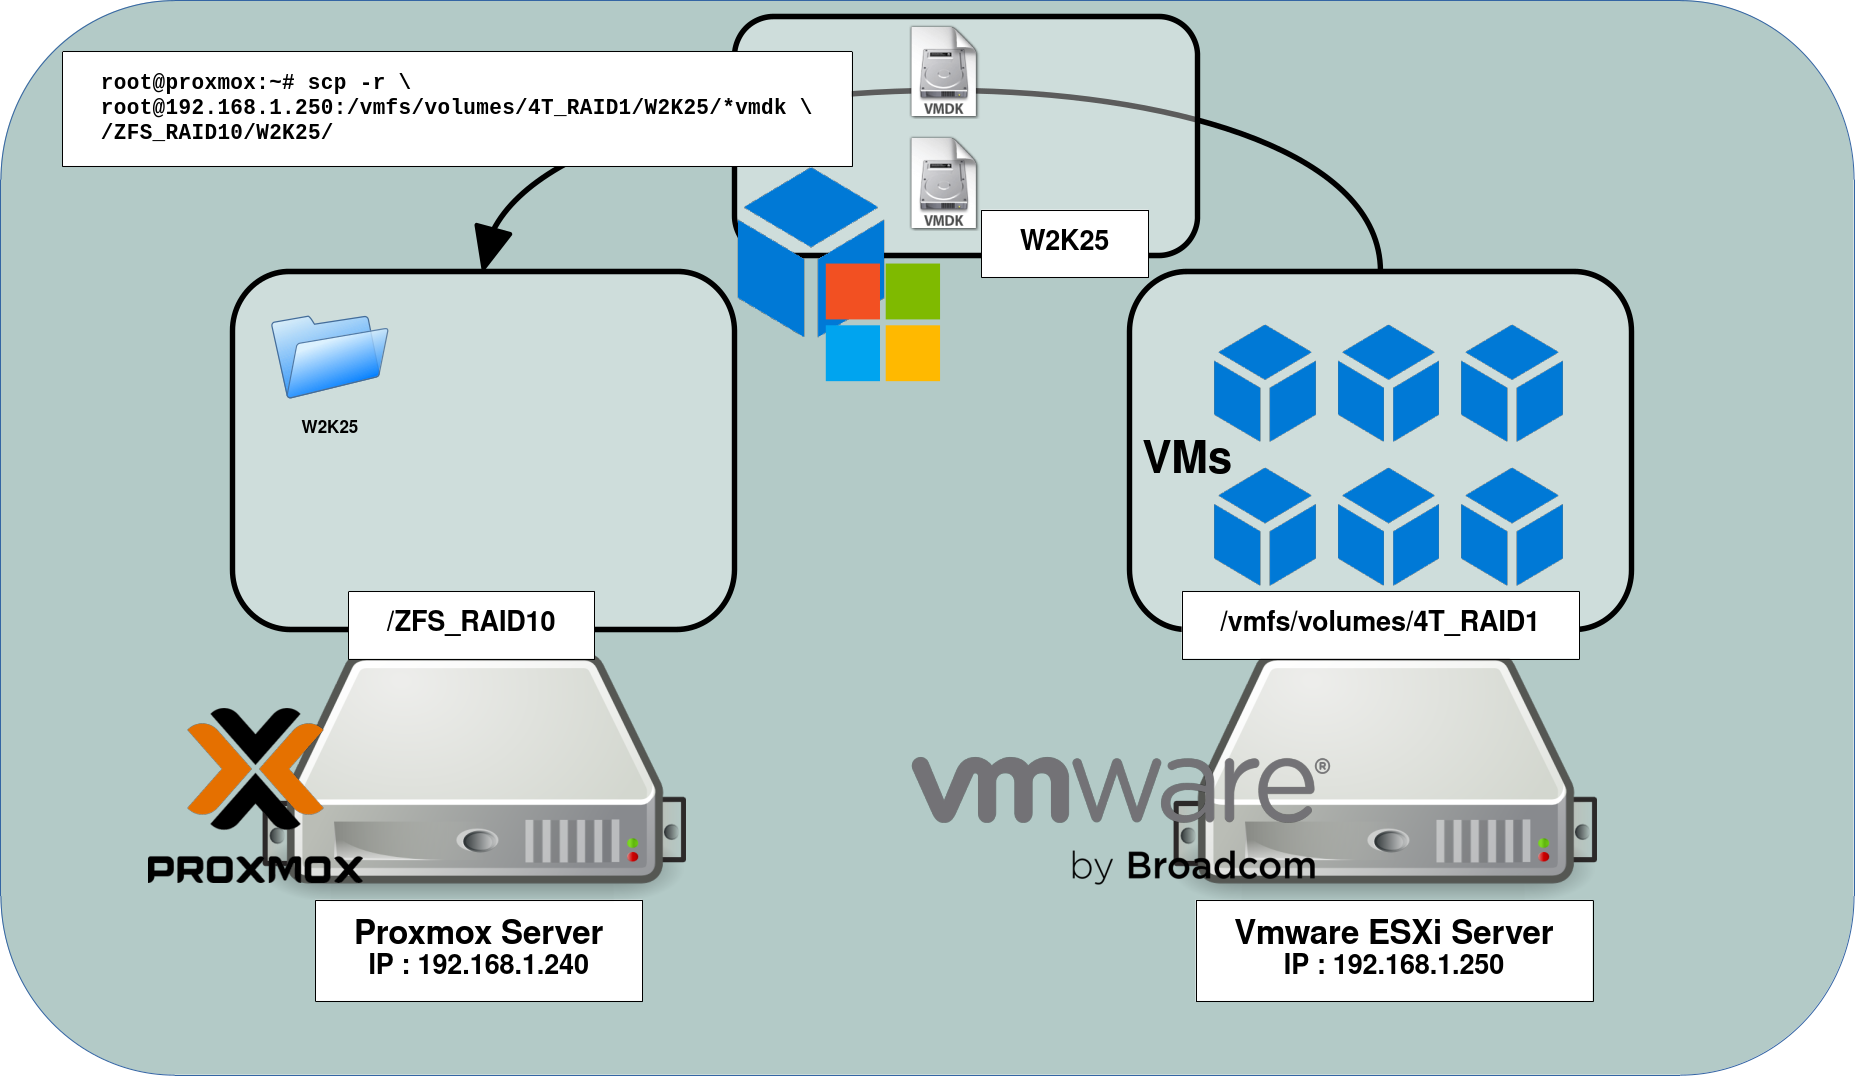
Convert VMDK to RAW
The VMDK format is not directly usable with Proxmox, we need to convert them to RAW format.
- Convert vmdk file to raw:
root@proxmox:~# cd /ZFS_RAID10/W2K25/root@proxmox:~# qemu-img convert -p -f vmdk -O raw w2k25.vmdk w2k25.rawImport Virtual Machine
Final step: create a new VM in Proxmox using the previously created RAW disks. As we'll see in the examples below, the syntax and procedure will differ according to boot type (UEFI or BIOS) and operating system.
Windows with UEFI boot

- Options:
--ide0 ZFS_RAID10:0,import-from=/ZFS_RAID10/w2k25_VM/w2k25.raw: specify OS partition destination (use ide because scsi needs the virtio drivers). ZFS_RAID10 is the destination disk. 0 means virtual disk 0.--tpmstate0 ZFS_RAID10:1,version=v2.0(optional): if needed, configure a disk for storing TPM state. ZFS_RAID10 is the destination disk. 1 means virtual disk 1.--efidisk0 ZFS_RAID10:2,efitype=4m,pre-enrolled-keys=1,size=1M: configure a disk for storing EFI vars. ZFS_RAID10 is the destination disk. 2 means virtual disk 2.--net0 e1000,bridge=vmbr0: specify network device. Intel E1000 does not require additional drivers with Windows.
root@proxmox:~# qm create 300 --name "Windows-w2k25" --memory 4096 --machine q35 --sockets 1 --cores 4 --bios ovmf --cpu cputype=x86-64-v2-AES --efidisk0 ZFS_RAID10:1,efitype=4m,pre-enrolled-keys=1,size=1M --net0 e1000,bridge=vmbr0 --ide0 ZFS_RAID10:0,import-from=/ZFS_RAID10/w2k25_VM/w2k25.rawAfter booting into Windows, you may have trouble uninstalling VMware Tools. This PowerShell script can help: https://gist.githubusercontent.com/
Installing the VirtIO drivers is also recommended for optimal performance. See the procedure here (2.2.3 Windows Post-Installation).
Debian

Debian with Legacy boot
- Run this command to create the VM with the raw disk and start the VM:
root@proxmox:~# qm create 301 --name "Debian-12-BIOS" --memory 2048 --machine q35 --sockets 1 --cores 4 --bios seabios --net0 virtio,bridge=vmbr0 --scsihw virtio-scsi-single --scsi0 ZFS_RAID10:0,import-from=/ZFS_RAID10/Debian/Debian.raw- Once booted, as the network interface name has changed, you'll need to identify the new interface name:
root@host:~# ip addr sh
1: lo: <LOOPBACK,UP,LOWER_UP> mtu 65536 qdisc noqueue state UNKNOWN group default qlen 1000
    link/loopback 00:00:00:00:00:00 brd 00:00:00:00:00:00
    inet 127.0.0.1/8 scope host lo
       valid_lft forever preferred_lft forever
    inet6 ::1/128 scope host noprefixroute
       valid_lft forever preferred_lft forever
2: enp6s8: <BROADCAST,MULTICAST> mtu 1500 qdisc noop state DOWN group default qlen 1000
    link/ether bc:24:11:24:0b:be brd ff:ff:ff:ff:ff:ff
- Update
/etc/network/interfaceswith the new interface name, then restart the networking service:
root@host:~# systemctl restart networkingDebian with UEFI boot
- Run this command to create the VM with the raw disk and start the VM:
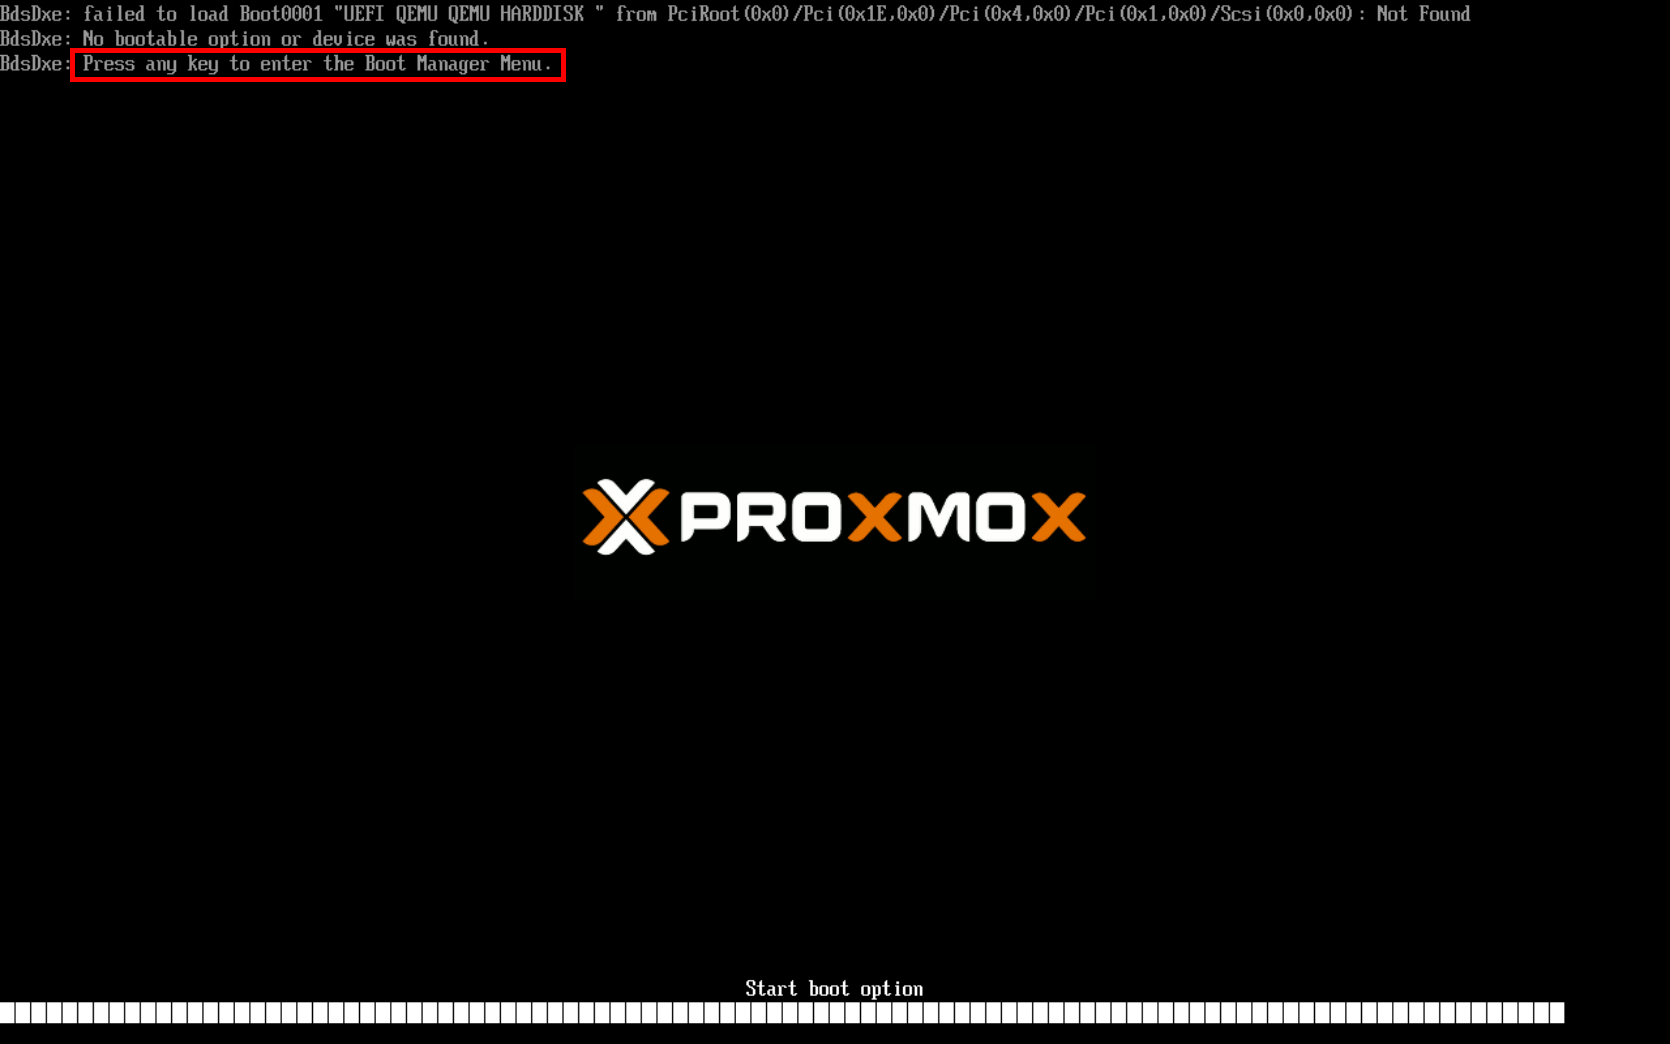
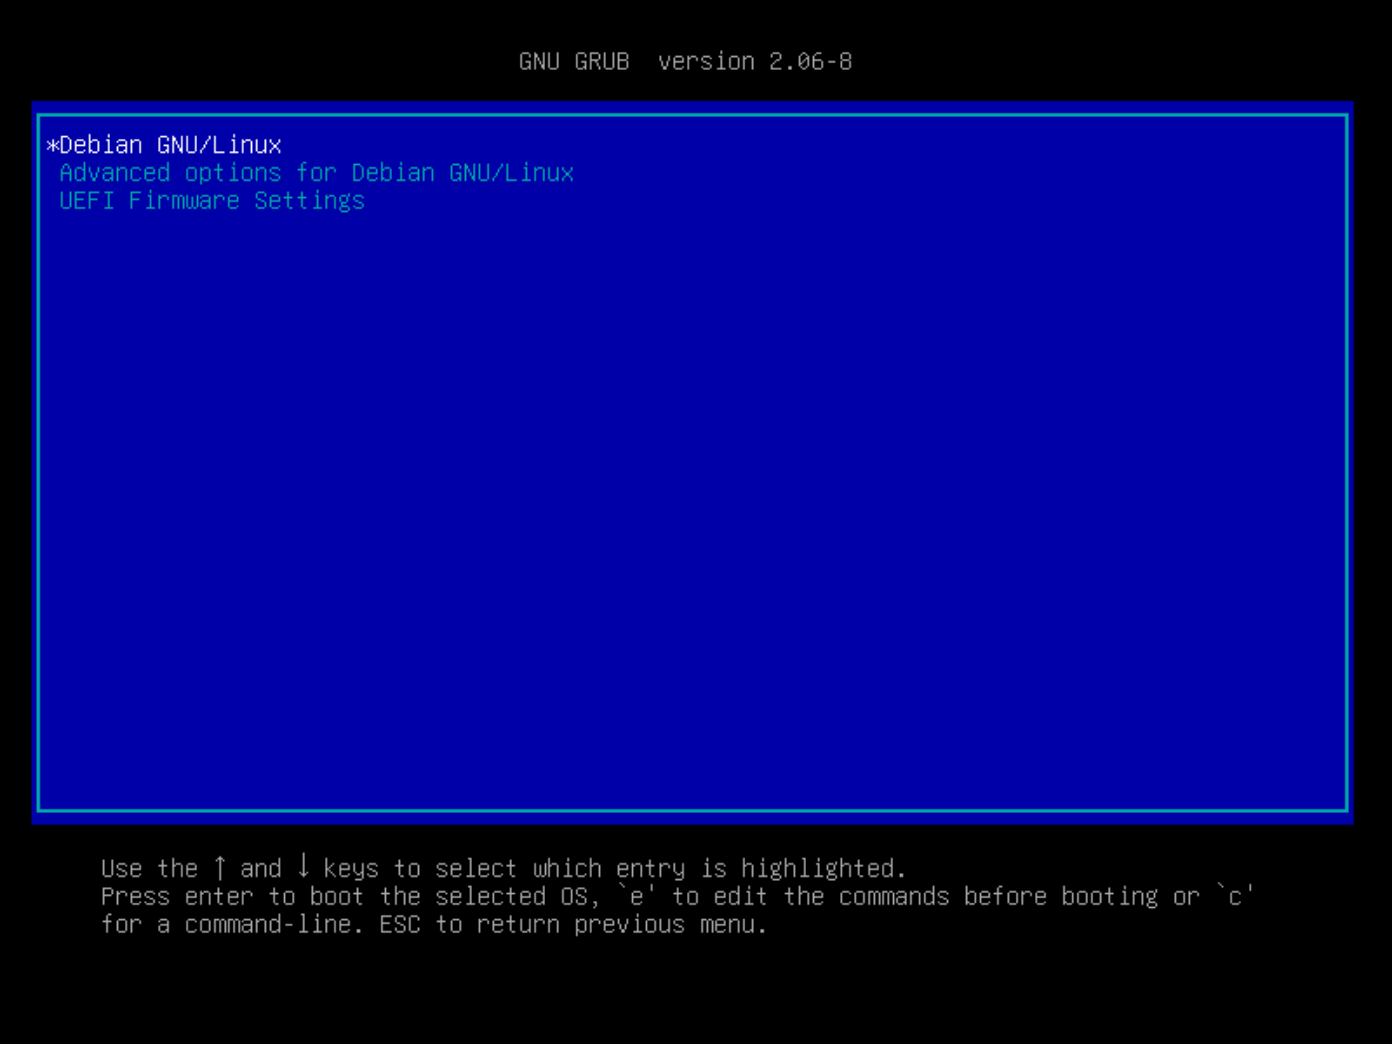
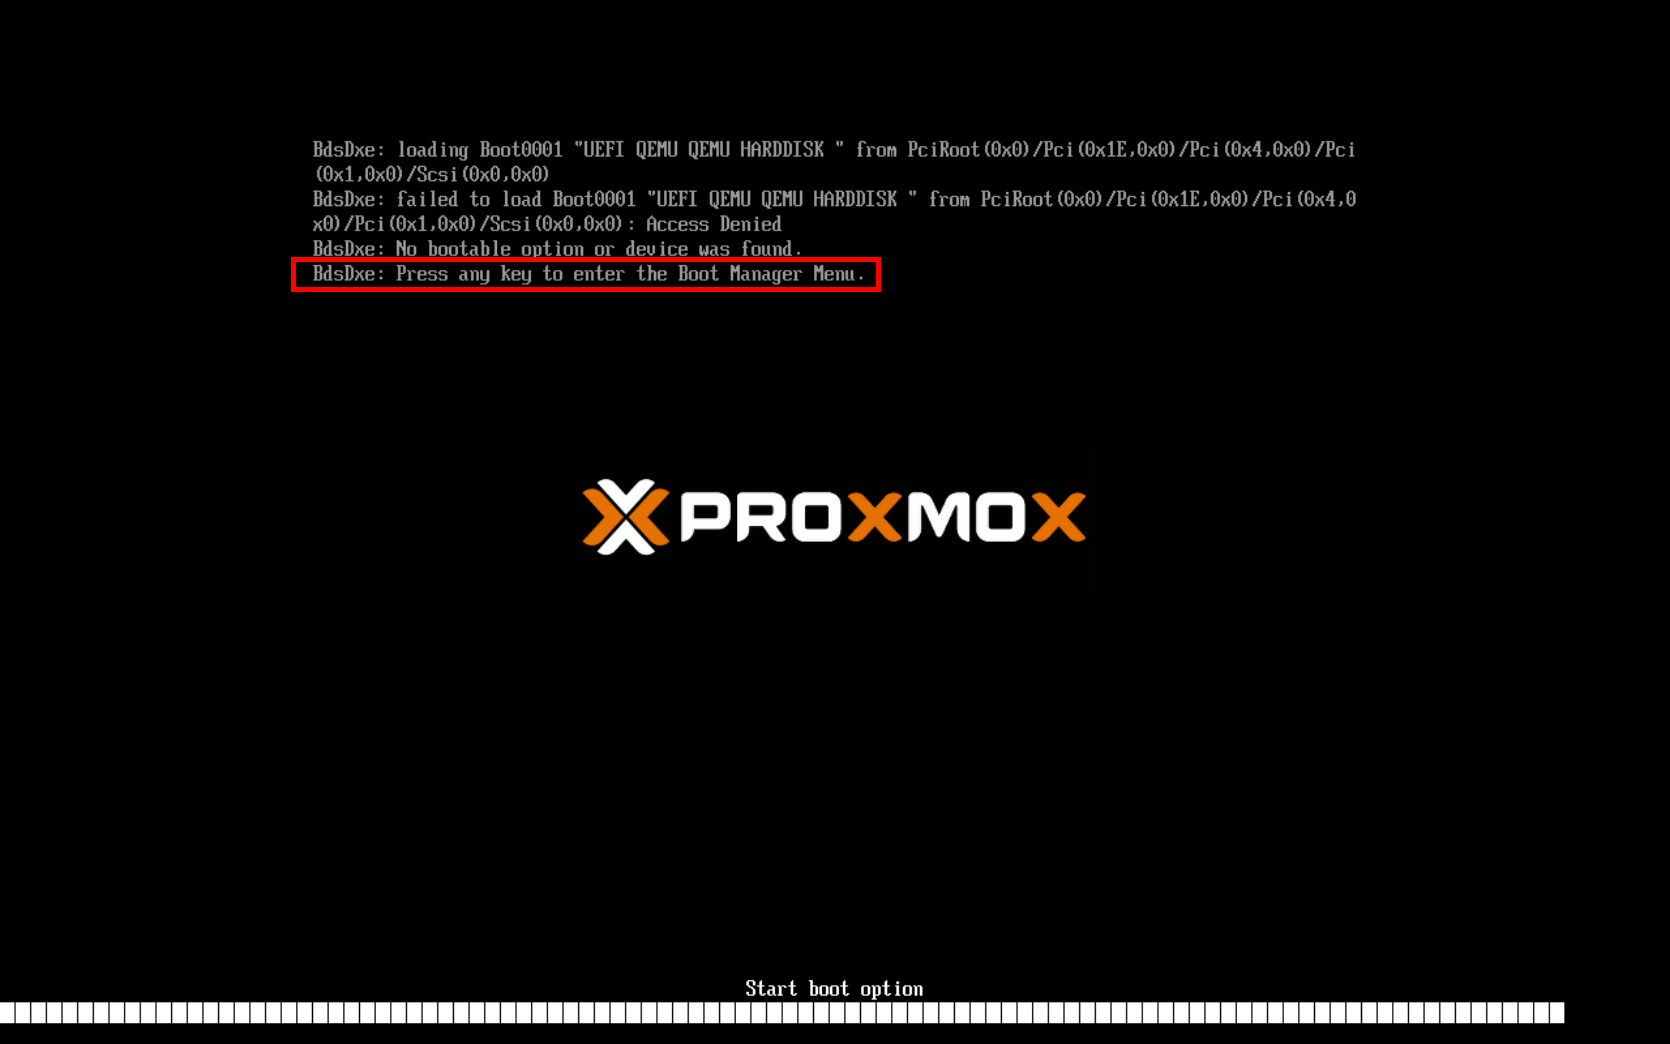
root@proxmox:~# qm create 302 --name "Debian-12-UEFI" --memory 2048 --machine q35 --sockets 1 --cores 4 --bios ovmf --efidisk0 ZFS_RAID10:1,efitype=4m,pre-enrolled-keys=1,size=1M --net0 virtio,bridge=vmbr0 --scsihw virtio-scsi-single --scsi0 ZFS_RAID10:0,import-from=/ZFS_RAID10/Debian/Debian.raw- If the VM fails to boot and gets stuck, press any key to enter the Boot Manager Menu:
- Inside the Boot Manager Menu, enter inside the Boot Maintenance Manager and select Boot From File:
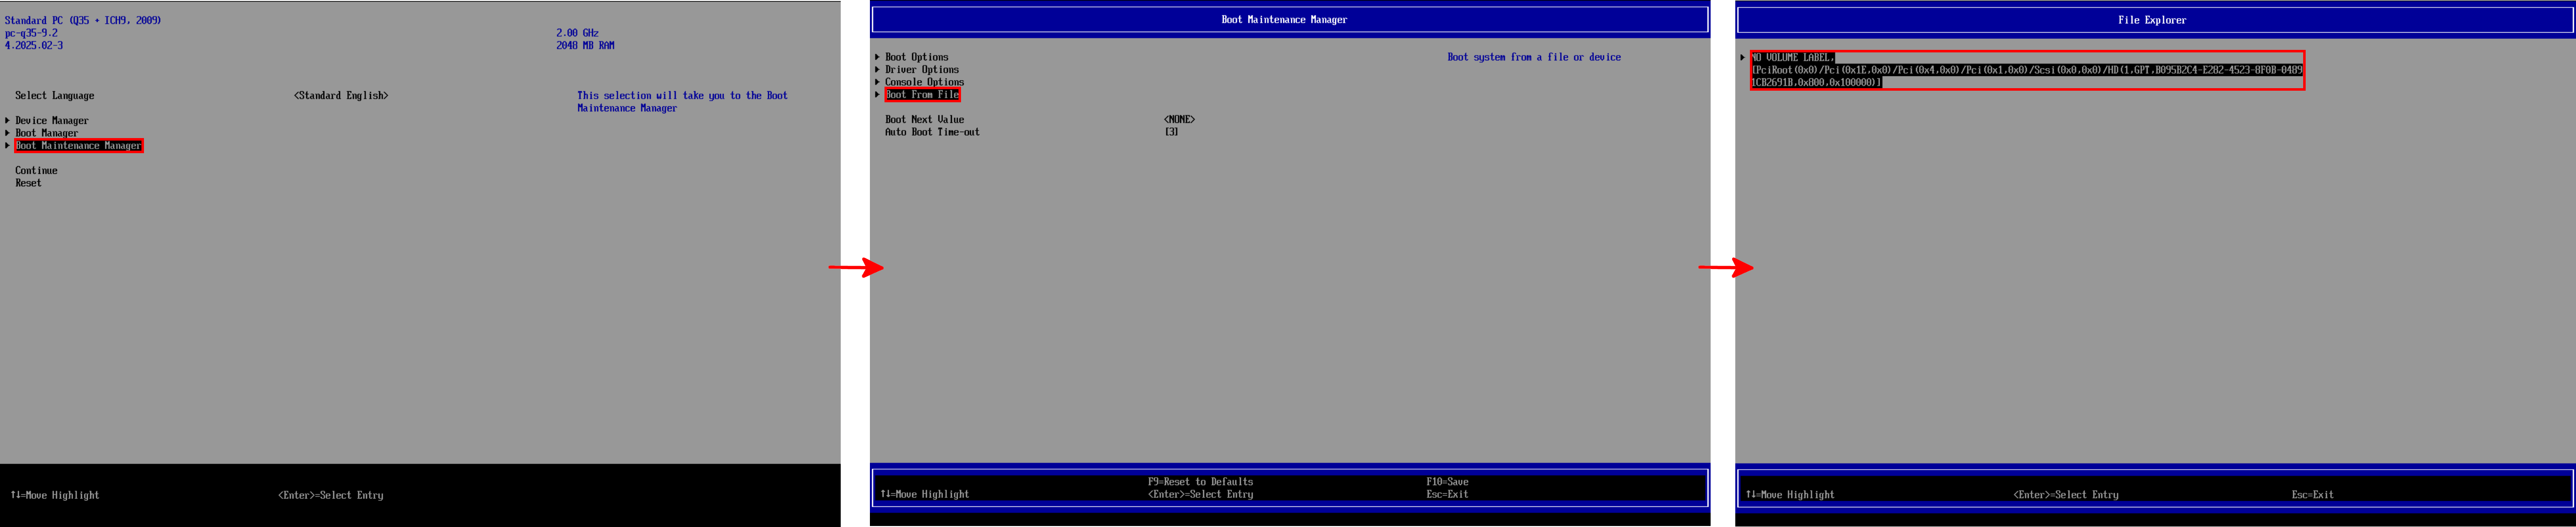
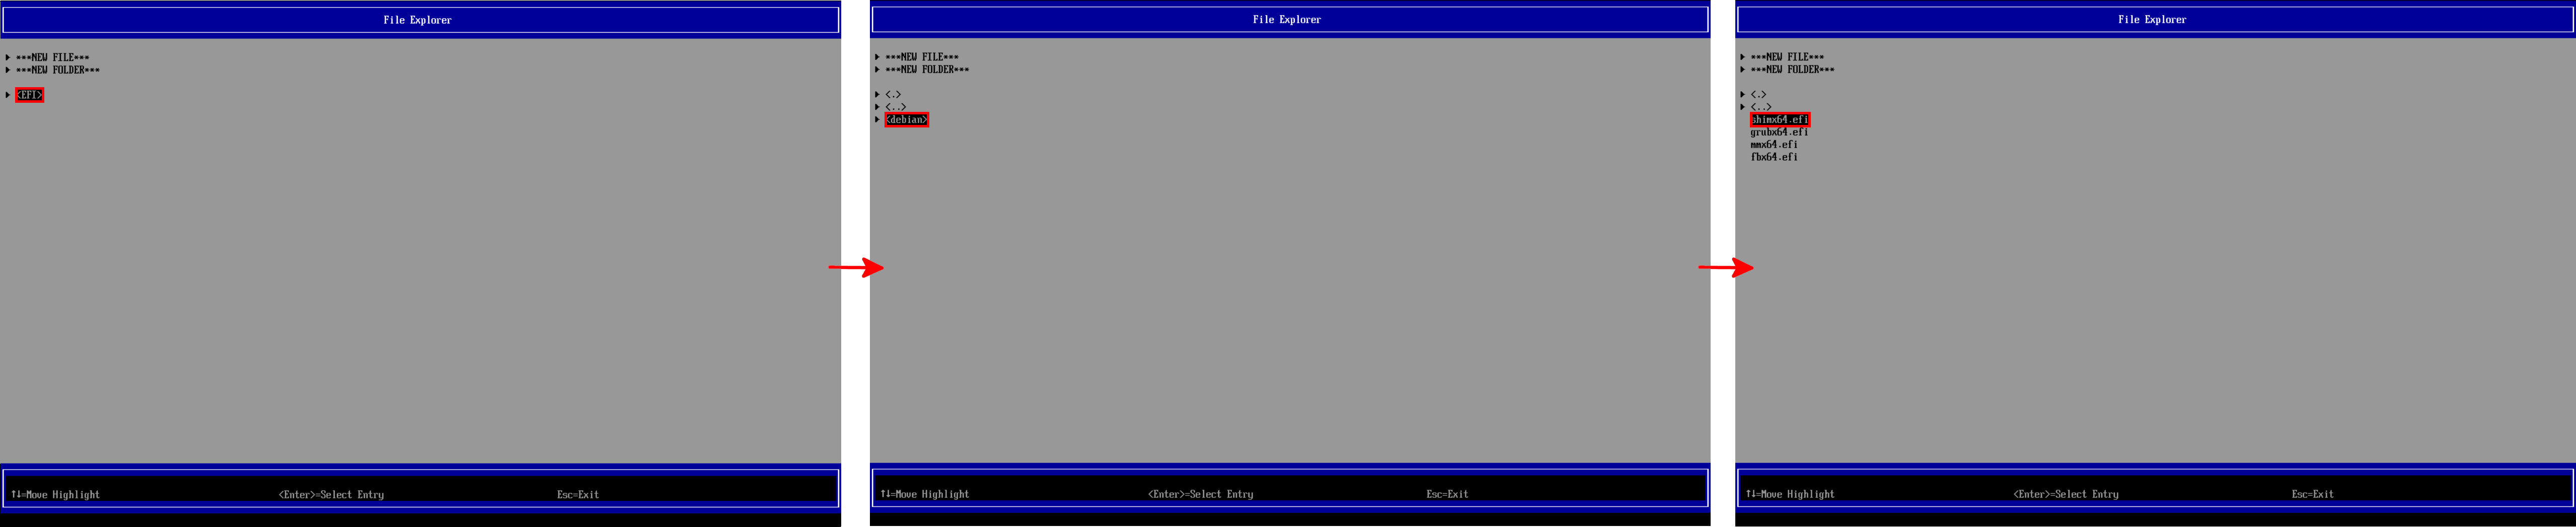
- Navigate to EFI >debian, then select shimx64.efi:
- Now the virtual machine should boot successfully:
- The first thing to do after booting is to add the EFI entry. After that, Debian will boot automatically on subsequent reboots:
root@host:~# efibootmgr --create --disk /dev/sda --part 1 --label "debian" --loader "\EFI\debian\shimx64.efi"- As we did with the BIOS, identify the new network interface name:
root@host:~# ip addr sh
1: lo: <.gLOOPBACK,UP,LOWER_UP>.g mtu 65536 qdisc noqueue state UNKNOWN group default qlen 1000
    link/loopback 00:00:00:00:00:00 brd 00:00:00:00:00:00
    inet 127.0.0.1/8 scope host lo
       valid_lft forever preferred_lft forever
    inet6 ::1/128 scope host noprefixroute
       valid_lft forever preferred_lft forever
2: enp6s8: <.gBROADCAST,MULTICAST>.g mtu 1500 qdisc noop state DOWN group default qlen 1000
    link/ether bc:24:11:24:0b:be brd ff:ff:ff:ff:ff:ff
- And modify
/etc/network/interfaceswith the new interface name and restart networking service:
root@host:~# systemctl restart networkingOpenBSD

OpenBSD with UEFI boot
For this, I used the following source: https://forum.proxmox.com/.
- Run this command to create the VM and start it using the RAW disk:
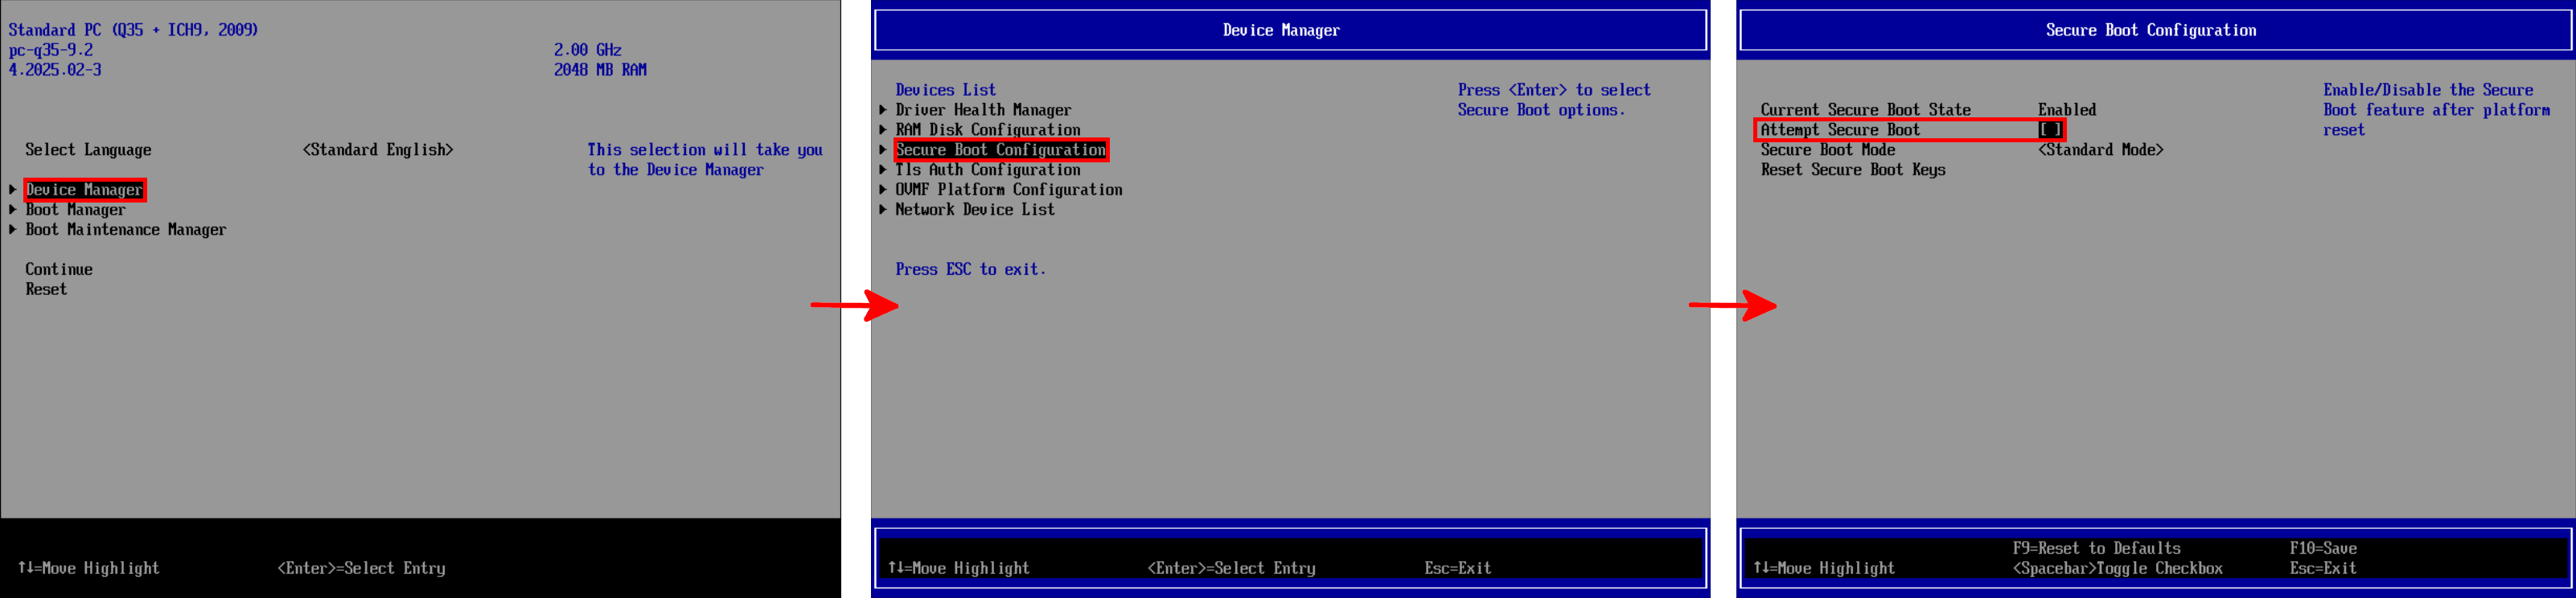
root@proxmox:~# qm create 303 --name "OpenBSD-UEFI" --memory 2048 --machine q35 --sockets 1 --cores 4 --agent 1,type=isa --cpu kvm64 --net0 virtio,bridge=vmbr0 --scsihw virtio-scsi-single --boot order=scsi0 --scsi0 ZFS_RAID10:0,import-from=/ZFS_RAID10/OpenBSD/OpenBSD.raw --bios ovmf --efidisk0 ZFS_RAID10:1,efitype=4m,pre-enrolled-keys=1,size=1M- The VM may fail to boot and get stuck on this screen. When prompted, press any key to enter the Boot Manager Menu:
- Inside the Boot Manager Menu, enter the Device Manager, select Secure Boot Configuration and disable Secure Boot:
- Once booted, since the network interface name has changed, you need to identify the new name:
host# ifconfig
lo0: flags=2008049<UP,LOOPBACK,RUNNING,MULTICAST,LRO> mtu 32768
	index 5 priority 0 llprio 3
	groups: lo
	inet6 ::1 prefixlen 128
	inet6 fe80::1%lo0 prefixlen 64 scopeid 0x5
	inet 127.0.0.1 netmask 0xff000000
vio0: flags=2008843<UP,BROADCAST,RUNNING,SIMPLEX,MULTICAST,LRO> mtu 1500
	lladdr bc:24:11:53:f1:5a
	index 1 priority 0 llprio 3
	groups: egress
	media: Ethernet autoselect
status: active- Rename your
hostname.interfacefile using the new interface name:
root# mv /etc/hostname.OLD /etc/hostname.vio0- Apply network configuration changes:
root# sh /etc/netstartOpenBSD with Legacy boot
- Run this command to create the VM with the raw disk and start the VM:
root@proxmox:~# qm create 304 --agent 1,type=isa --memory 4096 --bios seabios --name "OpenBSD-BIOS" --sockets 1 --cores 2 --cpu kvm64 --net0 virtio,bridge=vmbr0 --scsihw virtio-scsi-single --boot order='scsi0' --scsi0 ZFS_RAID10:0,import-from=/ZFS_RAID10/OpenBSD/OpenBSD.rawAlpine Linux with UEFI boot

- Run this command to create the VM with the raw disk and start the VM:
root@proxmox:~# qm create 305 --sockets 1 --cores 2 --memory 2048 --name "Alpine-UEFI" --bios ovmf --efidisk0 ZFS_RAID10:1,efitype=4m,pre-enrolled-keys=1,size=1M --net0 virtio,bridge=vmbr0 --ide0 ZFS_RAID10:0,import-from=/ZFS_RAID10/Alpine/Alpine.raw- The VM may fail to boot and get stuck on this screen. As requested, press any key to enter the Boot Manager Menu:
- Inside the Boot Manager Menu, enter the Device Manager, select Secure Boot Configuration and disable Secure Boot:
Import From GUI with Proxmox VE Import Wizard
Shortly after writing this article, I learned about an official Proxmox tool which allow the migration of the VMs from VMware ESXi directly from the Graphical User Interface 😅. I will then show here how to import VMs from VMware ESXi using this tool.
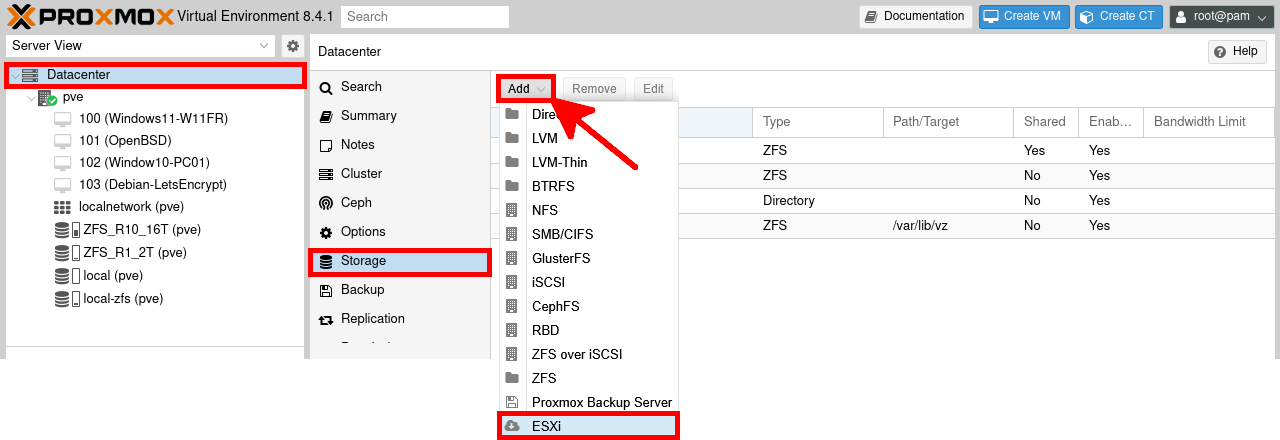
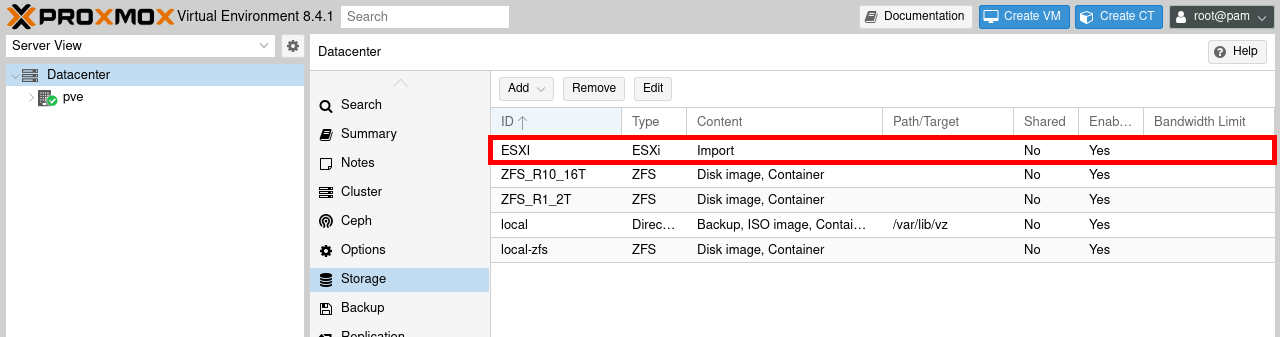
- The tool is already implemented, so we don't have to install anything. Simply go to Datacenter > Storage menu. Then click to Add > ESXi:
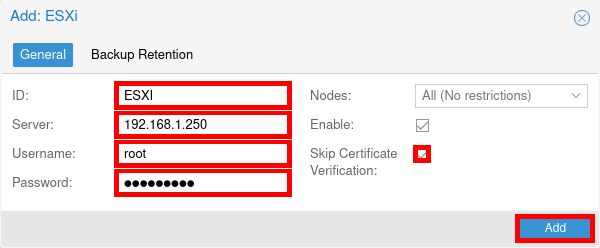
- From the Add ESXi window enter the following information:
- ID: name of your choice to identify the datastore
- Server: name or IP address of the ESXi host
- Username: username for the ESXi host
- Password: password of the username
- The ESXi should now appear:
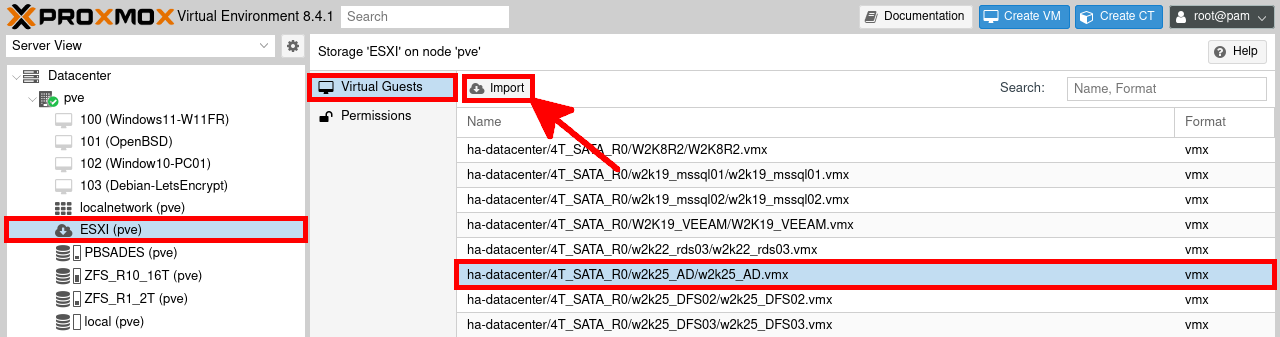
- From the ESXI storage menu, click on the Virtual Guests menu. Select the VM you want to import and click on Import:
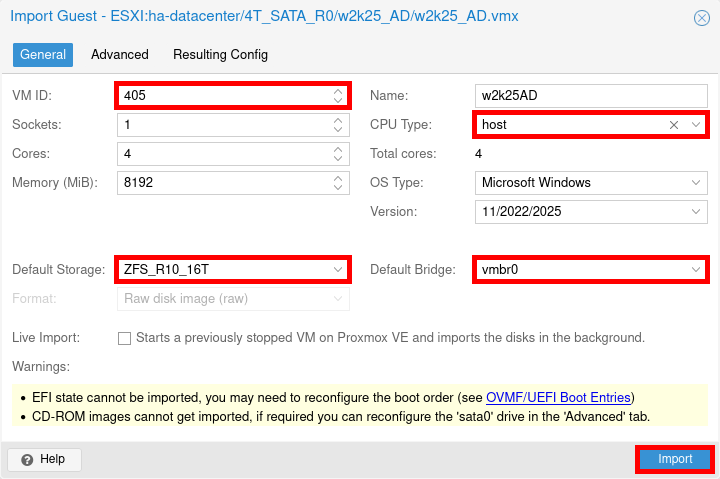
- In the Import Guest, modify the pre-filled elements if necessary and validate by clicking on Import:
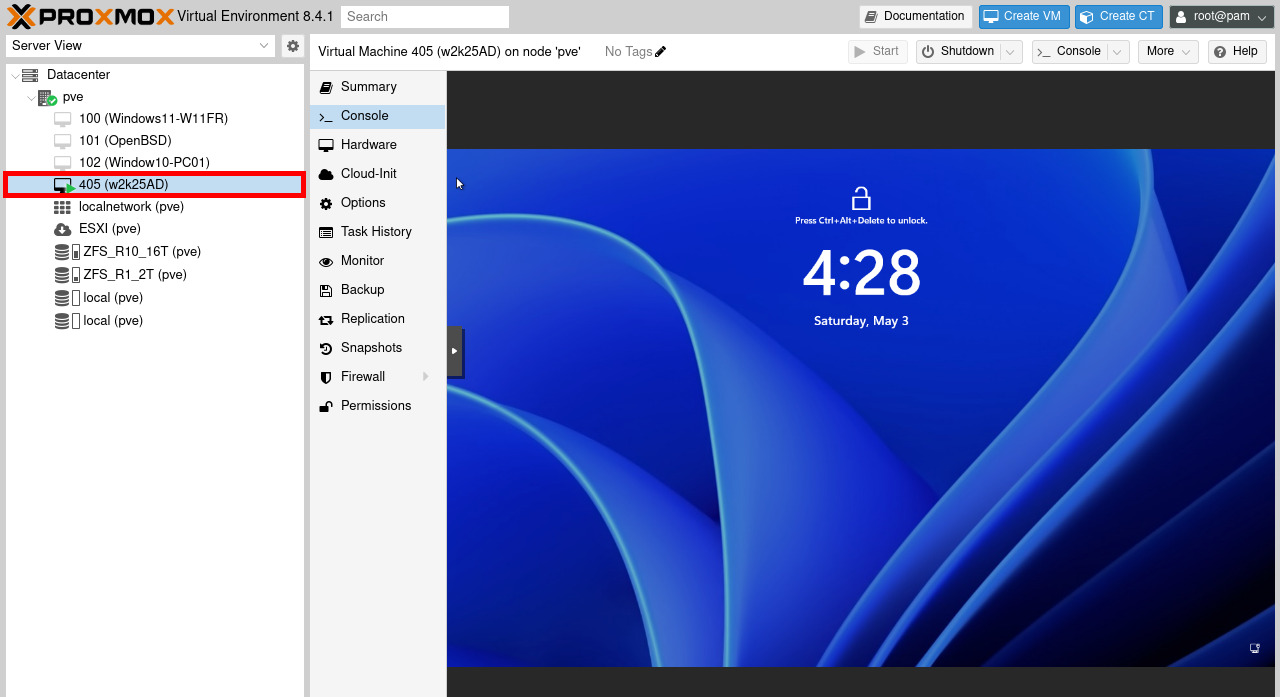
- Start the imported VM:
For Windows VM, it's recommended for higher performance to install the VirtIO drivers (See: here) and convert storage to SCSI: https://www.proxmox.com/.
Conclusion
So we've seen how to import VMs from VMware ESXi from the CLI and with the Proxmox VE Import Wizard. Now you have no excuse not to say goodbye to Broadcom! 👋